

BlueTR3A-5EKT
-
Content Count
9,756 -
Joined
-
Last visited
.thumb.jpg.b868f6e327c2f72ca543e9f9a5d24c82.jpg)


.thumb.jpg.baf4a57200626b2e494fb5a05f78a82f.jpg)


-
Is the small tag for the coil feed of 12 volts when the engine starter is engaged? Have you identified the terminal for the Starter switch wiring to energise the solenoid coil? Car being after 1973 would have the pink ballast resistance wire as part of the loom.
-
How about replacing the existing screw eyelet terminal loom for one with Lucar terminals already fitted? Then use a Durite Lucar terminal relay. Loom. Is pt no 131338. https://motaclan.com/product/loom-overdrive-switch-relaytr_131338_1688_0/ Alternative ADD a modern plug in relay with pre wired socket. Run the new wires of the pre wired socket to your existing relay eyelet terminals and use the old relay and its existing wiring as a junction box? Prewired socket and 30 amp modern relay with fuse. https://www.ebay.co.uk/itm/164795155511?itmmeta=01HWFZYX6MDJ6V76P0SS
-
Sorry I misread. The original stud will pull through the brake drum. The larger diameter of the stud between the two threads is to locate the brake drum on. This is what a drive flange and studs looks like This is the rear drive flange and studs with the brake drum removed (for some reason the axle shaft nut has also been removed - This is not required to be removed)
-
Replacement stud that fits from behind the flange rather than screwing in as original. The head is large enough to not pull through the drive flange and brake drum. https://rimmerbros.com/Item--i-100869PRESSFIT
-
Could the Morgan 16” wire wheel be suitable? http://shop.mwsint.com/product_details.asp?id=606
-
Drill, grind, chisel the offending locking wheel nut off the stud to remove the wheel. You have to Remove the brake drum to get at the back of the hub flange. DO NOT ATTEMPT TO REMOVE THE FLANGE WITH A LEGGED PULLER. It will bend and your pocket will get seriously lightened as you buy a new drive flange. The studs screw into the front face of the flange and are then peened over from the back to keep them from screwing back out. A screwed in stud and a blob of weld would probably hold it in place. Alternative is to remove the screw in stud and fit a type that pushes in from
-
Have you read this? https://www.triumphexp.com/forum/tr6-tech-forum.2/big-triumph-steel-carbon-synchro-rings.1918737.1919158/
-
Fitting TR4a Wing and Door Mouldings
BlueTR3A-5EKT replied to Steven Whitaker's topic in TR4/4A Forum
Years ago I watched a body work man fit side trims on a BMW 3 csl. He carefully marked the position of first and last holes along the length of the car for the trim clips. Taped the panels full length and drilled one hole front, one hole rear. Inserted a rivet in each hole and tied between them a chalk string line. He ‘pinged’ the the chalk string line and it left a nice visible straight line on the tape from the front to the back. He then worked out where his holes for trim clips should be and drilled as required. It look so easy! -
The master cylinder for clutch and brake are both Girling CV type with a 3/4” bore. Yes same as many other cars like the LandRover. The push rod is unique in its length. If buying a cheaper item there are a couple of things to check/note Bore size. Threaded pipe sizes. Push rod length ( use your old one) Where it was made and who by. Crucial as there were some damn right dangerous ones around not long ago. The only way you can confirm that is by stripping them and comparing the piston assemblies of a genuine to the repro. If possible buy genuine Girling (NOS
-
Find on Pages 8 & 9 23 rd July 2022 onwards into August Note the machined cut out to let the nipple pass the hinge leaf.
-
Free if collected Or postage cost added Otter Switch Push in for TR7/8, Lotus, Jaguar. 2 genuine Otter Brand, one replacement item. Both Otter items were new from Triumph. Rating 91 87. All unused They are the push in type of thermostatic switch for TR7/8 with a/c Radiator cooling fan switch for MGB pt no URP1126 or BHM7285 Radiator cooling fan on Lotus Elite and Eclat. Radiator/air con fans Jag XJ12 and probably E Type. My brother ran one for years in his TR2. Drilled a hole on the header tank and inserted, to control his electric cooling fan.
-
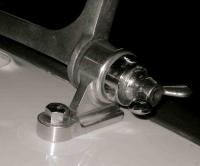
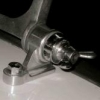
What does your existing relay look like Richard. With Lucar or screwed eyelet terminations? These are views of spare new relays that are in my drawer.
-
Image I posted before of cracks in the ferrous rocker shaft pedestals of a TR2. Later cars used cast aluminium pedestals. The cracks are visible inside and on the end faces. Such cracking is unlikely to have caused your push rod failure though. Worth inspecting if it is all in bits.
-
If the car is not negative earth now as has been said you will also need to swap the low tension leads on the coil. The lead going to the distributor must be connected to the terminal on the coil that has the same polarity symbol as the earth of the battery. If…you have CB and SW notation on the low tension terminals of the coil, all bets are off. Unless there is a statement of suitable polarity on the coil. The correct connection can be confirmed by use of a lead pencil and the HT connectors and observing the start and finish places of the spark. Again we await IanC
-
Agreed. Had precisely that on a 2500 S which is essentially a Stag brake system