EliTR6 Posted April 15, 2020 Author Report Share Posted April 15, 2020 28 minutes ago, Ralph Whitaker said: Hi Eli, I had a quick look through all 11 pages of this post to see where you got the seats from, I was looking at some very similar to these on ebay but from the measurements they gave they seemed too wide to fit. Just had another look and cannot now find them again. Hi. They're corbeau classic seats. I bought them from holden but I think they were the last pair. You'll need news seat runners too. They fit but they are a squeeze to get into! Quote Link to post Share on other sites
EliTR6 Posted April 16, 2020 Author Report Share Posted April 16, 2020 Hood is on! Annoyingly, the front is now showing a bit of slack even though I thought I had it all set up nice and tight. I'm not sure if my car has an extra pair of LTD studs or if I was supposed to skip a set behind the seats. Quote Link to post Share on other sites
BlueTR3A-5EKT Posted April 16, 2020 Report Share Posted April 16, 2020 Looks like the rear hood bow is too far back, the middle bow is good and the front bow too far forward. The bows should align with the seams in the fabric. Hood frame webbing adjustment is probably required. Push the front hood bow up by hand to see if the whole thing's fit improves. (carefully poke it upwards with a stick of wood and wedge the wood on the tunney to see from a distance if it has helped with the look and fit. Shorten the webbing to the front bow a touch if that helps. Could also try slacking the frame mount screws (top off) and pushing the whole frame up as far as it will go and retry the soft top. The extra LTD studs on the quarter panel are to do with the change in soft top and sidescreens between TR2-3 models and TR3A. The studs you have used for the soft top are the correct position for TR3A with Dzus sidescreens. The lower ones are for TR2/3 with wedge sidescreens. The studs moved up and rearwards to stop the later sidescreen hitting them. Does your hood stick cover fit? What is it like with sidescreens fitted? I guess you do not have a tonneau as the roll over bar is now installed. Cheers Peter W Quote Link to post Share on other sites
Lebro Posted April 16, 2020 Report Share Posted April 16, 2020 Yes, check the sidescreen fit before anything else, that can influence how you adjust the frames. Bob. Quote Link to post Share on other sites
EliTR6 Posted April 16, 2020 Author Report Share Posted April 16, 2020 1 hour ago, BlueTR3A-5EKT said: Looks like the rear hood bow is too far back, the middle bow is good and the front bow too far forward. The bows should align with the seams in the fabric. Hood frame webbing adjustment is probably required. The extra LTD studs on the quarter panel are to do with the change in soft top and sidescreens between TR2-3 models and TR3A. The studs you have used for the soft top are the correct position for TR3A with Dzus sidescreens. The lower ones are for TR2/3 with wedge sidescreens. Does your hood stick cover fit? What is it like with sidescreens fitted? I guess you do not have a tonneau as the roll over bar is now installed. Cheers Peter W Thanks Peter I have wedge type sidescreens and they are worn on the inside where they rub on the lower fastener (where the white dot is on the hood) I'll have a play with the hood sticks another day. No cover for them, I couldn't justify the cost of one to myself! I'll add a couple of clamps to the touring kit to keep the front section pulled down on the windscreen frame! Quote Link to post Share on other sites
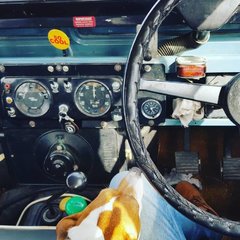
EliTR6 Posted April 16, 2020 Author Report Share Posted April 16, 2020 (edited) Back to aeros for now. Will attempt to replace the cracked windscreen this weekend! Edited April 16, 2020 by EliTR6 Quote Link to post Share on other sites
Hamish Posted April 16, 2020 Report Share Posted April 16, 2020 4 hours ago, EliTR6 said: The more important thing is is the dog alright !!!! Quote Link to post Share on other sites
DavidBee Posted April 16, 2020 Report Share Posted April 16, 2020 (edited) Just wondering about the flap in the sidescreen. Seems overly generous (I am looking at the strip where the fasteners will go, but also at the shape of the curve at the rear corner). Personally, I prefer this design to the later 3A rigid lower section. It may also be slightly more adjustable. Edited April 16, 2020 by DavidBee Typo Quote Link to post Share on other sites
Lebro Posted April 16, 2020 Report Share Posted April 16, 2020 The sidescreen is supposed to fit outside of the hood where it drops down behind the door, & it should fit inside the top flap. Like this: Quote Link to post Share on other sites
stuart Posted April 17, 2020 Report Share Posted April 17, 2020 14 hours ago, EliTR6 said: Back to aeros for now. Will attempt to replace the cracked windscreen this weekend! Good luck with doing the screen, theyre never easy, you will need the bottom corner bracket kit and a new seal as well as the glass, check the present glass as for years you could only get a flat version so the frames have often been flattened out to suit, they should be slightly curved and the current glasses are correct so you might need to re-bend the frame to suit. Stuart. Quote Link to post Share on other sites
EliTR6 Posted April 17, 2020 Author Report Share Posted April 17, 2020 28 minutes ago, stuart said: Good luck with doing the screen, theyre never easy, you will need the bottom corner bracket kit and a new seal as well as the glass, check the present glass as for years you could only get a flat version so the frames have often been flattened out to suit, they should be slightly curved and the current glasses are correct so you might need to re-bend the frame to suit. Stuart. Thanks Stuart. So I need a new bracket kit too? I thought I could reuse the old ones. 12 hours ago, Lebro said: The sidescreen is supposed to fit outside of the hood where it drops down behind the door, & it should fit inside the top flap. Like this: Thanks. I'll give this a try this weekend Quote Link to post Share on other sites
stuart Posted April 17, 2020 Report Share Posted April 17, 2020 (edited) 10 minutes ago, EliTR6 said: Thanks Stuart. So I need a new bracket kit too? I thought I could reuse the old ones. Thanks. I'll give this a try this weekend Its extremely unusual to be able to get the original ones apart as the water gathers down in the corners and theyre usually all rusted solid, you may find the heads on the screws in the new bracket kits are just slightly too big to go through the outer channel cutout so it would need to be relieved slightly with a drill, it doesnt matter as you cant see it when its all re-assembled. If you have a Workmate it will help a lot with re- assembly, I normally allow a day to do the change. Dont mix up the stanchion screws as the bottom ones are longer than the other two on each side. Stuart. Edited April 17, 2020 by stuart Quote Link to post Share on other sites
tr2_applegreen Posted April 17, 2020 Report Share Posted April 17, 2020 1 hour ago, stuart said: Good luck with doing the screen, theyre never easy, you will need the bottom corner bracket kit and a new seal as well as the glass, check the present glass as for years you could only get a flat version so the frames have often been flattened out to suit, they should be slightly curved and the current glasses are correct so you might need to re-bend the frame to suit. Stuart. I didn't know that. Do you have a picture on how the curve of the screen becomes visible? Quote Link to post Share on other sites
stuart Posted April 17, 2020 Report Share Posted April 17, 2020 44 minutes ago, tr2_applegreen said: I didn't know that. Do you have a picture on how the curve of the screen becomes visible? This is possibly the only relevant one I have Stuart. Quote Link to post Share on other sites
Ian Vincent Posted April 17, 2020 Report Share Posted April 17, 2020 (edited) A few years ago (just before I was about to refit the screen into my newly rechromed frame), Stuart published the attached set of instructions for assembling a screen on the forum. They worked for me. The only thing I would add is that to hold the seal in place around the screen whilst I fitted the frame, I used supeglue to stick the ends together so that I had in effect a large rubber band that I could stretch around the screen under very slight tension to hold it in place. The second document is another piece of advice on screen assembly that again came from the forum but I can't remember if I used it - I don't think I needed it. PS Although the stanchion screw size is UNF 10/32, I used stainless steel 2 BA screws. If the threads in the screen frame are knackered they can be re-cut to 5mm here are the relevant dimensions: 10/32 4.8mm max dia, 4.1mm root dia and 32 TPI 2 BA 4.7mm max dia, 4.0mm root dia and 31.4 TPI 5mm 5.0mm max dia, 4.2mm root dia and 31.7 TPI Rgds Ian Screen Assembly.pdf Replacing the Windscreen.docx Edited April 17, 2020 by Ian Vincent Quote Link to post Share on other sites
stuart Posted April 17, 2020 Report Share Posted April 17, 2020 30 minutes ago, Ian Vincent said: A few years ago (just before I was about to refit the screen into my newly rechromed frame, Stuart published the attached set of instructions for assembling a screen on the forum. They worked for me. The only thing I would add is that to hold the seal in place around the screen whilst I fitted the frame, I used supeglue to stick then ends together so that I had in efect large rubber band that I could stretch around the screen under very slight tension to hold it in place. The second document is another piece of advice on screen assembly that again came from the forum but I can't remember if I used it - I don't think I needed it. Screen Assembly.pdf 83.79 kB · 2 downloads Replacing the Windscreen.docx 102.76 kB · 0 downloads Not blowing my own trumpet but the second one was ripped off from mine and posted as being someones own idea . You know who you are. Stuart. Quote Link to post Share on other sites
BlueTR3A-5EKT Posted April 17, 2020 Report Share Posted April 17, 2020 If you find the screen frame will not bend back to shape I have a spare frame hanging on the wall in the garage. As Stuart has written - DO NOT MIX UP THE STANCHION ATTACHING SCREWS. Get it wrong and you will crack the glass. Similarly test the length of the 10 Tenax pegs in the top of the frame. If they poke through into the frame too far the glass is going to crack. Best Tenax pegs I have found come from Roadster Factory in USA Pt No 553827 They do not need p**ng about with to reduce the thread length, and the thread is not relieved under the hexagon flat, requiring a washer to move the peg away from the frame so more than 1 thread grips. http://trf.zeni.net/webcatalog/specials6.22/20.php?s_wt=1440&s_ht=900 Peter W Quote Link to post Share on other sites
james christie Posted April 17, 2020 Report Share Posted April 17, 2020 If it hasn’t been already suggested in this very long (too?) long thread have a look at Teri Ann Wakeman’s site where she gives all the dimensions for fixing the roof sticks and straps. Suggestion: this thread is fascinating and interesting but beginning to cover a serious multitude of subjects. How about starting a new one(s)? james Quote Link to post Share on other sites
BlueTR3A-5EKT Posted April 17, 2020 Report Share Posted April 17, 2020 24 minutes ago, james christie said: If it hasn’t been already suggested in this very long (too?) long thread have a look at Teri Ann Wakeman’s site where she gives all the dimensions for fixing the roof sticks and straps. Suggestion: this thread is fascinating and interesting but beginning to cover a serious multitude of subjects. How about starting a new one(s)? james This is a very sensible suggestion James as the 'thread' gets lost between posts responses - I am guilty of answering multiple subjects in this post. Off the topic again.....Terri Ann's info works with a soft top made to match the webbing dimensions and over the years there have been dozens of soft top remakes of originals, or copies of those remakes. Terri Ann I think has reproduced and improved the old Amco instructions that came with every soft top they sold. http://tr3a.info/sticks.htm Quote Link to post Share on other sites
EliTR6 Posted April 17, 2020 Author Report Share Posted April 17, 2020 2 hours ago, BlueTR3A-5EKT said: If you find the screen frame will not bend back to shape I have a spare frame hanging on the wall in the garage. As Stuart has written - DO NOT MIX UP THE STANCHION ATTACHING SCREWS. Get it wrong and you will crack the glass. Similarly test the length of the 10 Tenax pegs in the top of the frame. If they poke through into the frame too far the glass is going to crack. Thanks Peter. I've reached the point of no return with my old screen now. The PO used sealant instead of wrapping the glass and I've added more cracks to it trying to remove it from the screen. I'll continue slowly easing it out with screwdrivers while cutting the sealant with a stanley knife over the weekend. I've found stripped threads and stripped heads too. I only just managed to get all the screws out. I hope I can reuse the current frame but if not I'll be in touch. I had sourced (but not yet bought) a 2nd hand one in France but it seems it might have been bent to accommodate flat glass. 2 hours ago, stuart said: Not blowing my own trumpet but the second one was ripped off from mine and posted as being someones own idea . You know who you are. Stuart. Stuart, thanks so much for creating and reposting these. You're a godsend. 2 hours ago, james christie said: If it hasn’t been already suggested in this very long (too?) long thread have a look at Teri Ann Wakeman’s site where she gives all the dimensions for fixing the roof sticks and straps. Suggestion: this thread is fascinating and interesting but beginning to cover a serious multitude of subjects. How about starting a new one(s)? james I thought about creating a thread for every subject but as most of the information already exists on the forum it wouldn't be of much use. I imagined this thread as a blog to document the progress of the car with the odd general technical question, nothing too in-depth. The conversational tone of a long thread with occasional off-topic ramblings is more fun for me too. It's also a great help for me to keep track of where I am and what I have left to do. Now I've sorted the interior, I still have to paint the chassis, tidy up the wiring, replace all the fuel hoses, give it a good tuneup, fit the rear firewall and buy new tyres. It should give potential owners a good idea of what buying and owning a TR2/3 is really like. Quote Link to post Share on other sites
DavidBee Posted April 17, 2020 Report Share Posted April 17, 2020 (edited) 4 hours ago, EliTR6 said: I thought about creating a thread for every subject but as most of the information already exists on the forum it wouldn't be of much use. Oh dear, docked 2 likes each. Well, well. I prefer to have open dialogue, where we have the courage of our views. But that's just the opinion of a member. Edited April 17, 2020 by DavidBee Quote Link to post Share on other sites
EliTR6 Posted April 17, 2020 Author Report Share Posted April 17, 2020 I've got my new French reg number And I figured I would rivet an aluminium plate under the grille opening. I'm going to have to order some cutting compound to take the edge off as the paint has pulled itself up around where the old sticker plate was. Bonus round : does anyone know if the brackets used on this gorgeous car are available for sale ? Seems like an ideal setup https://superclassics.eu/listing/triumph-tr3-small-mouth-1957/ Quote Link to post Share on other sites
BlueTR3A-5EKT Posted April 17, 2020 Report Share Posted April 17, 2020 (edited) 2 hours ago, EliTR6 said: I've got my new French reg number And I figured I would rivet an aluminium plate under the grille opening. I'm going to have to order some cutting compound to take the edge off as the paint has pulled itself up around where the old sticker plate was. Bonus round : does anyone know if the brackets used on this gorgeous car are available for sale ? Seems like an ideal setup https://superclassics.eu/listing/triumph-tr3-small-mouth-1957/ I see you have no front bumper but do you have front bumper irons? If so I have a pair of 1950's Lucas spot lamp brackets that are basically lengths of steel flat bar with bends and holes to mount lamp on. They are designed to bolt behind the bumper. They cannot be used on TR2/3 as the over- rider gets in the way. The original factory item as viewed from Moss at 130 quid provides a bar between the two over-rider mounts that the lamps would fit to. Another method used to fit spot lamps was to drill the tops of the over-riders. See page 15 here. https://mgaguru.com/mgtech/books/pdf/L400e_sh.pdf I'll post a photo of the brackets later this evening. Two of the brackets including 160 mm Carello driving lamp and one of the flattened jubilee clip stabiliser cum adjuster fitted on my car with Lucas spots. Cheers Peter W Edited April 17, 2020 by BlueTR3A-5EKT Quote Link to post Share on other sites
DavidBee Posted April 17, 2020 Report Share Posted April 17, 2020 1 hour ago, EliTR6 said: https://superclassics.eu/listing/triumph-tr3-small-mouth-1957/ Gorgeous but no brass plates engine and body, and 3A rear valance and maybe wiper motor too? But nice spot and fog finish off the front. 39,000 euros! And chassis? They don't say. Red looks somewhat brash to me. Quote Link to post Share on other sites
EliTR6 Posted April 17, 2020 Author Report Share Posted April 17, 2020 45 minutes ago, BlueTR3A-5EKT said: I see you have no front bumper but do you have front bumper irons? If so I have a pair of 1950's Lucas spot lamp brackets that are basically lengths of steel flat bar with bends and holes to mount lamp on. They are designed to bolt behind the bumper. They cannot be used on TR2/3 as the over- rider gets in the way. The original factory item as viewed from Moss at 130 quid provides a bar between the two over-rider mounts that the lamps would fit to. Another method used to fit spot lamps was to drill the tops of the over-riders. See page 15 here. https://mgaguru.com/mgtech/books/pdf/L400e_sh.pdf I'll post a photo of the brackets later this evening. Two of the brackets including 160 mm Carello driving lamp and one of the flattened jubilee clip stabiliser cum adjuster fitted on my car with Lucas spots. Cheers Peter W No such luck I'm afraid Quote Link to post Share on other sites

Recommended Posts
Join the conversation
You can post now and register later. If you have an account, sign in now to post with your account.