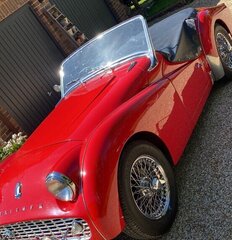
TR Rob Posted September 11, 2023 Report Share Posted September 11, 2023 As a newcomer to TR3a ownership I am gradually upgrading the rather poor (63 year old !) lighting to LED’s My next upgrade are the headlights, but I am at a loss how to get to the bulb. I have attached a couple of photos as I realise you have to work from outside the car, this means removing the outer chrome ring, which I thought clipped on, my car seems to have at the 5.30 position a Philips screw. I would remove this if I could get a screwdriver on it ! Others say they just clip on, but I don’t want to start trying to prise things off for fear of damaging the body work or the chrome ring…… help Quote Link to post Share on other sites
stuart Posted September 11, 2023 Report Share Posted September 11, 2023 (edited) I have had to deal with this sort of thing before, your right they should actually be clipped on but the original clips often fail on the rims so people resort to the screw fitting, you`ll probably need to make up a tool like this below oh and plenty of masking tape to protect the paint. Sometimes you can by lifting the rim get it to pop off the top of the inner rim but you`ll still have to deal with the screw. Stuart. Edited September 11, 2023 by stuart Quote Link to post Share on other sites
TR Rob Posted September 11, 2023 Author Report Share Posted September 11, 2023 Oh……this looks like fun ! Quote Link to post Share on other sites
mike ellis Posted September 11, 2023 Report Share Posted September 11, 2023 Depends what your commission number is, TR3As up to TS32585 had screw clamp. This thread refers. Mike Quote Link to post Share on other sites
stuart Posted September 11, 2023 Report Share Posted September 11, 2023 32 minutes ago, mike ellis said: Depends what your commission number is, TR3As up to TS32585 had screw clamp. This thread refers. Mike But no 3a had the screw in from underneath though Mike did they? Stuart. Quote Link to post Share on other sites
ianc Posted September 11, 2023 Report Share Posted September 11, 2023 I still have the right-angled screwdrivers which I made during my apprenticeship some 65 years ago - not often required, but a life-saver on occasion! Ian Cornish Quote Link to post Share on other sites
TR Rob Posted September 11, 2023 Author Report Share Posted September 11, 2023 (edited) My TR3a is a 1960 TS809910LO, first picture shows headlamp and chrome ring , second picture(upside down!) shows base of chrome ring with a Philips screw retaining the ring. I am damned if I can see , even with the tools suggested how this screw was fitted or removed. There is effectively zero room between bodywork and screw head !! All the right angled screwdrivers I have researched are two long to fit into the available clearance Edited September 11, 2023 by TR Rob Additions Quote Link to post Share on other sites
mike ellis Posted September 11, 2023 Report Share Posted September 11, 2023 1 hour ago, stuart said: But no 3a had the screw in from underneath though Mike did they? Stuart. You are correct Stuart, I was having difficulty making sense of the photograph. It looks as though someone has added that screw for some reason, on 2s/3s the screw was recessed giving a much neater appearance. Mike Quote Link to post Share on other sites
TR Rob Posted September 11, 2023 Author Report Share Posted September 11, 2023 (edited) Well now we have established that one the screw shouldn’t be there and two,if it is, it should be a much neater appearance , anybody on here got any idea how you get it out !! Edited September 11, 2023 by TR Rob Grammer Quote Link to post Share on other sites
TR NIALL Posted September 11, 2023 Report Share Posted September 11, 2023 12 minutes ago, TR Rob said: Well now we have established that one the screw shouldn’t be there and two,if it is, it should be a much neater appearance , anybody on here got any idea how you get it out !! Can you get a small Pozi Drive Bit onto it? Quote Link to post Share on other sites
RobH Posted September 11, 2023 Report Share Posted September 11, 2023 18 minutes ago, TR NIALL said: Can you get a small Pozi Drive Bit onto it? Probably still too big, unless........ Quote Link to post Share on other sites
keith1948 Posted September 11, 2023 Report Share Posted September 11, 2023 Hi Rob Some years ago now I fitted the Moss headlamp relay kit to my 4A and the improvement in light output of the sealed beam units was instantly noticeable. It also reduces the current flow through the switchgear. Means I can still use the original headlights. The rims on my 4A clip on and don't have any fixing screw. Keith Quote Link to post Share on other sites
RogerH Posted September 11, 2023 Report Share Posted September 11, 2023 2 hours ago, TR Rob said: Well now we have established that one the screw shouldn’t be there and two,if it is, it should be a much neater appearance , anybody on here got any idea how you get it out !! Hi Rob, have you tried a pair of pliers. Roger Quote Link to post Share on other sites
TR Rob Posted September 11, 2023 Author Report Share Posted September 11, 2023 5 minutes ago, RogerH said: Hi Rob, have you tried a pair of pliers. Roger Yes, doesn’t work, not enough surface to get a grip. Quote Link to post Share on other sites
TR Rob Posted September 11, 2023 Author Report Share Posted September 11, 2023 Thanks for all your comments and help, has anyone any experience of these…… Quote Link to post Share on other sites
roy53 Posted September 11, 2023 Report Share Posted September 11, 2023 I think Rob has your answer. I don't envy you. Plenty of tape protection on paintwork. Quote Link to post Share on other sites
Ian Vincent Posted September 11, 2023 Report Share Posted September 11, 2023 You can buy the little clamp item that the ring slots into from Moss. Headlamp Rim Clip Rgds Ian Quote Link to post Share on other sites
Charlie D Posted September 12, 2023 Report Share Posted September 12, 2023 10 hours ago, Ian Vincent said: ....You can buy the little clamp item that the ring slots into from Moss.... I wonder if the fitted rims actually have the prong attached to them that push into the clip… I’ve got some rims (I think from a Mini) that just had the hole for a screw. Maybe a previous owner fitted them because it was all they had. Not sure if my pic is the right one, but the TR one is similar. Charlie Quote Link to post Share on other sites
TR Rob Posted September 12, 2023 Author Report Share Posted September 12, 2023 This is all very confusing, and not unexpected with a 63 year old car. But to aid clarification regarding clips and screws , this is a screen shot of various headlamp build ups from Moss TR …….my car looks like this…. Quote Link to post Share on other sites
stuart Posted September 12, 2023 Report Share Posted September 12, 2023 13 minutes ago, TR Rob said: This is all very confusing, and not unexpected with a 63 year old car. But to aid clarification regarding clips and screws , this is a screen shot of various headlamp build ups from Moss TR …….my car looks like this…. On TR2/3 they did indeed have the screw in fittings, Once the change to 3a came in it was no longer possible to fit them hence the change to clip on rims or occasionally as Mike stated above the cross clamp where the rim was actually split. Either way what you have is incorrect, the screw driver I illustrated above has got me out of the sh1t before now where someone has done that. Stuart. Quote Link to post Share on other sites
stuart Posted September 12, 2023 Report Share Posted September 12, 2023 13 hours ago, TR Rob said: Thanks for all your comments and help, has anyone any experience of these…… Never seen them before but yes they would probably work. Stuart. Quote Link to post Share on other sites
Charlie D Posted September 12, 2023 Report Share Posted September 12, 2023 (edited) Here are the pics of what I actually have. I've just pulled the rim off to remind myself. The rim is removed by slight screwdriver pressure between the rim and the rear bowl. Putting it back is simply hooking the top over the rear bowl and then a push at the bottom followed by a satisfying "Click". (Probably now means it will fall off next time I go out !) My car is 1959. Edit: Just found this: Look at item 30 on this page (2 types) https://www.scparts.co.uk/sc_en/british-cars/triumph/triumph-tr2-to-tr4a-1953-1967/electrics-ignition-system-heating-and-dashboard/headlamps.html Charlie Edited September 12, 2023 by Charlie D Quote Link to post Share on other sites
Ian Vincent Posted September 12, 2023 Report Share Posted September 12, 2023 The SC Parts item (30) looks similar to the Moss part that is a lot cheaper. FWIW I also have a plastic trim remover kit bought from Screwfix a few years ago that i use for levering off things like headlamp rims. It saves damaging paintwork or fingers. Rgds Ian Hilka Upholstery & trim Kit Quote Link to post Share on other sites
TR Rob Posted September 13, 2023 Author Report Share Posted September 13, 2023 Managed to get screw out of headlamp chrome bezel using these Neiko low profile screwdrivers. Brilliant. Marked position of chrome bezel in relation to headlamp chassis made it an absolute doddle putting it all back together. Alignment and shut line of chrome bezel to bodywork perfect Quote Link to post Share on other sites
RogerH Posted September 13, 2023 Report Share Posted September 13, 2023 Well Done Roger Quote Link to post Share on other sites

Recommended Posts
Join the conversation
You can post now and register later. If you have an account, sign in now to post with your account.