Bill Bourne Posted October 13, 2017 Author Report Share Posted October 13, 2017 Excellent work Bill, I can't wait to see it at the Lincoln International next year maybe? I like the small spotlights on the front, what make are they? Gary Hi Gary Thank you - yes, I'm hoping to get Fiona (as it's her car) to drive it to Lincoln and enter it into something. Not sure what yet. Although she's fighting me on the "I'll be too embarrassed" front. I'll get her in the ring somehow. The spots, are "Mini" spots, s/steel best Bill Quote Link to post Share on other sites
Bill Bourne Posted October 13, 2017 Author Report Share Posted October 13, 2017 What’s the rule change regarding MOT, keep up the good work Bill just looked at your blog. She looks fantastic. What stamps did you use for the commission plate?, the letters and numerals look really crisp. Mark Hi Mark I think from May 2108, you won't need an MOT for anything + 40 years old. Although you can still volunteer for a test which I will do anyway. The plate - I took this down to Timpsons and they did it for me. £5 - I think Best Bill Quote Link to post Share on other sites
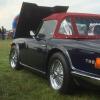
Bill Bourne Posted October 23, 2017 Author Report Share Posted October 23, 2017 Hi all Nearly there - MOT soon !! http://www.tr-register.co.uk/rebuilders-diary/2013/07/0055/TR5-Patience-Rebuild Best Bill Quote Link to post Share on other sites
Dave I O W Posted October 23, 2017 Report Share Posted October 23, 2017 Cracking job Bill! well done, Bet you can't wait to get it on the road, All the best Cheers Dave. Quote Link to post Share on other sites
Bill Bourne Posted October 23, 2017 Author Report Share Posted October 23, 2017 Cracking job Bill! well done, Bet you can't wait to get it on the road, All the best Cheers Dave. Thank you Dave Yep I am excited to know how she will turn out on the road. I'm sure I'll have some teething issues. Maybe ? and she won't be as good as yours, but I think she will be very presentable. Best, Bill Quote Link to post Share on other sites
Mark69 Posted October 25, 2017 Report Share Posted October 25, 2017 (edited) Hi Bill, Thanks for the timpson tip, just got my commission plate back lovely job. Thank you Mark. Edited October 25, 2017 by Mark69 Quote Link to post Share on other sites
Bill Bourne Posted October 25, 2017 Author Report Share Posted October 25, 2017 Hi Mark That's great, hopefully it didn't cost too much either Best Bill Quote Link to post Share on other sites
Bill Bourne Posted October 29, 2017 Author Report Share Posted October 29, 2017 Hi all More updates added - nearly there for the MOT, possibly next week, and Fiona takes her 1st drive ! http://www.tr-register.co.uk/rebuilders-diary/2013/07/0055/TR5-Patience-Rebuild Best Bill Quote Link to post Share on other sites
harrytr5 Posted October 29, 2017 Report Share Posted October 29, 2017 Well done Bill and Fiona. That grin will be permanent now. See you in the concours hall next year. Regards Harry Quote Link to post Share on other sites
Bill Bourne Posted November 6, 2017 Author Report Share Posted November 6, 2017 (edited) Yoo hoooo - she passed her MOT today !! - officially back on the road after 4 years, 3 months and 24 days since we started the restoration and 30+ years since she was last on the road. http://www.tr-register.co.uk/rebuilders-diary/2013/07/0055/TR5-Patience-Rebuild Best Bill Edited November 6, 2017 by Bill Bourne Quote Link to post Share on other sites
k_raven_smith Posted November 6, 2017 Report Share Posted November 6, 2017 Well done Quote Link to post Share on other sites
SeanF Posted November 6, 2017 Report Share Posted November 6, 2017 Congratulations Bill and Fiona. Another car back on the road and she's a beauty. Wishing you many years of happy driving. Sean Quote Link to post Share on other sites
Mark69 Posted November 6, 2017 Report Share Posted November 6, 2017 You lucky girl Fiona, Enjoy. Congratulations Bill lovely job. Quote Link to post Share on other sites
Geko Posted November 7, 2017 Report Share Posted November 7, 2017 Might be the recipe to maintain a long lasting relationship, yet enjoying it Quote Link to post Share on other sites
Kevo_6 Posted November 7, 2017 Report Share Posted November 7, 2017 (edited) Well done Bill, now you can relax!!! Edited November 7, 2017 by Kevo_6 Quote Link to post Share on other sites
Bill Bourne Posted November 7, 2017 Author Report Share Posted November 7, 2017 Thank you everyone for your support Best regards Bill Quote Link to post Share on other sites
mike3739 Posted November 9, 2017 Report Share Posted November 9, 2017 Fantastic Bill have followed with great interest Cheers Mike Quote Link to post Share on other sites
Bill Bourne Posted November 10, 2017 Author Report Share Posted November 10, 2017 Fantastic Bill have followed with great interest Cheers Mike Thank you Mike More work on her this weekend. The horn has decided not to work properly and she's sitting a bit too high at the rear. So I'll be fitting and trying some alternative springs.Then if time allows. I might try and fit the wheel arch covers. Then the spare wheel needs to be painted and fitted up with a new tyre and balanced. Then the boot needs to be trimmed out. Then hood has been booked to be fitted on 9/12.Then change the oil, as I have a weep on the drain plug. I'm sure there will a few other items as well. I'm sure I'll finally get there soon. Best regards Bill Quote Link to post Share on other sites
Bill Bourne Posted January 21, 2018 Author Report Share Posted January 21, 2018 Hi all More work done. Wheel arch liners fitted. I think I've run out of owners blog space, as I can't seem upload any more at the moment. So here are some pictures. Sorry you'll have to turn your head as I can't get some of them the right way round !! Blog link http://www.tr-register.co.uk/rebuilders-diary/2013/07/0055/TR5-Patience-Rebuild Best Bill Quote Link to post Share on other sites
had17462 Posted January 21, 2018 Report Share Posted January 21, 2018 Bill how did u find them to fit? Also was they from revingtons. Nick Quote Link to post Share on other sites
stuart Posted January 21, 2018 Report Share Posted January 21, 2018 I have fitted quite a few sets and the Revngton ones are the best of the bunch, not a five minute job despite what they say in their blurb as there is a bit of trimming to get them to fit nicely and a lot easier to fit if doing it during the build of the car. I fit rivnuts to the shell so they can easily be removed for inspection etc.Also a good idea to spray them with stonechip to lessent the possibility of stress cracks from stone impacts. In fact a coat of top colour also makes them look better too. Stuart. Quote Link to post Share on other sites
Bill Bourne Posted January 21, 2018 Author Report Share Posted January 21, 2018 (edited) Hi Nick I fitted these as Stuart has described, although not at the body build stage. Yes they from Revington. As Stuart has said they do take some time to fit. You need to fettle,file, file, on off on off file, on off, file. It's taken me a week and half. Not all day, as I have a day job, but most evenings for 2-4 hrs and a weekend. On the rear and the front I've used rivnuts. On the rear, 2 into the car and 1 into a made up bracket which is fitted to the rear bumper side support iron. On the 1st one I fitted (rear) I ran into some issues. I found taking them on and off so many times, that the paint inside the wheel arch between the inner and out wing joins was getting scratched and chipped. So repaired that and to stop it happening again, put some thickish close cell tape on the edge of the archliner where it meets that join. It also helped to brace the liner against the body, with minimum fixings. I've repeated that on all the other liners. It works well. I also used a different rubber seal to Revingtons. It has a slightly larger flap and a deeper groove, which makes it a much better fit. Then after the final unpainted fit. Fit the rivnuts , drill the holes, then I stone chipped and painted, then glued the rubber edging. Got that from Woolies. In the final fit I've used 6mm s/steel screws, s/steel rivnuts and rubber bonded washers. So in short I've got 3 fixings on each rear and 4 on each of the front ones. Hopefully you can make some sense from the pictures posted above as to how they have been fitted. I'm trying to add a more detailed description and more pictures on my blog, but I seem to have run out of space. I've asked Wayne to assist. Hopefully he will and I'll load them up as soon as I can. I hope that helps Best Bill Edited January 21, 2018 by Bill Bourne Quote Link to post Share on other sites
stuart Posted January 22, 2018 Report Share Posted January 22, 2018 Bill you have discovered with scuffing the paint during the fitting process why I say they are best fitted during the build! I fit two extra small angle brackets welded to the front inner side of the floor drop section to give a better and more secure lower rear edge on the fronts and then two more on the inside and one for the lower front, in the rear I utilise the lower lip of the inner arch with one fixing at the front and two at the rear and then one more in the top of the arch behind the rear cockpit trim bracket., I still use the supplied rubber though I do agree its a bit on the thin side in width so you do need to make the fit more accurate. Stuart. Quote Link to post Share on other sites
Bill Bourne Posted January 22, 2018 Author Report Share Posted January 22, 2018 Bill you have discovered with scuffing the paint during the fitting process why I say they are best fitted during the build! I fit two extra small angle brackets welded to the front inner side of the floor drop section to give a better and more secure lower rear edge on the fronts and then two more on the inside and one for the lower front, in the rear I utilise the lower lip of the inner arch with one fixing at the front and two at the rear and then one more in the top of the arch behind the rear cockpit trim bracket., I still use the supplied rubber though I do agree its a bit on the thin side in width so you do need to make the fit more accurate. Stuart. Tonys TR6 330.jpg Tonys TR6 331.jpg Tonys TR6 333.jpg Tonys TR6 334.jpg Tonys TR6 335.jpg Tonys TR6 336.jpg Tonys TR6 337.jpg Hi Stuart Nearly the same as you then ? But your'e an expert. I'm certainly not. If I had thought about it during the body work stage, I would have done it, but doh....Nope that didn't happen. I have to say though,even it's not exactly the same as you, I'm really pleased with the end result. The flappy bits, front/rear and rear/rear bottoms have also been dealt with. I thought they would eventually crack if not secured properly and perhaps cause movement and damage to the paint underneath. So, I've secured those with extra brackets as shown in the photos and as mentioned have also put some tape on the inside of the liner. The tape also seems to help with the bracing and insulating of the liner into the body. I wish these liners were made out of a plastic/rubber mix though. but alas... best regards Bill Quote Link to post Share on other sites
stuart Posted January 22, 2018 Report Share Posted January 22, 2018 Hi Stuart Nearly the same as you then ? But your'e an expert. I'm certainly not. If I had thought about it during the body work stage, I would have done it, but doh....Nope that didn't happen. I have to say though,even it's not exactly the same as you, I'm really pleased with the end result. The flappy bits, front/rear and rear/rear bottoms have also been dealt with. I thought they would eventually crack if not secured properly and perhaps cause movement and damage to the paint underneath. So, I've secured those with extra brackets as shown in the photos and as mentioned have also put some tape on the inside of the liner. The tape also seems to help with the bracing and insulating of the liner into the body. I wish these liners were made out of a plastic/rubber mix though. but alas... best regards Bill Like the moderns you mean yes I agree and also so they would fit to the arch lip on the outside like a modern but unfortunately these are the best you`ll get. Stuart. Quote Link to post Share on other sites

Recommended Posts
Join the conversation
You can post now and register later. If you have an account, sign in now to post with your account.