Steves_TR6 Posted February 7, 2011 Report Share Posted February 7, 2011 Hi Guys I've splashed out on the Racestorations telescopic shock kit, and some front shocks as well. I am thinking that i should fit polybushes at the same time, just the training arm ones which i have on the shelf. How hard are the trailing arm bushes to fit, is there a guide anywhere? I'm reasonable with a spanner but am concerned that a lot of dismantling is required?? Alternatively would it be ok to just fit the telescopic kit now and have a garage do the polybushes later??? Thanks in advance Steve Quote Link to post Share on other sites
Peter Cobbold Posted February 7, 2011 Report Share Posted February 7, 2011 Their Silentblocs were pigs to fit but vastly improved the rear end. I used G-clamps, sockets, hot water to warm the arm, silentblocs from freezer. And lots of molyslip. Dont use copperslip it will rot the aluminium. I guess poly-bushes will be easier, and not so bone-jarringly solid over the potholes. You will have to re-align the toe-in after fitting. I set mine parallel - and 15 years later they have not shifted. Quote Link to post Share on other sites
RobinTR6 Posted February 7, 2011 Report Share Posted February 7, 2011 All agreed. It make a great difference if there are two of you as one can hold the trailing arm in position whilst the vices in the polybush with a socket or similar. Expoect to spend a day doing them with 2. Robin Quote Link to post Share on other sites
RogerH Posted February 7, 2011 Report Share Posted February 7, 2011 Hi Steve, after you fit the shock mod check to make sure that the tyres do not rub on them at full compression. This could happen depending on shock mod type/tyres/wheels. Roger Quote Link to post Share on other sites
AndrewMAshton Posted February 7, 2011 Report Share Posted February 7, 2011 Hello, there is an excellent tool in TR Restoration by Roger Williams, it's a bolt welded onto some angle iron, the bush goes over the bolt and the angle iron sits on one face of the vice and the trailing arm the other, close the vice and the bush cannot go anywhere but where it should, use plenty of washing up liquid, Andrew Quote Link to post Share on other sites
Les Pettitt Posted February 8, 2011 Report Share Posted February 8, 2011 Hi Steve, I fitted poly bushes by just lowering the trailing arms and without disconnecting the brake pipes. I took the drop link off first, lowered the trailing arm and removed the spring and then reattached the drop link, removed the trailing arm bolts and lowered the trailing arms. This was in my single garage with limited room to work under the car. I made a puller out of the plastic downpipe from my shed and some threaded rod. They all pulled out easily although they were the original rubber ones and over 30 years old. The new polybushes pulled in easily too. I used Superpro bushes which I thought were excellent quality. Maybe I was just lucky. It certainly made a noticeable improvement to the handling. I was very pleased that I attempted this job. I had asked a local mechanic to do it but he refused because he didn't have a 80 ton press. I enjoyed telling him I had removed the bushes using plastic drainpipe. Very rewarding. Regards Les Quote Link to post Share on other sites
TONYL Posted February 8, 2011 Report Share Posted February 8, 2011 Hi Just changed my T/A bushes Long length of 10mm screwed rod from B+Q,big washers and a couple of nuts. Old bushes pulled out with out any drama New super pro bushes pulled in with the grease supplied with them - looked like a type of vasaline. The T/A's were on the bench so easy access - not hard to remove. Definiteley a diy job To make life easy you need a length of tube that is slightly larger than the new bushes. Hope this gives you the confidence to have a go! Best of luck Tony Quote Link to post Share on other sites
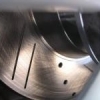
johnny250 Posted February 8, 2011 Report Share Posted February 8, 2011 (edited) Hi Steve, this is what I cobbled up to fit those bushes...a piece of pipe with a threaded brass insert to keep things lined up, and a length of studding....have you got the body off or lifted to weld the reinforcing plates for the conversion?......(works great BTW) john (just noticed you've got Racetorations not Revingtons conversion so that bit may not apply ) Edited February 8, 2011 by johnny250 Quote Link to post Share on other sites
RobinTR6 Posted February 8, 2011 Report Share Posted February 8, 2011 John an it looks very effective too, necessity being the mother of invention seems to be very apt for this forum. Robin Quote Link to post Share on other sites
Steves_TR6 Posted February 8, 2011 Author Report Share Posted February 8, 2011 Well the very lovely Racetorations kit arrived today :-) I would like to fit the bushes, and am encouraged by the possibility of doing this on the car. Thanks for the comments guys. Think I'll ponder for a day or two! Steve Quote Link to post Share on other sites
Guest ntc Posted February 8, 2011 Report Share Posted February 8, 2011 Well the very lovely Racetorations kit arrived today :-) I would like to fit the bushes, and am encouraged by the possibility of doing this on the car. Thanks for the comments guys. Think I'll ponder for a day or two! Steve Unless somebody has been there before or the body has been off you will find the first prob bdq inner bolts there is a clue Quote Link to post Share on other sites
Steves_TR6 Posted February 8, 2011 Author Report Share Posted February 8, 2011 Unless somebody has been there before or the body has been off you will find the first prob bdq inner bolts there is a clue Thanks for that Do you mean the bolts are not easily removed as they are installed with the body off and aren't easily removed with it on because they are the wrong way round to pull out?? Steve Quote Link to post Share on other sites
Dave McDonald Posted February 8, 2011 Report Share Posted February 8, 2011 Steve A worthwhile change. The angle iron with a welded bolt mentioned by AndrewMAshton is the easiest system that I have used. Roger Williams copied from mine in my garage when he was staying with us one weekend, though I don't claim to have "invented" it myself. I think Les Pettitt was very lucky to do them "in situ." Can't see how he managed it, but good luck to him. Removing the old bushes can be difficult. Make it easier by using one or all of the following:- 1. Hacksawing the widened bush end off one end before pushing them out. 2. You can also drill a few holes in the old rubber from end to end to reduce the bond, taking care not to score the aluminium bore. Take a firm hold of the drill to avoid it spinning and twisting your wrist. 3. Use a small dia socket against the central steel sleeve (at the end where you have sawn off the rubber end) with the trailing arm tilted in the vice to remove the sleeve. 4. Then either use the hacksaw through the centre to cut the rubber into bits to remove, or. 5. Alternatively use the same method as in 3. with a larger socket against the rubber to push it out in the vice. 6. Clean the inner bores well before trying to fix the new bushes with a suitable lubricant (Peter Cobbold worried me as I did use Copperslip but the aluminium isn't showing any sign of rotting away just yet!) 7. I found warming the new ones in hot water helped ease the path. Good luck Dave McD Quote Link to post Share on other sites
Guest ntc Posted February 8, 2011 Report Share Posted February 8, 2011 (edited) Thanks for that Do you mean the bolts are not easily removed as they are installed with the body off and aren't easily removed with it on because they are the wrong way round to pull out?? Steve You have got it they left the factory with the bolt head inwards and yes there is a way round it and you can change them without removing the arm , sorry DaveM Edited February 8, 2011 by ntc Quote Link to post Share on other sites
Dave McDonald Posted February 8, 2011 Report Share Posted February 8, 2011 Steve You will find that Neil's comments tend to be phrased in riddles. They mention "possible, maybe, perhaps, could be" problems without being specific about exactly what they are or, more helfully, how to avoid/overcome them. I think someone else referred to them as being "enigmatic" in another posting some time ago. Unless I am mistaken, he refers to potential problems with removing the trailing arms. The 2 pivot bolts connecting the trailing arms to the support brackets may have been fitted the wrong way round. They should both be fitted with the two bolt heads facing each other towards the middle of the trailing arm, nuts on the outsides. If they haven't you won't be able to withdraw the bolts due to conflict with the chassis on the inner one and cill on the outer one. Whilst not ideal the problem can be overcome. If you encounter this you have to remove the trailing arms complete with the support brackets. Remove the nyloc nuts from the 2 bolts on each bracket. You will need to draw the whole assembly backwards. However these bolts are approx 65 - 75 mm long and fixed through sleeves welded inside the chassis box section so will come back square. The outer bracket will foul on the cill due to it being in an acute corner. It's best to hold the inner bracket tight to the chassis and pull the outer end back as far as it will go to clear the bolt holes. You will have to do a fair bit of "waggling" and manoeuvering, coupled with cursing and knuckle barking but they will come out. When replacing, open up the support brackets slightly to make sure the trailing arm will fit inside them before fixing them to the chassis first just loosely bolted. Take note of the bracket configuration before you remove them and refit in exactly same position, orientation and with same number of shims. You will note notches in them, varying 1 to 3.Ffit them in same position with notches on top or bottom as they were before you started. Fit the trailing arm and insert pivot bolts in the only manner possible at that point, i.e. bolt heads towards middle of each arm and nuts on outsides of each arm. Do a few miles on road to settle everything down then check suspension for camber and alignment toe in. Alter alignment with shims between chassis and brackets. Alter camber with differently notched brackets. Good luck. Dave McD Quote Link to post Share on other sites
Mike Goldthorpe Posted February 8, 2011 Report Share Posted February 8, 2011 This is quite informative http://tr6.danielsonfamily.org/TrailingArmBushings.htm I didn't have to mess with the bushes in my old TR6 but I have used this method to install bushes in motorcycle swing arms. Get is all right and they just slip in - get the angle wrong or something and they are a pig! I used the opportunity to clean my trailing arms when I had to do some work there - they come out easily and look well good with just a wire brush and elbow grease. I didn't bother with the notched brackets - I used the Goodparts brackets - much easier to set up camber. Quote Link to post Share on other sites
Steves_TR6 Posted February 8, 2011 Author Report Share Posted February 8, 2011 Thanks all, especially Dave McD! This is clearly quite an involved job so I'll not attempt it in my little garage. I plan to have a bit of work done at Rees Bros quite soon, so will live with the old bushes for now. Thanks again. I'll fit the Racetorations kit later in the week and report back! Steve Quote Link to post Share on other sites
Guest ntc Posted February 8, 2011 Report Share Posted February 8, 2011 (edited) DM There is no riddle Quote The 2 pivot bolts connecting the trailing arms to the support brackets may have been fitted the wrong way round. They should both be fitted with the two bolt heads facing each other towards the middle of the trailing arm, nuts on the outsides Incorrect they left the factory with the inners the other way, (fact).Now all you have do is go on and tell him about the other problems he may encounter when removing the brackets if the chassis is not A1.How many times have you found that what seems straightforward is not? Edited February 8, 2011 by ntc Quote Link to post Share on other sites
Dave McDonald Posted February 8, 2011 Report Share Posted February 8, 2011 Good evening Neil, how's life in Beckingham? I agree with your note about the direction of the pivot bolt fittings when they left the factory and also the frequency with which apparently mundane tasks become more complex as they progress. I did allude to the likelihood of the job involving cursing and knuckle barking. However there is no need to exacerbate future component removal by fitting them back in the same manner. I'm all for making life as easy as possible, both for myself and, where I can, others. Dave Quote Link to post Share on other sites
Guest ntc Posted February 8, 2011 Report Share Posted February 8, 2011 Good evening Neil, how's life in Beckingham? I agree with your note about the direction of the pivot bolt fittings when they left the factory and also the frequency with which apparently mundane tasks become more complex as they progress. I did allude to the likelihood of the job involving cursing and knuckle barking. However there is no need to exacerbate future component removal by fitting them back in the same manner. I'm all for making life as easy as possible, both for myself and, where I can, others. Dave Not to bad Dave thank you, hope you are well? are you racing this year? Quote Link to post Share on other sites
Dave McDonald Posted February 9, 2011 Report Share Posted February 9, 2011 Neil This is a bit off the original subject now but yes I am well thanks, a retired gentleman now. I will be racing this year but on a limited scale doing a few Thoroughbred Sportscars Championship and a few Classic Sportscar Club Swinging 60s races, hopefully including a round at Cadwell Park. No doubt Alan Coote will let you know the date later. Regards Dave Quote Link to post Share on other sites
Guest ntc Posted February 9, 2011 Report Share Posted February 9, 2011 (edited) Neil This is a bit off the original subject now but yes I am well thanks, a retired gentleman now. I will be racing this year but on a limited scale doing a few Thoroughbred Sportscars Championship and a few Classic Sportscar Club Swinging 60s races, hopefully including a round at Cadwell Park. No doubt Alan Coote will let you know the date later. Regards Dave Dave Enjoy your retirement I to have put things in slow down mode yes it is off subject I know but seeing Steve's other posts I did not want him to tackle something that can go very wrong? so back to the ? with regard to the inner bolts I agree with you to make it easy later,however I have asked over the years many of the main players in the game about this and no accurate answer has been given as to why Triumph fitted them this way in the first place.Maybe the gurus can come along and explain?.Have a good season Edited February 9, 2011 by ntc Quote Link to post Share on other sites

Recommended Posts
Join the conversation
You can post now and register later. If you have an account, sign in now to post with your account.