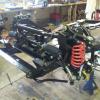
nibbo Posted January 3, 2014 Report Share Posted January 3, 2014 Hi Guys I thought I would start posting some pictures of my restoration project "if I can down load the picts ha ha" Will post some more later, Nigel Quote Link to post Share on other sites
Ghianightmare Posted January 3, 2014 Report Share Posted January 3, 2014 Nice work. Nice to have lots of space to work in! What year is it? Are you doing the body yourself too? Quote Link to post Share on other sites
nibbo Posted January 3, 2014 Author Report Share Posted January 3, 2014 Hi, Yes I am doing the body work myself but will have the finish done professionally, I have a mate with a car spray business 2he still charges me the same ha ha" Car details: NBW 576P The Heritage cert says it was built June 74 ! Chassis: CR64570-0 Body: T.3581/CR Colour: Magenta (it will stay the same) Trim: Black Engine: CR/004494-HE I purchased it from Classic Chrome in Richmond 30 months ago as a project, I drove it for 18 months then started the resto. Nigel Quote Link to post Share on other sites
Guest ntc Posted January 3, 2014 Report Share Posted January 3, 2014 (edited) Edit Good job well done Edited January 3, 2014 by ntc Quote Link to post Share on other sites
Andrew Smith Posted January 3, 2014 Report Share Posted January 3, 2014 (edited) Nice job Nibbo, But take the opportunity now to strengthen the diff pins and hangers if you haven't already done so, uprated plates and pins are available from Moss, see: http://www.moss-europe.co.uk/Shop/ViewProducts.aspx?PlateIndexID=2502 and here: http://www.moss-europe.co.uk/graphics/uk/instructions/850-795_140009K_inst.pdf Cheers Andrew Edited January 3, 2014 by Andrew Smith Quote Link to post Share on other sites
Steves_TR6 Posted January 3, 2014 Report Share Posted January 3, 2014 Excellent pics of a job well done. I shall follow progress with interest! Steve Quote Link to post Share on other sites
Mark69 Posted January 4, 2014 Report Share Posted January 4, 2014 Hi Nigel Can you tell what the two eyelets welded to the rear of your chassis are for Great job so far , keep up the good work Mark Take Andrews advice and checkout additional strengthening at diff mounts and front suspension mounts. Quote Link to post Share on other sites
simonjrwinter Posted January 4, 2014 Report Share Posted January 4, 2014 Nigel, We LOVE restoration threads, keep the pics coming. Looks like you're doing a cracking job there. Simon Quote Link to post Share on other sites
stuart Posted January 4, 2014 Report Share Posted January 4, 2014 Hi Nigel Can you tell what the two eyelets welded to the rear of your chassis are for Shipping tie down brackets. Stuart. Quote Link to post Share on other sites
Dave McDonald Posted January 4, 2014 Report Share Posted January 4, 2014 Hi Nigel Can you tell what the two eyelets welded to the rear of your chassis are for I'd been wondering the same thing, thanks Stuart. Dave McD Quote Link to post Share on other sites
nibbo Posted January 14, 2014 Author Report Share Posted January 14, 2014 Hi Guys, Just thought I would post some more pictures of my resto, shell and engine this time, [:Shed 2.JPG] Quote Link to post Share on other sites
stuart Posted January 14, 2014 Report Share Posted January 14, 2014 Looks to me as if that shell has survived quite well. That will make life easier. Stuart. Quote Link to post Share on other sites
Mark69 Posted January 14, 2014 Report Share Posted January 14, 2014 Why are there two different types of inner rear wings. Both my Os and ns inertial wings have same recess depth. On the pics above the os as a much deeper recess why? Mark Ps Thanks for the enlightenment Stuart did all export car have these welded on. Quote Link to post Share on other sites
stuart Posted January 14, 2014 Report Share Posted January 14, 2014 That depression on the r/hand rear inner wing is for the expansion tank for the fuel breather system on US market cars. Not all cars for export had those tie down brackets, Later cars only I think. Stuart. Quote Link to post Share on other sites
KOB Posted January 15, 2014 Report Share Posted January 15, 2014 Deja Vu, I did the same works on my chassis a few years back. Interesting that my 6 JEJ 199P was registered 1 August 75 but built June 74 also. Quote Link to post Share on other sites
nibbo Posted January 16, 2014 Author Report Share Posted January 16, 2014 Hi Stuart, Yes the shell, front and rear wings and the bonnet are all in very good shape, just got to repair where the rear deck joins the inner rear wings, both B post rears and both seat belt anchors apart from that it's just the odd bit to cut out and patch. unfortunately the boot lid lip near side is shot I am going to attempt a repair as the rest of the boot lid is fine, there's some funny bends to do, shame there is not a repair section for the boot lid lip !!! or may be you know different. Nigel Quote Link to post Share on other sites
stuart Posted January 16, 2014 Report Share Posted January 16, 2014 Unfortunately AFIK there are no repair sections for the boot lids and yes it is an awkward shape to repair. Stuart. Quote Link to post Share on other sites
nibbo Posted January 31, 2014 Author Report Share Posted January 31, 2014 Bugger !!!!! wrung off two of bolts holding the water pump body onto the block, 3rd bolt undid ok, looks like the other two are rusted solid........out with the drill !!!! Quote Link to post Share on other sites
Speed Posted February 1, 2014 Report Share Posted February 1, 2014 great rest pics and well done for taking so much on, will watch with interest! Quote Link to post Share on other sites

Recommended Posts
Join the conversation
You can post now and register later. If you have an account, sign in now to post with your account.