BarryG Posted November 24, 2015 Report Share Posted November 24, 2015 Does anyone know if the captive nuts on the front of a Surrey Top can be replaced? I bought a TR4A a few months back and one of the front bolts will not do up. The threads seem to be OK, when I insert the bolt when the top is off the car but cannot seem to get it started when the top is on the car. I have now bought all the correct washers and two spacer tubes as these did not come with the car. Is there a sequence in doing up the four bolts? Thanks Barry Quote Link to post Share on other sites
peejay4A Posted November 24, 2015 Report Share Posted November 24, 2015 They're all a fiddle to get started. I replaced the rear ones with studs and I use Mini rocker cover tube nuts (T bar type) to tighten it down. I start the front bolts first, jiggling the roof as necessary. The studs at the rear are easy. Quote Link to post Share on other sites
BarryG Posted November 24, 2015 Author Report Share Posted November 24, 2015 Thanks Pete Did you ever peel back the headlining to look at the captive nuts? The only problem I have is with the passenger side, as soon as I use the new distance tube I cannot get the bolt started so I am suspecting that either the captive nut has been pushed further in or the thread is past its sell by date. Quote Link to post Share on other sites
dpb Posted November 24, 2015 Report Share Posted November 24, 2015 I have the same problem - one won't do up. But the cause in my case is that the holes are misaligned, and I can only get three of four done up. Which three depends on where I start! Dave === Quote Link to post Share on other sites
stillp Posted November 24, 2015 Report Share Posted November 24, 2015 I have the same problem - one won't do up. But the cause in my case is that the holes are misaligned, and I can only get three of four done up. Which three depends on where I start! Dave === Mine's exactly the same! I think the rear screen frame is not quite parallel to the windscreen. The steel top has been propped against the garage wall for 23 years now. Pete Quote Link to post Share on other sites
Barry Green Posted November 24, 2015 Report Share Posted November 24, 2015 Thanks for all the input. I plucked up the courage and peeled back the headlining from the front. It turns out that the thread on the captive nuts on the passenger side is stripped. My next task is to try and replace the nut. It's very difficult to get too and am not sure how to make good the captive part. But I guess it must be do-able otherwise no one would sell the captive nuts. Maybe a quick blast using the mig, hopefully won't wreck the paintwork. Fingers crossed. Storing the top in the garage does seem a good option. :-) Quote Link to post Share on other sites
stargazergs Posted November 24, 2015 Report Share Posted November 24, 2015 Hi Barry, I'm not sure if this will help but uf you look on ebay for a product called a helicoil and in the search put the size of thread it should be and you may find a kit that will replace the thread with the helicoil if there is enough meat on the captive nut. It may save you working with the mig? Gavin Quote Link to post Share on other sites
stuart Posted November 25, 2015 Report Share Posted November 25, 2015 (edited) FWIW The front captives are welded to a plate spot welded up under the front return and arent very well spotted on, I have had the plate drop off completely before now. You could always remove the plate and then spot it back once you have changed the nut. Always measure the depth of the hole with roof on from the underside of the screen frame until it touches the roof skin and make sure your bolt isnt too long. Stuart. Edited November 25, 2015 by stuart Quote Link to post Share on other sites
stuartmac Posted November 25, 2015 Report Share Posted November 25, 2015 The above is very similar to my problems and I was just about to ask the same question regarding replacing a front captive nut After struggling to get any of the four bolts started I replaced the rears with 50mm studs and rocker nuts as suggested elsewhere ( see photo) For the fronts I used s/s hex bolts that are 1/4 inch longer than standard - on inspection the original bolts looked to have damaged threads. By supporting the rear of the lid about 50mm above the backlight the front bolts can be installed loosely, then a little shove from the rear and the studs drop into the holes and the rocker nuts can be done up. However the passenger front bolt is very tight to wind in - I'm worried that I will rip out the captive nut if I force it and once it starts to pull the lid down it and get some load on it the bolt starts to slip back a turn or two - so the nut needs replacing - Barry, I would be interested to know how you get on with this. Quote Link to post Share on other sites
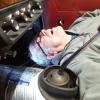
BarryG Posted November 25, 2015 Author Report Share Posted November 25, 2015 My preference is to try replacing the captive nut (I have attached a photo). It is very difficult to get to being under the front lip, I think I will be able to chisel the front edge of the cage, bend it upwards then change the nut. Hopefully then I will be able to bend the cage back and weld it. I just hope it doesn't fall off as per Stuarts experience. At this stage I am not bothered about wrecking the paint work as I am planning on respraying the top anyway. If it all goes belly up then I shall try the Helicoil route, but either way it does need repairing as I cant think that it is that safe with just one bolt done up on the front edge. Quote Link to post Share on other sites
stuart Posted November 25, 2015 Report Share Posted November 25, 2015 There is only 2 legs of the captive cage that are welded so you can if your clever open one side (The one nearest to you in the picture) and slide the nut out and replace it. (5/16" square nuts are available under part number CN5) Stuart. Quote Link to post Share on other sites
dpb Posted November 25, 2015 Report Share Posted November 25, 2015 Mine's exactly the same! I think the rear screen frame is not quite parallel to the windscreen. The steel top has been propped against the garage wall for 23 years now. Pete Hi Pete Yep, my rear screen is misaligned by just enough to cause this problem.. A winter task for me now.. Dave == Quote Link to post Share on other sites
harrytr5 Posted November 25, 2015 Report Share Posted November 25, 2015 For the rears I managed to drill out the stripped thread using a metal tube with the correct size drill bit poking out the end so the drill could not go any further than the end of the thread.I then helicoiled successfully mind you I was sweating a lot as the top was newly painted and I did not want to mess this up. Good luck with yours Regards Harry Quote Link to post Share on other sites
BarryG Posted November 26, 2015 Author Report Share Posted November 26, 2015 This is getting more confusing by the minute!!! Went in to my local TR parts dealer to buy the captive nuts and being ultra cautious took along the two bolts I had (came with the car) that are for the front edge of the Top, after checking it turns out that the bolts I had apparently are from a Spitfire hardtop which measure 50mm (length of thread), the ones I should have are part no 62287 which are for a TR which measure 63mm (length of thread). I bought the longer ones, just in case. The other cause for concern I have is that the 2 'Distance Tubes' I bought (part No 613508), by the diagrams I have are pointing upwards from the underside of the windscreen frame ie 'mushroom' head on the underside. When I try this the diameter of the 'tube' will not fit the hole in the windscreen frame, the only way it will fit is pointing downwards, ie pushing it downwards from the top of the windscreen capping. So before I try knocking six bells out of the top trying to change the captive nut can anyone shed any light on:- a. what is the correct length of bolt? b. which way up should the distance tubes be? c. Are there any definitive diagrams that show the order of the bolt, washer and distance tube, (rather than relying on a parts catalogue) Thanks in anticipation, the soft top is beginning to look like quicker option! Quote Link to post Share on other sites
stuart Posted November 26, 2015 Report Share Posted November 26, 2015 The tubes should go up through but you will find the current offerings are a tad too big and require the screen frame hole to be opened up a smidge. Stuart. Quote Link to post Share on other sites
BarryG Posted November 26, 2015 Author Report Share Posted November 26, 2015 Thanks Stuart, the hammer and chisel beckons Quote Link to post Share on other sites
BarryG Posted November 26, 2015 Author Report Share Posted November 26, 2015 Well I did not see this one coming! I was able to carefully open the 'cage' that holds the captive nut, but then noticed that it was loose. It appears that the cage is mounted to a separate plate which is then pop riveted to the top. I have attached a few photos. I guess this is not standard and that a previous owner must have had problems in the past. What was very worrying though was that the front edge of the top was only fixed to the car by 4 rivets! Having said that it makes it much easier for me to repair as rather that using pop rivets to hold the plate down I will be able to plug weld, sorry don't have a spot welder. Onwards and upwards Quote Link to post Share on other sites
stuart Posted November 26, 2015 Report Share Posted November 26, 2015 My answer post #8 did say it was mounted on a separate plate and they often arent well fixed. Stuart. Quote Link to post Share on other sites
BarryG Posted November 26, 2015 Author Report Share Posted November 26, 2015 Sorry, Stuart missed that one, it was the rivets that took me by surprise. At least now the job is much easier to complete. Many thanks for all of your advice though. Quote Link to post Share on other sites

Recommended Posts
Join the conversation
You can post now and register later. If you have an account, sign in now to post with your account.