nibbo Posted August 22, 2012 Report Share Posted August 22, 2012 (edited) Hi all, Well I had a great year driving my TR6 since I purchased it from Classic Chrome in Richmond, he did say it would need some work done so bought it with a project in mind. Anyway it has just failed the MOT on holes in the chassis and nothing else so I have decided to spend the next year / 18 months on a total renovation, so will be looking for much advice from all you experts out there. On a good note my TR7 Drop Head which has been moth balled for two years passed its MOT with flying colours just a tweak of the co2 emmissions, so will still be able to enjoy any sunny weather we may have left this summer. I intend to keep a photo diary of my progess on the 6 so will try and keep a thread going hear. Cheers Nibbo ( Nigel ) Edited August 29, 2012 by nibbo Quote Link to post Share on other sites
simonjrwinter Posted August 22, 2012 Report Share Posted August 22, 2012 Sounds good Nigel. Will you do the whole "body off" restoration thingy? Simon Quote Link to post Share on other sites
nibbo Posted August 22, 2012 Author Report Share Posted August 22, 2012 Hi Simon, Yes I intend to to take the body off and rebuild the chassis, the body work is in suprisingly good condition with only surface rust on the under side, no holes in the floor panels, the wings front and rear are sound as are the sills. But once I start to dismantle it I may find things different, but it will get a complete respray in the origonal magenta Nigel Quote Link to post Share on other sites
elclem1 Posted August 28, 2012 Report Share Posted August 28, 2012 Hi Nigel, Sounds like a good basis for a project. I've been doing a basket case on and off for the last 7 months nut and bolt restoration of a 1970 cp model and i'll be keeping it in the original Damson colour. but by the sounds of it you have got a much better starting point than me. Good luck - let me know if you need to know anything help etc. Cheers Andy Quote Link to post Share on other sites
nibbo Posted August 28, 2012 Author Report Share Posted August 28, 2012 Hi Andy, I have know got to the point where i'm going to remove they windscreen, dash etc, How the devil do the dash and crash pads all come off ?? there must be an easy way. I expect I need to get the windscreen off first which I have loosened by undoing the two nuts but its proving to be a pig to shift, I may have to release the two brackets first ! Some advice on removal of the all the dash bits would be good. Nigel. PS I have already removed: bumpers, front and rear wings, doors, bonnet and boot, fuel tank, seats and all the carpets, tunnel cover, steering wheel and given all the chassis to body bolts a liberal coating of WD40 Quote Link to post Share on other sites
Grabea Posted August 28, 2012 Report Share Posted August 28, 2012 Hi Nigel, sounds like you've made a good start already, I'll be putting my 6 in for a MOT soon more to see what it throws up before I start the restoration, my chassis doesn't look too bad but I need to do the sills before I can risk the body off bit, so far I've grit blasted and painted the doors and been tidying up the electrics. Best of luck Graham Quote Link to post Share on other sites
TRBeaver Posted August 28, 2012 Report Share Posted August 28, 2012 Hi Nigel, Some photos would be nice to see. You've certainly taken this on the right way, making the most of the car for a while, getting to know it and then restoring it. Also a very nice colour. Looking forward to hearing more about your rebuild. Quote Link to post Share on other sites
nibbo Posted November 1, 2012 Author Report Share Posted November 1, 2012 Hi all, The tub is finally free of the chassis, just got to finish manufacturing the the door braces and fit them befor lifting the tub clear of the chassis. I am pleasantly suprised at the condition of the tub very little repair work to do before grit blast and repaint, I think the worst job is going to be removing the old under seal probably going to use a heat gun and scraper to remove the worst then maybe some thinners. I have taken a load of pics so when I work out how to I will post them on here. Cheers Nigel Quote Link to post Share on other sites
PILKIE Posted November 1, 2012 Report Share Posted November 1, 2012 I have taken a load of pics so when I work out how to I will post them on here. Cheers Nigel Good luck with the resto Nigel. Re posting pics,load them to a free photobucket account then all you have to do is copy and paste a link to a pic,slideshow or album! Quote Link to post Share on other sites
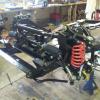
nibbo Posted November 26, 2012 Author Report Share Posted November 26, 2012 Hi Guys, The tub is finally off the chassis and sitting on a purpose made trolley, the engine is off the chassis and sitting on it's trolley. The chassis is up on axle stands, wheels are off i have removed the prop shaft and diff. Two question I'd like to ask: How much play should there be in the diff ? if you hold the the drive shaft flange and the prop shaft flange and move one how far if at all should it move ? The spring compressors I have are too big to clamp on to the springs can anyone tell which ones to purchase and from where ? The actual chassis top still has some original black paint on it and there are no holes anywhere ! can't believe my luck. Cheers Nigel Quote Link to post Share on other sites
had17462 Posted November 26, 2012 Report Share Posted November 26, 2012 Nigel just done the chassis on mine and used 10mm studding which worked a treat, u put the studding thought the springs with a bracket top and bottom and compress with nuts on the studding, Nick Quote Link to post Share on other sites
Grabea Posted November 26, 2012 Report Share Posted November 26, 2012 Happy to report MOT went well, one advisory on a ball joint boot which I'd missed, had a good poke about underneath while it was up in the air(my mans not one of these H&S pussies) and all looks good and solid, apart from the back panel which I'd already bought as I know it's shot so another free tax disc and we're good to go for some more fun in between the work I'm planning. Going to start from the back, fit new back panel new n/s wing then paint those bits so at least half the car will look decent! Got a couple more weeks away till I can make a start next month, sounds like you've got quite a head start on me there Nigel, keep it up. Regards Graham Quote Link to post Share on other sites
nibbo Posted December 17, 2012 Author Report Share Posted December 17, 2012 Hi All, Has anybody got any pictures of how to build a frame so that I can spin my tub round like a spit roast !! Any help would be apreciated. Many thanks in advance Nigel P.S. Happy Xmas and a prosperous new year to one and all Quote Link to post Share on other sites
had17462 Posted December 17, 2012 Report Share Posted December 17, 2012 Nigel I have one could use iam at bishops stortford ,will need I'd deposit etc, only joking Regards nick Quote Link to post Share on other sites
nibbo Posted December 31, 2012 Author Report Share Posted December 31, 2012 Hi all, I had a great Xmas family and friends round both days ate and drunk ( two 18 pint casks of wherry ) me out of house and home !!!!!!! Finally got the chassis completely bare and turned over on to stands with the bottom up so to speak ? After getting all the rubbish cleaned off all I need to replace are the two rear trailing arm out riggers and the lower breast plate, they all could have been repaired as the condition wasn't that bad, but I thought what the hell while I'm here replace them, every thing else is solid. And quess what to my suprise a P.O. has installed the 6 front strengthening plates which are still solid. The only other thing I have found is the cross member for the rear axle has had a crack each side welded in the past but the weld was not to brill, what I am thinking of doing is to grind the welds flat and install two plates each side to sandwich the cracks, do you experts out there think this repair will be ok ?? Have a happy, prosperous and healthy new year. Nigel Quote Link to post Share on other sites
Grabea Posted December 31, 2012 Report Share Posted December 31, 2012 If you're not happy with the standard of the previous welding grind it out and reweld it, as long as the surrounding metal is good there shouldn't be any need to reinforce it. If you do decide you'd like to plate over it remake the original weld first and then plate over. Now you have a bare chassis access should be a lot better than when it was done before, probably with the body in place. ATB Graham Quote Link to post Share on other sites
nibbo Posted January 4, 2013 Author Report Share Posted January 4, 2013 Just received my two new rear trailing arm out riggers and lower breast plate, well thats my starter for ten this weekend. Any tips out there for installing the out riggers before I go blindly fourth, I'm going to weld a support brace right accross the chassis before I start any cutting to keep every thing lined up, photo's would be brill. Nigel Quote Link to post Share on other sites
AlanT Posted January 4, 2013 Report Share Posted January 4, 2013 I would make a wooden pattern, MDF will do or even stiff card, so as to be sure that I re-instated the exact ANGLE of the out-riggers. This will also enable you check that both sides are exactly the same. When welding, you have enough to think about without making measurements and referring to pencil marks. Stuff can move as you heat it, clamps can shift, just keep popping the template in to check. You don't want to finish all the welding and find its wonky. Check the area where the two rear-sections that "tip upwards" join the breast-plate. There is a water trap here and it rusts from inside outwards. Or at least my 4A, which is more or less the same here, had done, Al. Quote Link to post Share on other sites
Grabea Posted January 4, 2013 Report Share Posted January 4, 2013 I think I would make up some kind of jig which picks up the trailing arm mounts to maintain their position when attaching the new parts, this is something I think I'm going to have to tackle at some time as one side has been patched up already by a PO. Regards Graham Quote Link to post Share on other sites

Recommended Posts
Join the conversation
You can post now and register later. If you have an account, sign in now to post with your account.