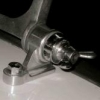
BlueTR3A-5EKT Posted August 9, 2020 Report Share Posted August 9, 2020 I have thought about this one for a while as I am less than happy with the spring clipped bright finish not round button supplied these days to retain the trim covering material on TR3A. So concluded a bit of stainless bar with a 15 degree lead angle, domed end and a countersunk hole would do. The thing is retained by a stainless screw into a 10-32 threaded Rawlnut. (Rawlnut is same as used on TR6 washer bottle bracket) Only modification is to the metal door top capping. In which the hole for the original spring clip button is opened out to 3/8"" from 1/4" Cheers Peter W Trial arrangement in photo. Quote Link to post Share on other sites
foster461 Posted August 9, 2020 Report Share Posted August 9, 2020 My door capping end caps fitted ok but I imagine they will rust over time. Your stainless solution looks good and would likely cover up more of the material poorly wrapped over the edge of the capping. Just need to be willing to drill that hole.. Stan Quote Link to post Share on other sites
Rodbr Posted August 9, 2020 Report Share Posted August 9, 2020 I thought about this issue and came up with the following moisten the area and use Gorilla glue. This stuff foams up and fills the void round the spring and if you tape it into position whilst it foams up and goes off. Rod Quote Link to post Share on other sites
Ralph Whitaker Posted August 10, 2020 Report Share Posted August 10, 2020 Just received my re-pro drivers door capping and the sponge rolls and end clips and was wondering about those end buttons whether they should be covered or left as they are, and whether they are supposed to be pressed into the bottle top fully or not. Ralph Quote Link to post Share on other sites
Rodbr Posted August 10, 2020 Report Share Posted August 10, 2020 (edited) Hi Ralph, On the outer end of the metal capping there should be a vertical "bottle top" with a hole in the centre., The cover either leather or vinyl should be wrapped round this and glued into it.Tip cut serations in the material to e fit into the edge, don't cover the whole BT. The cap has a floating spring which enters the hole in the "bottle top" as flush as possible. and this is the area that gives trouble. Too lose and it flops about. you can open the spring out a bit to get more spring effect. Do this before you cover the capping to be sure it will bite when it is then trimmed. It is worth taking time to make a hole in the sponge for the spring end to enter or you will fight with the sponge. The ponge must be as close as possible to the "bottle top" to prevent material sag over time. Too far out and it will bind with the "z" trim cap when the door closes. Wait till you try to do TR2 cappings as they have material end caps. Hope this helps Rod Edited August 10, 2020 by Rodbr Quote Link to post Share on other sites
Ralph Whitaker Posted August 11, 2020 Report Share Posted August 11, 2020 On 8/9/2020 at 6:35 PM, BlueTR3A-5EKT said: I have thought about this one for a while as I am less than happy with the spring clipped bright finish not round button supplied these days to retain the trim covering material on TR3A. So concluded a bit of stainless bar with a 15 degree lead angle, domed end and a countersunk hole would do. The thing is retained by a stainless screw into a 10-32 threaded Rawlnut. (Rawlnut is same as used on TR6 washer bottle bracket) Only modification is to the metal door top capping. In which the hole for the original spring clip button is opened out to 3/8"" from 1/4" Cheers Peter W Trial arrangement in photo. I like this idea, seems far more positive than a flimsy spring clip. I think I will adopt this idea right from the start, despite having just paid nearly £18 for 4 end buttons. At the stage I am at I could tack weld small nuts inside the bottle tops before covering the cappings and turn up some stainless buttons like Peter has done. Ralph. Quote Link to post Share on other sites

Recommended Posts
Join the conversation
You can post now and register later. If you have an account, sign in now to post with your account.