johnny250 Posted August 14, 2007 Report Share Posted August 14, 2007 Just about to fit new wiring harness after a RHD conversion to my TR250. Can anyone offer info or photos on how the (TR5) loom is run? thanks John Quote Link to post Share on other sites
stuart Posted August 14, 2007 Report Share Posted August 14, 2007 Just about to fit new wiring harness after a RHD conversion to my TR250. Can anyone offer info or photos on how the (TR5) loom is run? thanks John John the loom runs basically the same as it did before conversion with the exception of the part of the loom for the speedo/ rev counter /for the wiper and washer switches/ indicators / reversing lights and dipswitch that run along the firewall behind the heater to the right side of the dash. If you have overdrive fitted then you will need a new loom for the switch to run over there as well. If you lay the loom out on the bench first and identify the wires it soon becomes apparent where everything will lay in the car. Be careful how you get the dipswitch wires running as they can be a bit critical in length and you may end up with a bit of a washing line effect. You may need to order about a dozen or so capless bulbs as well as the last new loom I fitted had those type of bulb holders instead of original type. If you need any more info you can always ring the workshop on 01726 882680. Stuart. Quote Link to post Share on other sites
bonjovi Posted August 14, 2007 Report Share Posted August 14, 2007 place bulb holders behind clocks and there should be metal clips welded onto the car insulated with a sleeve which will lead the wrg harness to the LHS of the car (as you sit in it) over the heater and glove compartment and through the bulkhead rubber gromet above the pasengers feet. as tou pull it through the remaining wires go along side the sill behind the rear quarter panel trim and into the boot area where some cross over for the fuel sender unit and rhs rear lights and the rest to the lhs rear lights. i have pictures in my service books but can not load them on this computer. i found it fairly easy and the colours matched up which was a lot more than i expected have fun and good luck i put a wiring harness in my TR5 after converting a tr250 shell to rhd Quote Link to post Share on other sites
johnny250 Posted August 14, 2007 Author Report Share Posted August 14, 2007 Many thanks Gents, I was wondering if the main harness ran down the opposite (drivers) side, as the manual diagrams that I have, state that they are 'left hand steer shown, right hand steer similar' ?! whatever that means.... As a matter of interest I have the TR5 workshop manual supplement to the TR4 (1st edition) and that shows photos and diagrams underbonnet etc, of a LHD car...I thought they did not go to USA so European I suppose? I also received (in double quick time from the US Gulf) a redrawn wiring diagram from Ian Howard...thanks to all John Quote Link to post Share on other sites
stuart Posted August 15, 2007 Report Share Posted August 15, 2007 Many thanks Gents, I was wondering if the main harness ran down the opposite (drivers) side, as the manual diagrams that I have, state that they are 'left hand steer shown, right hand steer similar' ?! whatever that means.... As a matter of interest I have the TR5 workshop manual supplement to the TR4 (1st edition) and that shows photos and diagrams underbonnet etc, of a LHD car...I thought they did not go to USA so European I suppose? I also received (in double quick time from the US Gulf) a redrawn wiring diagram from Ian Howard...thanks to all John John the loom runs down the left hand side sill on both L&R steer cars. Stuart. Quote Link to post Share on other sites
johnny250 Posted August 24, 2007 Author Report Share Posted August 24, 2007 Thanks again.... I've fitted the loom OK (I think) using the rheostat dimmer wiring as the centre of the car.....this leaves a pair of spade connectors dangling in the LH passenger footwell, green + some colour I can't remember(it's dark out there!) ...(Its a RHD TR5 loom)...do they connect to something useful or should they go through the grommet into the engine bay? ALSO.....any photos please of the inner wings/bulkhead of a clean TR5 to show what bits hang on where?.....as i said it's been a long time and it was originally LHD. John Quote Link to post Share on other sites
cp25616 Posted August 24, 2007 Report Share Posted August 24, 2007 Thanks again.... I've fitted the loom OK (I think) using the rheostat dimmer wiring as the centre of the car.....this leaves a pair of spade connectors dangling in the LH passenger footwell, green + some colour I can't remember(it's dark out there!) ...(Its a RHD TR5 loom)...do they connect to something useful or should they go through the grommet into the engine bay? ALSO.....any photos please of the inner wings/bulkhead of a clean TR5 to show what bits hang on where?.....as i said it's been a long time and it was originally LHD. John Sounds like the two wires that connect up to the flasher unit thats located in the passenger footwell. Alan Quote Link to post Share on other sites
ianhoward Posted August 25, 2007 Report Share Posted August 25, 2007 John I will concur with Alan - it's for the flasher unit... Rgds Quote Link to post Share on other sites
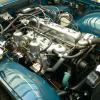
stuart Posted August 25, 2007 Report Share Posted August 25, 2007 (edited) I dont know if these pictures will help they are of a right hand drive 250. Stuart. Edited August 25, 2007 by stuart Quote Link to post Share on other sites
johnny250 Posted August 26, 2007 Author Report Share Posted August 26, 2007 Sounds like the two wires that connect up to the flasher unit thats located in the passenger footwell.Alan Thanks Alan,...If I had looked a bit further into my TR5 supplement manual I would have found a photo of the flasher installation. Thanks for the snaps Stuart ( a bit too small to see all the detail but I get the idea...it will probably become clear as I connect the various bits.) as you wrote earlier.....the dipswitch wiring seems to be too short (if the loom is fitted to the top clips behind the dash)...it looks as though they will have to be extended. anyone fitted a relay conversion for the lighting? worth doing yes/no? John Quote Link to post Share on other sites
jonlar Posted August 26, 2007 Report Share Posted August 26, 2007 anyone fitted a relay conversion for the lighting? worth doing yes/no? Are you intending to use higher than standard power bulbs? if you are, a definite yes, but worth doing anyway as it reduces to milliamps the current loading on the switch and the arcing that kills switches, same as with the fuel pump, it also ensures that you get full voltage to the bulbs rather than slightly reduced due to high resistance which will also cause the wiring heating up. Quote Link to post Share on other sites

Recommended Posts
Join the conversation
You can post now and register later. If you have an account, sign in now to post with your account.