1968 TR5 Restoration 5 – UPB 4F – Dave McDonald
Dec 2019 - March 2020
With the body shell and panels away at Wolverhampton for blasting I removed the engine/gearbox and differential from the chassis in late November. The engine will have a full rebuild. The gearbox/overdrive and diff were taken to Pete Cox for full rebuilds. The gearbox/overdrive had no obvious issues but it last received any attention 25 years ago, so while it’s out of the car it seems sensible to give it a complete overhaul. The diff had a fair amount of lash which he will rectify in the rebuild.

Engine in its’ transport frame
The shell blasting took 3 ½ weeks against the original 2 ½ weeks. Finished in grey etch primer to temporarily avoid flash rusting, I collected it from Soda Blasting Ltd on Wed 4th Dec 2019.

Blasted and primed shell and panels being collected
Once again, the project went on hold when I took up the opportunity to carry out another spell of freelance construction management work December 2019 to end of January 2020. Well the income all goes towards assisting the restoration fund.
February 2020. Well the blasting didn’t find any more holes, which was good news, though the ones that I knew about are all slightly larger now that the rust around them has been removed. At least the condition of the shell and panels is now clear.
As expected from earlier inspection, the bottoms of both doors have suffered from corrosion. This has ironically been caused by weld repairs undertaken during the previous restoration by Jowett Man in 1993/94 when he failed to provide the required drain holes in the door bottoms. This prevented any water escaping and caused water, penetrating past the door window seals, to stand in the door casings.

Rotted door bottom
Removal of all the fittings and trim and then blasting has exposed a number of weld repairs from the previous restoration by Jowett Man in Bradford 25 years ago. Some are not too pretty but, other than the above mentioned door problems, appear to be secure. They only need a bit of localised dressing of the welds to make them a bit more acceptable. These are mainly at the usual places that any of the wind up window TRs suffer from:-
1.Rear deck ends and inner wheel arches
2.Front wheel arch brace to bulkhead
3.The fresh air plenum under the scuttle behind the front bulkhead
4.Joint between floors and rear inner wheel arches
Once blasted and with all remnants of underseal removed, there is evidence that the inner cills were changed by Jowett Man in 1993/94and that while doing that the floor down stand, which forms the back of the cill box, has also been cut away and replaced on both sides. That, together with the state of the outer cills and the general floor perforations made the integrity of the shell a bit questionable. After discussions with the restoration man who will do all the welding repairs made me decide to replace the floors and inner and outer cills on both sides.

Perforated Floor at back of passenger side

Perforated floor under drivers feet
All 4 wings are corroded at the bottom where they cover the cills. This is such a common problem that ready made repair panels are available from the usual suppliers which will be used to replace these sections.
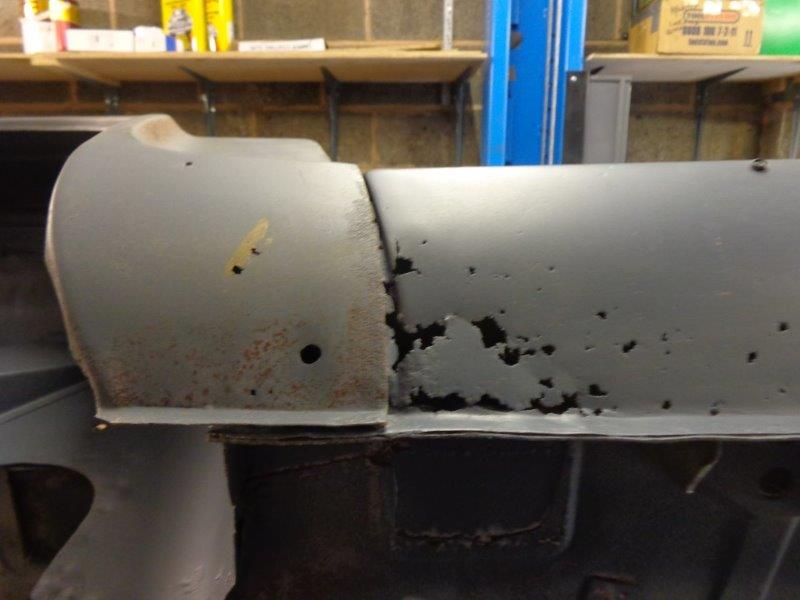
Rotten cill which extended behind back wing
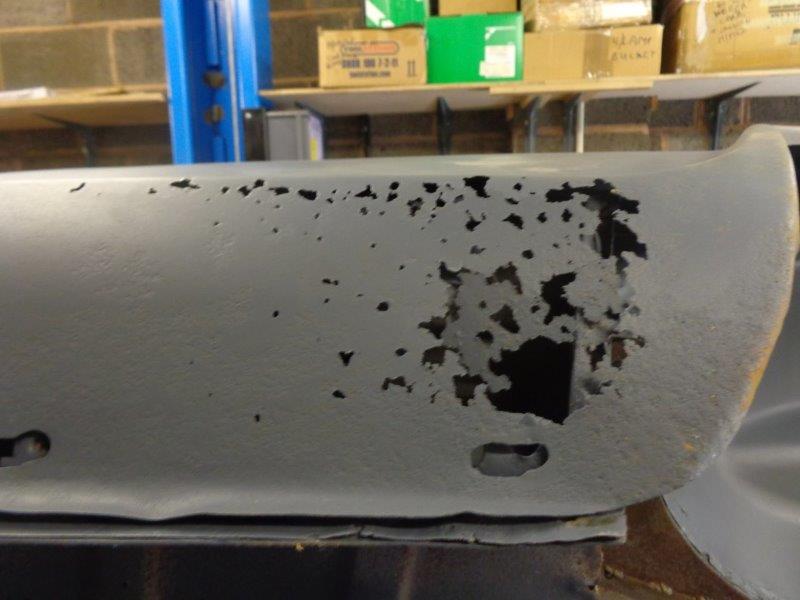
Rotten front wing and cill behind it
Rotisserie
The next task before it goes for the body repairs is to make a rotisserie to allow the shell to be turned over easily during the weld repairs and painting processes.
As with I’m sure many of these homemade rotisseries the central rotating tube is a 50mm diameter scaffold tube. I was disappointed to find that I couldn’t fit one complete tube all the way through the car. With minimum clearance to the diff bump in the rear and the top of the transmission tunnel through the front bulkhead, I found the tube lined up exactly with the dummy “starter handle” hole through the front valance. I considered welding a tight fit smaller diameter bar into the scaffold tube to pass through this hole to form the front support. However, I thought that any flexing in the assembly in use might distort the valance so discarded that idea. I ended up instead with two separate tube support assemblies, one rear and one front with the front scaffold tube just above the “starter handle” hole. A straight alignment through the shell meant that the back end of the front assembly tube was just above the top of the transmission tunnel in the bulkhead.
A local steel fabricator folded 3mm thick steel plate to my requirements to form the points of attachment to the car shell.
The two support tripods were fabricated with legs from 40 mm RHS square tubes with a top tube that would take the scaffold tube internally and 25 x 25mm RSA braces at the bottoms. The tripods and scaffold tubes were also provided with “pipe flanges” made by the local fabricator to weld to the tubes to form the means of securing the shell in any one of eight positions at 45 degree intervals, with M12 bolts.
Front Assembly
The tube was welded to a plate bolted to the bulkhead using available fixings and bolt holes, etc and a front plate bolted to two 25 x 25mm RSAs fixed between the bonnet hinge fixings in the inner wings and across between the bottom inner wheel arch fixings. Two bolted diagonal bracings completed it. Once unbolted, the welded tube and plates will pass through the front radiator void in the valance to remove it from the shell. See photo below. This assembly should work on both a TR4/4A and a TR6 as well.4.
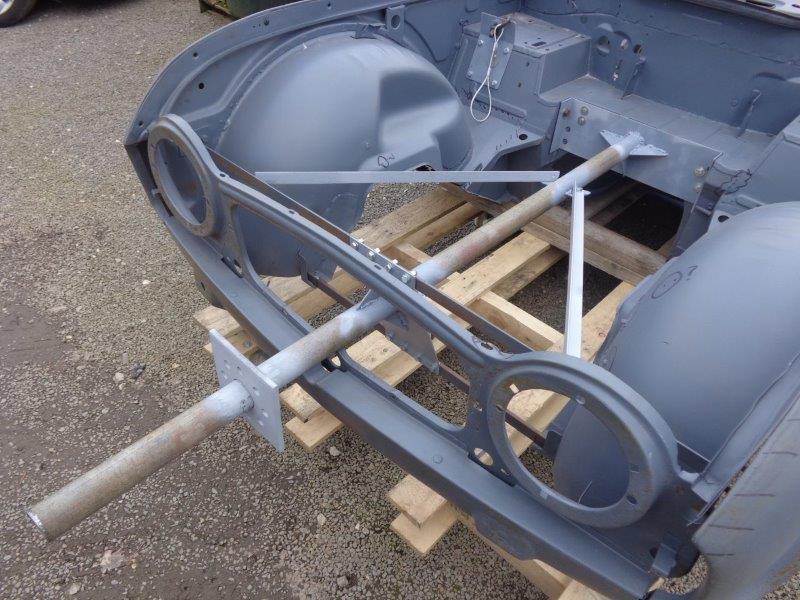
Front Rotisserie assembly
Rear Assembly
The scaffold tube has two plates welded to it. The front plate bolts to a 12mm plywood diaphragm fixed by bolts in the six fuel tank captive nuts. The rear plate fixes to a 50 x 50 RSA across the back of the car. This RSA is fixed with welded plates at the ends bolted into the rear light recesses. Again two bolted diagonal braces complete the assembly. See photo below.
Unfortunately this assembly in its’ current guise won’t work on a TR6 as it would conflict with the rear valance.
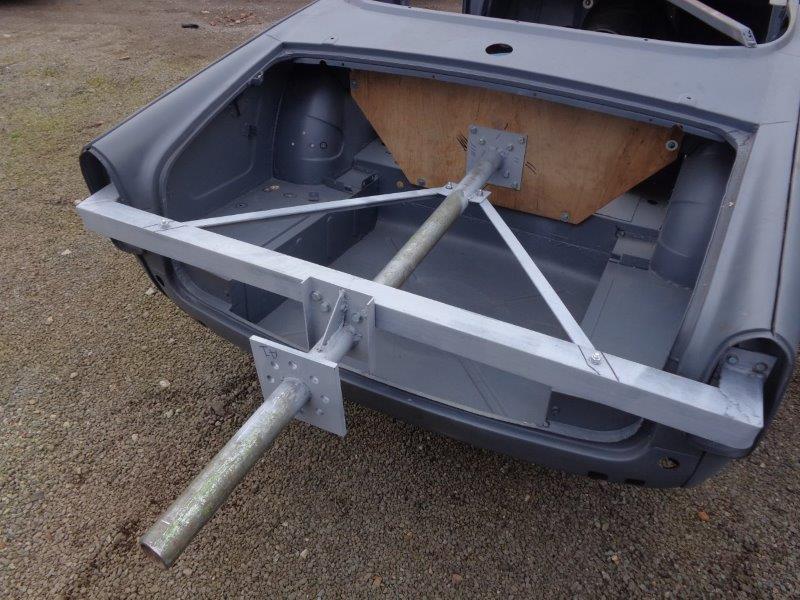
Rear Rotisserie Assembly
To say this exercise tested my limited welding skills would be an understatement, but I persevered and while the welds may not be text book in appearance I’m satisfied that they’re secure enough.
When it finally came to testing it all, the car turned easily, being reasonably well balanced and didn’t bind at all, confirming that I’d got the tube alignment back and front spot on. The end support tripods are sufficiently robust and didn’t show any signs of instability. See photos below.

Shell level on Rotisserie
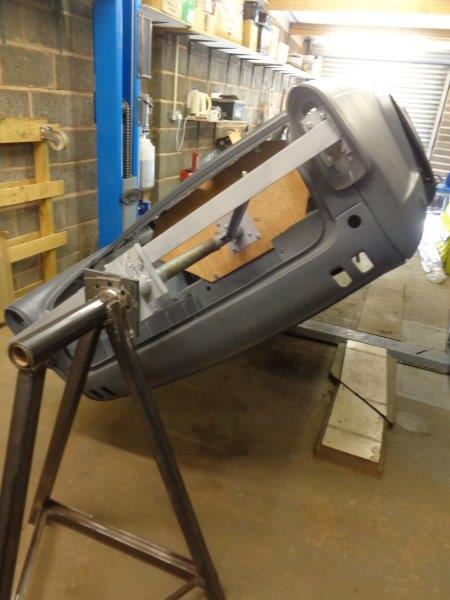
Shell at 45 degrees on Rotisserie

Shell at 45 degrees on Rotisserie
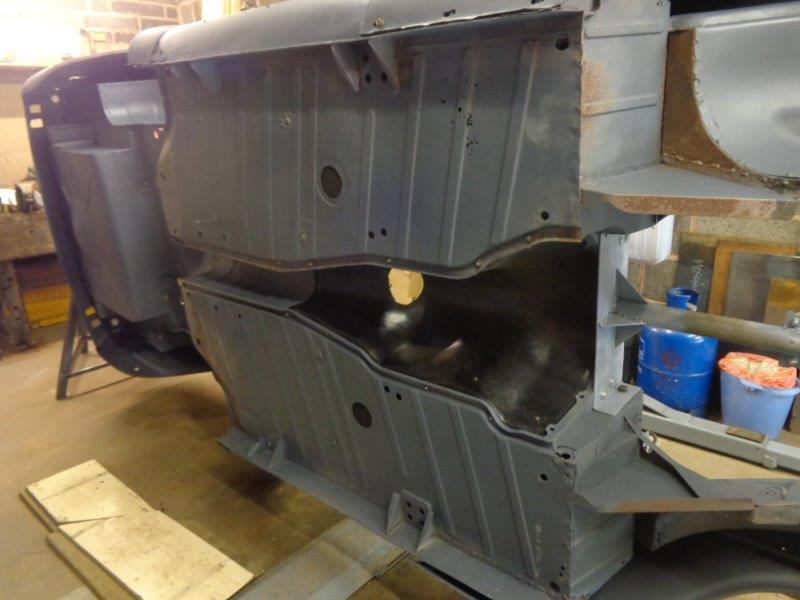
Shell at 90 degrees on Rotisserie
It’s now mid March 2020 and I’m waiting for the welder to fit it into his schedule. Could be into April before it goes but plenty of other things to get on with.
The Government imposed Coronavirus lockdown then put a stop to progress from 23rd March. I work on the car in a rented unit 7 miles from home so I can’t get there and the welder is restricted similarly on what he can do at his premises.
Total standstill to proceedings again, very frustrating.
DMcD
24.3.20.