


John McCormack
-
Content Count
1,364 -
Joined
-
Last visited
Content Type
Profiles
Forums
Calendar
Posts posted by John McCormack
-
-
Agree, let it rest for awhile. The Prince of Darkness sometimes lets you off with a scare.
If it persists check all the battery, generator, earth and regulator wires are clean and tight. Do this anyway.
Then put a multimeter on your battery with the engine at 2000 revs, it should show above 14.5-15 volts. If it reads 12-12.5 volts it isn't charging at all and if above 12.5 and less than 14.5 it isn't charging properly.
If it isn't charging or not properly, put one lead of the multimeter lead to earth somewhere on the engine (e.g. head stud or bellhousing bolt) and the other on the big cable from the generator. If it is reading 14.5 or higher the generator is charging so it is probably the regulator.
-
John take a look at My Google photo album. I used a skinner set which i was happy with But needed Some detailing to have it original
Thanks Edwin. Beautiful job.
What detailing did you need to do to the Skinner kit?
-
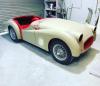
Now that the body and chassis are together (photo attached) I have dug out the wiring loom and the upholstery.
The wiring loom is an original factory item purchased in the late 60s or early 70s and is in perfect condition and complete with all fittings. The insulation is like new and the original colours look great. Woohoo.
The upholstery is the original cardboard backing, mostly original leather, vinyl and even the original brown carpet. It will need complete replacement which I was going to source from Skinners.
The car was last registered in Apr 65 and driven in Dec 66 and only one or two things had gone missing while it was in storage. I have obtained them from another long door that was to be scrapped (now being restored).
This dashboard is the original from the car, although the brown vinyl was painted black at some stage. The brown on the back and behind the instrument holes is untouched and provides an excellent colour match. The dash even has its clips and fittings as per original although an extra switch or two has been added to what was there.
I have always believed that the centre panel on sidescreen TRs was painted black in a crinkle finish.
The centre panel on this dash is finished in the same brown vinyl material as the rest of the dash. There is no black paint under the vinyl on the centre panel, it appears it has never been painted.
My first question on the interior restoration, was the centre panel finished in vinyl the same as the rest of the dash on long door TR2s, or some of them?
-
Agreed, Dirk -- I run a 4 lb/in² cap too. What's your logic in running a 7 lb/in² cap in an otherwise very, very original restoration, John?
I am an originality freak and will source a 4lb cap for display.
For driving around a 4lb cap is very touch and go in our climate. Even in early autumn in my garage with roller doors at each end open it was probably 30+degC on the days I was running the engine. Today's forecast is for 28+.
I have used a 7lb cap in my driver TR2 for 30 or more years. It provides a measure of safety and 7lb caps are readily available here and 4lb ones aren't.
-
Thanks again.
It has a new stock radiator, no crank hole. The radiator is brand new and flowing well.
The timing is at 9 deg BTDC.
Mixtures are bit rich.
Water pump is working normally with about 40 thou space to back of housing with gasket and sealant.
I have used two thermostats. The first one was a Brydon with a plug in the bypass hose with a small hole to allow a little flow with the thermostat closed. This thermostat started opening at 165 deg F, fully open at 175 . The 2nd skirted one starts opening at 155 and fully open at 165 so I fitted it.
There is no body so no funneling of air through the radiator. While you can feel air is going through the radiator most of the air is just being thrashed around behind the radiatior.
The car is being restored to original specs so the fitting of a 6 blade fan or an electric fan, both of which I have, is not an option at this time.
It takes about 15 minutes running at idle with periods at higher revs before it overheats.
I don't now believe it is a problem and only driving the car will tell.
The chassis went back to the body shop yesterday so hopefully in a year or so I will have it on the road.
It takes about 15 minutes running at idle with periods at higher revs before it overheats.
I don't now believe it is a problem and only driving the car will tell.
-
Thank you all for the advice.
The cap is a 7lb cap, same as on my other TR2 for the last 40 years, so it shouldn't be a problem.
The engine is in the chassis with no body so no heater or stray hoses. After running the engine I top up the radiator. So no air locks.
TR2s with original fans do overheat in traffic (It does take 10-15 minutes to get this one to boiling point) and without the body the the air is not being sucked through the radiator so much as just being thrashed around by the fan. Like 3As without the fibreboard funnels into the radiator.
Following the advice on here and a bit more thinking it through I don't think it is an issue. Once I get the body on and can drive it I'll see how it goes.
-
As Bob says the car isn't made for the engine running without forward air flow into and through the rad. Triumph fitted radiator shrouds to channel air through the rad, if the car doesn't have these 2 bob bits of cardboard in front of the rad to either side and over the top of the rad the engine will overheat.
Luckily you're in a country noted for it's fresh and cool climate...no wait !
I'm only kidding you, you've said the engines tight and of course this plus the points listed above is why the engines overheating, get the biggest household fan you've got plonk it in front of the rad and block off the top and sides of the rad in front to make sure the air goes through it and try it again, it should be markedly better.
PS: I'm not normally keen on running freshly rebuilt engines at tickover or low revs, it doesn't help the freshly renewed components to bed in and puts pressure on surfaces where oil supply is important for too long periods, so don't go over the top here.
Mick Richards
Thanks Mick. I am also wary of running the engine like this so have varied the revs with occasional blips. It has been run enough now to identify any leaks or major problems so it won't be run again until the car can be driven..Hopefully that will be towards the end of this year.
-
Running idle theres no air flow to cool the radiator, perhaps thats an extra issue. Do you use a correct skirted thermostat , so the bypass is closed after reaching temperature.
Yes, it is a skirted thermostat. It had a non skirted one in it so I tested a skirted one and fitted it. I then found the bypass hose has an insert with a small hole so the non skirted one was ok anyway.
Thermostat, radiator and engine all appear to be right. Timing and mixture aren't out enough to make a difference.
It is only the pump that I think could be a problem, if there is any problem. I don't know how much clearance is ok between the impeller and the back of the casing?
-
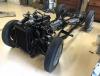
Here it is, the oil and temperature gauges have been removed for transporting to the body shop.
-
A long post I'm sorry, a bit of explaining to do. I am doing a complete ground up rebuild on a long door TR2 to its original specs, albeit with a better finish than the factory achieved.
The previous owner bought the car in 1966, he was the 2nd owner, and started a rebuild but got sidetracked. The restoration was recommenced about 8 years ago and then he got ill and finally realised the car needed to go to someone else to rebuild it. The car has 70,000 miles from new. He had done most of the body rust, panel alignment and many other jobs. He had the engine fully rebuilt by a professional shop. I have spoken to the rebuilder a few times and confirmed the quality of the engine work. The engine is tight with extremely good compression.. Oil pressure is 70-80 psi.
The chassis is now complete and we have been running the engine in the chassis to test for leaks and any major issues prior to the body going back on.
Last week the engine ran hot and after about 10-15 minutes I shut it down. It boiled post shutdown.
I have an original 4 blade fan on the engine and had a normal house fan assisting. It wasn't an overly hot day and it was in the garage with roller doors open at each end for air flow through.
I wasn't sure why it had got hot. The engine was acid dipped for a couple of weeks in the rebuild and the engine inside the water pump is clean as a whistle. It has a new radiator without a crank hole and the thermostat (an original sleeve type) has been tested, opens at 145-150 and fully open about 170-175. The timing is 8 degrees advanced at idle, mixtures are fairly rich.
I suspected the water pump which is the original but doesn't leak and no bearing noise. The impeller clearance on the back of the housing was roughly between 20-35 thou, with out a gasket.
I measured the gasket the pevious owner had put on it at 35 thou thick. In addition what I thought was a thin coat of paint on the pump housing mating surface turned out to be layers of paint and very thick.
I cleaned the surfaces back to metal and installed the pump with a 0.4mm (12 thou) gasket.
I ran it yesterday and it didn't get as hot as quickly but it still ran hot, I shut it down when it got to 200 degrees measured by an infra red sensor and the temperature gauge.
Some knowledgeable people say it should not run hot like that.
Other equally expert enthusiasts say it is normal for a new tight engine run on a bench or in a chassis, with no body on to funnel the air and no solid air flow through the radiator, will overheat. Their advice is get the car running and take it for a drive. If it overheats then do something about it.
If it it shouldn't overheat why is it?
What do people think?
-
I fitted one to my TR2 which is my daily driver. I did it with a steering box rebuild and Revington phosphor bronze steering rod bushes to replace the silentbloc ones.
My steering is fantastic and how they were intended I expect.
I agree it would be pointless to fit one to a worn out steering system, but replacing the original steering with r&p with a bigger turning circle, possible bump steer, the loss of your original cockpit and a higher cost doesn't suit many TR owners.
-
I would love a copy of the TR2 pamphlet if that is at all possible. I doubt there would be one in Australia.
-
Charles Runyan reported in his email to customers on 14 March that he's going to re-make the long-door TR2 seals.
Also tonight, I was working on the cross-section for the rubber seal that goes onto the sills on long-door TR2s. The seals on the doors of long-door models left something to be desired, but I am going to have the sill seal manufactured now. The sample came from Bill Lynn of VTR a long time ago. I had lost it for a while, but it turned up again, and I am going to act on it. The little piece of original seal was compressed flat, but I revived it somewhat in warm soapy water. Originally, it was one of those sponge seals inside a harder rubber shell. The actual method of making these seems to be obsolete, but we are able to make a modern seal that fills the bill. Actually making the seal will take a few months, but I am getting started now.
I will take a set when they are available.
-
My short door TR2 had the same small heater when I bought the car 42 years ago. It died and I replaced it with the bigger TR3A one. The bigger one is a big improvement.
-
Very few sidescreen TRs are still stock standard or the same; rebuilt engines with different pistons, extractors, compression changes, cylinder head upgrades, cams, carbies, electronic ignition and modern fuels all affect the optimal timing for each car. None are the same.
I set the timing at about 10 deg advance at 800rpm idle. I then advance it bit by bit on the road until it just pings under load. Back it off a degree or two at a time until it doesn't ping. I expect you will get much more power and a smoother idle.
-
Front engine seal as they do wear a groove in the pulley extension. Do it now in an hour or two, with a speedi sleeve on the pulley extension.
Revington steering box top as suggested above.
If you have the time fit Revington phosphor bronze bushes to replace the silentbloc bushes. These two Revington mods don't detract from the car's original style and vastly improve the steering. I did it about 4 years ago and it is truly transformational.
-
I have bought two lengths of fuel pipe and I still have a bodge up in the pump to carbs line. There are a number of tight bends.
I have an 8.00 mm pipe bender and can not make a smooth bend. If I had a 5/16" wheel would it be easier or is it my skill shortage?
I would like to borrow a proper tool if any one in Sussex area has one to loan.
Thanks
Richard
I bought a multi pipe bender with 1/4, 5/16 and 3/8 wheels. Works a treat, cost $25 Australian, about 15 pds. I can now do the brake and fuel lines.
-
Yes 5/16" from tank to tap.
On a TR2/3 with H type carbs it was 5/16 from tap to carbs. - so correct for your purposes.
The later windy-up window cars used 1/4"
I can send you the length information if required as I used to make these pipes.
Peter W
The lengths would be great thanks Peter.
-
The fuel pipes between the tank and pump on both my TR2s is 5/16". The pipe from the pump to the carbies on my driving car is also 5/16". The pipe between the pump and carbies on the restoration car is 1/4".
What diameter should the pipe from the pump be?
-
The holes on the push rods of my very early 56 TR3 had unthreaded holes of different diameters. I was unable to find any clevis pins from the usual sources to fit properly. I ended up buying some SS clevis pins and had them machined at a local shop to the correct stepped diameters. You are not the first to run into this issue. I was involved in a discussion on another forum about this very issue. Hope this Google picture link works.
https://photos.app.goo.gl/OjNhSJ0u1Tnw5UMy2
Cheers, Mike
Thanks Mike. I noted above the original TR2 parts manual does not show a screw in clevis pin. I subsequently spoke with Viv Paine who confirms that TR2s, probably all Lockheed braked cars, did not have screw in clevis pins. The book shows a straight 5'16" pin but my other TR2, your car and this one have forks with different sized holes for a stepped clevis pin.
As with many details on these cars there were different bits fitted to cars, I suppose depending on what happened to be in stock.
I may have to take your path and get some 3/8" clevis pins turned down.
-
Thank you Stuart, that is the sort of photo I am after.
They look to me to be screw in clevis pins as there isn't a split pin on the inner end of either. I will need to get some of these clevis pins and get a thread in the large hole of my pushrods forks.
I have just had a check done by a car restoration shop on the original TR2 Parts Book. It lists a straight 5/16" clevis pin listed as standard. There is not an option for a threaded clevis pin.
The restorer who did the check tells me that other cars, maybe including the MGA, had the same Lockheed master cylinder and may have had screw in clevis pins.
I am back to using the standard pushrod, fork and 5/16" clevis pin.
-
Hi Dirk,
I understand that Baines in Tunbridge UK made the original and can still make them. But the quantity may be an issue.
I may have this wrong but the earliest beading was cotton covered.
Then it went to colour coordinated rubber/plastic.
And now it is Stainless steel.
ADDRESSCOH Baines Ltd
Unit 3
Buckingham House
Longfield Road
Tunbridge Wells
Kent
TN2 3EY
United Kingdom
TELEPHONEPhone: 01892 543311
Roger
Does anybody know when the beading changed. My car is TS3732O and I would like to have the correct beading if I can do it.
-
Thank you Stuart, that is the sort of photo I am after.
They look to me to be screw in clevis pins as there isn't a split pin on the inner end of either. I will need to get some of these clevis pins and get a thread in the large hole of my pushrods forks.
-
see above - Thread 10
Thank you. I have never seen those clevis pins on a TR2 master cylinder in 42 years of TR2 ownership and 40 years in the TR Register Australia. They are on the clutch slave cylinder shaft on all TRs I have seen so it doesn't seem right I can't find aren't any images of them on the TR2 or early TR3 master cylinder.
They may be the original fit but if someone has a photo of them on an original car it would be great confirmation.
The car I am building is intended to be a Concours standard car so I need to get these details right, as best I can.


Ammeter (daft question?)
in TR2/3/3A/3B Forum
Posted
It is probably just parallax error. The needle is a small distance from the face so it will 'move' depending on the angle you are looking from. I always get a bit of a surprise looking at the gauges from the passenger seat as they all read differently than from the drivers seat.