

BlueTR3A-5EKT
-
Content Count
9,844 -
Joined
-
Last visited
Content Type
Profiles
Forums
Calendar
Posts posted by BlueTR3A-5EKT
-
-
I like the idea of magnetically fixed sound proofing. There is always a question though.
How good is the adhesive between the magnetic foil and the damping material?
-
29 minutes ago, james christie said:
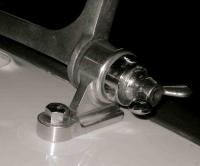
I think it is a rather rare 3A frame. They have a specific tenax fastner. I had one on my 3A fifty years ago but swapped it for a chrome one for an unremembered reason.
I believe the tenax fastener is no longer available
james
Correct on the pedigree James.
The Roadster Factory remade that peg that screws through fron the inside of the car. The whole arrangement I think is a more sturdy way of doing two tasks. Clamping the screen in the frame by squeezing the frame together and stopping the peg being pulled out by the soft top.
-
4 hours ago, Rod1883 said:
Thanks for the info Peter, glad I asked about the length. Did you say you had a nicely shortened spare........?
Rod
4 hours ago, Rod1883 said:Thanks for the info Peter, glad I asked about the length. Did you say you had a nicely shortened spare........?
Rod
Yes Rod
PM me your postal address and I will get it in the post to you this week.
-
Point 1. When you changed the oil filter did you part fill the filter bowl with oil, or as full as you dare so it did not dribble down your hands as you refitted the bowl.? You have rechecked the oil level and the 1/2 litre drop is probably the content of the oil filter bowl.
Point 2. Did you crank it with the plugs out and the coil wire disconnected to see the oil pressure rise? I do that sitting in the car. When the oil pressure comes up go and look under the car for obvious oil leaks and feel for excessive oil around the oil filter, before fitting plugs, reconnecting coil and pressing the go button.
As Bob remarks. Get the copper washer with the bigger hole in it, the one that is sloppy on the stud, next to the filter head, then the banjo, finally the washer with the hole that fits the stud plus retaining cap nut.
-
15 hours ago, Rod1883 said:
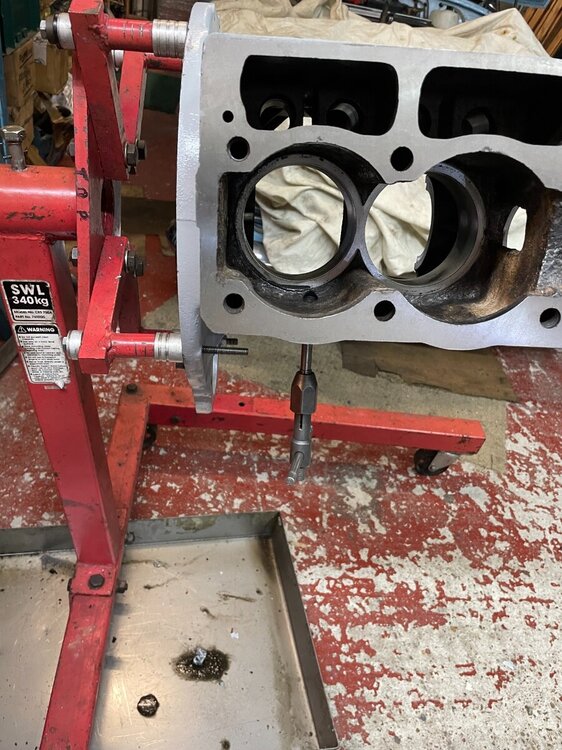
Peter - how long is/are the 1/2"(?) UNF set screws that you used/sourced? I understand that there isn't very much depth beyond the wall of the block before the cylinder liner is impacted.
The A2 stainless screws I sourced are 1/2" unf 3/4" long thread - and they are too long. I did think I would put a pile of washers under the screw head but decided that was a bodge too far, as in the future if I forgot to refit the washers I'd be in the effluent.
I have reduced them on the lathe to 7/16" thread length. Without the sealing washer they screw in by finger force to full depth in my cylinder block, which has had the thread cleaned up. I use a copper crush washer under the head.
What I bought https://www.kayfast.co.uk/view-product/UNF-Hexagon-Set-Screws-A2-Stainless-Steel
-
11 hours ago, Kenrow said:
Now there is a wealth of information. Thanks for posting.
-
1 hour ago, michaelfinnis said:
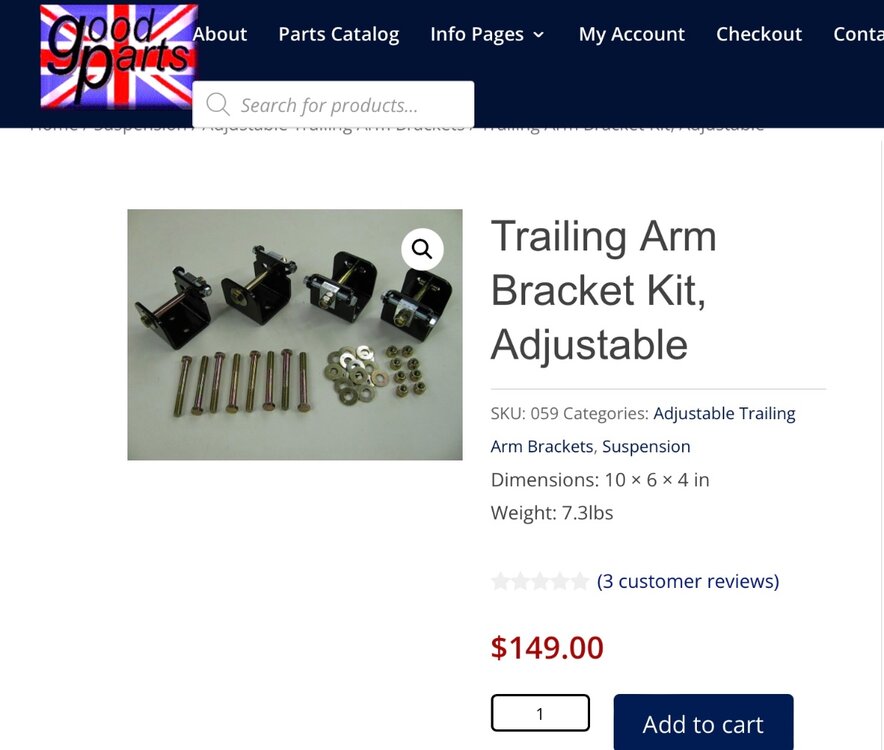
The Bentley reprint of the BL workshop manual printed 1972 also quotes 1 deg. negative, +/- 1/2 deg. which seems to be the consensus. However, there is no procedure in the manual for adjusting the camber. I realise camber can be altered by turning the trailing arm brackets upside down, or by swapping the different bracket types around, but that is not described in the Triumph manual. So was camber considered non-adjustable?
The different brackets are specific to model year according to the parts list.That raises the question of whether camber is the same for early and late cars. Roger Williams 'How to restore Triumph TR5/350 and TR6' book states that there is a difference in the early and late type trailing arms that accounts for the different brackets. He says that if changing from an early trailing arm to a later one then the brackets also need to be changed to the later arrangement (from 1 notch inner/2 notch outer to 3 notch inner to 1 notch outer).
Yet when I did just that and replaced an early trailing arm with a later type recently using the later bracket arrangement threw the camber way out. Reverting the brackets to original restored the camber to same as it was with the original camber, within the above specs. In which case the later cars with different brackets would presumably have a different camber angle?
All of which is a bit contradictory. Maybe someone out there can enlighten us?
Mike.
The brackets changed with spring type and other specification changes during TR6. The final spring offered was 216275. (350lb). And according to Triumph, should be used with 3 notch inner bracket and one notch outer.
-
1 hour ago, Rod1883 said:
Peter - how long is/are the 1/2"(?) UNF set screws that you used/sourced? I understand that there isn't very much depth beyond the wall of the block before the cylinder liner is impacted.
Will measure the depth tomorrow
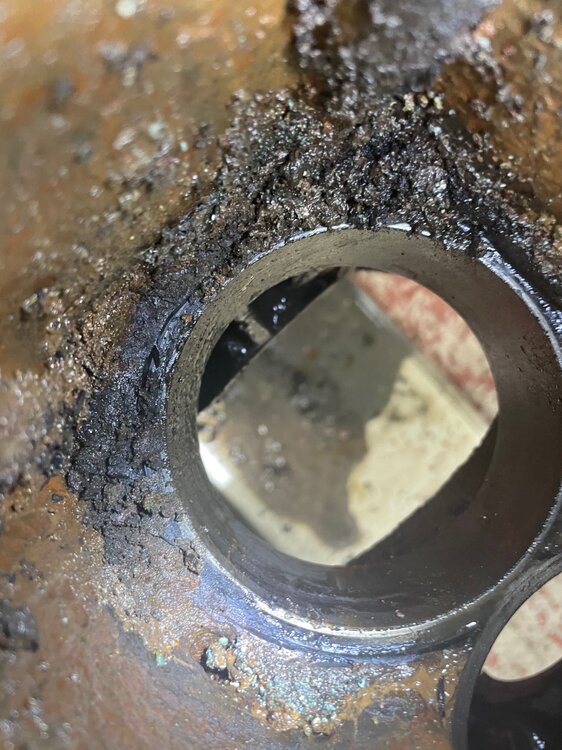
Here is the water drain hole thread being cleared.

What it was like before cleaning. The drain hole is visible...just
-
If the glass is rattling I’d think the chrome bezel is less than tight on the glass. It may be corroded to the gauge case but a spot of easing oil will probably remedy that and allow the bezel to twist.
-
This kit will take a lot of the hassle out of doing the rear suspension angles. As stated above swapping springs away from original standard is an immediate cause of camber change. As is worn springs. Swap the left rear to the right rear and see if the angle difference moves with it.
https://www.goodparts.com/product/trailing-arm-bracket-kit-adjustable/
-
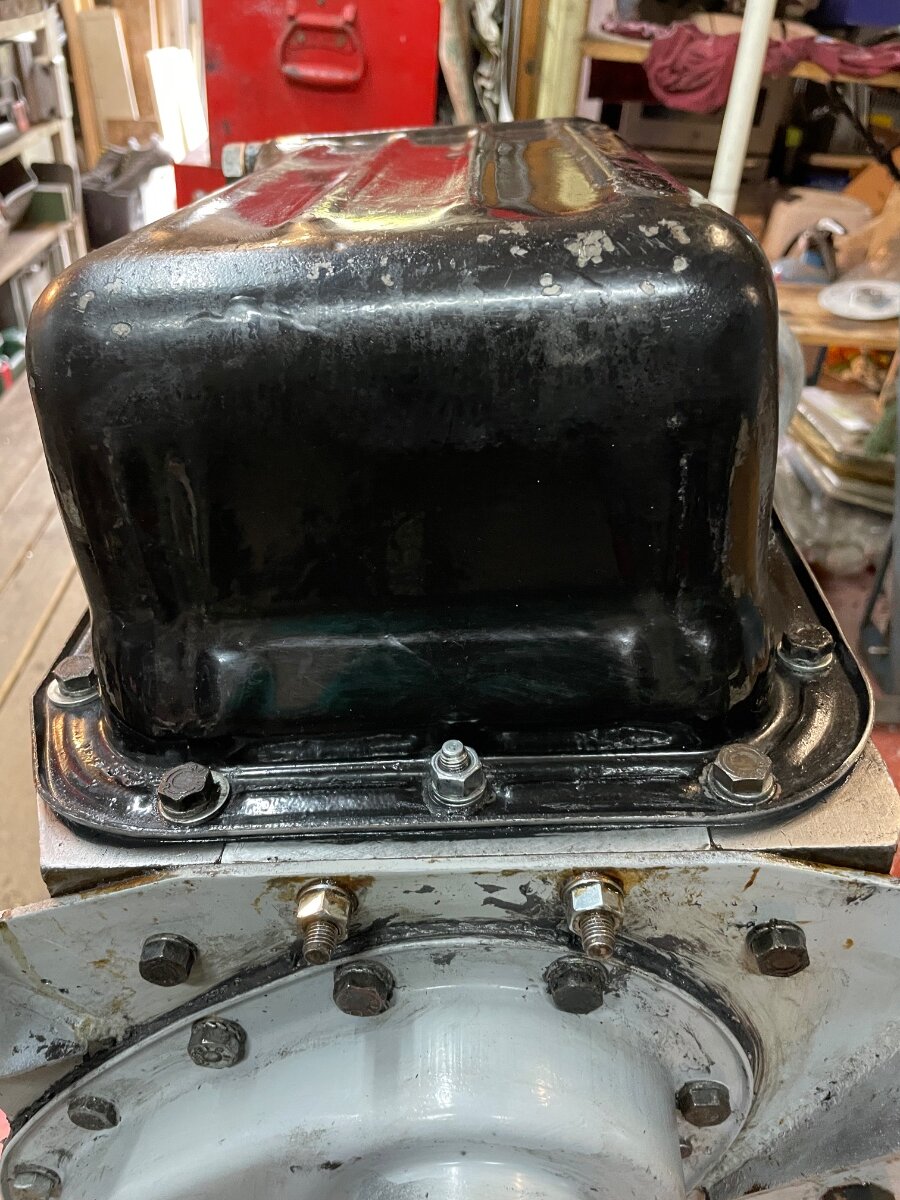
Phil, when you come to refit the sump screws do not forget that the one at the front in the middle screws into the aluminium front main bearing sealer block.
The trick is the retap the hole as deep as you can with 5/16 unc as original and fit a stud, that screws to full thread depth. Secure with Loctite. Makes for a good alignment of the sump when you come to fit it too. Secure the sump to the stud with washers and appropriate plain nut. Loosely fitting another stud at the rear corner will help with alignment also If under the car, once the sump and gasket are located on the studs you can’t hold the sump loosely up in place with a jack, fit a nut on each stud then fiddle to your hearts content getting all the other screws in. Remove the rear positional stud at the end and fit regular screw and washers.
Here’s one I did earlier.

-
Remove the gauge
Undo the TWO thumb nuts that hold the support/lock bar into place. Seen in your second photo is one of the nuts with an earth wire attached.
You will need to refit an earth wire or the lights in the gauge do not work
undo the drive cable that is attached at the gauge.
pull the gauge towards you , prise out the illumination wire/bulb holders.
Now you can try to rotate the bezel to get the offending bit of rubber out or reseated or renewed.
Damn fiddly is the best description.
-
Glad to read of a successful outcome.
-
Thanks for the update
-
25 minutes ago, RogerH said:
Hi Phil,
it looks like the PO has had a great time inventing.
The clutch pipe should be a braided flexible pipe item #23 HERE
Was the PO particularly small. Could he have walked through the hole to do maintenance
 perhaps not.
There will be a blind grommet somewhere to fit that.
Roger
I think ….The original clutch flex for TR4A was a bit of plastic tube with a steel fitting at each end, like the really moderns have (5~250~6)
-
6 minutes ago, phil Dean said:
I was thinking more a bung than a grommet the bell housing is reasonably thick there I dont think a grommet would stay in place. so something like a rubber foot on a stool, but were it sits inside the tube not on the outside.
Phil.
There is a rubber plug to go in the hole of a brake drum that the adjustment of the brakes is done through using a screwdriver. Part no. 2A7228 It might fit.
https://www.moss-europe.co.uk/plug-brake-drum-round-rubber-2a7228.html?assoc=506488

-
I’ve seen that bell housing bore hole before on a Stag. It was for a grease gun end to go through to grease the clutch release bearing carrier.
-
4 hours ago, Motorsport Mickey said:
I hate having a potential large leak or breakdown saved up for away from home.
So on the basis a "buggers job" is better done in your drive, drop the fluid and warm the tap up with a blow torch (don't melt) and quickly try to TIGHTEN the tap body up or get some movement by using two large spanners at 180 deg to each other pulling and pushing together to keep the force equal on the large nut sized body of the tap. If it moves even a few mm it will probably break the seal (if it's the BSP tap body it should be, there's only 1 thread and a half on the body that seals it, so should come out). If it comes out cleanly you may be able to strip it down and after cleaning lap the valve in as suggested by Ian (above) and reuse it. If not replace with a bolt or a new tap, but I'd still lap the tap in first before fitting.
Mick Richards
The cylinder block thread for the water drain is unf. I just had to clean out the thread in a block. Hence my use of a stainless screw to seal instead of the more than unreliable repro drain taps. I have a spare if you are after one as I had to buy 5.
-
4 hours ago, phil Dean said:
Peter I have had a look and I cannot find this crank case snorkel pipe unless its the pipe which is at the very back of the block in the centre I have tried and there doesn't seam to be any movement with the sump off on this pipe.
Phil.
You have probably got a closed circuit breather as it is a 4A, so there is no external snorkel pipe. The internal central tube on the rear main bearing cap is oil drain back to the sump Don’t mess with it.
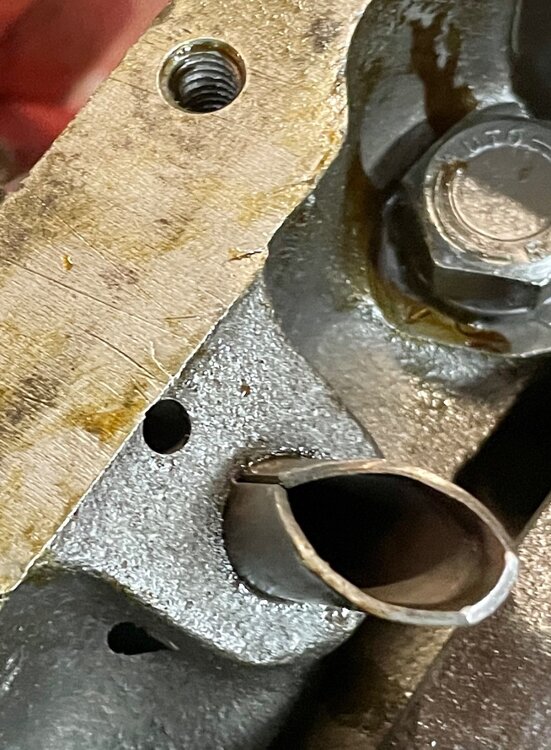
Tge snorkel, if fitted goes in the hole circled. Poke your finger in that hole. If it meets a dead end about half an inch in your breather hole is plugged for closed circuit breathing and the snorkel is not fitted.
The internal central tube on the rear main bearing cap is oil drain back to the sump from the scroll seal. Don’t mess with it or block it. And yes there is an extra hole to the side of that drain tube (there is one on the other side too) . It is an owner added modification to increase drainage from the seal area, as this engine has a rubber lip seal on the crank rear main instead of the original scroll seal.

-
17 hours ago, Lebro said:
I have the same style of (original) tap on the block & the Red, neither leak.
Bob
Nor does my stainless steel plug/bolt
-
1 hour ago, phil Dean said:
yes I did think about that if you look on the Moss website it shows them with both spring washers and washers but there is not a lot of room and TRGB said you should just use spring washers. The same page on the website shows 2 of the longer bolts when only one is required. When I look at the bolts taken out at least 5 have turned over threads so new bolts new spring washers and run a tap up the threads prior to fitting.
Phil.
You will need two longer bolts.
If you have a crank case snorkel vent pipe as well as the clutch slave stay rod to attach. -
2 hours ago, iain said:
It’s a Lucas dipping mirror. Model number to follow.

Lucas type 584
https://www.mgaguru.com/mgtech/accessories/at103l.htm
The bright finish Lucas 608 from the early to mid 60’s is available as a repro. As used in Jag and rally Minis
Hold onto your hat if you fancy buying a 584.
The Lucas
-
Racetorations do the windscreen stay you are mentioning
https://www.racetorations.co.uk/product/windscreen-top-rail-brace-tr2-3a/
-
Certainly all the original Triumph Spares steering racks I have sold were painted black. Cannot answer for what was on the car from new.


New Forum's Member from Germany with TR3A
in TR2/3/3A/3B Forum
Posted
What is the black finish used on the metal plates and some of the bolts?