

BlueTR3A-5EKT
-
Content Count
9,844 -
Joined
-
Last visited
Content Type
Profiles
Forums
Calendar
Posts posted by BlueTR3A-5EKT
-
-
Just a little update on the situation.
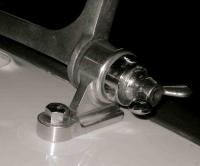
I managed to loan an original Churchill M.86 Hub removal tool and after taking advice from other forum members such as inserting a length of suitable steel into the split pin aperture and partially refitting the castleated nut but the opposite way round, to protect the half-shaft threads from damage. I have successfully removed the hub.
I attached an image of the Churchill Puller fitted to the end of my axle.
Many thanks to John for the loan of the puller and to Peter for his helpful tips.
Pleased to see the tool you borrowed in service and completing the task. As ever, the right tool halves the time.
How much hitting did it need? I've had them need anything from a light tap with a wire wheel mallet to a whack with a sledge hammer. Also got to the point where I gave up for fear of breaking the tool.
You can understand the reason for the steel pin in the split pin hole and the nut on back to front, to prevent thread damage!
On the comment about bent flanges after going to a machine shop. This is a not too uncommon a problem. This can happen with anything from Girling axle TR3 through to TR6 IRS rear hubs.
Cheers
Peter W
-
Trying to wrap up some final details on the "Grey Lady" and need some advice.
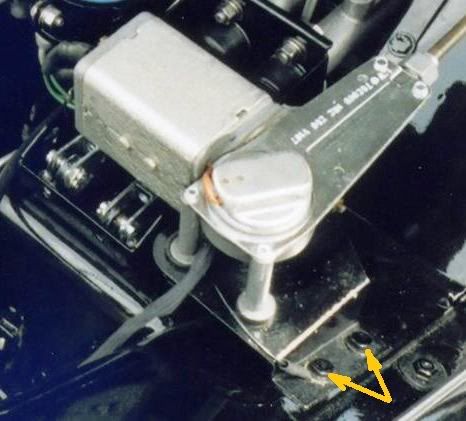
We could not find details in the spare parts catalog or any other "official" document. The photo below shows the windscreen motor of Don Elliott's original early 3A. However, we can not be sure due to the limited resolution. Can someone confirm the correct attachment details for the windscreen motor bracket. We are assuming that the two bolts each have a flat and lock washer, but would appreciate someone confirming that this is correct.
Many thanks
Hi There
The part nos for the Bracket, wiper motor are in the parts book Plate AG11 onwards
Use
HU704/P & WQ0307 qty 3 each WQ series are square section split washers.
I did what you suggest, HU706P + GHF331 + WM57 qty 3 each (Wing attachment screws)
Cheers
Peter W
-
Setting end float in the steering box
Help again please, I've read the manual re setting the steering box but
I'm still unsure how to measure for end float in the steering box, is it just trail and error with the shims until the steering is at it's least stiffness or is a dial gauge used and if so where do you place it?
Thanks in advance
Alexander
I have done the trial and error method-assembly - keep checking the 'feel' as you add or remove shims. Do not forget the gasket! Once all feels nice build in the lever and adjust to get hi spot. Be careful to wrap tape round the spline on the lever pin as you fit the seal or you will cut the seal surface - and it will leak.
The whole job is quite easy on the bench.
Cheers
Peter W
-
Yesterday I was stripping the front seat cushion upholstery from an early TR4. Inside the seat I found a tag jammed between the springs and horsehair padding that had a partial name of the manufacturer. It was ***ALOK LTD.
Can anyone tell me the name of the company that made the seats for Triumph?
Thanks,
Gary
I do not recognise the label but it is certainly for the TR4 as it mentions ZEST - has anyone trace 806222 the part no?
The makers of the rubberised hair were Hairlock. I would have thought either Callow and Maddox or Coventry Hood and Seating may have had something to do with the seats also.
Cheers
Peter W
-
Woolies are a reseller here is the manufacturer
and their catalogue
http://www.coh-baine...s-catalogue.pdf
The one piece furflex is a good option as I do not think the double height furflex is now made.
Peter W
-
I've heard many times about hot running problems on the Triumph 6 cylinder which have been solved by moving the ignition coil somewhere that isn't bolted directly to a hot engine.
Has anyone else here done the same on their TR6? Just wondering where people put them, photos welcome!
I moved the coil from the block to the inner wing on my TR3 some years ago to stop the overheating of the coil and misfire problems. Problem solved.
Peter W
-
Took my 4a from Essex to the forest of Dean last weekend a round trip of about 450 miles.
All was well driving down along the A40 at about 60mph when the engine cut out luckily I pulled off, a bit tricky as I was on the outside lane.
I changed the coil and condensor and went on my way.
All was well but heading back on Monday got to just before Burford on the A40, and the car cut out again, so this time I changed the points, condensor and rotor arm and got all the way back home ok.
Problem now is, what was wrong? at the side of the road no time to eliminate items one by one just want to get going.
My question, is it the A40? how can I find the root cause? should I change to electronic ignition? should I avoid the A40?how can I check the replaced items for faults?
any suggestions especially with regard to electronic ignition would be greatly recieved, car has always been a bit lumpy but I put that down to the uprated cam which was fitted by the previous owner.(moral of the story always carry some spares I was only off the road for approx 20 mins each way )
Regards Lee
This is a similar sounding problem to one I was posed with on an E Type. The E Type was originally a +ve earth car that had been modified to -ve earth when an alternator was fitted and the coil connections had been ignored.
It was easy! - I swapped the LT wires on the coil and performance + reliability (as much as a Jag has) were restored.
Check your car - If your car is -ve earth as all 4A's should be, the wire to the coil from the battery/ign should be connected to the +ve terminal of the coil and the wire to the distributor is on the coil's -ve terminal. If your coil has CB and SW be very wary and check what earth polarity car system the coil is designed for. It may be marked on the base of th coil. - If in doubt substitute the coil for a known 12volt one from a friend's TR (not post '73 TR6 or Wedgie 7 - as they use ballast type 6v coils.)
Peter W
PS My own TR3 runs with Moss Petronix ignition system and a Lucas Sports Coil from Ron Leacy MG parts co. It improved the tickover immediately and gives smoother pick-up with consistent tickover. I use a variable strobe gun to set the ignition at 30 degrees max advance which is about 8 degrees static BTDC. The coil is mounted on the inner wing rather than the block where it 'cooks and shakes'.
-
I have fitted the later siamesed TR4a inlet manifold to my TR3a and am in the process of rebuilding a pair of HS6 carbs to fit onto them.
The question is, what air filters should I be fitting? The vehicle came without any air filters so I can't refurbish the originals or use them to check if there is enough clearance to the inner wing.
I have seen pictures on this site of KN conical filters being used and I have also seen a post by Badfrog that says don't bother with them, just fit the originals. Which would be fine by me if I knew whether or not they fitted.
So will the original filters fit?(available from Holden Classics at about £30 each, or does anyone know a cheaper source?). Or do I need to go to the additional expense of KNs and if it is the latter, what model number should I be ordering, is it the KN56-9320? They look the right shape but I couldn't find any details of the backplate fixing - do the drillings/tappings line up for HS6s?
Rgds Ian
Just to add some spice....
Do you have a heater fitted?
What have you done about the RH water feed through the bulkhead as it points at the float bowl on the rear carb?
I used the TR6 double bulkhead adaptor fitted on the LH side of the TR3 bulkhead.
Air filters - I used K&N with central mount on rear carb and upwards offset on front. The needles are RH - and still it runs lean at high rpm.
Cheers
Peter W
-
Thanks for the replies guys....
As much as it pains me to pay the postage to get the front set from Moss US, I`ll order them as I really dont want to be taking the diff out again if I can help it. Hopefully this should ensure that the rear and front all bear the torsional loading as a set rather than one flexing more than the other.
Cheers
But you are in Australia where Super Pro or Super Flex or Powerflex or whatever the Australian company that developed these things is called.
Why buy from the US - are they that much cheaper? From China to the US to Australia - They will be out of mileage warranty!!!
Try this link http://www.superpro.com.au/ or TR5/6 specific http://www.superpro.com.au/find-superpro-parts-for-my-vehicle?listMake=72&listModel=499&listSeries=774&button=Search+Now
Hope this helps
Peter W
-
Absolutely - Get the thing centred to the car.
These are odd jottings from the notes I made years ago when I developed the weather equipment range with Oxted Trimming for Cox&Buckles (later Moss). Oxted are still in business http://www.oxtedgroup.co.uk/ and would be happy to help any TR owner.
Measure with tape rule the size of the car back to front and check that figure on the new weather equipment fabric before any attempt to fit. If in doubt reject.
Mark both the car centre lines at the back and front. Measure between the two back pegs with a piece of paper cut to exactly the right size and fold it in half to get centre.
Mark the hood/tonneau centre line with a chinagraph pencil. Good fabrics will have these already marked. Fold in half to get centre.
Take your time on a hot day. drink lots of tea!
Use a small hole punch to pierce round holes just the right size to fit over the pegs before you try to fit the fasteners. You can 'move' small holes.
Use a Lift the dot punch tool to get the fasteners in the right places - knock through onto a lead block.
If it is not warm put a fan heater in the car under the thing to get the material soft and boggy. (vinyl will stretch easier - not mohair/duck material)
It will stretch and be able to be pulled to where it is wanted.
Use steam from a boiling kettle to shrink stretch the mohair material at corners above windows. - to get rid of creasing.
Hope this lot is of use
Peter W
-
Have you tried running the engine till it is good and hot and then attempting to undo the sender? A bit of heat may be all it needs.
Just be sure to remeber the engine is filled with pressurised boiling water, wear appropriate goggles gloves etc and cover the sender with a rag so any spurts get caught.
Cheers
Peter W
-
Just a quickie
Fit the gearbox to the overdrive!!!
Hold the o/d in the vise by one of its mounting ears.
Lower the gearbox onto it without springs or pump cam fitted - get the splines aligned by turning the gearbox NOT the o/d - then do not rotate anything!!!
Lift off the gearbox, fit springs and cam (held in place with a gob of grease) with the cam set at its lowest point in line with the pump. - some pump cams have a ramp to help the engagement.
Depress and Wire down the pump plunger. - you can fish through the side with a long screw-driver at the last minute if you feel confident.
Fit all 8 springs in correct places. - unless you have a 2000 Innsbruck A type o/d in unmodified form.
Fit gasket and apply suitable goo.
Lower the gearbox onto the o/d as before
Push by hand the gearbox onto the o/d (as you tighten the 2 nuts on the 2 long studs) to ensure nothing is binding (I find a bit of a bounce is in order to give re-assurance that all is not jamming)
REMEMBER do not turn the O/D flange, only the gearbox input shaft. - If it all goes tight as you are assembling STOP or you will need to buy a new adaptor plate after you have bent/cracked it due to misalignment.
Remove wire at last minute, and tighten all home. and Hey presto it's all done.
Cheers
Peter W
PS Read the book on how to do it
PPS I have never attempted to remove the A type o/d with the gearbox assy in the chassis as it looks as tho there is insufficient room or the correct directional pull of gravity.
PPPS If you have the tunnel out you are 3/5 of the way there. JFDI
-
Nick,
No difference internally except for the camshaft and yours has the TR6 cam already fitted as noted by Alec. The compression ratio is also the same.
Derek
Yes I agree with Derek. I discovered this 'CR' thing many years ago when I worked for C&B in Balham.
Additionally the top surface of the block on the 2.5PI Mk1 will be flat, so the later head gasket for recessed top blocks should NOT be used. Use the head gasket for Pre CP 75000 TR5/6 engine. - Check before buying head gasket.
Peter W
-
Hi folks:
I have ordered a pair of K&N 56-9327 filters for my TR3A. After ordering, I realized that it is for HS6 carbs, while my car has H6 carbs. I have found a picture of a TR3 with those filter mounted on (see picture below); however, it is not clear whether the owner has used the original carbs, or he changes his carbs to HS6 (as you know HS6 is for TR4A).
In any case, I wonder if anyone can answer the following question(s):
1. Has anyone has the filter on his/her car?
2. Are the boltholes on HS6 on the same spacing as that of H6 carb? (the vacuum holes do not matter, because they can be drilled (or filled) if on wrong location)
Thank you in advance!
Farid
PS. The correct filter for H6 carb is apparently 56-1400 if interested.
The car in the photo you have posted has H6 type carbs.
The filters used are a good idea as the filter tapered/cone shape looks as if it will stop the filter hitting the inner front wing.
Using regular 'pancake' shaped filters (56-1400) can cause the front filter outer lower edge to touch the inner wing - hence the recommendation of using offset upwards type on the front position in the MOss TR cat (as fitted on my own TR3 with HS6 and 4A inlet manif - before the cone type were available.)
The filter mounting holes H6 and HS6 are the same as are the air balance holes, so 56-9327 and 56-1400 are suitable for TR3 and TR4 and TR4A with original H or HS type SU carbs.
So best solution is the 56-9327 cone type for the H6 or HS6 type SU carb on a TR3
Cheers
Peter W
-
Hi to all,
My front coils springs seem to have sunk , my rear leaf springs which I bought from TR Revington have done the trick , but my front wheels look as if they have sunk - the coil springs are just over a year old from Moss Bristol - have I got duff coils ?
Thanks ,
Will
What distance from the chassis lowest point under the front suspension where the rebound bracket attaches to the ground do you have - and what size tyres are you sporting.
I will measure my TR and see if you really have an issue as I have just fitted new Moss spring TT4006 - my car has risen 1/2" over the TR4 standard items that were fitted (210903). This was something I wanted as the car was too low.
Normally only one side settles (sag) rather than both.
Cheers
peter W
-
There's 2 on ebay right now:
http://cgi.ebay.co.u...=item2a10b384ac
http://cgi.ebay.co.u...=item20b9490372
Brian
If you have not got old ones of these fitted to your car you still need the taper collar seat that the wheel centralises against.
The manufacturer for Moss said these were b..st...ds to make when he a did a batch some years ago.
Peter W
-
How much play should I expect in my wheel bearings?
I recently replaced my front wheel bearings as I received an advisory on last years MOT for one side only (the same tester has tested the car for the past five years and this was the first mention).
On this years MOT although I received a pass I did get an advisory on both sides, the tester did say that he appricates that with this vehicle there should be some play and thats why he passed it but he did think that I had allowed a little to much play.
The workshop manual says to tighten the nut only sufficently to remove slackness then back off until you can refit the pin, my problem is trying to judge when I have removed the slackness
If the MOT tester will let you assist him by sitting in the car to work the controls, a job his mate would otherwise have to do, be sure to hold your foot on the brake pedal when you see him go for the wheel bearing wobble test. Holding the brake on ensures the wheels do not wobble. Always worked on my TR2....
Peter W
-
Unless you are a concours/originality type, who is going to know or care that you upgraded by fitting the TR4 bracket under there? I see that I recommended this upgrade in Newsletter 23 (Autumn 1975).
Newsletter? we didn't change the name of the publication to TR Action until later.
Ian Cornish
It is still the Newsletter to me. but in colour....
Peter W
-
Cheers guys,
As it happens I have optain a set of 4 on 195/65/15, but I like the original look and feel so 165 xas is the way for me.
Just need to find a 5th wheel and a set of rostyle trims
also does anyone know what colour the '69 12 hole rims are meant to be, black or silver like the 15 hole ones?
Steve
Mine were a horrid dark brown primer as supplied new from Stanpart by a bloke in Mitcham who sold TR Spares from his garage on Saturday afternoons - Peter Buckles was his name and he charged me a fiver each in 1975. I knocked out the long hub cap attachment prods, turned them down to a shorter more appropriate length to fit hub caps and refitted. They have done sterling service since.
I bent one when I curbed the rear in a dash with a 1600E, but I blame the tyres and brain fade, I had only just changed from those fabulous Dunlop SP Sports, that stuck like glue, to Cinturatos. If I remember rightly Pete Buckles charged £2.00 more for the Dunlops than the Pirellis and I made my decision on cheapness, and bent a rim in the process. The following month I sold the Cints and bought Dunlops again.
On a construction point:- My 4" TR2/3 rims are rivetted centre to rim, but the centres of the '69 wheels are spot welded to the rim in much the same way as the set of post '69 wheel rims I have. (recently advertised on this forum with red stripe tyres and now sold to a man with a Peerless) I do recall the remade TR6 wheel rim having the centre continuously welded to the rim. Any comments?
Cheers
Peter W
-
Just looked at my NOS item and it is as sketched by TR2100.
Probably a bit more oval top to bottom, (when fitted) being greater than side to side. Pretty damn spot on sketch.
Cheers
Peter W
-
You need 806696 MET from Moss plus the 'smash together rivets' to hold it all in place
link
http://www.moss-europe.co.uk/Shop/ViewProducts.aspx?PlateIndexID=2378#12
So long as you do not need any sewing the job of renewing the metal strips is a doddle.
Peter W
-
Is the oil visibly dripping from the rear oil seal when the engine is running?
Just be double dog sure it is not the rocker cover gasket or the mechanical fuel pump leaking before tearing the gearbox and engine out.
The rocker gaskets shrink in service and then leak like a sieve. This leak is easily checked by wiping clean, running then checking for leaks on the back of the cyl hd. I have experienced a shrunk rocker gasket and thought I was in for a rear crank seal replacement, but a new rocker cover gasket fixed it.
Be sure also that the engine breather is 'breathing' and not allowing pressure to build up in the crankcase.
REPLACING REAR CRANK OIL SEAL - You would ideally need to remove the crankshaft to renew the rear crank oil seal as you have to centralise it when re fitting. Ideally, if you are doing that, consider replacing the rear oil seal with a lip type rubber seal instead. They are considered to be a lot more durable. The rear oil seal land on the crank shaft has to be ground to a new size to accept the lip seal. (removing the scroll)
No doubt many have managed to do it without crank removal and do not want to consider the lip type oil seal.......discuss.
Peter W
-
I think that Neil Revington would be more than a little upset at the suggestion that his new steering racks are anything other than new.
New means NEW, not re-conditioned.
I bought one as a spare (just in case ....). It is NEW.
Ian Cornish
Did you lubricate your new steering rack and the other bits - or is the rack 'sealed for death' like so many new components today?
I once bought a genuine new steering rack for my Morris Minor from Austin Morris, (LHD Frogeye NAS Spec to be precise) it was bone dry and everything improved no end once it was lubricated. - I poured hypoid oil in the gaiters to do it as I had not figured out how to fill a grease gun with oil then..... I have now and lubricate my TR trunions accordingly.
Peter W
-
Would someone enlighten me on what part number 030123 actually is!
Having dismantled the pressure relief valve and reseated the ball bearing I find I should reassemble using one of these under the locknut.
Can I wrap a length of solder round a few times as an alternative?
Yes solder will do.
I have a couple of actual NOS rolls of 30123 Lead Linger in the garage - if any one wants to buy a foot or two. I have recently used some under head nuts and the Oil pressure relief valve lock nut.
Cheers
Peter W
Adjusting Steering Box Endfloat
in TR2/3/3A/3B Forum
Posted · Edited by BlueTR3A-5EKT
I've read the ROM now and it says some preload is acceptable but no end float. I suggest the trial and error fitment, adding and subtracting shims 'till the feel is with smooth. Go a thou or too tight from that point to feel what pre load is like. There will be a distinct tightness or even grittiness. Over tighten the pre load and you will dent the balls or the race areas.
You could set up a dial indicator on the steering column end to measure end float when you first start with a known shim, pack thickness (bit like doing a diff) - very fiddly tho, especially on a long column car. We did my brother's short column in about an hour without removing the apron, a great improvement to the steering feel and reaction.
What ever you do be sure to eliminate all end float from the column or the steering will be sloppy. Refill the column with the chosen lube before putting the apron back on, it is easier to part fill through the filler plug in the box then dribble the remainder through the hole in the column outer tube.
Cheers
Peter W