


ChrisR-4A
-
Content Count
1,160 -
Joined
-
Last visited
Content Type
Profiles
Forums
Calendar
Posts posted by ChrisR-4A
-
-
Hi Bob, firstly check the ignition warning light holder is properly earthed, secondly do you still have your original ammeter, if so try that as that's about the only other part you've changed that could cause the problem because if wiring is as standard all the power on a 4A goes through the ammeter.
Chris
-
I painted mine black with aerosol vinyl paint (also avail in white) some years ago and still look good.
Chris
-
Available here if you need some,

-
Be carefull if you have removed the bushes that the bores don't end up oversize especially if fitting poly bushes as they don't expand as much as rubber and could end up a loose fit.
Chris
-
Hi Paul, worth checking if it is the vinyl top which is causing the problem or the webbing straps which space the hoodframe hoops out. The webbing often shrinks when old if it has been wet.
it can be extended or replaced.
Chris
-
Opie Oils, that’s where I get my Millers pistonease 20/50.
Check out their EBay shop, (not always that easy to find) usually cheaper that direct and free delivery!Chris
-
2 hours ago, RogerH said:
Hi Chris,
those clamp bolts can be more than difficult to tighten as the clamp on the rubber UJ's is very badly made
See the attached pic to see what metal is in the way.
The shiny bits stop it all working properly.
Roger
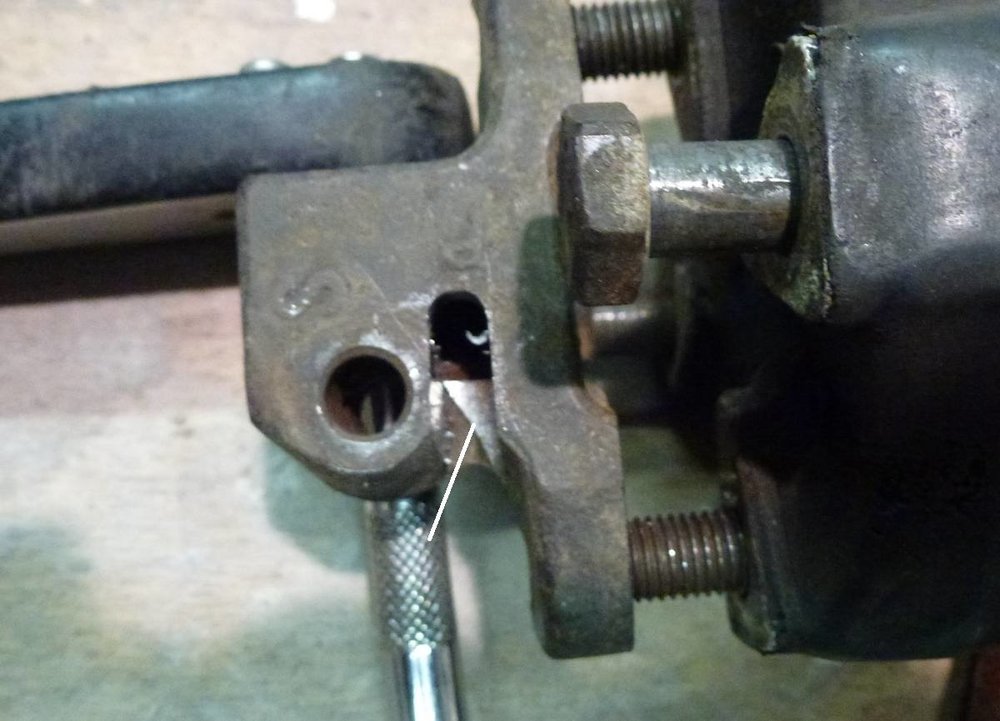
Yes Roger, mines an all steel UJ at rack end but can still get loose on splines if bolt is not tight enough.
Chris
-
The spigot on the rack has a scallop where the bolt that clamps the splined joint fixes, if the bolt is worn and is not clamped tight enough then the column can move in and out about 4/5 mm. Due to restricted access it’s not always easy to get this bolt tight enough. Also use a shouldered bolt not a screw and grade 8 if possible, you don’t want to snap the head off as the joint won’t come off then and access to drill it out is dire.
Chris
-
Great stuff, but if you go to the trouble of having the crank, rods, pistons, flywheel and clutch balanced don’t forget the prop shaft. They were balanced originally by Triumph but that was a long time ago.
Also on a 4cyl TR either remove the fan and long extension and go electric or include these items to be balanced. That awful extension is frequently out of Ballance and I have seen many which due to errors in mounting run far from true.
Chris
-
On 12/21/2019 at 1:20 PM, keith1948 said:
Hello Tom
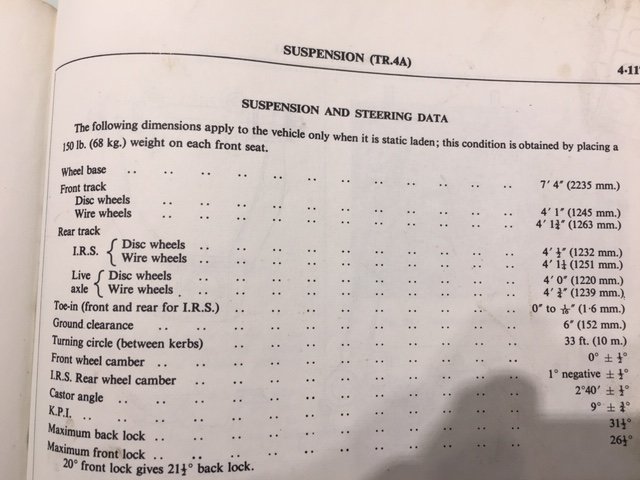
I think I am right in saying that in the USA toe in is measured at front and back of the tyres whereas here in the UK we measure toe in at the rims of the wheel itself. A DIY way of checking is to stretch two thin pieces of string each side of the car so they are parallel to each other and at a height at the centre of the hubs. Adjust the position of the strings so they are equidistant from each rear hub and equidistant from each front hub (and still parallel to each other). You can then measure from the rims of the wheels (not the tyres) to check toe in or out. Stick to the original spec in inches. I have between 0 and 1/8 inch toe in at the front. Never really understood using the tyres as the reference points because depends on tyre make, type and inflation. The only thing to watch out for using rims is any in/out movement of the rims as you rotate the wheels caused by slightly out of true wheel rims. Take a few measurements in that case.
I managed to buy some classic optical wheel alignment gauges from a garage that was closing down but they are not that easy to use. I calibrate them in the parallel position with two lengths of copper pipe that are cut exactly the same before using them. They have pins that have to touch the rims and you measure off the alignment using the mirror system. On eBay the Dunlop type are around £200 and there are modern Sealey ones at twice the price. My bargain was £20 for the Dunlop style optical wheel alignment gauges and £20 for the Sealey type GA44 drive on alignment gauges. The only thing I had to make for the drive on types were small wooden ramps for all 4 wheels so the car sat level.
I agree with Peter that inside wear means too much toe out. I always do my own toe in since one garage misheard 0 to 1/8 inch toe in and adjusted fronts to one inch toe in. That managed to wear out the fronts in no time and the handling was very strange as well.
Keith
Hi Keith, not sure where your 1/8 front toe in figure came from but in the 4A wsm which I expect is the same as tr5/250 it gives 1/16 toe in front wheels and rear wheels. This usually means a total of 1/16 measured between the wheel rims on the centre line which is half the 1/8 you mention. This agrees with Waldi's comment of 1/32 for each wheel on the rear.
Chris
-
On 12/21/2019 at 12:32 PM, Willie said:
Good day All, back to my original approach for advice!
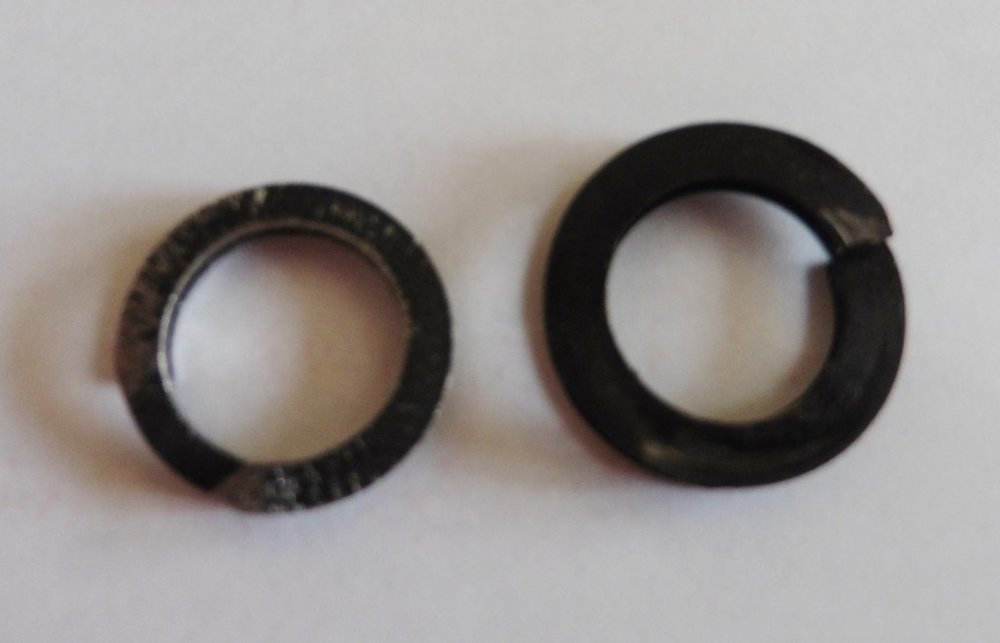
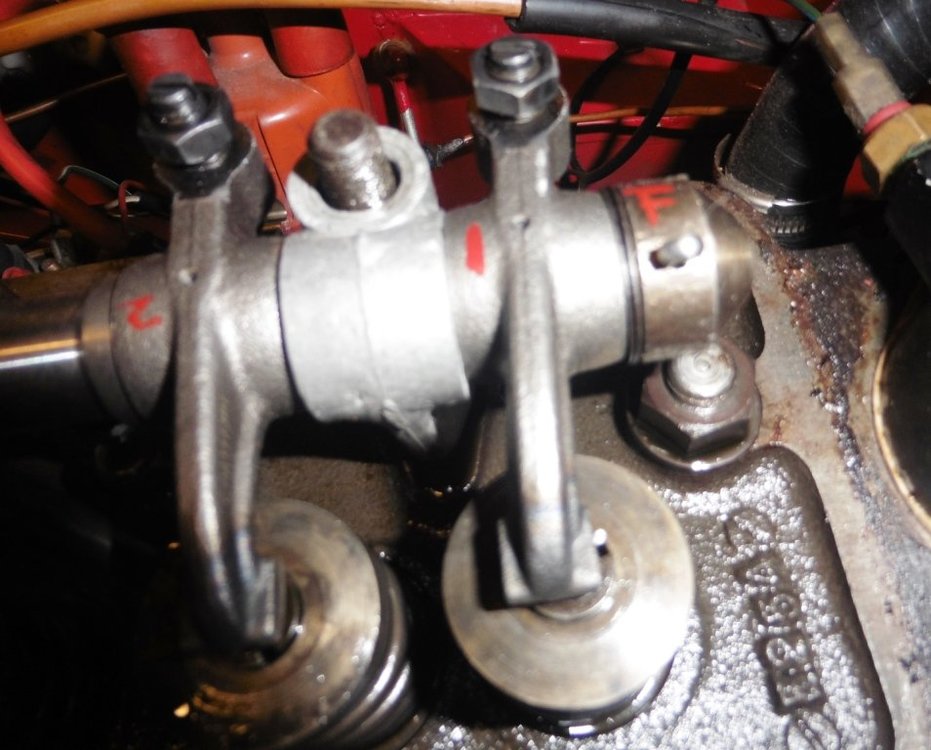
I have succeeded in removing the rocker shaft end caps and I have achieved fitting of split pins [1/8" x 1 1/2"] by rubbing them down with emery paper to be a snug fit with no movement. I thought the front double coil end cap spring had broken. This is not the case, but I did discover that these springs are out of stock everywhere and Moss currently have not found a supplier. TR6 springs are smaller in diameter, but having purchased a couple of TR6 items, I succeeded in drilling the TR6 washer out to 16mm plus a bit of filing to slide on to the TR4 shaft. Pic attached to show the remarkable difference in size, the TR4 item being the larger.
Now I have the new rocker shaft put together using spacer kit instead of springs, my son & I have been assessing where the shims supplied with the kit should go before the rocker gear is bolted back on. At the site of the loud clicking noise pre-disassembly - the front of the engine - #1 rocker looks to be slightly too far to the left, but the double coil spring [the proper TR4 one] prevents appropriate adjustment. Question - can I leave the double spring washer off at the front and use shims instead? Shot attached showing how firmly the washer is compressed with #1 pedestal on the stud.
Best wishes Willie
 Hi Willie, has that front rocker been running in that position for thousands of miles, if so check it hasn't worn a step on the surface which would result in excessive valve clearance and your rattle.
Chris
-
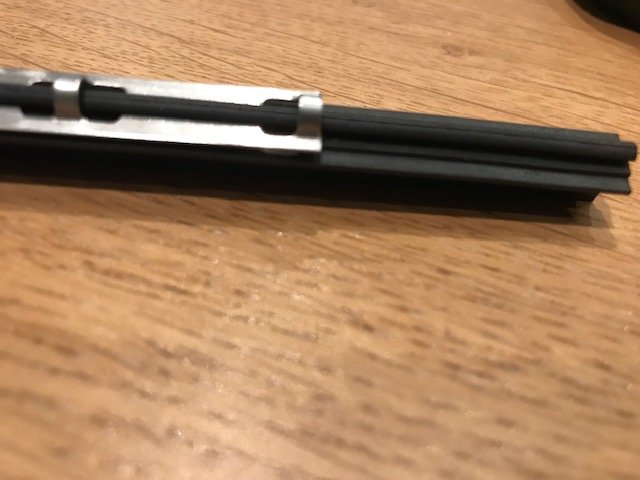
Hi Roger, while talking wipers, have you tried the PIAA blade refill reference SKR52E from www.tdcautomotive.com.
I recently fitted to my 4A and was surprised how much better than the rubber ones they are.Chris
-
On 11/15/2019 at 7:33 PM, Phil H 4 said:
Considering the weather we've been having new wiper blades have moved up the list of things to do.
I have read a few posts regarding wiper blades on the forum and PIAA silicone blades appear to be the way to go.
My wipers are 11" long with the blade fitting into a steel channel / carrier.
Blade reference SKR52E from www.tdcautomotive.com mentioned in Tim Hunts post are too short and whilst longer options are available, I'm not sure about the carrier as previous post speak of re cutting a notch, not required as my carriers have a bayonet end.
Has anyone purchased PIAA silicone blades for these carriers.( Pic below)
Phil
Hi Phil, the Piaa blades come with two metal strips either side the rubber which make them the correct width to fit the original arms, the metal channel in your photo is not required and is discarded with the old blades. Your car may not have original length wiper blades fitted as the PIAA blade refills fit standard length blades.
Chris
-
All standard engines will benefit from having an advance/ retard vacuum connected to the distributor, only the injected engines had this removed and that was because with the fuel injection there is no vacuum in the inlet manifold for a suitable take off.
Chris
-
1 hour ago, BlueTR3A-5EKT said:
What we are concluding is that the rocker shaft must be sealed at both ends.
Either by the original caps with solid pins if the shaft has no internal plugs or if the replacement shaft has internal plugs that seal the shaft; the end caps can be secured by split pins or roll pins as they are not required to form part of the shaft oil seal with the end caps.
The end caps locate the rockers Nos 1 & 8 with a double coiled flat spring washer. Those washers could be replaced by solid correctly sized shim washers, in much the same way as the springs are replaced by tube spacers. This all requires selective assembly and time.
Cheers
Peter W
Exactly
Chris
-
I may be missing something but, the oil pressure gauge reads 60 or 70 psi and it has a small inlet, I would of thought it’s the outlets back to the sump which determine the pressure at any given point. Therefore pressure at the rockers is determined by clearance between the rockers and the shaft and any other outlets like the endcaps, too many oversized/unwanted outlets would result in a drop in pressure to the rockers and your in trouble!
Chris
-
Hi Willie, don't drill them out, the roll pins are split along their length which provides tension to hold them in place, the end you can see is probably the end it was knocked in from. Remove with a hammer and suitable punch from other side.
Chris
-
16 hours ago, ctc77965o said:
If you DIY, which I fully support - it's just flat plates to weld on - make sure there's drainage points...don't weld-up an initially-strong rust-trap
There flat in one plane but usually have a right angle return edge about 6mm wide opposite the welded sides. This stops the flat plate flexing and adds strength.
Chris
-
Error
-
Error
-
At least with the cardboard and cissors Iain you will know there going to fit. When you do have a valid steel bracket make sure you position it so you have access for the welding nozzle from both sides.

-
Hi Iain, before you look elsewhere check out this previous forum content
: http://tr4a.weebly.com/chassis-strengthening-kit-welding.html
The exact dimensions of the reinforcing brackets is not as important as the basic principal, if it ends up looking similar to the video then it should be ok. Having said that if someone has precise drawings then please add them.
PS: I made my own, rule of thumb, 15 years ago and there ok so far.
Regards Chris
-
The above video suggests that the liners will all stick up the same amount, I supose it could happen but not very likely?
Chris
-
That’s surprising and worrying! Strange airflow. Maybe the Triumph design engineers knew best.
Chris


Alternator Problems
in TR4/4A Forum
Posted · Edited by ChrisR-4A
Info added
Not knocking Alternators, but in the past 15 years LED lighting has come on leaps and bounds, and if all the bulbs except maybe the headlights are changed to LED then a Dynamo will cope just fine.
Of course you can always change the headlights to LED as well, plenty of posts on that on the forum.
As has been stated already it's only at night (ie when lights are needed) that the Dynamo comes into question at all. It's a plus/plus scenario to take the LED route as this reduces the electrical load on the whole loom.
Also don't forget to spec the largest capacity battery that will physically fit, Bosch do a good 74amp/hr one. And replace all those corroded bullit connectors to ensure those Volts reach their final destination.
Chris