


Bfg
-
Content Count
1,800 -
Joined
-
Last visited
Content Type
Profiles
Forums
Calendar
Posts posted by Bfg
-
-
Hi Tom,
what is, and where is the accumulator. I cannot see it listed in the exploded parts diagram, so I assume it to be a number of components which when assembled go by that name. ?
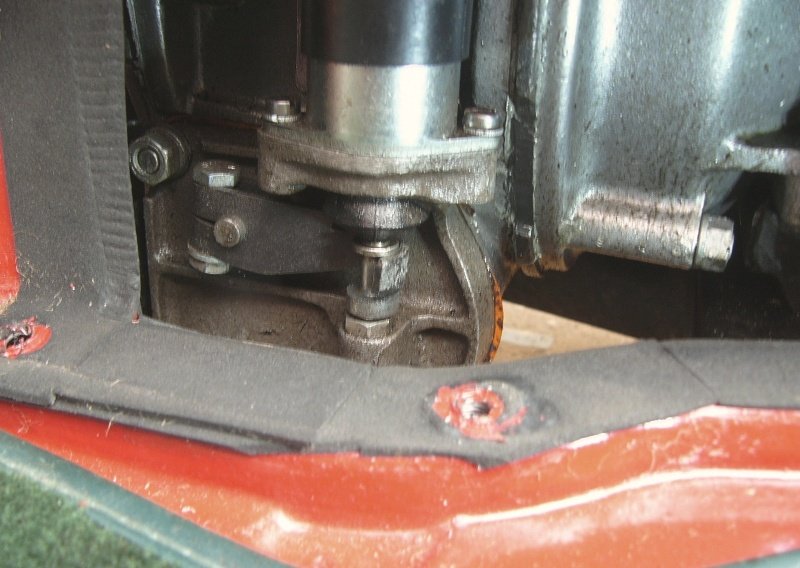
The lever is the one on the RHS of the overdrive. I appears to have about 1/8" movement against light pressure and then it doesn't move any further.
Doing this while looking over the gearbox to the solenoid - it's clear that this RHS lever is directly connected to the lever activated by the solenoid. Although I've not adjusted the LHS / solenoids lever - it's now making sense, as it's this RH one which aligns with the 3/16" hole. So when pushed forward on the RHS lever it duplicates the action of the solenoid's lever and then cannot come any further because of the solenoid unit itself. Understanding this helps me make sense of what Stuart said about the solenoid's gasket being left out. There appears to be no gasket under the solenoid on this overdrive unit. But it had been working great for the past six months.
cheers, Pete
-
1 hour ago, stuart said:
Just try when your driving with the cover off and overdrive engaged to just push that lever slightly forwards and see if the overdrive does engage. Obviously oil levels do affect overdrive operation but it wasnt down that far was it?
Stuart.
Hi Stuart, thank you again. No the gearbox oil level was a little down but only by 30 or 40 ml, measured with a family size syringe.
As you suggest I've tried pushing forward on the operating lever, but with the back wheels off the ground rather than when driving down the road.
I tried this in each of the three upper gears, pushing hard forward with a screwdriver blade on the operating lever, but the overdrive did not seem to operate. There was no suggestion of the drive-shaft rotating at a different rate and although the speedo was only reading 10mph, there was no sign of rev's dropping when overdrive solenoid was activated.
Having read of an air-lock, but having not yet identified what an accumulator, nor where a choked air bleed might be ..in must be the worse workshop manual I've ever used, I've subsequently tried to bleed the bubbles out of the operating valve hole. If only because I reason that anything hydraulically operated doesn't work very well with air bubbles in the system ...
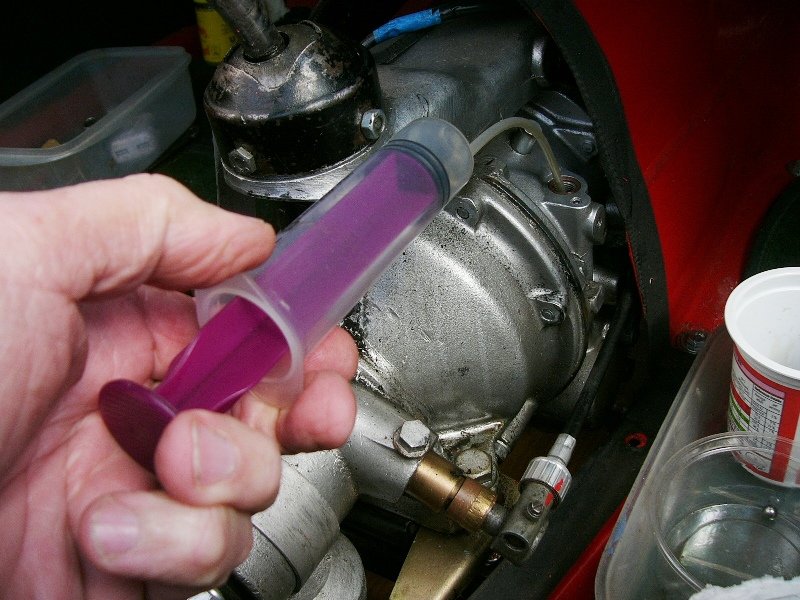
Without the ball valve in place, I've been running the engine at tick-over speeds in forth gear, with and without the overdrive switched in. The book tells me that it is correct that oil wells out of this hole if the pump is working. Using the syringe I've been pulling out what comes up.
After doing that three times I tried the overdrive again, with the ball valve, plunger, spring and cap back in place ..but still Katie's overdrive doesn't appear to be working.
Lifting those components out again, I started and engaged overdrive in forth and clearly are still bubbles in there. Surely that means there are bubbles within the closed hydraulics from the pump, &/or else the pump is sucking in air ? . . .
^ mostly the bubbles are smaller than these, but any bubbles don't seem right to me.
Admittedly I might be on the wrong track so I'll now try reading the Haynes manual. Perhaps that's written in clearer English than Triumph's own WSM. I'll also do a search through this websites pages and see what else I can find. The link I saw to Buckeye threw my old computer into a right wobbly (..opened numerous tabs), so I'll need to dig out the horrid HP with its later windows version on it before I try that link again.
I don't know anything about overdrive units, or how they work, so please excuse me if I'm not asking the right questions or otherwise seeing the obvious.
Pete
-
I have a lightweight (compact to carry) and generic-to-any-vehicle car cover, dark blue and £20 from Aldi, to cover the TR when I go away and stay overnight. Parked under a lamp and in view of hotel windows &/or security camera, but otherwise blending into the background and out of sight.
Pete
-
Thanks Stuart,
")
Might this happen after a couple of thousand miles ? or would the gearbox oil level being that bit low, possibly be a factor ?
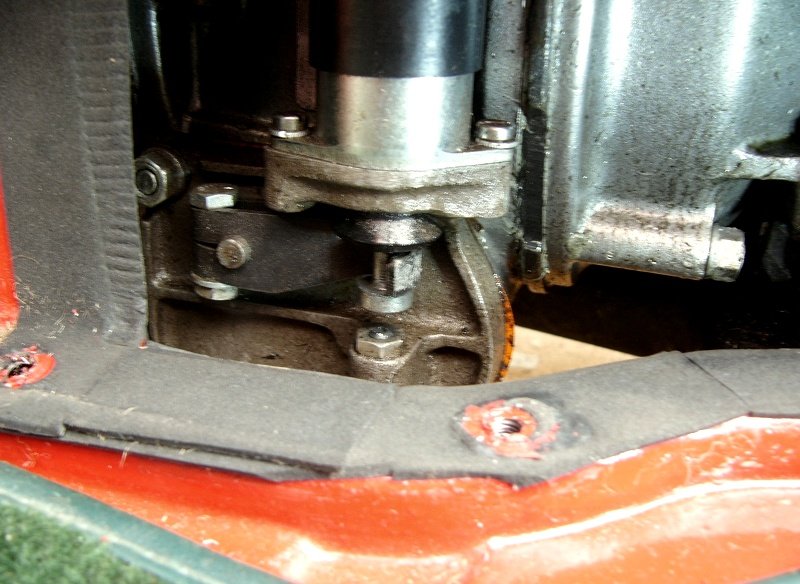
Yes, I can see the lever on the RHS. It's retaining dowel-pin can be seen in the photo showing the operating valve cover. The lever is inclined to about 45 degrees, and I can easily reach it with my finger to push its forward-end forward and down. Statically it seems to move just 1/8". Does it need to go further than that ?
As there appears to not be an electrical problem with the solenoid, would you think it reasonable to presume that the brake's electrical fault / fuse blowing and the overdrive not working is just a coincidence ? Or would an electrical power cut, while it was engaged, contribute to the problem ?
As always, we all very much appreciate your prompt advice,
Pete
-
Just now, Nigel C said:
good point raised about having brake lights and Hazards on the same fuse, I will address this soon!
at least the rear side lights are on another fuse so there oughtn't be a totally black-out.
")
-
On another note ... Overdrive not working.
Professionally rebuilt just last year / 2000 miles ago, I don't know what's wrong. It was working fine until last weekend when I had the fuse blow due to a fault in the brake light circuit. Since then, although the solenoid clicks and seemingly operates fine, I have no over-drive in any gear.
Following previous advice to other owners having the same or similar issues - I've checked the gearbox oil level, and it took a topping up of between 30 and 40ml. The oil is Dynolite Gear 40 non-hypoid & non-friction modified gear oil.
I've also check the solenoid's operation (audio and then visually only. I have not made any adjustment to it). It seemed to be working fine. and while driving I can just about hear it disengaging and reengaging as I change gear.
^ peekabo for overdrive perverts

^ off and.. activated ^^
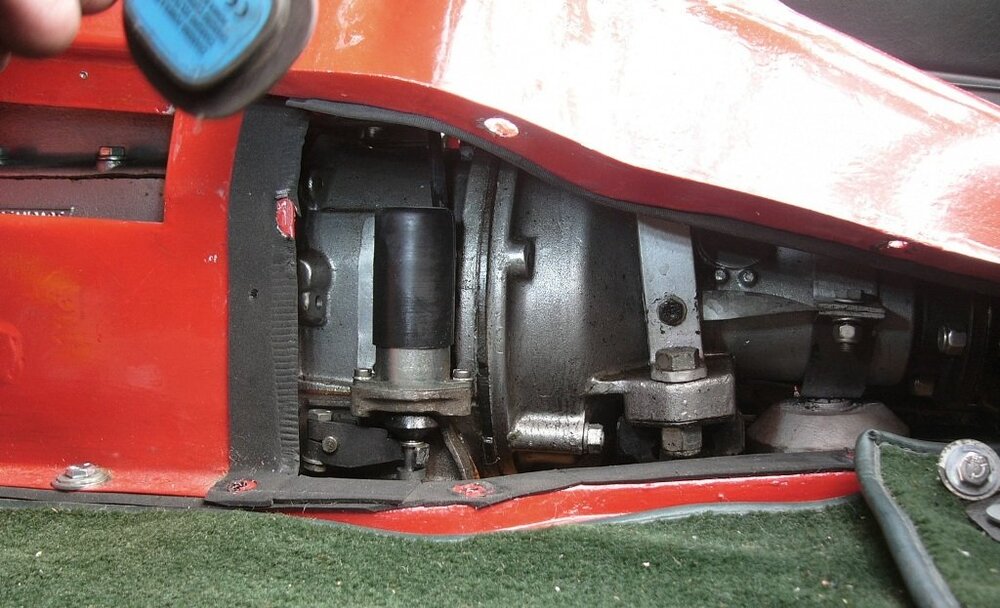
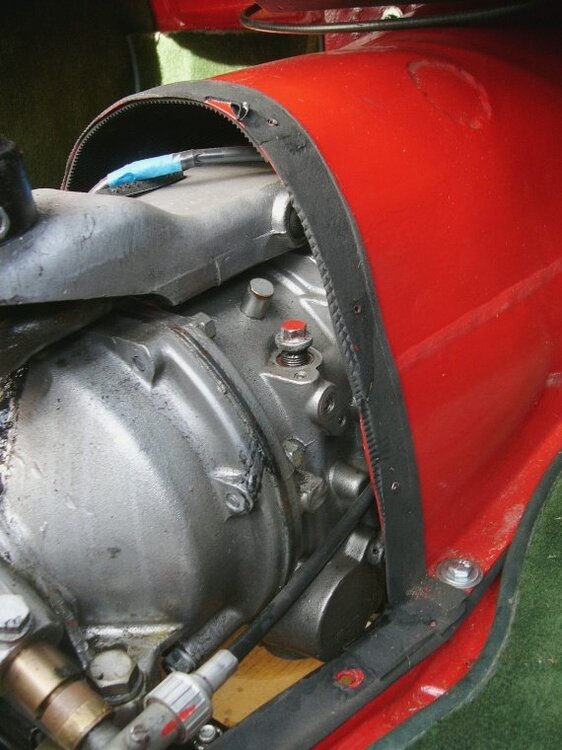
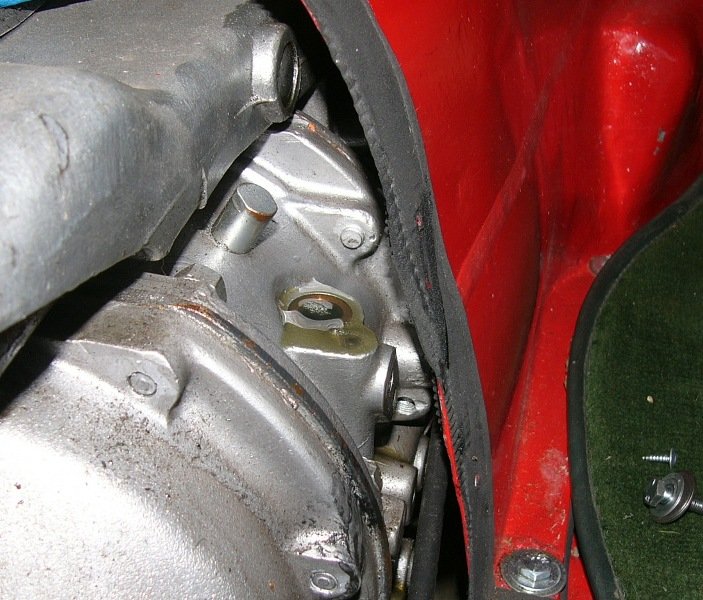
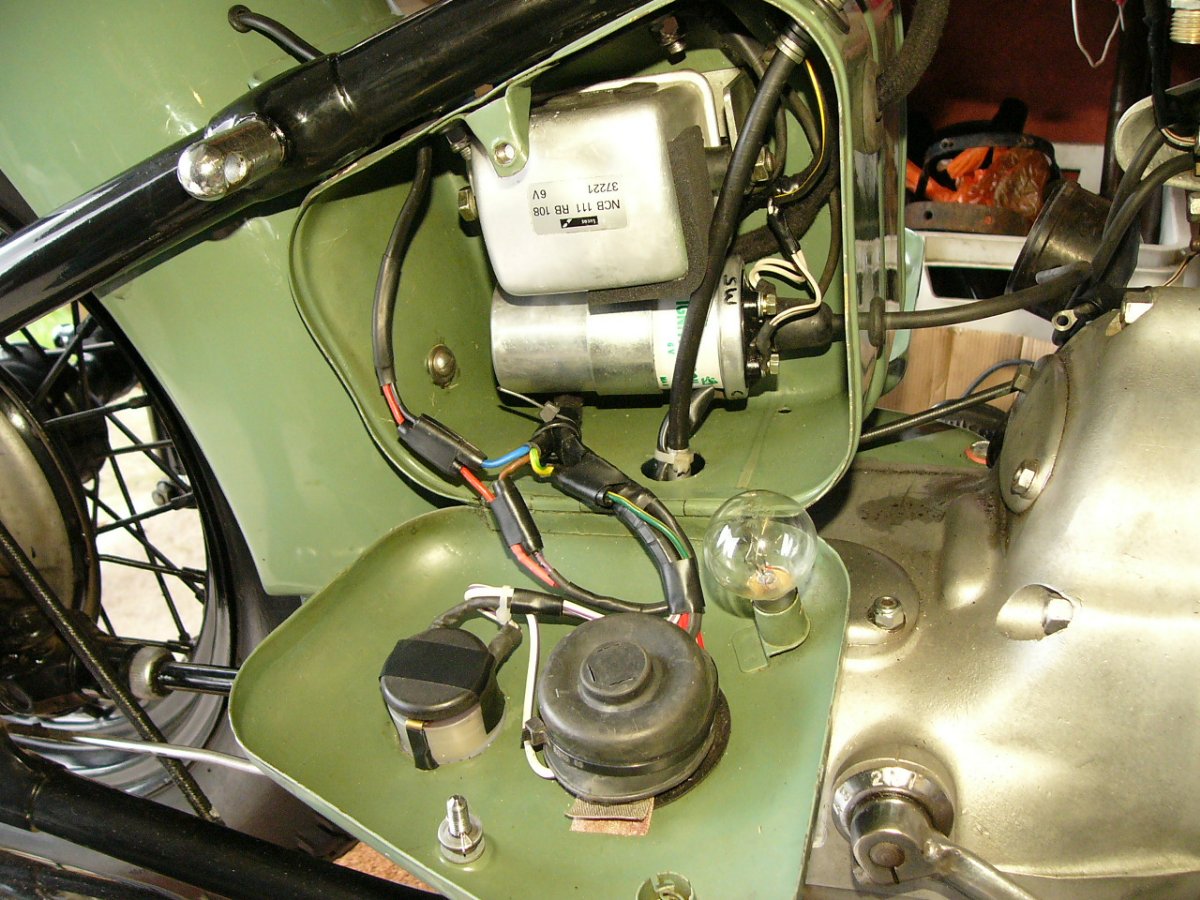
Note. I can hear this, and could see it from underneath the car, but I've lifted the rear half of my gearbox cover off, because i wanted to visually check what-was-what under there now, and to access the operating valve.
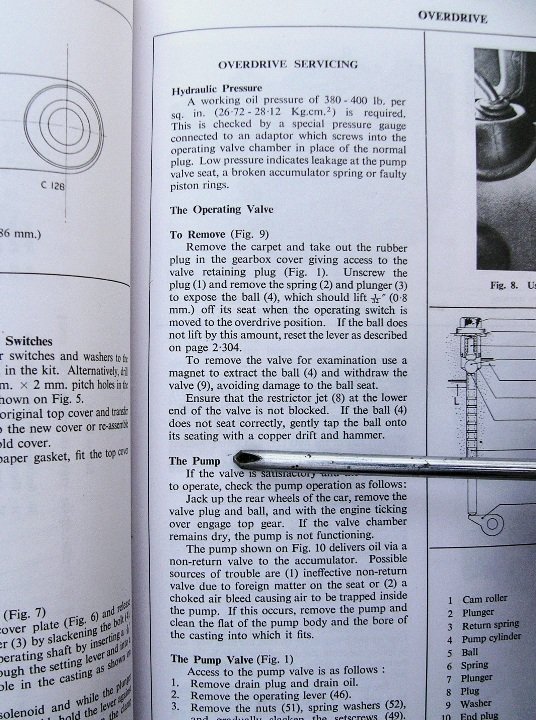
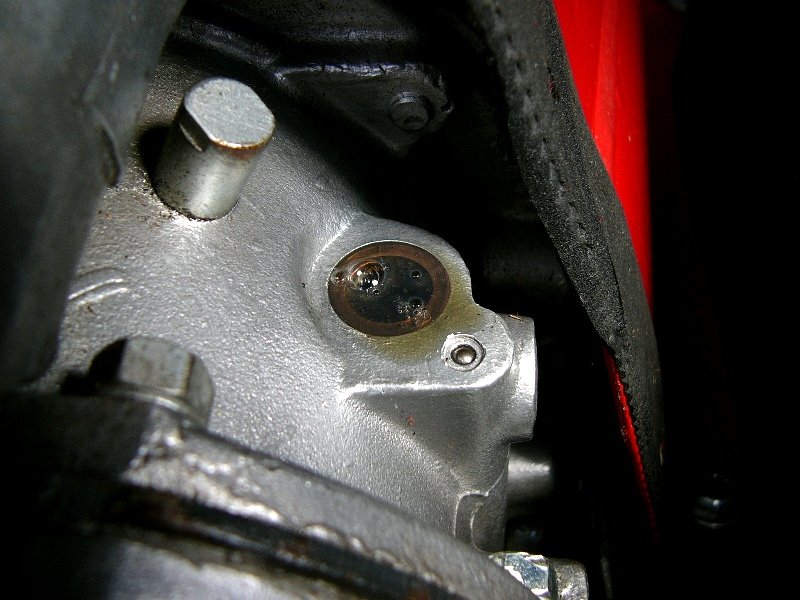
^ Following the suggestions in the workshop manual - I've removed the valve operating cover (the top of which is painted red, centre of this photo), pulled and checked the spring, it plunger and ball. As expected of it having been professional restored, the ball's condition looks brand new. The spring wasn't broken, nor did it appear to be unduly weak.
With the ignition on, but the car not started ; I engaged a higher gear and clicked on the overdrive switch. The ball lifted (against a 1/4"-drive-socket screwdriver) as prescribed. I haven't measured it but it seemed more like 1/16" to me rather than the 1/32" specified in the book.
Is too much travel an issue ? or perhaps the solenoid's lever arm needs to taken down a bit ??
^ To test the operation of the pump, which is inside the overdrive unit ..with the rear wheels of the car lifted (timber blocks under the trailing arms) and the front wheels chocked, I started the engine and engaged 4th gear at engine tick-over speeds. When the overdrive switch was operated.. oil very quickly welled up to fill and overflow the valve cover flange. According to the book, only if this doesn't happen the pump is at fault.
However, I did note a ring of small air bubbles inside the hole's oil. Perhaps there was air in the pump and/or the valve that has stopped the overdrive unit from working ??
That's as far as I've got. I have not subsequently driven the car to see if the overdrive is now working or not ..but aside from letting those air bubbles out, I can't see that I've actually done anything. The car is still up on the blocks with the rear wheels lifted 1/2" off the ground.
And I'm very much open to advice as to what to check next.
Thanks, Pete
-
Absolutely No problem Andy.
I like and so very much welcome different solutions, approaches and the balance of opinion ..as long as things stay reasonably close to topic related - which your post certainly is.
I've always liked the drop-forward minor-instrument-panel of my old Jaguars, which had the fuses neatly laid out across the back of it. It had the benefit when opened, of being directly under the windscreen which of course benefited from natural light, or street light, to see things more clearly. Today I guess we'd just add a strip of LED lights to see what we are doing. Sunbeam motorcycles (see photo below) used a similarly convenient solution to accessing and being able to clearly see their wiring, but still only had one fuse. In yacht design, of larger vessels, we frequently use pull out or hinge-open (for access to both sides of the board) breaker boards. Those vessels inevitably had two or three different voltages and charging systems, which we preferred to keep separate.
I think you've come up with similarly practical solution for your TR6. Whether your car's 17 or 18 fuses and 5 or 6 relays are necessary ? is your choice ..and otherwise for each individual to decide for their own car. I'm happy to see other's solutions being presented. I have yet to closely examine Charlie's diagram, but will do and I'll consider each as a I decide what might a best-compromise for Katie. No solution is perfect but some may have useful benefits.
Odd though it may seem - I was, in retrospect, glad that my Tom-Tom gave me an audio-visual warning that something was amiss with its power supply. This was within perhaps half-a-mile of when the brake-light fault happen. as a consequence I wasn't driving around oblivious to the brake lights not working, for very long at all.
Importantly - the vehicle wasn't debilitated by it, as only auxiliary circuits were effected, nor was I compromised by limp-mode on a busy motorway. An experience I've had twice and did not enjoy.
Thanks to Rob and others for their sensible council and good-natured forum conversation, I've learnt a few things . . .
-
I don't want a voice activated or any other diagnostic computer telling me, or the car, what to do

- my car's headlamp wiring and its switches are not fuse protected. That to me is unacceptable.
- I also think it would be prudent to have the brake lights and indicators / hazard warning lights on different fuses. As the indicators have their own tell-tale then it seems logical to leave the brake lights on the same fuse as the instruments, so those not working would alert me to the likelihood of brake light failure. The Indicators / hazards can have their own fuse.
- Thanks to Rob I've also come to realise that because the headlamps are not on the same fuse as the side lights ..which is a good thing, as I would not want to loose all the lights at once, that fuse (presently 35A) is way too high for this car's side lights, which are now all LED.
- Having the screen wash, wipers, heater blower and cigarette lighter (aux power to Tom-Tom and phone charging) all on the same fuse as 'safety items' ..like brake-lights and hazard warning light, also doesn't make good sense to me. I think it would be worthwhile to fit another two fuses for those four circuits. probably screen wash and heater blower on one, and wipers and auxiliary chargers on the other ..as I don't like not knowing when these a problem with the wipers.
So, I must admit that I've moved to think that perhaps six to eight fuses might be wiser. Katie already has three and so a block of just four more would not be difficult to fit in.
Thanks to all,
Pete

^ 1940 - 50's Sunbeam motorcycles had an electrical box, situated in the relative dry space under its saddle, which housed the voltage-regulator and coil. Fitted through the hinged lid of the box was the ammeter and the ignition / light switch. There were also two spare-bulb holders. A similar electrical box on the other side of the bike houses the battery and the wiring loom's single fuse. Neat, simply and yet effective.
-
I don't want a voice activated or any other diagnostic computer telling me, or the car, what to do
-
-
I stand corrected and apologise for my obstinacy Rob ..I hadn't realised the headlamps were and are powered directly from the live un-fused side of the ignition switch. I will add an in-line fuse between the ignition and high/low beam switch (which on Katie used to be the overdrive switch).
Very much appreciated,
Pete
-
1 hour ago, RobH said:
Glad to hear it Pete, but they are not fused at all as standard.
sorry Rob but . . .
I'm a dinosaur too, but don't tell anyone
Pete
-
1 hour ago, Mk2 Chopper said:
And surely the fuse rating has to be enough for the highest draw (everything switched on/ being used on that circuit) rather than suited to individual components?
Gareth
Yes indeed, with all being used at the same time, the 10-amp rated fuse (green wires from the fuse box) on Katie is good for . . .
- fuel gauge (stepped down to 5v)
- temp gauge (also stepped down to 5v)
- indicators or hazard-warning lights
- brake lights
- heater blower
- wipers
- screen washer pump
- overdrive
- auxiliary / cigarette lighter / charger, which I mainly use for the Tom Tom
The horn has its own in-line fuse.
And the lighting circuits (and their switches) on my car use a 35-amp rated fuse (red wires from the fuse box) and that is good for . . .
- halogen H4 headlamps (which are incredibly bright on full beam)
- all the side-lights, including the extras I added within the headlamps, the side repeaters and number plate lights.
- all the instrument's illumination.
Katie now has LED side lights, brake lights and indicators, but they were tungsten beforehand.
Pete
-
3 hours ago, RobH said:
Perhaps the fact that ALL modern cars individually-fuse the circuits because that is the right way to do it Pete.
The TR ( and other classics) way means that you lose several functions at once. It was really just silly penny pinching on the part of the makers but lots of them did it. Not a good idea for instance to have indicators, brake lights and wipers defunct together and not many drivers will have the knowledge to isolate the fault at the roadside as you could even if they had a good supply of new fuses.
Agreed that most people have been very lucky and have not encountered this problem because electrical short-circuits are surprisingly infrequent (a fault is much more likely to be an open-circuit) but when they do the result can be catastrophic, particularly on circuits like headlights which were left un-fused. Think burnt out car.
I suspect that if Standard-Triumph were now building cars, then they too would have had many more fuses. To think of the electrical items on my 2002 'modern' car is intimidating. Off the top of my head, and in addition to what we have as standard on the TR4, there's . . .
- engine management controls with fuel injection, and on petrol vehicles electronic ignition
- auto-shut down to limp mode
- diagnostics for all sorts of things, from engine coolant temperature and pressure, from near-empty fuel tank to brake pad wear warning, from icy conditions to you're farting too loud.
- twin electric cooling fan
- electric windows with individual door switches, and warnings when you've parked with one of those windows left open.
- headlamp delay, that stays on while you open your homes front door
- five door central locking by remote fob, with stages of locking and unlocking
- hands-free electrically opened rear side doors and tailgate
- built in alarm, with door and motion sensors
- auto tinting interior mirror
- door foot lights
- boot light
- under bonnet light
- six interior lights with switches on each of the five doors
- fog lamps, front & rear
- hazard warning lights
- air conditioning with multiple vents opening & closing for directions, as well as multiple speed fan(s)
- intermittent and multiple speed wipers
- an audio system, with all around speakers ..louder than Italian air horns !
- steering wheel switches for audio and cruise control
- built in navigation system (gps)
- dvd player, with remote and screen to the rear seats
- electric seat adjustment, forward and back, up and down, backrest tilt, and recline
- heated seats
- warning lights and buzzer to say when seat belts are not fastened
- warning light and buzzer to advise when a door is not fully shut
- electric mirrors (mine does not have mirror demist heater elements)
- rear screen demist element
- rear screen wiper
- rear screen wash
- electric instruments
- cruise control
- fuel consumption and fuel range
- electrical relays for numerous systems
- mine does not have headlamp wash or wipe
- mine does not have an opening roof
And I'm sure there is an equally as lengthy list of many other things on more modern upper-market cars, such as key-less ignition, voice recognition controls, screen displays and warnings, different user seat preferences, electronic gear change, wet screen sensors, parking 'aids' and low tyre pressure warnings, theft tracking, etc, to suggest just a few. How many fuses do they now have, relative to the number of functions, and do you need a masters degree to understand them ?
In short, the modern automobile's wiring is chalk to cheese compared with a standardTR4. The vehicle is generally comfortable and convenient - but at the end of the day it mostly does the same job in getting me out and about, albeit in a detached sort of way.
And you know what.. along with all those fuses comes a screen full of warning lights that tells me when a brake light or indicator is not working.! Sometimes however the warning icon is so obscure that necessitates getting the manual out to see what the issue is. And then it takes specialist diagnostic equipment (up to date, but at the same time not so up to date that it cannot read older versions of the same model) to tell you what might be wrong and to turn the flipping warning light off again. As it happens, the warning light switch on my car's brake pedal failed and it cost over £200 + tax to fix because that switch was only supplied together with the brake pedal.
No, in my considered opinion "The right way to do it" is not necessarily the same as we see on a modern car.
By the way the TR's light circuits are on another fuse.
Pete
-
13 hours ago, Nigel C said:
only had two fuses, madness.
14 hours ago, RobH said:The obvious lesson here is that the fuse scheme is really inadequate as you say.
Semantics, but I never said that the original wiring design was inadequate, I simply said "Are more than just three standard fuses such a good thing ? Perhaps yes.. I think.. "
In my mind, anything which has served well for 55+ years, on tens or perhaps hundreds of thousands of vehicles of all marques, and which has generally been neglected from maintenance, cannot honestly be said to be inadequate. Could it be improved ? .."perhaps". But then one might possibly say that about any aspect of any vehicle ever built. My Sunbeam motorcycle has just one fuse from the battery, and 70 years on it still starts easily, is remarkably reliable, and in a worse case scenario is usually easy to fix at the side of the road, as was Katie when this fault occurred.
I did go home to fix it, but only because we were just a few miles away and I was carrying an inadequate number of spare fuses with me. My objective with the car was to make it as reliable for touring - as economically and time-invested practical. But then to be prepared for roadside repairs for those other niggles. i failed in the latter respect, as that type of fuse is no longer stocked by most filling stations (on a bank holiday Sunday).
As an aside ; other things like fat tyre valves, the wide fan belt, and a selection of bulbs, all need to be carried - if even minor roadside / modern garage repairs are to be made.
I look at Nigel's and Rob's, very neatly done, eight fuses and think of the latter - where's one or two for the lights ? - it or they must be on another fuse. And then I think what is the real benefit of having that many fuses ? If your own car's brake light fuse blows - then would you even know about it ? This is surely a deficit to be balanced against the benefit of it not having effected other circuits. So., could those multiple fuse wiring systems be improved ? " perhaps "
The benefit of multiple fuses it seems - is in isolating and therefore in tracing the fault to a particular circuit. Seems a lot of effort to save me putting a new fuse in and then trying one switch at a time ? That is after all - all the diagnostics came down to ..in tracking the fault to the brake light circuit. And if I hadn't found the fault - then I could simply have pulled the brake-light's wiring connection off ..then all the other circuits still worked fine.
What am I missing ?
Pete
-
Katie suffered an electrical affliction on Sunday morning, insomuch as soon after I drove off to go to Hedingham Castle - a fuse blew. The first I knew of it was that Tom-Tom's power was cut and a screen notice came up asking if I wanted it to shut down or resume. I then noticed that the fuel gauge read zero, despite the tank being filled the previous day, and also the temperature gauge read zero. I then discovered the indicators didn't work and nor did the overdrive ..and yes, I did check the power lead connection into Tom-Tom
Ooh, this was annoying, not least insomuch as I was booked in (read ; pre-paid) to an jousting event at the castle (an hour's drive away) rather than my usual day out in the sunshine of getting in the car to go somewhere where I'd pay on the door. Naturally, the main event was going to happen at midday whether or not I was late. In addition, I was faced with a car that worked but which without instruments and indicators wasn't roadworthy. One cannot blame Katie for this, it must have been something the plonker (me) who checked the wiring didn't do right.
I pulled into a filling station and checked. Yes, it was the fuse for green wires (..ignition switched-on power). There was no wire obviously shorting out to be seen under the dashboard, so perhaps it was just an iffy fuse that had blown. I had two spare. I replaced the fuse and all seemed fine
Now, with with just one fuse as a spare - any diagnostics would require a methodical approach.. A fuse blows when the component draws too much power too quickly or else when the wiring circuit shorts out to earth. The latter is more usual, particularly on a car that had been reliable for the passed 2000 miles in six months. So., with the new fuse in and the engine started . . .
- The fuel gauge was now working, as was the temperature gauge.
- I had not used the wipers, the screen wash (converted to an electric pump on this car), nor the heater's blower. So the blown fuse was unlikely to have been caused by an overload through any of those circuits.
- The indicators flashed ..all is good so far !
- I put the car into second gear (foot on the clutch) and even though were were still parked I could hear the overdrive's solenoid click to activate. So that too was OK.
- I touched my foot onto the brake pedal and the new fuse blew. The fault, by deduction my dear Watson, was somewhere to be found in the brake-light circuit.
Following this simple but systematic approach - I very quickly knew where to start looking for the fault ..it was going to be somewhere in the brake-light circuit.
Because i was still nearby, and although I had the tools in the car - I drove home to sort it out ..and to replenish the car's spare fuses . . .
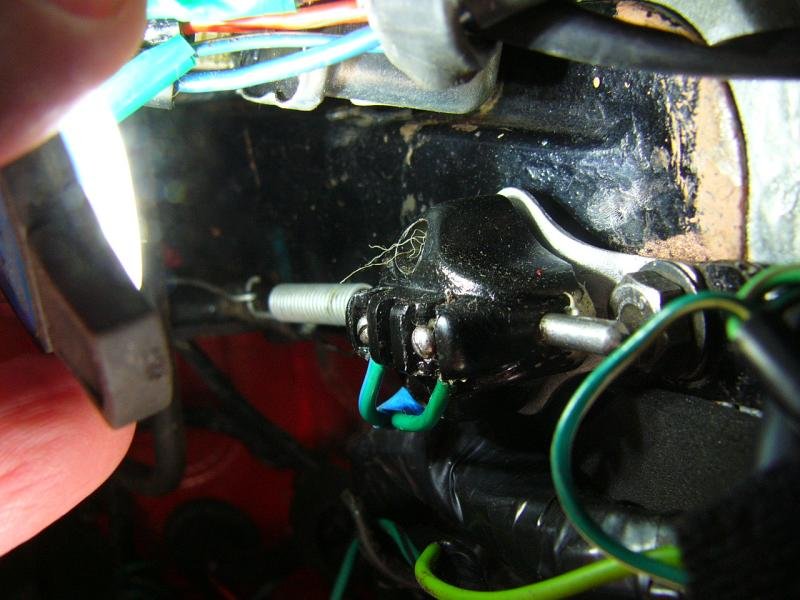
^ This photo (turned on its RHS because it seems clearer that way around) shows the ex-motorcycle brake light switch I'd fitted in Katie's footwell, not far from the fuse box which along with the voltage regulator is now also under there. This switch is a very simple pull-the-rod ..connected, via a spring, to the brake pedal, to bridge the electrical contacts. The green wire to the right (middle of photo) into the switch, is the green switched-power from the fuse lead. That was not going to be at fault ..because the fuse doesn't blow until the switch is activated ..so the fault must be in the switch itself, or anywhere thereafter ..all the way back to each brake-light bulb (which btw are now low-amperage / high luminosity LED's on this car).
The switch's bracket attachment of the brake-light-switch had fluff in the screw hole (centre of photo), which at first I thought must be fine wire filaments that would short from the electrical connection to the screw / to the bracket / on the underside of the bulkhead / to the car's body / to earth.
My screwdriver's blade attracted the fine filament, which again implied magnetic. However when pulling the filaments out I found that they broke, and were mostly trapped under the screw head.. They were probably filaments of the felt underlay, I'd used over the gearbox tunnel, and were most likely attracted to the screwdriver blade by static rather than magnetic. Even when pulled out and the surrounding area wiped clean (..of Vaseline smeared into the wiring connections), the next fuse I tried also blew. The fault was not there then !
I pulled the switch and visually inspected it, ensured that its body was clean and not cracked (..which can cause electrical tracking). I refitted it and tried again. Another fuse blown, so the fault was not there then either. Nevertheless, the methodical approach of working my way along the circuit made good sense, if only in eliminating the power feed wire and the switch itself from being at fault.
Nevertheless, although I'd just traced the wires between the fuse holder and the brake light switch ..for obvious sign of fault, I checked them again. Satisfied with my logic, I proceeded to check the wiring, wrapped as part of the loom, as it drops down the front corner of the bulkhead and then back along the inside sill corner of the floor (under the carpet). No fault could be identified in that stretch of the circuit either.
Thereafter the wires disappear up behind the B-post's trim panel. The wiring harness is next seen is within the top corners of the boot space, as it leads from behind the fuel tank covering board to the rear lights. Again all looked fine.
I then pulled each rear light bulb to check for anything obvious (like a bulb that had half fallen out or otherwise blown to bits ..and those bits were shorting against the bulb holder). But no each were very clean, and the bulb holders lightly smeared with Vaseline to minimise corrosion. There was no tell-tale sign of anything having arced an electrical short.
The one connection I couldn't see was that hidden by the boot / fuel tank covering board. This is a double-bullet-connector which splits the brake light circuit to both left and right hand rear lamps of the car. So out with my overnight bag and the car cover (which I take to hide the car under when I'm parking overnight away from home) to unscrew that end of the covering board. With that pulled forward on just that one side I could, ease the wiring connector into the boot space.
I had replaced & Vaselined that double-connector just last year and it looked fine. I made sure that each of its three bullets were thoroughly pushed into the connector and refastened the lining board, but this time with the connector still inside the boot space, rather than hidden behind the board.
When checked the brake lights now worked again ..without blowing the fuse. Success ..but I still don't know for certain where the fault was. It may have been one of the bullets into that rear double-connector was just touching / shorting against the angled bracing under the rear deck ..in there besides the full of petrol fuel tank ~ which on reflection is not at all a happy prospect.! Or was it that in pulling the rear section of the car's wiring loom out of the corners, and twisting it to inspect all around its insulation for a fault, that it was shorting in some other place. I cannot be certain.
I'll sometime revisit this wiring. in the meantime I wanted to get to the Spring Joust at Hedingham Castle. I was almost 2-1/2 hours late and so just missed the first bout of jousting, but still in good time to see the castle, and other attractions before the second bout of the day.
- - -
Although long-winded, I've written this episode out - in the hope that it may be helpful to those who are less-than-comfortable with vehicle electrics &/or those of us who can generally fix things ..if only they can find / identifying the fault or faults (ie., what to fix).
Methodical approach ..checking one thing at a time in order, and then as required changing and retest before moving on. It may seem slow and laborious but in the end it's inevitably quicker and less frustrating. So ;
- When several things are not working - what's the common factor to those ? - in this instance ; it was the power feed that came from the same source ..one fuse
- in looking for the fault - start by looking for where there was not a fault. ie., eliminate what you can, so then you can hone-in on where the issue is. In this example ; the things least likely circuit to draw heavy electrical current, and also the least likely to be faulty, were the instruments. With a new fuse, turn the ignition on and start the engine ..with nothing else turned on, and check the gauges worked. No fault there then.
- You can also mentally eliminate (check off ) those things that were not being used (in this instance ; the screen-washer pump, the wipers, and the heater blower).
- Then systematically try other things... Indicators = check. Overdrive solenoid clicking in = check. Brake lights = FAIL.
- Acknowledge that the brake lights caused the fuse to blow only after the brake pedal's switch was activated. So the fault was not before the switch ..otherwise the fuse would have blown when the ignition was turned on.
- So - after the wire, which feeds power to the brake light switch, comes the switch itself. I checked this and then checked again to see if the fuse still blew when the brake lights were switch. They did = FAIL ..the fluff seen in the screw hole by to the wires terminal-connector was my chasing a rabbit down a blind hole ..It happens. But take heart ..not finding a fault is progress, as it eliminates that component.
- I then methodically followed the wires and any connectors, looking for any sign of fault (cracked, slit or otherwise broken or chafed insulation) or perhaps signs of arcing (very localised burn marks on adjacent metal) ..all the way back to the bulb holders and the bulbs themselves.
- I couldn't find any sign of fault, and so I retraced the route back to the one connector I couldn't see, without first undoing pulling it out from behind the boot's trim panel.
- Had I not found the fault then I would have gone back to the start and gone through the process again, perhaps with better lighting &/or with my reading spectacles, to see what I'd missed.
If you are not intimately familiar with your car's wiring, then please do carry a diagram ..that you've previously checked is accurate to that particular car. Note ; having a diagram doesn't tell you the route of the loom as it runs through the car, so have a look beforehand and then also recognise that certain coloured wires only go to certain places.
Lucas tracer-colour wiring codes are particularly easy to work with, and it's worth becoming familiar with those colours ; for your own car's primary earth and live wires, for each of the different light & indicator circuits, and for the horn. Any of the others can be looked up, if and when you need to know what they are. In the meantime those tracer-colours you are familiar will allow you to say, " it's not that wire because it's an earth wire, or for the headlamps, for the side-lamps, the horn, the indicators " which immediately eliminates 50% of the wires in the loom.
A compact torch is necessary to see clearly in the footwells, under the dashboard, and into darker corners. I keep a small (waterproof) flat but adjustably bright rechargeable LED one (..a beanie-hat head-torch) for such purposes in my car's tool kit.
A lesson I learnt - was to carry lots of spare fuses (..of the right type for your car). Although a multi-meter (which I do carry with me) can be helpful to trace faults (in this instance ; it would be used across the fuse holder to see if there is an excessive spike in power when different things are switched on, when the fuse blows). I'd say that fuses are easier, cheap, small to pack into a corner of the car for touring ...and absolutely definitive.
When this happened, I immediately kicked myself that I hadn't fitted a multiple fuse holder, allowing one for each circuit. But then I thought, well if the Tom-Tom's power hadn't been lost, and then I'd been alerted to the instruments not working, then how would I know that the brake lights had stopped working ? Or the windscreen wipers ? ..which I mostly I use when it's miserable weather ..and not a time time when I'm happy to trace a wiring fault.
As it was - I was alerted to something being wrong within half-a-mile, when Tom-Tom didn't (audibly) tell me which way to go. Surely that's an aid to road safety.?
Isolating each circuit with a separate fuse wouldn't have done that.
It's useful to note ; that had I been unable to trace the fault, to get back on the road - then I could simply have pulled the wiring connector to that particular circuit off the fuse box. In this instance ; I would have had no brake-lights, but everything else would still work, to continue the journey &/or until I was in a better situation (perhaps in an illuminated service station if it had been at night) to trace the fault.
So I now ask myself - Are more than just three standard fuses such a good thing ? Perhaps yes.. I think.. If so is it best to add more fuses, for individually fused circuits, after the existing main fuse holder (which has a 10amp fuse in it). ?
Katie's wiring has (deliberately on my part) not been complicated with additional relays. She now has just one horn (and it's loud) so no relay is necessary for that (the original one I've removed along with a few meters of wiring and their x-number of connections). I think now, only overdrive solenoid has a relay in the circuit.
- - -
Katie has driven a hundred miles since this incidence, including some pretty horridly wet weather where the instruments, brake-lights, indicators and wipers were all on at the same time ..from that single 10amp fuse - and it hasn't blown again. Unfortunately since however the overdrive has stopped working, despite the relay or solenoid clicking. That's on the menu as the next job-of-the-day.
Hope the above notes are useful to some,
Wishing you happy and reliable motoring,
Pete
-
On 4/9/2023 at 8:45 AM, DenisMc said:
If I remove the road spring and the pivot bolts is it physically possible to lower the front of the arm on the car, push out the bushes, clean the grease off and reinstall them as per the Polybush instructions? I have the use of a pit to do this. I am still going to correct the toe in first.
Yes.
Last month I replaced one of the trailing arm's notched brackets ..to correct the camber on one rear wheel of my 4A, and at the same time remove a shim on that one side to correct its tracking. I did it without removing the spring, hub, brake, etc. < here >.
I just needed to substitute the one bracket, and so although I slackened off the other bracket's through-the-chassis-rail bolts - the trailing arm was still attached and the trailing arm was safe from twisting on its support block, or otherwise naughtily falling off that block altogether with an almighty bong under influence of the spring's compression. The front pivot of that side of the arm had to be pulled down / dropped low enough to extract the bracket's through-bolts and so it would have been possible to also have removed the polybush. Do one side at a time (with the other pivot bracket holding the arm secure) and you should be OK. However...
..because it is so easy to release the damper's drop arm link and to lower the rear end of the trailing-arm on a trolley jack, and then to remove the spring - if I were wanting to take the bushes out, even just to clean them - I would do just as you suggest. It's the safer option and even with the drive shaft, hub and brake left in place / undisturbed (but do support the hub to prevent the arm lowering too far and the half-shaft pulling apart at its spline) - it would give you appreciably better access to the pivot bushes for your task.
Correct your toe-in first ..and then also check the rear wheels camber (with the car loaded to simulate driver & passenger weight) otherwise you may be under there again to correct those.
Hope that helps.
Pete
-

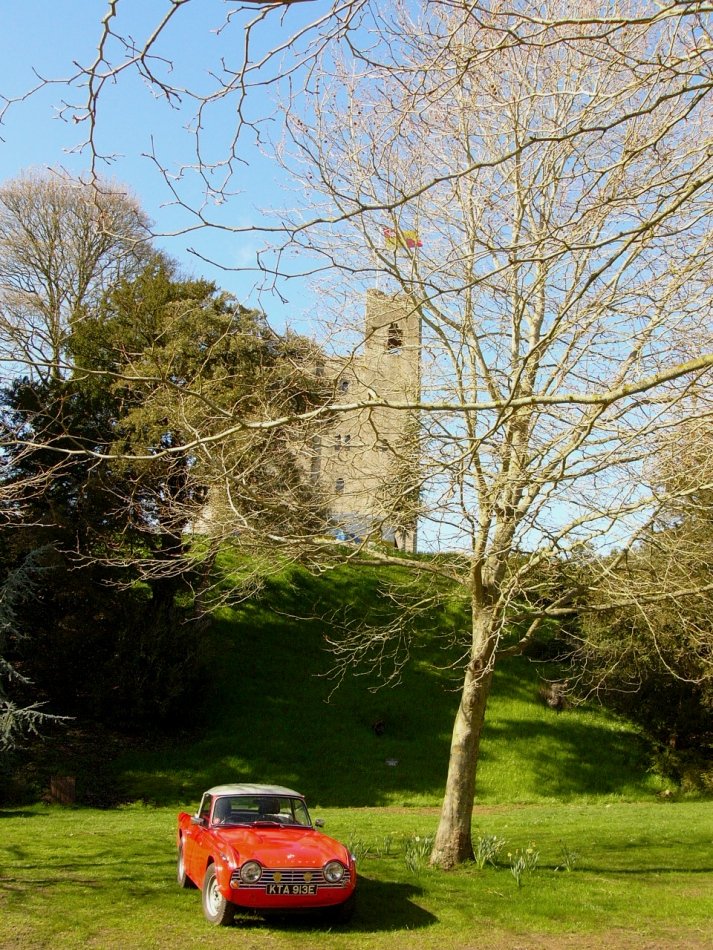
This Easter weekend Katie and I visited Hedingham Castle, Halstead, Essex - built around about 1140 by Aubrey De Vere, the eldest son of a good buddy of the former Duke of Normandy, aka William the Conquer. The property remains the home of one of his ancestors (..well he, his wife and three children live in the somewhat more comfortable mansion house built c.1719, within the grounds. They don't actually reside in the castle's keep). The above photo was taken on Monday afternoon, belying the reality that the morning was miserably wet & quite chilly weather (hence the other half of the roof also being on).
Nevertheless.., it was a great day out, and I met some other chaps there who were celebrating their Triumph ..

^ Spring Joust with Knights of Middle England
-
Very Nice Conrad, and well done on getting her on the road to be useble and enjoyable ready for the springtime.
As an aside, I was interested to see the shape of your door glass and how it appears to more suddenly drop off at the top back corner. Mine own car's are wrong as it has TR6 door glass (..as was the hood n' frame) with a rounder top curve and less of a drop at that back corner. Thanks for that.
Best regards, Pete
-
-
17 hours ago, DenisMc said:
I'll see if I can find a DIY method to check the toe in. If anyone knows of a method I'd be pleased to hear about it.
For wheel tracking (checking and correcting toe-in) I use a piece of fine cord, taut around the four tyres (using 1/4" wood packers under the string on each side to correct the 1/2" difference in front and rear tracking of the TR4A) and then measure from that to the wheel's rim < here > It's a convenient method and accurate enough to measure (..if I'm wearing my reading glasses !)
For the wheels camber angle I use a spirit level (positioned vertical against the wheel arch flare) and then measure from that straight edge to to wheel's rim < here >
My own car's trailing-arm polybushes are red ones (branded 'polybush') which are not split in two parts like yours. I replaced a cracked trailing-arm casting but reused the bushes, from the old arm, in its (also used) replacement. Even the one-piece polybush pulled in easily enough, and then the steel spacer tube was inserted < here >. The polybushes have a flange at either end and the arms do not slip sideways on them.
Hope that helps,
Pete
-
6 hours ago, Nigel C said:
Nice work Pete, the neighbours should be grateful they have someone who is willing to make a temporary building as attractive as possible
")
Thanks Nigel

-
On 4/2/2023 at 9:04 PM, Tony_C said:
Great stuff Pete, I’ve missed a couple of weeks (used to think I know all about the ‘challenges’ of running TR4’s after having a few and busy all over Asia and then straight onto N Denmark)…… Who’d have guessed Tolkien door’s the next time I look in?………… My first and favourite all time boat in the world was called ‘Gwahir’ when I managed to acquire her …. Story was ‘Gwaihir’ was the Eagle "who would carry you to safety" from Lord of the rings story, hence the ‘Eagle’ on the main sail.. Sad to say, I could never get into the books… to date?!………. And promptly renamed her "Josephine C’ after my Mum

Well travelled Tony, Tolkien round ports in square panels are surely what you've come to expect from me ?
Impressive yacht, nicely proportioned with the long coachroof and its pilot house a good way back. The unusual but easy to handle rig and other details suggest Asian built perhaps with real teak interior.
Speaking from the same situation, naming your favourite boat after your mum, is very appropriate.
Pete
-
20 hours ago, john.r.davies said:
Very nice indeed - have you renamed your house "Khazad-done"??
Khazad-dûm no.. I think khazi doom might be more appropriate at times !

-
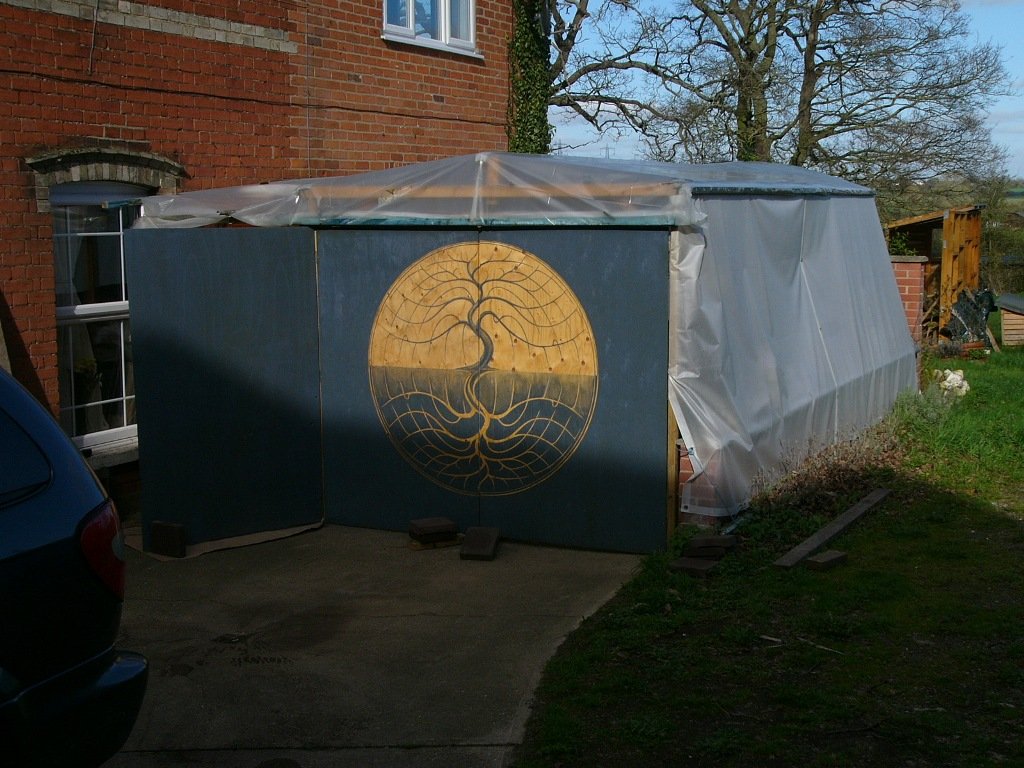
final Tolkienian doors update . . .
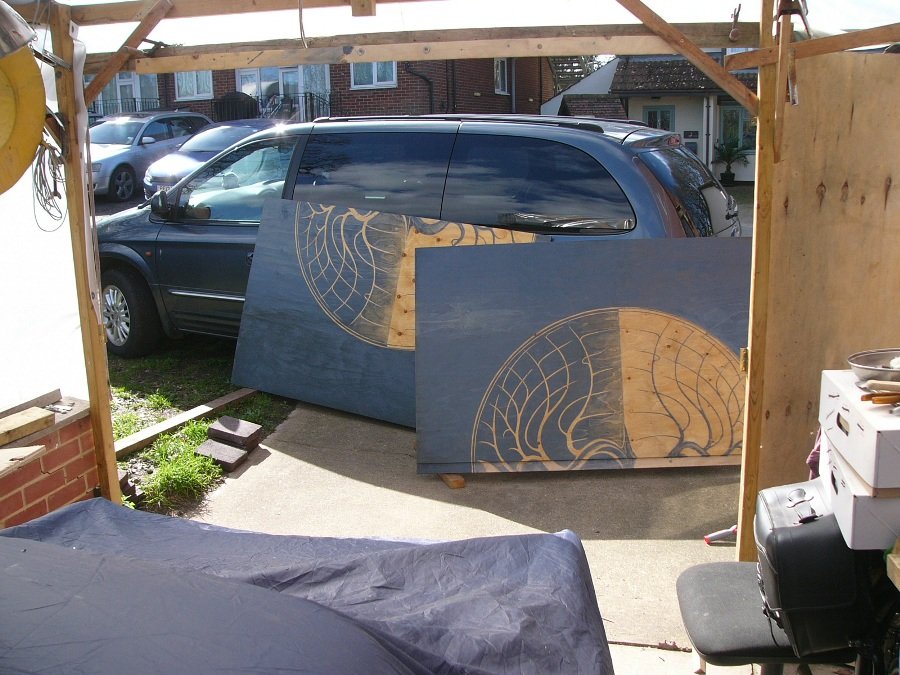
^ Today the sun was glorious but still there's a cold northerly breeze, and so I've swung the Chrysler around to divert the wind as I sealed the end grain of the plywood with thinned boat-varnish.

^ rehung, albeit with just one screw in each hinge. The side door, which when closed just looks like a fixed panel - I've repainted blue (because rain water poured down it last week) and have given it two coats of thinned varnish to help seal the wood. That door is useful though.. because when the Chrysler is parked back in place, the two muralled doors cannot be opened.
Because the doors edges were still tacky-wet with varnish, I'll do their finally adjustment and add other screws to the hinges next week. In the meantime the neighbours are beginning to notice, but no one has complained yet.!
Pete
-
indeed she is
..as indeed is your 'garage'
Pete.


That was a year that was..
in General TR Technical
Posted
Thanks Peter, I haven't yet looked at the pdf's you kindly posted for me, but I will do.
I've just had a good conversation with Tom Chatterley-Cox, who was very patient with me and helpful in his explanations of the operation of these overdrive unit. He's explained that the hydraulics are not wholly a closed pressure system and as excessive pressure is shed by the valve - it would not be unusual for bubbles to come out from it.
Still he has suggested that it would OK to pump more oil out of that valve's hole, and we spoke of a clear pipe inserted into the threaded hole to pump through perhaps 1/4 litre of gearbox oil in case any debris was causing or contributing to the problem.
Furthermore and encouragingly, he's suggested the issue may simply be that the solenoid lever may have slipped around on the shaft just a tad, and so although the electrics and hydraulics are good - the lever simply isn't moving quite as far as it should. This of course corresponds with what Stuart was saying about the gasket under the solenoid effecting the adjustment. He, Tom, has recommended I undo the solenoid's operating lever and then to test the overdrive's operation by pushing forward on the LHS operating lever. This can be done with the rear wheels off the ground. If the overdrive works again, then it would just be a matter of readjusting that lever. The solenoid not having a gasket under it is not a problem, and may only have been there as a shock absorber, perhaps noise insulation so that owner's didn't hear the clunk of engaging.
Anyway I'll try what's been suggested and let you know.
cheers, Pete