


Bfg
-
Content Count
1,800 -
Joined
-
Last visited
Content Type
Profiles
Forums
Calendar
Posts posted by Bfg
-
-
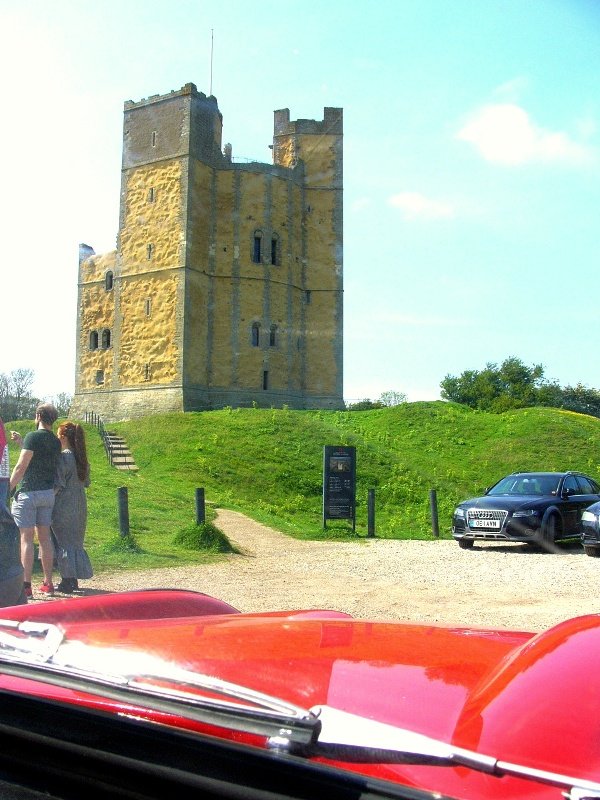
I've not driven Katie for a couple of weeks now, due to general despondency & cold wet weather, floods, my own health and my working afternoons on my boat, but this Sunday afternoon I pulled her out for a drive across to Rendlesham forest and over to my local castle at Orford. She's not running well, seemingly running too rich with these carburettors, but I'll address that in due course. The weather was a beautiful mid-May day with blue skies and that's something we both needed to be out in. . .
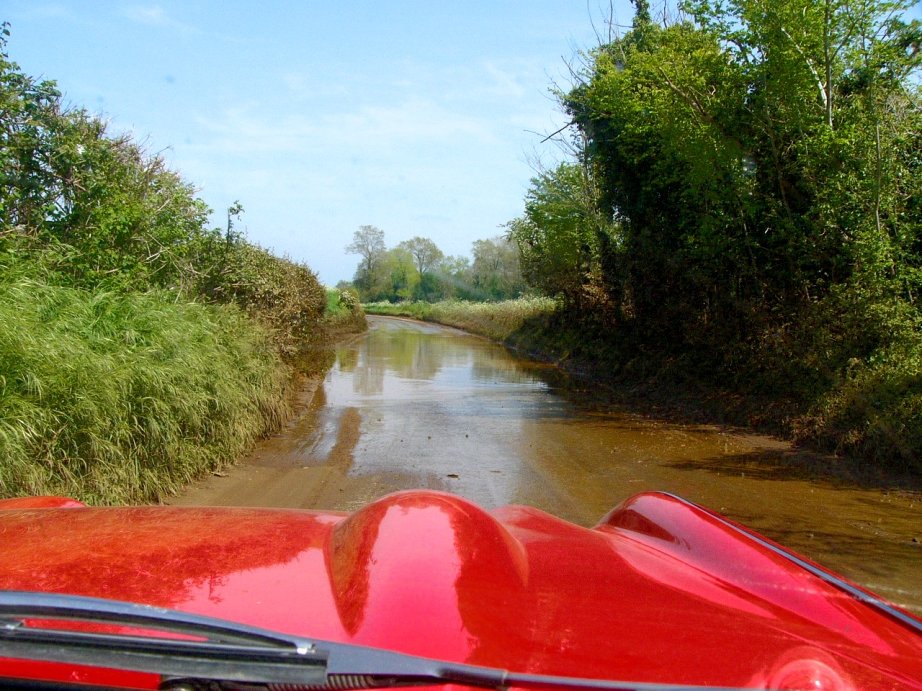
^ did I mention floods ? This one was particularly muddy and I guess only about 6" deep ...although it felt much deeper than that as we went through it.

^ The faces of this castle's keep look very 'blobby' now that they've spent a cool £-million (which even then I'm led to understand ran over budget) to render over the coralline red crag stone < more about that here > in order to prevent it from further crumbling away. It's odd that a castle built 1165 on the order of Henry II should all of a sudden be crumbling but for sake of popular reasoning let's blame that on global warming - as it seems to be responsible for everything else. It's noteworthy at nearby Framlingham castle too that the limestone stone carved coat-of-arms above its gatehouse has suddenly and badly eroded in the past 80 years (photographs over this period showing its loss of definition are indisputable), so it's a good thing that the English Heritage and other such organisations are working to preserve our country's heritage.
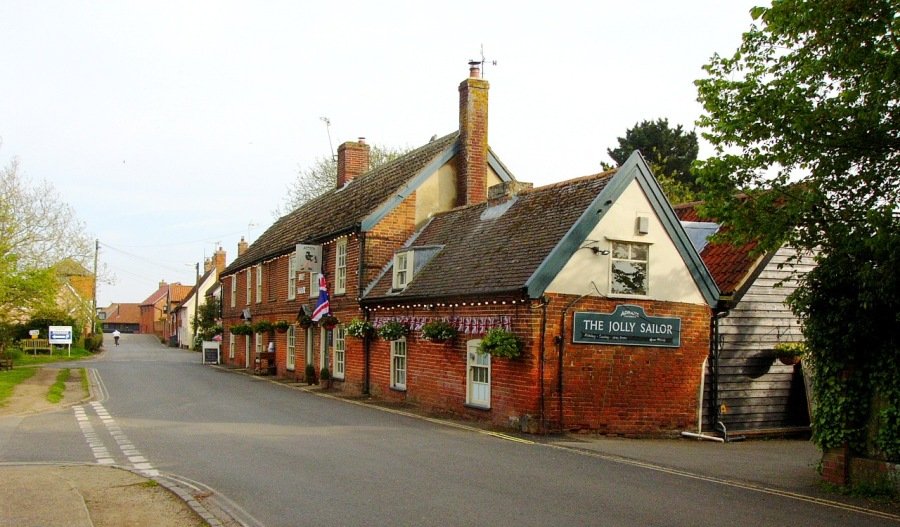
I enjoyed good conversation with the English Heritage staff regarding details of the castle's design and construction, before walking down to the quay, via the very pleasant 'Jolly Sailor' for a quick and rather good a half a pint of ale. . .

^ Orford, Suffolk - once a small but busy sea port, sheltered by the ness (..the shingle beach) is now some 5-miles from the sea. That is but a reflection of how things that may seem timeless have in fact changed ever so slowly through the centuries. Even before this, the shingle moved by the action of the sea's waves ad tides, long ago formed a bar across the river Alde, and that diverted it's flow down the coast across marsh land to Orford. The mouth of the River Alde has long since been completely cut off from the sea and it's name changed to the River Ore. Orford's name (which was cloned after the doomsday book) was I guess was derived from the rust coloured sand ..the iron ore in that red crag, and the shallow ford across to the ness. What is now Quay Street, Orford used to (just 150 years ago) be called Bridge Street. As you might gather from the above photo the River Ore is wide and so for very many years a ferry has served the purpose of conveying animals and foot passengers across.


^ springtime with luminosity through the leaves and bulbs of seed (nut ?) or flower yet to reveal itself. Even the pines were in flower.

^ Orford castle still has the quarry from which that red crag of the castle walls was hewn. There's an incredible timeline if you were to think about it, not least perhaps because this is a particularly rare to Britain and ancient rock ..the remains of a causeway to Belgium & Holland.

I opted for a slightly different return route through the forest (avoiding the flooded roads) and driving directly into the setting sun made for some wonderful glimpses of light through the trees.
A pleasant afternoon out in a TR
Pete
-
17 hours ago, brenda said:
Only 2 TRs today but lots of other new and old vehicles to look round with a brew and bacon butty.
Looking around that collection of classics one might have instigated a competition as to which was the most difficult for someone of my size to get in and out of.


-
Judging by the slip angles -presented, it appears they opted for a best compromise ..for high-profile cross-ply tyres ...being driven spiritedly.
Pete
-
1 hour ago, John L said:
Is there is a simple may to determine the rack central position mechanically?
John, assuming your car's toe in is approximately correct, and the track-rod-ends are the same on either side .. the simple way is to mark the thread where the track-rod-end is adjusted to (a junior hacksaw blade scratching into the thread groove is easy). Do this on both sides. Then undo them and count the total number of threads that were wound onto, on both sides. You can try counting as you unwind them but I find it awkward to count on my fingers at the same time as unwinding each track-rod-end. Anyway it's the total number of threads from both sides you're interested in. Half of this number is how how many threads each track rod end needs to be wound on - for when the steering is central.
Pete
-
2 hours ago, Charlie D said:
Pete,
I think it’s worth carrying a length of wire with a small crocodile clip on each end.
If you ever find that power is not getting to the distributor at least you can do a quick fix by patching the coil terminal to the battery direct. It may get you out of uncomfortable situations quicker.The photo with the dropped screw. Is that oil on the floor just under the end of the oil filter bowl? Classic sign of a leak where the bowl joins the top part.
Charlie.
Thanks for the tip Charlie, I'll try that.
The oil is in a drip tray, which has been under there for the past six months, but kicks around into different places. The engine has a slight weep from the front timing case, and more from the rear scroll seal, but as i have no wish to pull the engine - I can live with them. The more persistent oil leaks though are the result of £1500 worth of professionalism in rebuilding the gearbox and overdrive, and their reassembly.
2 hours ago, RobH said:Check the short lead from the coil to the distributor. It is quite common for the wire to fracture inside the insulation near the connector, because that wire flaps about. If the broken ends are still touching inside the insulation, the result is an intermittent connection which can seem to cure itself if you move the wire a bit.
Thanks Rob, I have replaced the low-tension lead between the coil and distributor and soldered new connections onto either end. While doing so I took the wire's diameter up in size. I would be surprised if it were that, but as the wire was recycled (but shiny copper when stripped back for the connectors) then it is a possibility.
The feed wire to the coil (white wire) is taken from the back of the ignition switch, a connected wire from this goes to the ammeter warning light. I wasn't conscious / I didn't notice there was anything wrong with that lamp when I first tried to restart the engine. This ignition switch's connection is a two-terminal post (for spade connectors) and the other wire is the white one which goes to the fuse box, on the green wire side ..from which the fuel and temp gauge instruments take their power, and also the heater's fan blower. The instruments always read low when the engine's not running (..which is rather annoying), and I might otherwise only say that heater blower worked fine when the car restarted ..but of course I didn't try it when the car was dead. Could be that the control box (remember the excess charge reading on the ammeter) is playing up and the brown and blue wire from that to the ignition switch lost its power. The horn is from that same connection on the control box, so if or when it happens again I'll try the horn to see if it is that.
The hazard lights are from the other fuse, which takes it power from another terminal on the control box. That was OK.
1 hour ago, Mk2 Chopper said:It'll be worth doing all the ignition components to make sure it's all tip top. Having adjusted the points, you might need a small tweak on the timing to get everything optimal again, and then I'd be setting up those carbs. Would be worth doing your valve clearances before you do so that all the cylinders are at their best.
An enjoyable write up as always. Looking forward to your next escapades!
Gareth
Agreed Gareth. Thanks.. I've only been through the low tension / feed wiring, and changed the low-tension lead from coil to distributor. I deliberately try to do this sort of thing - just one system at a time. The ignition was working and although probably not spot on, had otherwise not given me cause for concern ..whereas the old carburettors were very obviously old n' tired.
Valve clearances have been done recently, and the rocker shaft and rockers are new, but aside from the oil pump, which I've also rebuilt - I fear this engine is also worn n' tired.
Katie is some nine years younger than me, so I can relate.
Pete
-
Katie seems to be afflicted with annoying (to me !) little issues, one after another. . .
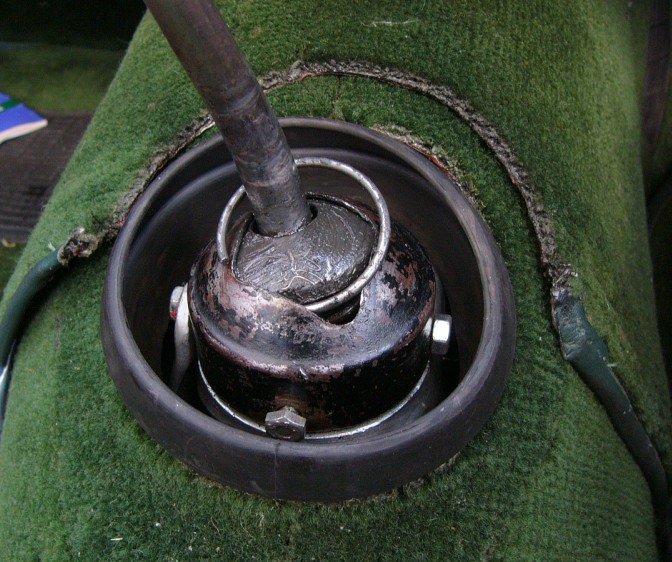
^ the spring coming out from under the gear-lever cap was one of them.. The car still driveable like this but with a very floppy gear change. I removed the rear cup screw and just loosened the pin going through across-wise, and was then able to wind it back in using a pair of long nosed pliers and a screwdriver (to hold the bottom end of the spring up ..so it could turn clockwise without snagging). I hadn't touched it, when I had the gearbox cover off to adjust the solenoid relay's lever, so I can't explain why it happened, just that it did.
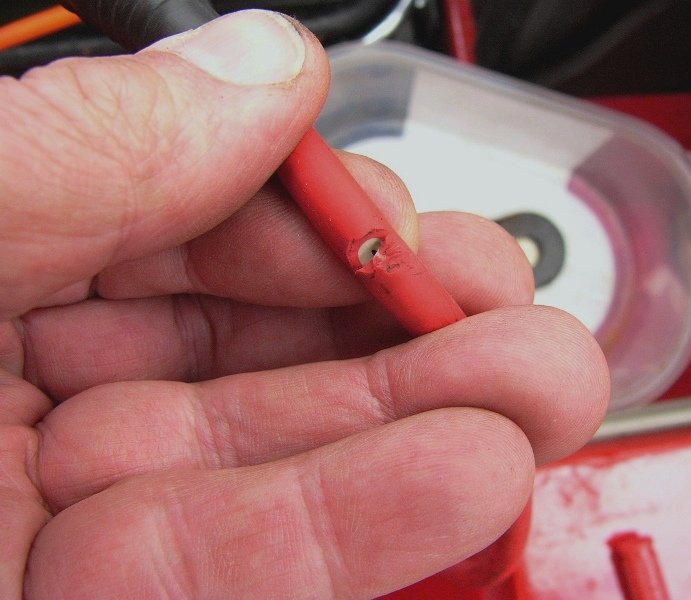
^ this was another.. The high-tension lead between the coil and the distributor cap (aka the 'king lead') has a slit in it, or more correctly several close together although just the one was cut down to this lead's silicon core.
I spotted it a week ago, when I had the spark plugs out to clean them, which I needed to do to assess their colour in accordance to the carburettors' adjustment. This in turn followed comments that Katie smelt like a TR6 - when I turned up into our local group's breakfast meet several weeks ago (ie., Rich suggested - it was running rich). This in turn was subsequent to fitting the reconditioned carburettors, so I'd borrowed a flow meter and tried to balance the SU carbs. At the time I just taped this HT lead up, but I've now replaced it for a new one (with copper multi-wire core ..which I prefer).
Last Thursday., when I went down to the East Saxon group's club meeting, the car appeared to be running pretty awfully ..but then it was also p***ing down with rain, and I had the roof on. That's 23 miles for me, so it's the furthest I've driven the TR with a roof on (either the fabric one or Katie 's fibreglass Surrey top). With unfamiliar noise levels it was difficult for me to assess anything much regarding carburettor tuning.
On the way back from the meeting the roads were wet but the rain had cleared. Nevertheless some of the finest brains in Essex had decided to close the A12 again, whereby all traffic is diverted into the north of Colchester, around it, and then out the north-east side of the city to Ardleigh, Manningtree to cross the River Stour, before cutting up to the south side of Ipswich. Of course I live on the north side of Ipswich, Suffolk.!
It was only another 8 miles added to the journey (a third as far again !) but it takes another 20 minutes more because of the nature of those country roads. I was not in the most relaxed of moods, in part because this diversion has happened to me half a dozen or more times too many ..over the past two years of going to this group's meeting, but also because I happened to be the last to leave the pub. I'd lost the car keys. I eventually found them wedged behind a radiator, next to the seat where I'd original taken my coat off. Hey ho., Pete's a plonker.
And then, just because Essex is such a nice an d welcoming place.. the assigned diversion route had a mobile police speed-trap. I was one of a stream of cars driving along at 34mph (when checked on the gps) through a sleepy country village. Of course the next village has a 40mph speed limit ..and all the houses otherwise along that stretch of road cope with a 60mph. But here where it 30mph we ought to have been watching our speedometers rather than the wet and dark road and any pedestrians who might be dancing along from puddle to puddle at 11:30pm on a cold and miserable night. Perhaps Britain's finest think it lessens traffic noise, with the car in 3rd gear.? Anyway, bottom line is that again I couldn't sensibly assess the carburettor's tune during that drive.
As it happens last week I'd decided to try Katie with a new set of plugs. I'd not changed them in the two years since I bought the car and as I was trying to assess the carb's tune I thought it easier to start with bright steel. The plugs fitted were NGK BP6HS and as she's always been just a little sooty, I opted to try a set of BP5HS. Without changing anything else driving across to and back from Hedingham again yesterday, and following the rough running on Thursday evening, I wasn't expecting any improvement, but a new set of plugs following a 65mile round trip ought to give me a much clearer idea of what was going on. . .
The car was frustratingly lumpy driving across there, but the weather was nice and the driving across country pretty easy. However.., after an enjoyable day there I headed back, again in no rush. Just a few miles later the engine cut out completely. The place that happened was soon after a sharp left handed corner, up an incline through a cutting between fields. With no more that 50 foot visibility in either direction it wasn't a comfortable place to stop and absolutely no grass verge to get off the road. If I'd tried to roll back down the hill, then I'd be rolling down to that blind hard left-hander corner. It's at times like this you're glad you've fitted hazard warning lights and LED bulbs.
Open the bonnet, again a useful thing that it's bright red, and there's fuel in the pump, fuel in the in-line filter inbetween that and the carbs, and no fuel flooded out anywhere. There's also no oil nor water all over the place or under the car. Electrics then, the HT leads and low tension leads on the coil all appear to be fine, unclip the cap and there appears to be no spark happening at the points. Power to the ignition, if I remember correctly comes from the ignition switch. I try to twist under the dash to have a look, but I don't want to be sitting there with my legs out in the road for very long. I can't see anything wrong but I try the car and she starts.
Let's get out of this cutting and off the side of a hill. Of course as I pull away a car comes right up behind. The instruments check OK except of the ammeter which is now reading off the scale - over charging. I can't do much about it in that situation, so not wanting to melt wiring nor boil the battery I put the headlamps on and then also the heater's fan blower to burn off some of the current. With a car up your jacksie it's not terribly easy to find somewhere to pull off, and in any case there were only small private driveways to be had. a mile later I spot a turning into a field on the other side of the road, hastily indicate and finally get to pull off the main road. Big, deep water filled pot holes don't make it a smooth landing.
Open the bonnet, check the dynamo's wiring connections, tucked in behind the exhaust down-pipe's heat shield. Naturally they are hot but no signs of looseness nor melted insulation. I feel the battery leads for excess heat. Nope they feel fine. Next I've got a piece of carpet out and am kneeling next to the driver's foot-well, trying to see if anything is amiss with the connections on the back of the ammeter. I'm glad to be carrying an LED lamp, even though the evening is light there's not a lot of light behind a dashboard (..aside from the red glow of the oil warning and ammeter warning light bulbs). Nothing seems astray, nor any sign or smells of melted insulation.
30 miles to go, 5:30 in the evening, I decide to carry on back with the headlamps and heater's fan blowing as required to try and save the battery. Keeping the engine revs down as low as I can, I head off and the ammeter is still reading high, but at least it's not off the scale. Things settle down at 40mph in top gear and overdrive and I turn the headlamps off. after another couple of miles I turn the fan blower off and the ammeter settles back down to reading its normal 5amp charge. It's then fine all the way home even when pushed to 3500rpm.
Today . .
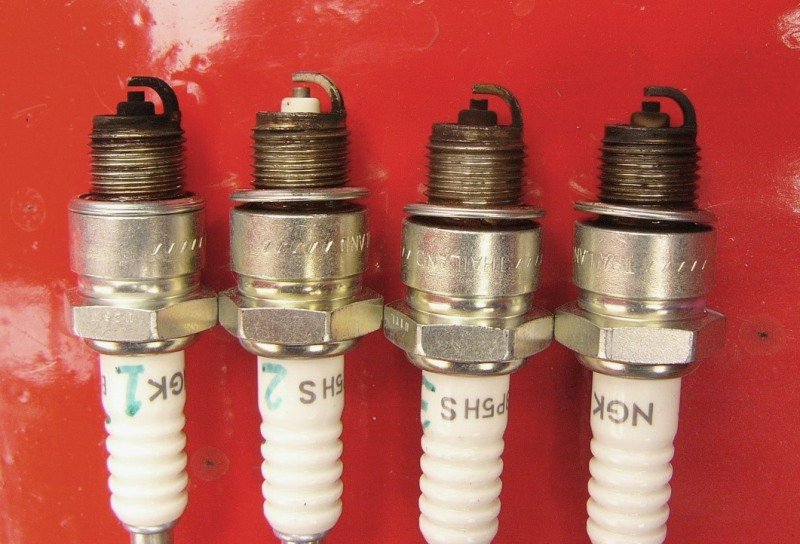
^ Number 1 plug is sotty, #3 a little too sotty still but just starting to turn brown, #4 plug a little less sotty still and turning brown. Oh yeah.. #2 light soot around the steel threaded rim but otherwise pretty much unused. There's a clue there somewhere !
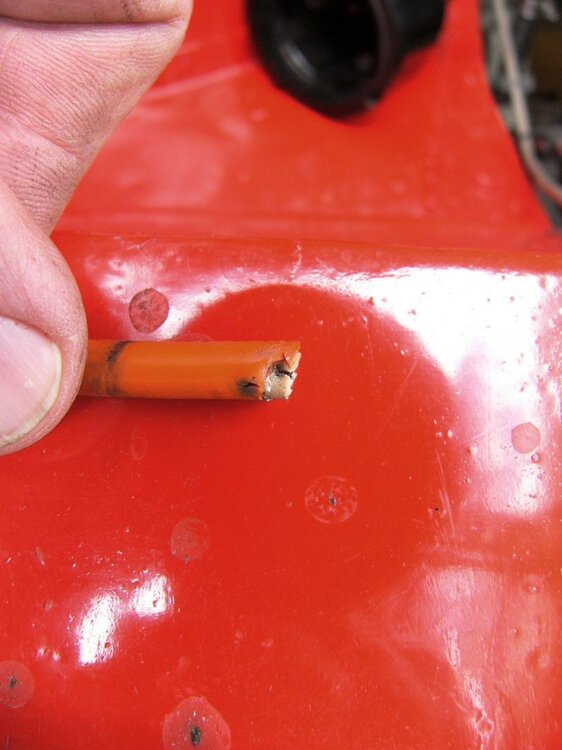
^ number 2 HT lead as it was in the cap. I think the dark marked hole through the orange insulation was where it had been fitted sometime in the past, and the dark marked hole through the white insulation was where it had been refitted, and has been like this since I bought the car. As I said I've not touched the distributor or the HT leads, aside from routing them more neatly, since I bought the car, although I did fit new connectors to the low-tension wires. I might only guess that when I had the cap off, to get to the forward two cylinder's spark-plugs I mush have pulled the lead, the end of the split orange insulation has broken off and the lead was loose in its hole, although when I pulled on it it didn't appear to be.
For anyone who doesn't know, it's important to undo the pin screws (on the inside of the distributor cap) all the way when you refit these leads. Only when the screw is right the way unwound, and after you'ved checked there no debris inside the hole, should you push the lead in, hold it securely pushed into the cap, and then refit and tighten the grub screw. If however the screw was still partly in, and even you push the lead hard into the cap, then the sharp end of the screw can catch the insulation and the lead doesn't go all the way in. It only just held there. Even when tugged it feels secure, but over the years the lead is also twisted and that can break it out. As has happened here.
Those grub screws by the way can fall out of the cap when they are fully unscrewed. they look like this . . .
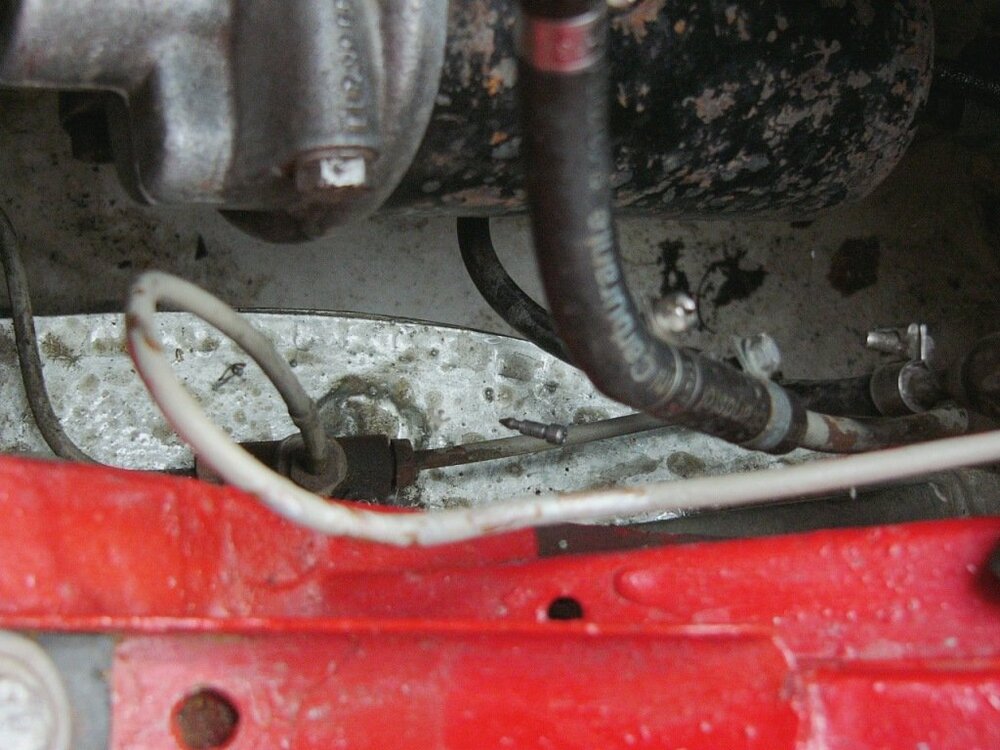
^ you can just see the pointy ended screw (..just a little down from the centre of this photo) which I dropped (i being the twit who inverted the cap) ! It dropped down by the oil filter to the chassis (silver painted on this car).
For those astute enough to notice, that screw is above the brake pipe ..and there's no shadow from or around it. That's because it is suspended in space. No, it wasn't that I was incredibly quick with my camera ..it's simply caught in a cob-web. It might be worth remembering this image next time you drop a small screw or washer and you simply cannot find it anywhere on the ground.
Moving on, with the end of this HT lead cut 1/4" shorter and carefully refitted, I have since retried the car down the A14. When first started the ammeter shot around and off the scale, but tapping it and turning the lights on again restored it to read normally. I guess the control box is forewarning me that it's about to die. Engine ticked over more smoothly and at all speeds things are back to normal again ..running on four cylinders. Vibration of the engine is still very noticeable above 3000rpm, so I guess there's a still a little more carb tuning to happen, as well as a difference in compression between each cylinder. That is something I am not going to check because I do not want to know ! As 3100 is 70mph I can live with some vibration as I work through the gears, and otherwise it is not a problem.
It is noteworthy that the vibration period of the engine has moved from 3000 - 3200rpm to now peak at 3300 - 3400 rpm. This I might attribute to the points gap being 0.008" ..which I've now corrected to the handbook's specification of 0.015". The gap effects exactly when the points open (when the spark happens), so by increasing the point's gap by another 0.007" .. I've retarded the ignition a little. This in turn can be felt as a slight drop in the engine's gusto, as well as in the rpm change of its peak vibration.
Why the engine cut out completely ..and when checked there appeared to be no spark across the contact breakers - I do not know. I think that intermittent faults reveal themselves in time, or else I've corrected something without knowing it. It's my local TSSC club night tomorrow, at The Sorrel Horse, Barham, so we'll see if she runs OK for that.
Frustrating issues these past few weeks, but all in all really nothing very major.
One thing to be noted here is that ; while my focus was on carburettor tuning, having previously (..and deliberately) changed absolutely nothing to the ignition side of things, aside from cleaning the spark plugs - the engine's rough running after I adjusted the twin SU's mixture.. was mostly due to my inadvertently twisting the one poorly attatched HT lead.
Pete

-
18 hours ago, TRier said:
Has anyone ever seen a car leak oil from the bolt hole for the coil like this one does?
18 hours ago, oxf2 said:On mine, a dynamo bolt was missing and oil was being chucked out of the hole. New bolt inserted, leak stopped.
Thank you both. I don't to my knowledge have leaks from either of these ..but that is more chance than engineering ..as I didn't know about either location being a through drilling. I, and I'm sure others too, appreciate the heads up.

Pete
-
Good to hear that your home again, and sounding like the procedure went well.
I've only had private medical once ..when I needed a dentist due to an abscess, discovered by the cabin's pressure change during a flight across Europe. The dentist turned out to be an oriental lady who tilted the chair right the way back and steadied my head in her ample cleavage. Thankfully I remember that sensation very much more than the dentistry. There's much to recommend going private !
Best regards, Pete
-
Rich went in for a cartilage operation today. I guess the size of his dinner at the East Saxon's group meet yesterday evening must have put too much load on his knee !
Anyway I sincerely hope it went well, and especially think he deserves a bit of peace n' quiet rest, with our best wishes for a speedy recovery.
Pete
-
Thank you Marco,
") I shall look out for narrower belt then.
I shall look out for narrower belt then.
Pete
-
Thanks Marco, and also Rob, My car was also restored in the 1990's so perhaps its Flennor belt also originates from then.
3 hours ago, Z320 said:A typ 20 is MUCH too big for your small pulleys (not smaller than 160 mm recommend).
Just to clarify, are you saying the 20mm wide belt is too wide for the TR4A or for Tim's TR3A.? It seems to fit fine on my car with the outside flat face of the belt sitting 1 or 2mm below the rim of the dynamo and water pump pulleys, and 5 or 6 mm below the rim of the crankshaft pulley. I can think of no advantage for it to sit further down in the 'V' but I am glad to learn.
Pete
-
I'd use CT1 for this sort of thing. I also used it to bed down / seal under things like stanchions and mooring cleats cleats on the boat. On my own container I thoroughly cleaned off the top surface and allowed that to dry in the sun and the wind, sealed where necessary, and then painted it (two coats) with liquid Dulux paint. That was in white to help reflect the sun's heat. The Dulux paint was water based as their air-drying spirit-based paint takes weeks to dry over CT1, and then only sorta ..as I found out when I used it as seam-sealer around the TR's floors. The Hemple two-pack paint I used around the boat's deck did go off just fine though.
Pete
-
For what it's worth.. I find the cogged belt slightly smoother running.
Background ; As a matter of course I changed my TR4A's wide fan-belt for a new one soon after I bought the car. I simply didn't know how old and perished the existing one was, and as all other rubber parts were perished and the car's tyres 27 years old - I considered it prudent to change it. I kept the old (solid) one as a spare.
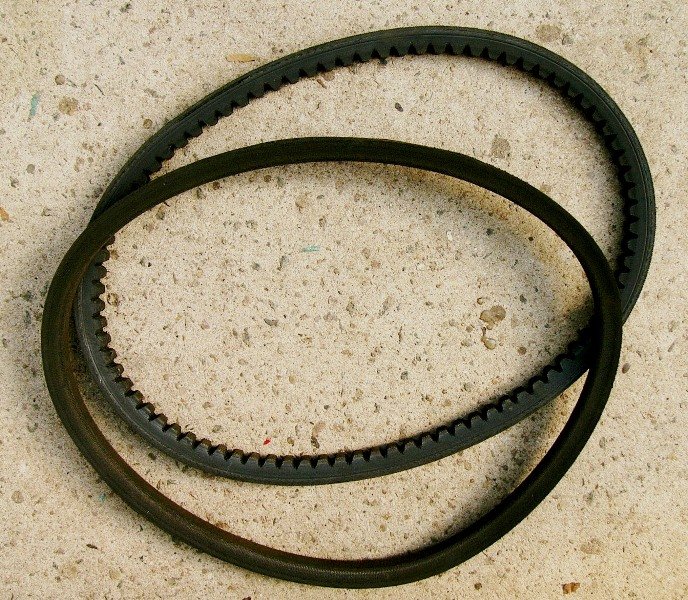
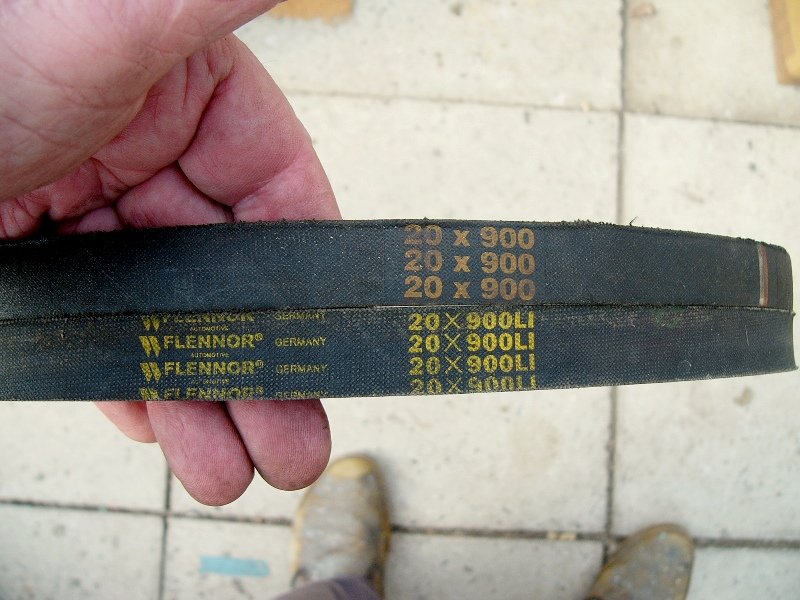
Just recently, after some 3000 miles of driving on the new one, I've swapped back and now use the old WFLENNOR Germany cogged belt. The photos are instructive insomuch as the plain belt is holding the triangular run of the pulleys, even after being removed. Perhaps this stiffness goes when the belt is hot, but otherwise it may attribute to the belt flapping (as it does have some weight) ..rather than it just spinning out as a circle inscribed by its three pulleys.
At the extreme right of the second photo you can just see how the solid belt's profile is rounder, whereas the outside face of the cogged belt is slightly concave. It is more pronounced when the latter is fitted. However, this may be because the prior-owner ran the belt much tighter than necessary, or else there's a slight difference in V-angle, &/or in the design of their fabric reinforcement. In any case, as that photo records, each belt is the same size - but the cogged belt sits further into the pulleys. If it is of consequence to you car, this relates to the dynamo being 8 or 9mm further out on its clamp bracket.
The solid belt does feel a harder compound and it is less flexible. I also think that its join (to make the belt a continuous loop) is more pronounced, ie., a bit lumpier and harder still. Possibly that may be felt as a vibration as it goes through the pulleys, which is perhaps unkind on the water pump and dynamo's bearings. This is difficult to assess even at tick-over speeds.
I did have a water pump failure when its pulley worked loose, but that was because no woodruff key had been fitted. I then also had a dynamo failure, but that may again be coincidence ..and better attributed to heat from the exhaust down-pipe (I have since fitted a heat shield). In short, I cannot say if the solid belt made any difference to their final demise.
NB. from what you and Rob says, your car's fan-belt width x length is different to that on my 4A, but the principles behind what I write are equally applicable. Anyway it is perhaps food for thought.
Pete
-
^ There's a nice selection of TR6 colours in the group
On 4/16/2023 at 9:50 PM, brenda said:Redrose Group meeting today, after 9 cars had short run to Woodside golf courses for coffee cake and a game of Boules.
Mike Redrose Group
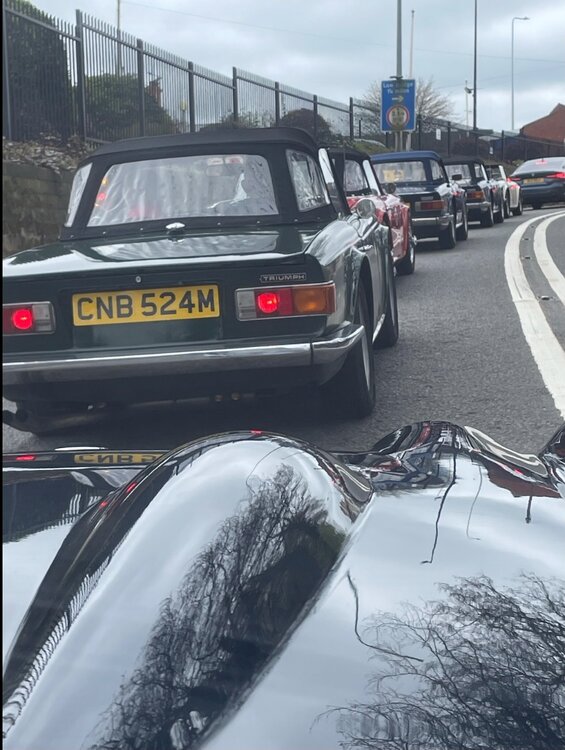
^ I see one doesn't trust his car's handbrake. No names mentioned of course

-
Indeed my TR4A uses just a 3/8" thick board flat on the shelf, with no blocks to raise it higher for the TR6's wider tyres.
Pete
-
18 hours ago, pfenlon said:
Have just bought a piece of plywood for over the spare wheel, and note that it needs 2 small straps to hold the rear down, the front sliding into the 2 rear brackets, just
beneath the fuel tank. But see pic there are 4 holes in the bodywork, the lower ones make sense but what are the top ones there for, puzzled, again.
(same on the other side)
As Stuart points out they are studs ..although they might better be called posts.
The press studs on the rear face have little straps, and these hold the spare wheel cover down, but they need a little slack to get the press stud on. The ones in the top face (as I say are more like countersunk-for-a-screw posts, than a studs), together with a corresponding hole into the covering board accurately positions the board from sliding around. The raised pressing at the sides don't work very well on their own when the straps are stretched loose and when you drive over sleepy policemen.
Pete
-
judging by the state of the filter and the sludge in the sump of my car, some owners only change the filter perhaps once in 20 years ..so there's really not a lot of reason to change to a cartridge type

-
Well done Denis. That's a good result.
Have you check / are you happy with the rear wheels camber angles. ? I use plywood pads on one side (due to a very slight incline in the patio slabs where I park) to level the ground, and then load the seats with night storage heater bricks to the prescribed weight and rolled the car forward to its parking spot (two wheels on ply pads), and then use a spirit-level, set vertical, to measure to the rims ..in the same way as when measuring to the string. I guess a plumb line would work instead of the spirit level. My car's wheels were a tad positive (leaning out) on the LHS rear and similarly on the LHS front wheel. Changing one trailing arm bracket corrected the rear, and shimming under the front suspension bottom wishbone brackets mostly sorted out the front.
Pete
-
Thank you Nigel and Charlie, and again to Stuart and Peter, to my friend Rich who phoned me in support, and especially to Tom Cox who I called again today for a second round of advice.
 GREAT NEWS is that the overdrive now appears to be working, albeit spinning away inside a breeze shaken and quite chilly poly-tunnel rather than yet tested on the road.
Today, Following clearer advice in the Haynes manual, I fished the operating valve out with a bent piece of wire . . .
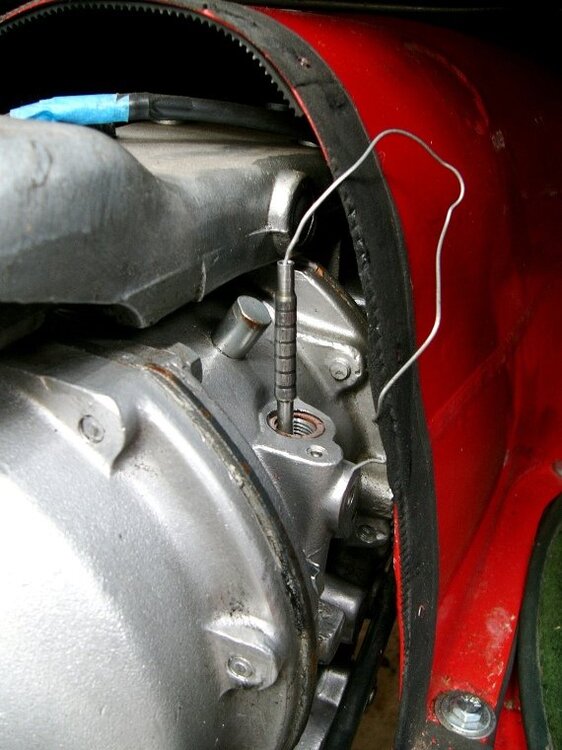
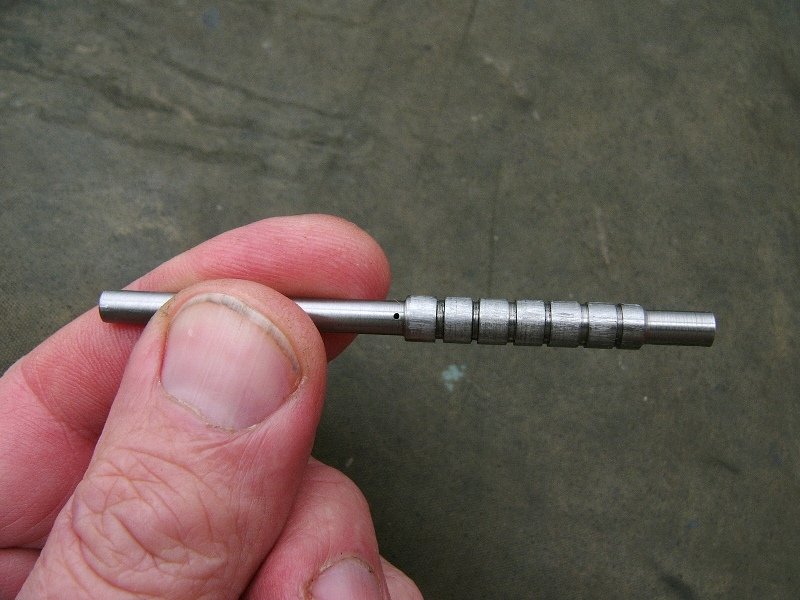
^ That to me is an odd looking valve, but I'm sure there's good reason for that. The bottom end, of the plain shanked length, is closed off but the drilling inside this tube otherwise goes all the way to the bottom. You'll see the small hole by my index finger which needs to be clear. After blowing through that, and it appeared to be clear, I washed it out inside and out in petrol. It is possible that a tiny flake of something was laying across the inside of that hole, but I cannot say for sure.
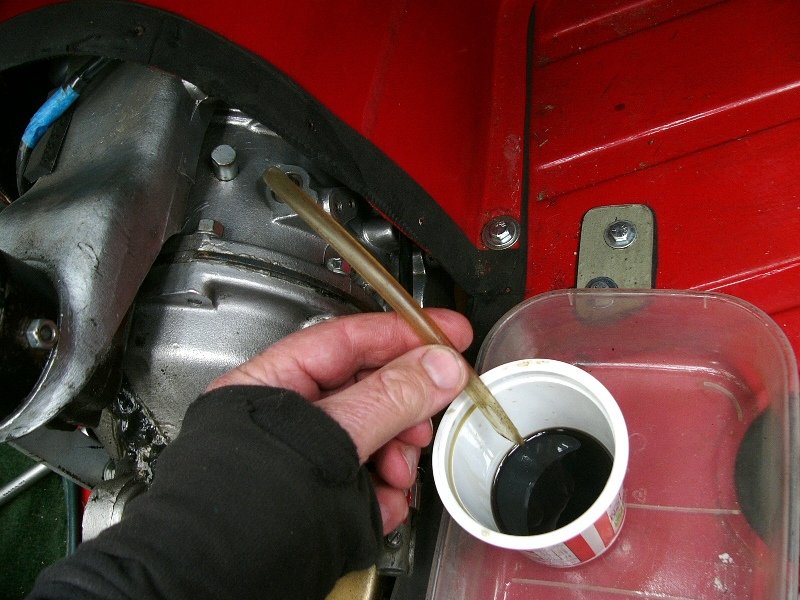
^ While that was out, I found a length of clear pipe with a sleeve of rubber pipe on the valve-cap-hole's end to seal it, and ran the car up to speed in top gear. Fine bubbles came out but surprising little trickle of oil, even at 2500rpm ..I was getting braver doing that sort of speed (50mph) in such a confined space with a garden seat and brick wall in front of me.
This is when I phone Tom again. He reassured me that ; oil coming out showed the pumps was working, and they tend to work or not. And that the slow rate did seem rather slow but it was pressure rather than flow which counts. Next, if it didn't work.. would be to find a pressure gauge and check what it read. Above 100psi and it should just about work, 200psi would be much better. And if the pressure was Ok then things pointed to a mechanical fault ..and most likely the circlip (item 21 in the parts manual, page 2-302) on the thrust race which has failed or come out. Without that - the thrust ring assembly (item 19) can move rather than it engaging the overdrive.
It's so helpful when a kind man explains what should be happening and why it may not. Thank you Tom. I'm close to the end of my tether after a catalogues of 'experiences' with this car.
I'm surprised at the dirty state of the oil after just 2000 or so miles, so I'll order some more and change it very soon.
In the meantime, I reassembled the operating valve and tried it again ..using the lever on the RHS, and with the solenoid lever still disconnected, the overdrive engaged.. and although the revs didn't drop (because there's no load on the spinning rear wheels) the speedometer showed a marked increase. As you might imagine I was delighted.

So what was the issue ? . . .
- I get the impression that the solenoid's operating lever was not moving far enough, just a tad out of adjustment, perhaps having slipped on the cross shaft.
- One of the solenoid's two mounting screws was a little loose. It tightened up, by screwdriver, more than 1/2 a turn.
- I'm not sure where it came from or if it were part of the problem, but I caught a fleeting glimpse of a tiny metallic flake inside the operating valve, when I was flushing it out in petrol.
- I think Nigel's observation that tick-over rev's might not give sufficient pressure (to overcome the eight springs on the thrust ring assembly) might be right. Taking the engine up to 2000 rpm, in top gear - clearly registered the overdrive engagement on the speedo.
I'll now reset the solenoid's lever and try the car on the road. I need to shop for groceries anyway. In case that lever needs slight adjusting, I'll just rest the rear half of the gearbox cover in place while I do that.
My gratitude to those who supported and educated me through this episode. A tid-bit of information from here and there and between us we got the hoped for result !
Thank You. Pete
- - -
Postscript : the overdrive now works again on the road. According to the Haynes Manual one might have checked the current across the solenoid to ensure that when switches the current reduces to a 2amps holding current, rather than 15 - 20 amps as the solenoid is activated. I don't know how to do that measurement, but the ammeter is not showing a discernible discharge when the overdrive is engage ..which I would expect it to if there were 15 or 20 being drawn, so I guess then the solenoid's lever arm is now adjusted OK.
-
I bought a Classic Gold GFE104 (no 'K' suffix on number on the box) from the TR Shop, for my 4A and although it came with two new seals neither were the rights profile
< here > is the old filter, as it was taken out. < here > I'm fitting the new filter after have replaced the bodged end-plate washer. And < here > after the filter canister had spewed oil out ..and I learnt more about the o-rings. I put the old (originally fitted) one back in the car, with the new filter of course, and it has be fine since.
Hope that helps, Pete
-
9 hours ago, unclepete said:
The engine all runs fine except it gets a little bit buried when accelerating from tickover which is a pain in traffic!
If I understand your parle.. my 4A SU carbs seemed balanced but the engine suffered spluttering at bottom end pick up. Pulling away from junctions or from tight corners was horrid. I sorted that by very accurately synchronizing the link rods, so each carb started to pick up at exactly the same moment. Your Webers wouldn't have the same rod linkage but still each carb and each choke must start to open at the same time and by the same amount.
Hope that helps, Pete
-
Got that Stuart, I had hoped that the same (maladjustment) might have happened here.
I'll try pumping oil out via the valve hole in the hope that it may help. And then I'll try the overdrive at road speeds to see if tick-over speeds isn't enough oil-pump pressure. And I'll read what Buckeye suggests ..but otherwise I'm wide open to options right now.
Thank you, Pete
-
-
1 hour ago, Bfg said:
.. he's suggested the issue may simply be that the solenoid lever may have slipped around on the shaft just a tad, and so although the electrics and hydraulics are good - the lever simply isn't moving quite as far as it should. This of course corresponds with what Stuart was saying about the gasket under the solenoid effecting its adjustment. He, Tom, has recommended I undo the solenoid's operating lever and then to test the overdrive's operation by pushing forward on the LHS operating lever. This can be done with the rear wheels off the ground. If the overdrive works again, then it would just be a matter of readjusting that lever.
Tried that and the overdrive is still not working.

When pushing the RHS lever forward, one can feel a little free play (light spring load) and then firmer pressure. The lever moved very much further than with the solenoid's lever connected, which was stopping against the bottom of the solenoid.
Tom had also talked about a circlip inside, possibly having come out of its groove. I guess looking at the exploded diagram this might be either of those retaining the trust race. Must admit - I was hoping that whatever the issue was.. it wouldn't have involved pulling the gearbox out yet again.
Pete


MX5 seat fitment
in TR6 Forum
Posted
Hi Andy
If you're worried about it.. the MX5 seat conversion brackets are widespread enough to add extra through-the-floor-bolts with big load distribution plates on the underside of the floor.
Personally speaking I don't consider anything more than the standard mountings are necessary ..as long as their threads are fine and the captive nuts are secure. If the threads are iffy then put longer bolts through and a lock-nut on the underside.
The standard TR4a seats tilt forward so their (ripping out) mounting (during a side impact) would mostly be through the two front bolts. When braking really hard - you can , with your legs push back on those front mounts really very hard, when the direction of force is one of lifting (tension) as your back pushes against the backrest the seat wants to tilt back, and also in sheer ..as the seat adjusters prevent the seat from pushing backwards. The rear two mounting bolts mostly keep the runners aligned.
When I was in automotive design and testing, it was always the upper seat belt mounting, on the B-post which took most load & were vulnerable to ripping out in either a head-on or side-impact accident. Unless you are actually attached to the seat, it doesn't have anything near the inertia that an adult's body would have, and its c.of g. is very low down ..so the bolts are mostly in shear.
This is not so when designers started attaching the seat belts to the seats. Then the forces are very different. If you plan to use the MX5 seat belt mount ..attached to the seat - then the seat's mountings needs to be as strong as the seat belt bolts.
Racing boys would, I'm sure, prefer to use four-point harnesses which pass through slots in their lightweight bucket seats to appropriately reinforced seat-belt mountings. The seats themselves are sized for the driver and securely bolted down ..to counter the very much more extreme lateral / cornering forces that any decent racing seat would be designed to take. Conversely, the seat-back's lateral support, offered by the MX5 seats I have fitted in Katie is really no better than the original seats for hard cornering. They are certainly not a close-fitting bucket seat for my girth. ..perhaps I need red-polybush polymers in their bolsters.") Although I top 220lb - I've not had an issue with Standard-Triumph seat-mounts failing. If anything it's usually the seat frame which cracks.
Although I top 220lb - I've not had an issue with Standard-Triumph seat-mounts failing. If anything it's usually the seat frame which cracks.
Just my opinion of course, but I hope it helps,
Pete