


Bfg
-
Content Count
1,800 -
Joined
-
Last visited
Content Type
Profiles
Forums
Calendar
Posts posted by Bfg
-
-
On 11/26/2023 at 11:36 AM, Z320 said:
Hi,
I think this could be worth an own thread?
My TR4A came with a "cardboard" (?) gearbox tunnel, which I have never seen.
Because the classic car dealer swapped it to a fibre glass tunnel to make the car ready to sell.
With the gb out the first time I noticed its poor fitting and with the MX5 gearbox I had to cut it out.
This gave the idea to make it new from DC04 "Tiefziehblech", something I never made, perhaps a good exercise with no need for a perfect result?
My mate Dieter, a 100 points DIY man with a 100 points workshop borrowed me his stretcher / shrinker.
From cardboard I made negatives of the car floor, from this postives from laminated wood.
I started with the right side flange, obvious more simple than the left one with its sharp S shape at the front end.
Please be gentle and ignore the chaos on my workbench, I started euphoric.
On the left side I learned: streching wide makes the flange slim, shrinking tight makes it "crumpled".
Dieter gave me the advice to cut and weld the flange on the sharp S on the front end: too wide to strech and tight to shrink.
Knowing his classc cars and projects I know: this man knows what he is talking about!
A model made from cardboard helped me to easy find the shape for a sheet steel cover.
Yesterday I fitted both sides in the car, drilled 8 of the 10 holes perfectly, therefore I had to modify the shape of the right side at the bend for gb bell
The ear end is a bit longer than original to cover what I had to cot out for the MX5 gearbox.
The question is which end to continue: at the rear will be more easy and has the benefit for me to lear,
the front end is more difficult but without the rear end finished I have better access now....
Looking forward for your advice and questions.
Ciao, Marco
Nice work Marco, as always. That stretcher / shrinker looks to be a very useful tool. It's a shame we are not neighbours
")
Regarding which end next.. Reaching under the dashboard is awkward enough at the best of times, and handling steel panels in the gap can lead to damage underside of the dashboard - so I'd recommend working on the most difficult forward end first. Remember to allow access to starter motor bolts.
All the best. Pete
-
I concur.. very nicely done.
")
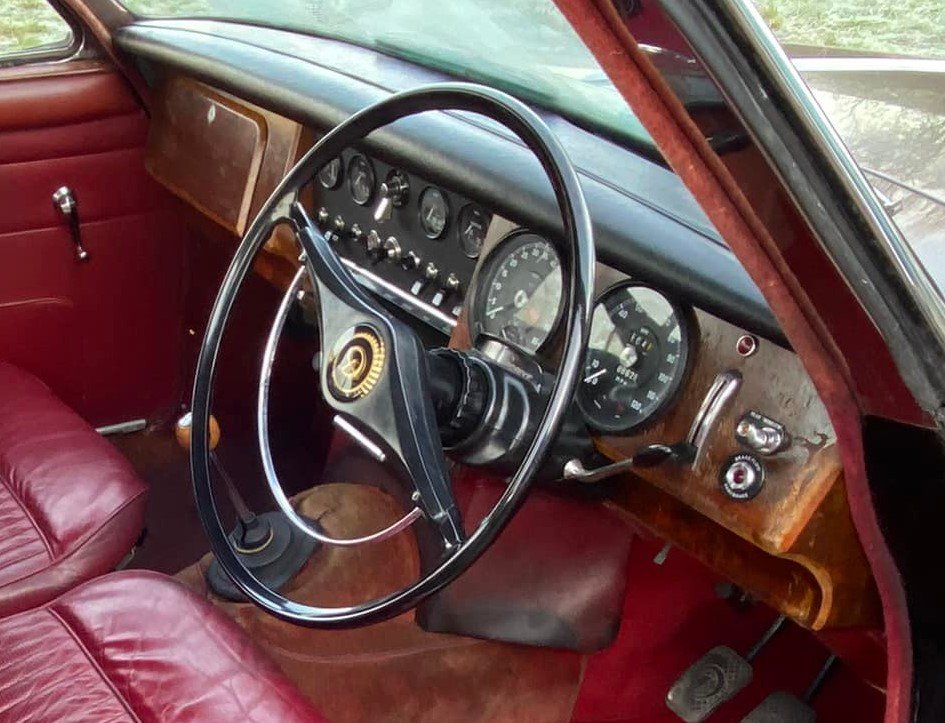
I'll need to tackle the wooden dash of my 'other' sometime soon, and although I hope to retain its original veneer and to just re-lacquer it - it's encouraging to see yours. Thanks.
Pete
-
p.s. yes I agree check the compression ratio gauge, and then recheck your TR engine's compression after adding a tablespoon of engine oil to each cylinder. This will both lubricate the bores and help seal around the piston rings which have yet to be bedded in. Do this with each of the spark plugs out and spinning the engine over on the starter with a fully charged battery. The minimum compression my old sunbeam motorcycles will start on is about 100 psi, and they were designed to run at 6:1 compression on pool petrol.
Pete
-
Wow, I leave things for the weekend and come back to find so many cooks. Can I order a Suffolk-ham mature-cheddar omelette please, with multigrain toast, fresh orange juice and a black coffee.

Table 3 in the corner.
-
On 11/23/2023 at 3:24 PM, Michel Higuet said:
In Dutch "Meten is weten" given in English "to measure is to know".
or just perhaps "Meten is verzanden in cijfers" ? ..which is a google translation of 'to measure is to get bogged down in numbers'
I don't mean to offend. It's just that a four-stroke internal combustion engine will run within an extremely broad ranges of variables. It may not start and run as smoothly as one might like, nor might it pull strongly at a certain rev range, or else it may have brilliant or absolutely appalling fuel consumption, but it will start and run if those variables are within +/- 10 or 15 percent of what the books says they should be. And that is all that's needed to address the question being asked 'why is this engine not starting.?' Tuning of those parameters can happen after the engine runs.
Blah, Blah, Blah.. Just a few of the variable parameters include ; a broad spectrum of camshaft profiles, the camshaft's / valve timing which conceivably work within a range of +/- 10 or 15 degrees from optimum. Ignition timing offers a similarly broad spectrum ..as well we know from an auto-advance mechanism going from 0 degrees to 15 or more degrees advanced. Or perhaps the different types of valves. Then, as is being discussed, are the coil's resistance and voltage, wiring continuity, the points gap and the dwell angle, and the ramp profile of the cam which opens those points ...if at all there are mechanical, rather than magnetic or optical, or whatever. Each again have a broad parameter within which they will work. And then there's an enormous spectrum of spark-plugs being made for thousands of different 4-stroke engines. We might otherwise measure and number crunch with the above '&/or scenarios' ; the upper and lower range of acceptable (for starting) compression ratios, the variables in combustion chamber shapes and their porting. What effects ram pipes and turbos and super-chargers has, and of course the degree of back pressure from / through the exhaust. And/or again the mix of the fuel itself, which if I recall may range from something like 20:1 to 7:1 fuel-air and still fire. But of what octane ? indeed what fuel additives or planet-saving spirit fuel or gases, Nitros to LPG, agricultural and static engine paraffin-like fuels to that especially formulated for use in the extremes of drag racing. Talking of extremes we must not forget to factor into our analysis both temperature &/or humidity, richness of oxygen or nitrogen in the air versus airborne salts, minerals and dust particulates.
No, okay let's stick to the TR engine, as otherwise I could go on & on, and on. Yeah, I know - I already have. But my fear is that ; to adopt "to measure is to know" each and every &/or possibility of any particular TR4A engine (..with this one we've barely discussed its rebuild specification, &/or possible variables in its carburation &/or ignition) - might only lead to wholesale number crunching ..and ongoing analysis.
Is not an actual figure, for each cylinder's compression (at what engine revs ? ) on an engine that's not yet been bedded-in, and apparently lacking its dose of fuel mix, almost irrelevant in its exactness.?
Surely it's much easier and quicker to do as Steven has now done, which was to have a quick look at the rocker arms at TDC on #1, together with a peek at the points to check (within acceptable parameters) both the valve and ignition timing. And then to stick one's finger loosely over the plug hole as the engine spins ..to gauge (from experience) the extent of sucking and compression. Again all he needs to know is ; whether they are within reasonable parameters for the engine to start ?
It seems to me that these simple tests, without gauges but done already, have narrowed his investigation down to ; a) fuel-air mix, &/or b) quality of spark.
Regarding a).. it comes down to i) fuel not being fed, or ii) it not sufficiently being picked up and drawn into the engine. Taking the fuel pipe off the carb and turning the tap on checks the flow ..while a whiff of it will confirm its fresh petrol (no laboratory analysis ought to be necessary). And fingers spanning over the carburettor's mouth, with the throttle open, as the engine is turned by a freshly charged battery - checks for the latter.
Diagnostics is really that simple.
Regarding b).. quality of spark.. Elimination of failure in ignition components, like the plugs, points and its insulation, condensor and wiring, HT leads, and Low tension supply and its polarity (all of which are easy to check) narrows the possibilities down to.. the coil.
I'd reason - Steven is very close to having a running engine.
Pete
p.s. I confess - in all my years of home mechanics, I've never once measured the resistance of a coil. I have however had cause to swap coils out though ..after following the process of elimination.
-
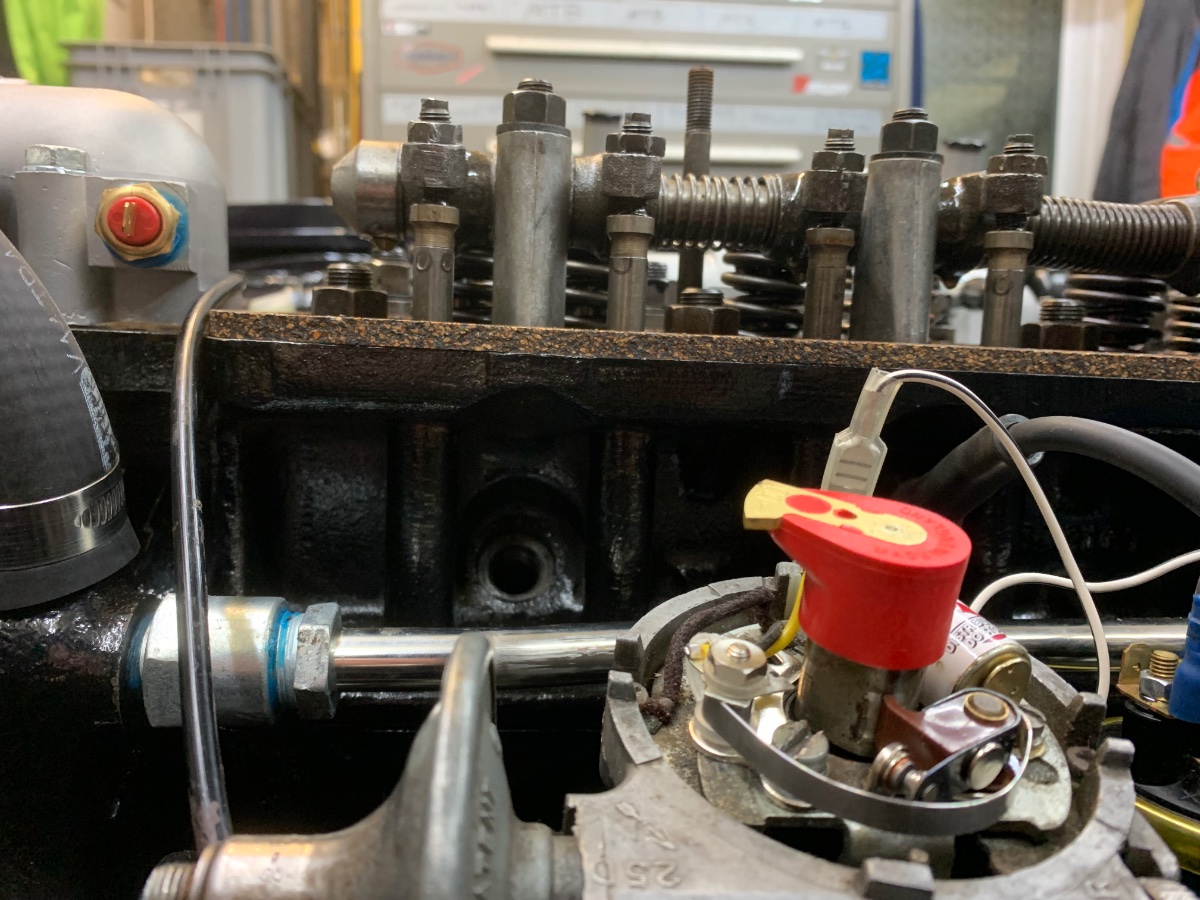
13 hours ago, Steven Whitaker said:
Just checking valve timing. It seems ok? All at tdc showing valve positions. The pic with both valves closed with clearance under tappets is at tdc and rotor arm pointing to cylinder 1 on comp stroke which I think is correct.. So can I rule out the valve timing being wrong?
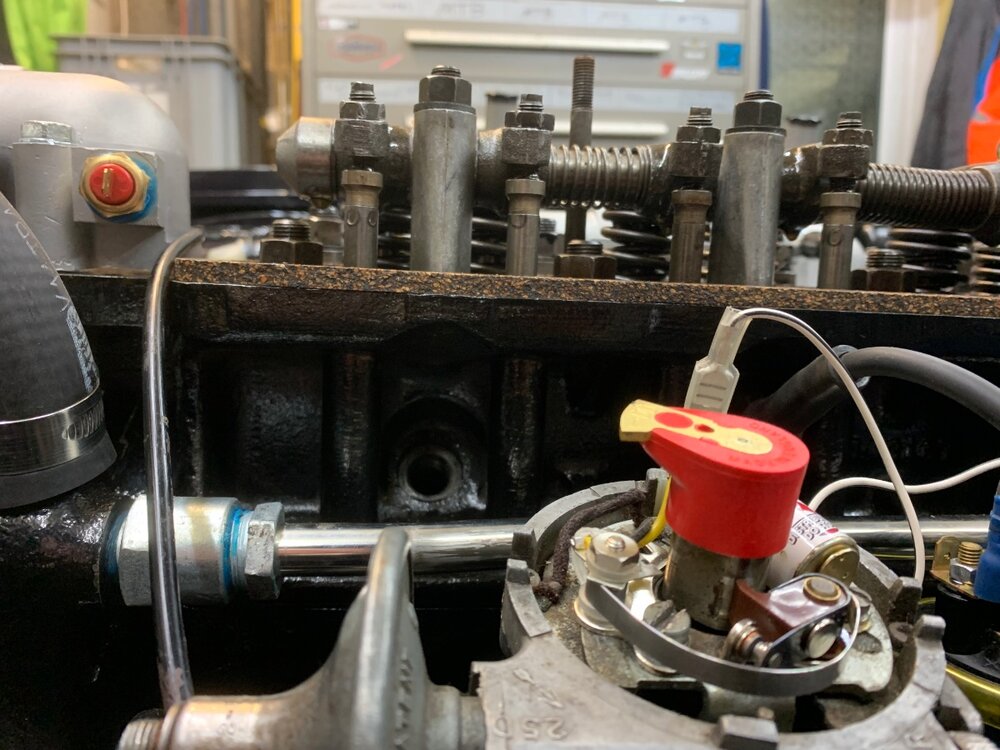
Yes, this is the correct valve timing at TDC for #1 cylinder. The rotor arm is directed at the distributor cap's #1 plug lead ..and the points are on the cam lobe, which (with 0.015" points gap) visually corresponds to (static) ignition timing of 4-deg BTDC being very close to correct.
Pete
-
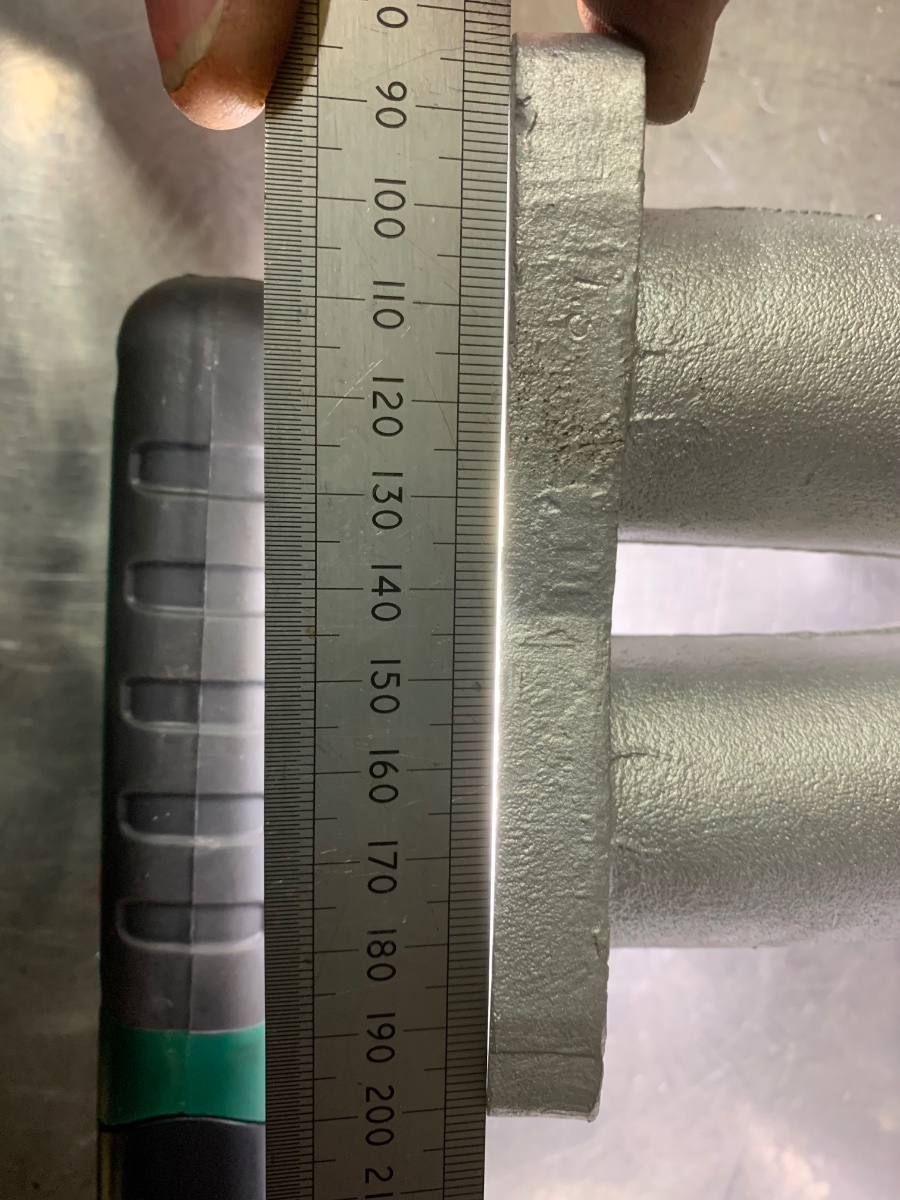
11 hours ago, Steven Whitaker said:
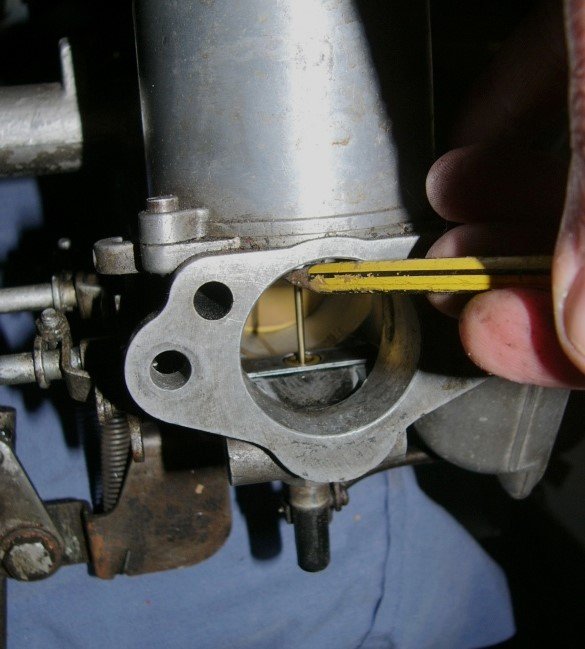
Thanks Mike. I’ve just removed the inlet manifold and found that the mating face is not flat as per the photos. Would this be enough for it not to run. I’m thinking that the draw / pull on the vacuum stroke will pull air from least path of resistance, which could be the gaps as shown? I shone a torch from behind and can see a millimetre gap. Tnx.
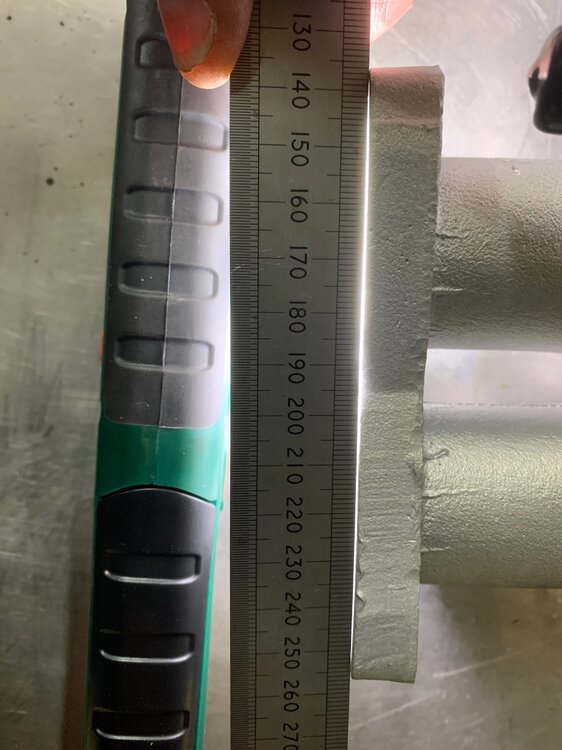

Yes, this extent of flange distortion would weaken the mixture to such an extent - the engine would not start.
Having corrected this with emery paper on a broad flat plate - I think you are very close to having a running engine ..assuming of course the manifold to carb flange, and each of the carb's flanges were also checked and corrected for flatness.
Well done .. a credit to your perseverance.
Pete
p.s. As a word of warning to others ; the inlet manifold to cyl. head flanges need to be both free from local distortion (as was evident in Steven's photos) and at the same time trued to the same plane as each other (..to sit on the machined-flat face of the cylinder head). The broad emery paper flat plate Steven used achieves this, whereas if flange distortion is filed flat individually then one flange may be out of plane with / at a slightly different angle to the other. This equally applies to the exhaust manifold flanges.
-
13 hours ago, Steven Whitaker said:
I just spun the engine over without ignition on holding a piece of paper loosely over the carb mouths and there’s virtually no pull. See video. Maybe a bit on the front carb. Does that point to valve timing? Thanks
Sorry, I cannot see the throttle mechanism being operated, but without the throttle's butterfly being open there will be next to no air flow through the carburettor or at the mouth.
As Keith says "the vacuum advance isn't connected so there is an open tube at the carbs which will allow air in". Perhaps incorrectly, I had assumed you would have blocked this off as you have the crankcase breather vent.
Pete
-
Just now, Steven Whitaker said:
Isn't this negated when using the choke?
Not entirely. The choke mechanism does pull the jet housing down, but it is a relative setting, so choke applied to a very lean needle position will bring the fuel-air mix correct for when hot. But the mix needs to be richer still for starting from cold, especially on a tight engine.
-
20 hours ago, mike ellis said:
The SU book does say this but goes on to say to then lower the jet by two complete turns (which makes it about 1mm down) and adjust from there. If the jet is level with the bridge it is likely to be very weak.
Mike
You are absolutely correct Mike, but that 'turn down the jet adjusting nut' is noted under item 3. 'Replace the piston/ suction chamber .. Check that the piston falls freely onto the bridge ..If it does not do this, then...'
When the piston did drop freely, I moved onto the next item ..without taking much notice of the last sentence of item 3. oops ! My Bad, so it's why I posted about this and included a photo.
As I say, imo, it's a poorly written, proof-read and edited book. Where even the illustrations, Fig.6 included, are somewhat difficult to unravel.
It may be different for those who know the subject, and are just checking up a detail here and there, but for a novice like myself it's warther confuuzing.

Pete
p.s. perhaps you can advise me.. why is the orientation of the dashpot (aka 'the piston/ suction chamber') important and different between carburettors.?
-
If all else fails - go back to basics. Easier done on a motorcycle with a kickstart but the same applies to a car engine..
Valve and Ignition timing ....
On a motorcycle I've removed the spark plugs and leaving one in its lead resting against the cylinder head with ignition on, so as to check when it sparks, I've turned the engine over (kickstart lever) with my finger over the spark plug hole to feel when that cylinder was on its compression stroke. As it neared TDC the spark plug should fire.
Doing this on a car engine is more awkward but the same principles apply. Remove spark plugs from their holes, leaving just #1 plug in its lead resting against the block. Remove the rocker cover and turn the engine over until #1 cylinder is on its compression stroke. ie., both inlet and exhaust valve rocker arms are not resting upon / pushing against the valves. Check, with a piece of plastic tube, that the piston is near the top of the bore. Turn the engine back 1/4 of a rotation and turn the ignition on. Turn the engine forward again until the spark plug fires (it earthing against the engine's block) and check that the piston is just before TDC. It all sounds very inaccurate but an engine with fuel will start if the valve and ignition timing are each 'close enough'.
Turning the engine over can of course be done via a spanner on the end of crank, or else by rocking the car along in gear.
My sincere apologies if I'm teaching grandpa to suck eggs, but when we get to the point of pulling our hair out and our mind is filled with frustration, then a 3rd party's simple instruction can sometimes help. I'm just trying to be supportive and helpful,
Pete
p.s. if compression is much below 6:1 it won't run. This might be because the valves are not seating properly. A finger over the plug hole while the engine is turned over will barely be pushed away with such low compression.
-
2 hours ago, Steven Whitaker said:
Thanks again for all your ideas. If the crank/cam valve timing was wrong, would it still 'try' to start. It just seems so close. Thanks.
On the TSSC forum last month there was a topic regarding a "GT6 Mk3 only runs well with VERY advanced timing" (10 deg's or more than the standard 13 deg BTDC). It would start and run easily though. It was found to be because the valve timing was out by one tooth (equating to 6 degrees on that engine). < here >
If you suspect that.. simply turn your distributor around. Of course it's easiest to temporarily mark the distributor's position you have it presently set to (hopefully correct) so it's easy to put back if to that position if this is not the problem.
Pete
-
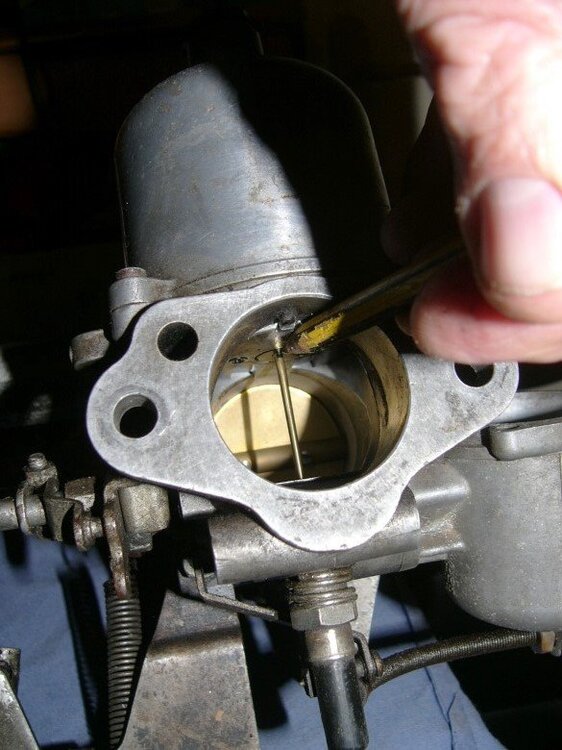
Another thought, which will make starting difficult is if the main jet is adjusted too high. I say this because the Brookland's book I have on SU carburettors says "Screw the jet adjusting nut until the jet is flush with the bridge of the carburettor, or fully up if this cannot be obtained." ..well that is not how mine is . . .
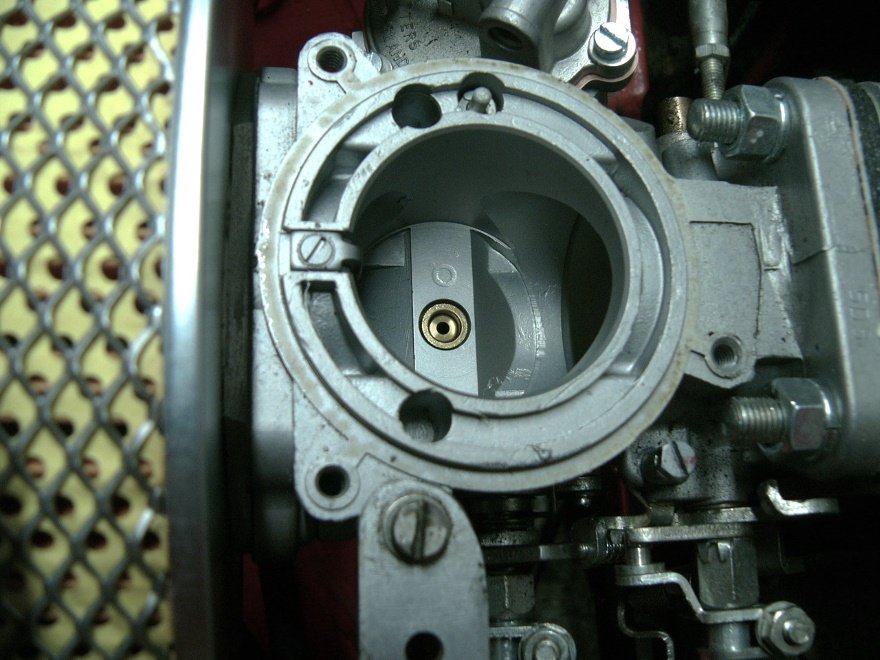
^ This is one of my carbs, and as you can see the top of the main jet is a good 1mm or more below the level of the venturi's bridge.
Admittedly I'm just in the process of re-tuning my carburettors, having previously lost a bottom manifold clamp and so an air leak passed the gasket. Although on Sunday (70 mile round trip) she was running just a little rich, this jet position is not very far out for the needles fitted and the air filters I'm using. This is of course with the shoulder of the needle being flush with the bottom face of the piston.
Hope that helps
Pete
-
10 hours ago, Steven Whitaker said:
I haven’t checked this. I don’t have a vac gauge. Is it possible without?
Simply put your fingers flat across the carb mouth as the engine is turned over. You'll feel the suction of the air.
Pete
-
hey you two, didn't you know Santa is living in Norway is also a scam ? You don't have to fly out to see him... If you are each good boys he will come to visit you next month. He's even got a new, tighter fitting, red coat so it's easier for him to slip through balanced flues !
... I said flues not loos

p.s. Thanks George for the heads up re. Booking.com
-
On 11/20/2023 at 12:11 PM, Steven Whitaker said:
Hi Pete. You are right. I’m not trying either on the video. Neither adjusting the throttle or the choke makes any difference. Tried all combinations. Plugs dry even after trying to start several times. I’ll swap the filter around. There’s fuel in the float chambers. I’m baffled, but have new things to try now, cheers.
Just a long shot but I'd suggest you temporarily pull the fuel pipe off the carb and lead it into a clean jar or pot, to then check the free flow of fuel from the motorcycle tank, down the pipe and through the filter. A trickle of fuel may be getting through under gravity, which fills the float bowls, but perhaps not enough for starting. I wonder if the (wrong way around ?) filter includes a one-way anti back-draining valve. ? or whether the petrol tanks vent is blocked. There may be a piece of the pipe that's collapsed or blocked with a foreign body. Laborious perhaps but, re-running through each element in a back to basics systematic manner, to check / eliminate from suspect ; (richer to start) Fuel feed, Spark, Compression, Valve and Ignition Timing.., will reveal the issue.
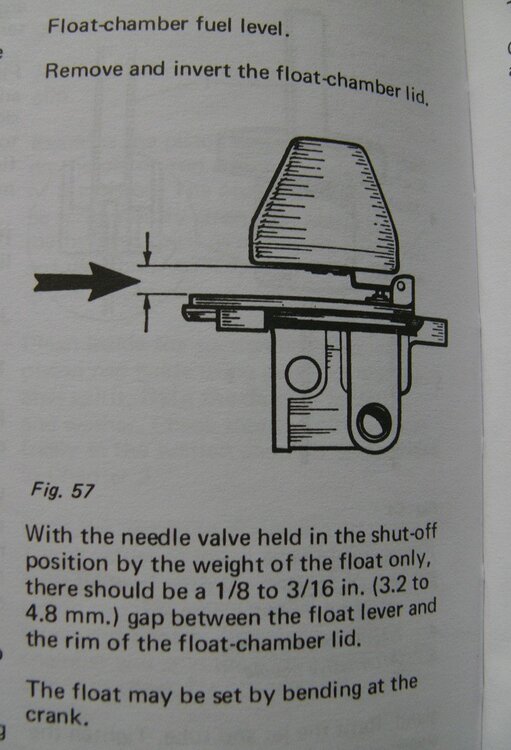
It's unlikely with professionally rebuilt carburettors but another item to check is the float level. These carburettors rely on a correct fuel level within the bowl, so that the venturi (low pressure) doesn't have to lift the petrol very high to the jet. This would happen if the float bowl is sitting too low. Shown below is how to check ; Remove the float bowl cap and invert so gravity shows the float level relative to the rim when the fuel feed valve is closed. Repeat for both carburettors . . .
Hope this helps and you get to the bottom of the problem soon.
Best regards, Pete
below the fault finding chart from 'SU Carburettor Tuning Tips & Techniques' Brookland books, which I'm led believe is a reprint of G.R.Wade's book.

NB. Although there are many useful items of information in this book - it is exceptionally poorly written and equally as badly edited and published. As a consequence, it is very much more confusing than it ought to be and with great superfluity. It needs to be rewritten, this time with a proof reader.. In all good conscious I cannot recommend it.
-
Excuse me if I'm mistaken but from the video it appears, from the angle of the lift quadrants on the carb's linkage rods, that the choke is not on and you are not even blipping the throttle. From cold my car's engine will not start without these.
Pete
p.s. If I might also suggest ; the in-line fuel filter is the wrong way around. It is more usual is for the fuel pipe feed to go into the clear bowl side of the filter, so that you can see if there is a blockage around the outside of the paper element. The way around yours is would takes any blockage or sediment inside the paper element, which is then not visible. Most likely this will not be the cause of the engine not starting from a motorcycle petrol tank, but it is worth reversing for everyday use especially if the fuel tank has been disturbed during restoration and paint. Fuel feed from a small capacity motorcycle fuel tank petcock (possibly with filter inside ?) may be a bit limited for much more than starting the engine.
-

We had a great breakfast meeting today at The Swan, at Chappel. The pub is nice, the meal was huge and very well presented, a true credit to their kitchen staff. Richard C-R did a great job in organising a good number to attend (I think about 37) ..and the autumn weather was beautiful for an open-top drive. Sorry but I didn't take photos in the car park (I was a few minutes late and the cars were spread about the place, Big Breakfast aromas and the fragrance of fresh coffee drew me in) but there were probably a dozen or so TR's, other Triumphs, and other interesting motors in attendance. A good turnout for this time of year. Photo is of course my driving to the breakfast meet this morning in Katie..
Pete
-
On 11/15/2023 at 10:15 AM, DenisMc said:
I should have assembled their bushes with soap and water and not the Superpro grease.
One of those instances where 'You told us so' (April 13th) rather than.. we told you so.
-

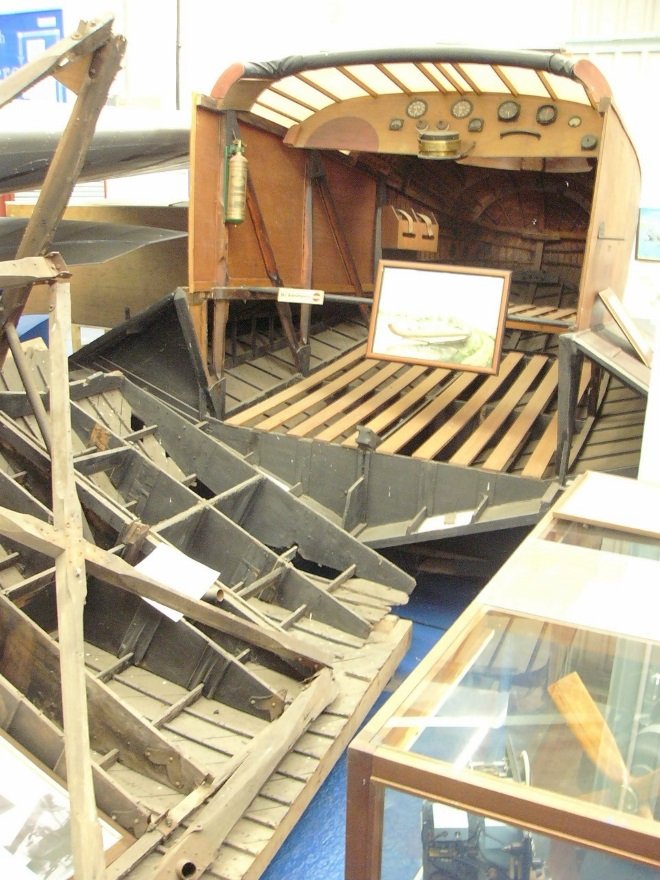
End of Season opportunity to enjoy clearer roads as yesterday I went back across to the Norfolk and Suffolk Aviation Museum, Flixton, Suffolk, NR35 1NZ(which at this time of year is opened only on Sundays). From where I live it's some 35 across country miles away but, since moving home a few months ago, the route is different.


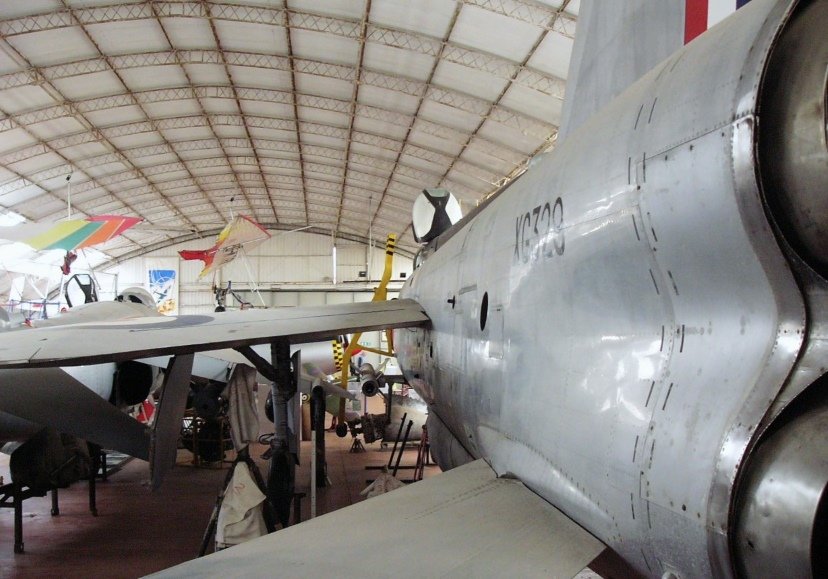
I love this museum because it’s a local one and that makes it unpretentious. It might be noted that it’s a volunteer-run museum charity, and lacking the glamorous and glossy exhibits of well funded museums, but perhaps because of that - it is fascinating. In many ways it’s more like an old workshop packed with minute details.
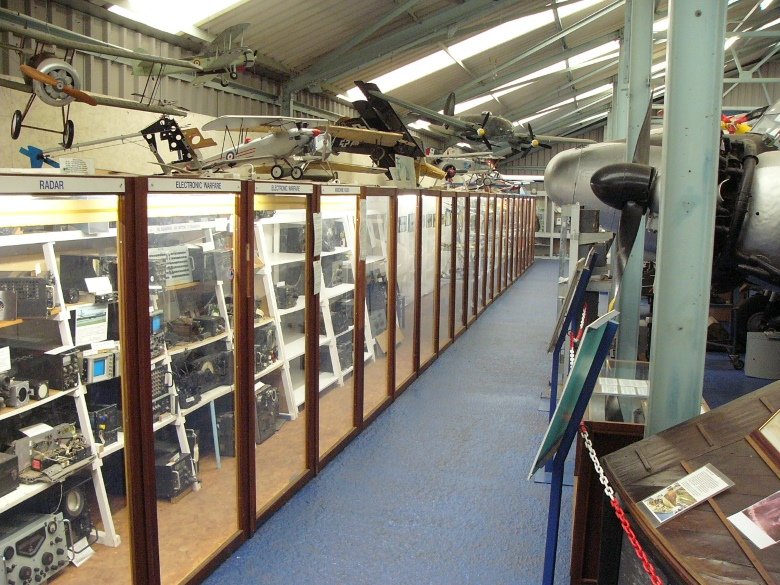

East Anglia was of course dotted with airfields throughout the 2nd WW, and the memorabilia and photographs reflects the true grit of it. More depth is found in the stories relayed by airmen, farm workers (who witnessed aircraft crashes of both friend n' foe) and of the air-sea rescued. These do take a time to read, but there’s humanity in there which isn’t reflected in the glossy paint of a restored museum exhibit, however awesome an aircraft style &/or its specs may be. My visiting on Sunday 12th, the day of the National Service of Remembrance, was poignant.


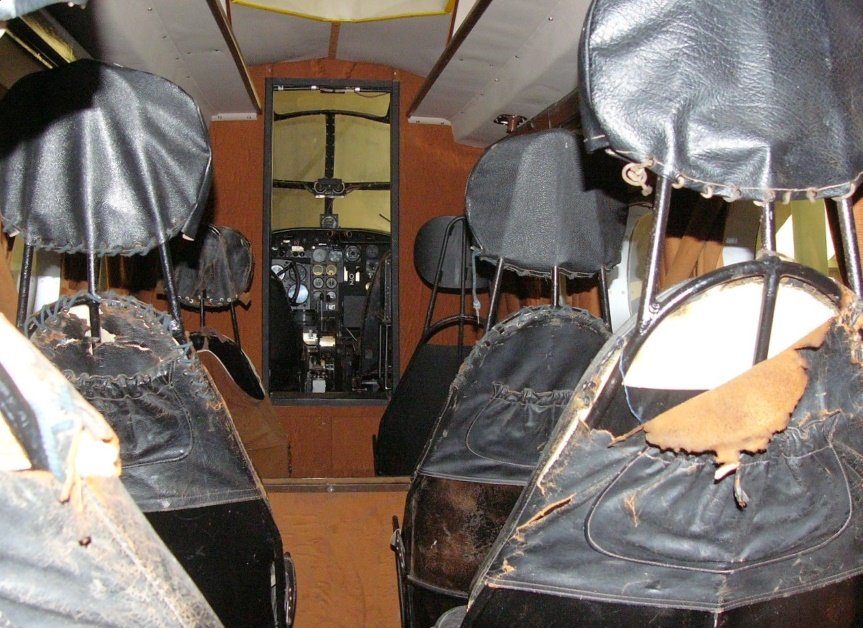
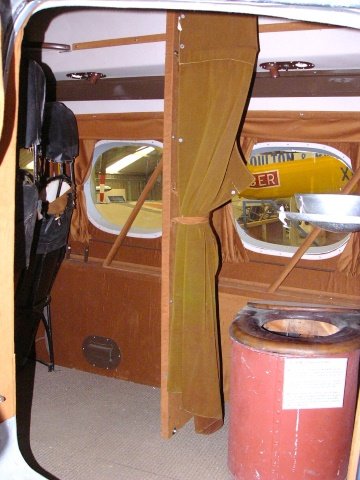
^ far right, yes behind the curtain in the anson is the .....
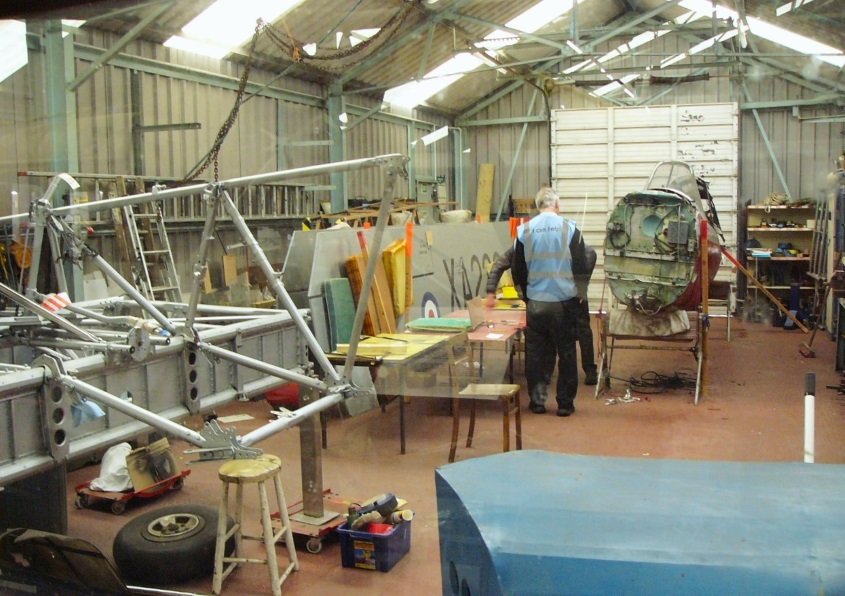
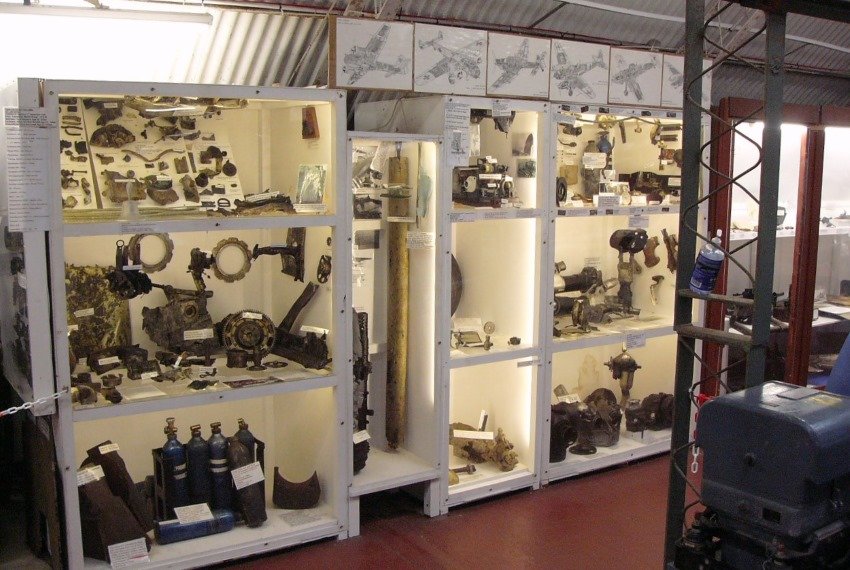


With so many artefacts found in gardens, along the coastline & esturies, and farmland across East Anglian counties - it may to the uninitiated seem to be filled with mangled pieces of metal, cloth or whatever, but to an engineering mind - those same objects are like cutaway illustrations ..or rather sculptures, revealing in life-scale the guts and the craftsmanship in engineering.
Pete

-
23 hours ago, Mk2 Chopper said:
I have a full disk lock that goes over my steering wheel that locks over it.
I did have the hand brake gear stick lock, but I figured all they have to do is unscrew the gear knob to remove.
Gareth
I decided against a full disk lock, either for the steering wheel or a road wheel only because I supposed they are heavy, more bulky, and less quick to fit. As I'm often running late for wherever I'm meant to or want to be.. the latter was not such a good plan.

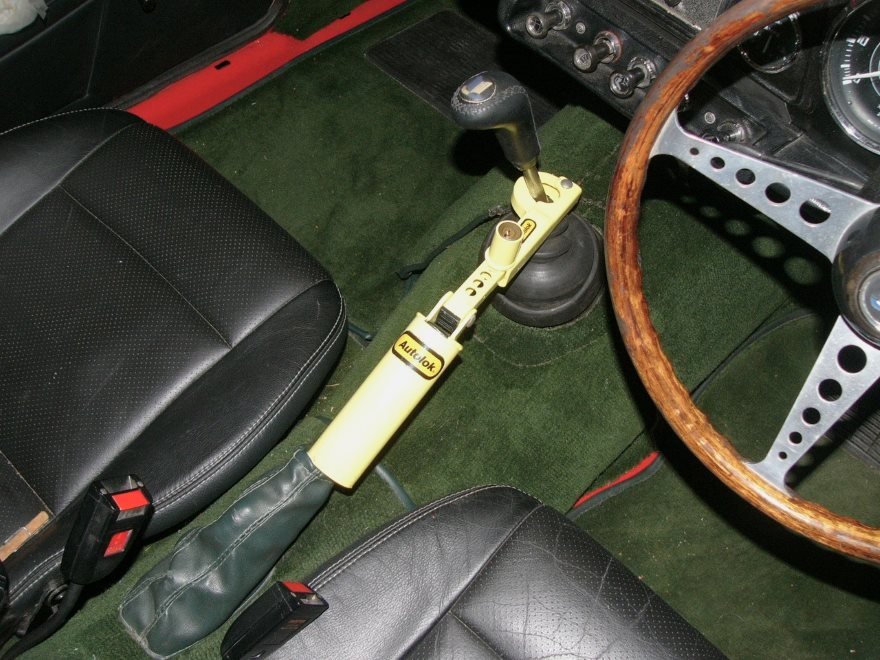
apparently the Autolok should have a steel ring, grub-screw-locked onto the gear change lever, which cannot be accessed / undone with the lock, collar around it. If you don't have this.. it seems ; if you weld the articulated joint of the lock - to permanently fix it (in its maximum bent position) for the TR in first or third gear - it likewise cannot then be pulled upwards and over the top of the lever (sans knob). When unlocked and with the jaws opened it can still be removed easily enough.
Pete
-
..and how long without one ?

-
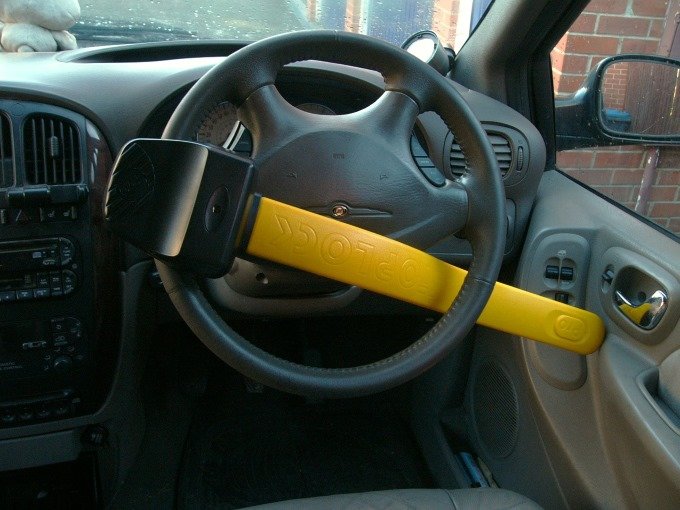
Not much happening this week (aside from our local TSSC club meeting tonight at the Sorrel Horse, Barham, IP6 0PG) but with classic cars it’s impossible not to notice how very insecure they are, so in addition to my everyday Autolok handbrake to gearbox lock ..for when the car is being left unattended in a more vulnerable location - I've just bought one of these. . .
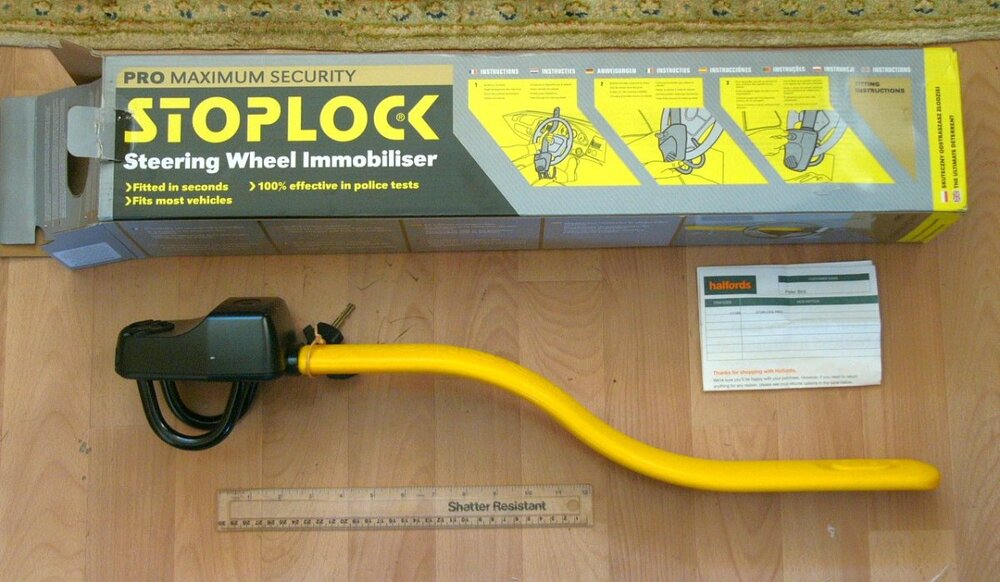
This steering wheel immobiliser is the higher security Pro model of the Stoplock range, which gets good reviews (NB. their Elite model of the same device has a deep offset for fatter steering wheels). After looking on-line, including for a second-hand one, I bought this new (with 2 keys) from Halfords. They presently have them with a £10 off RRP, and then another 10% off when buying on-line and free postage over certain order value. In total it cost just a few pence under £35 delivered.
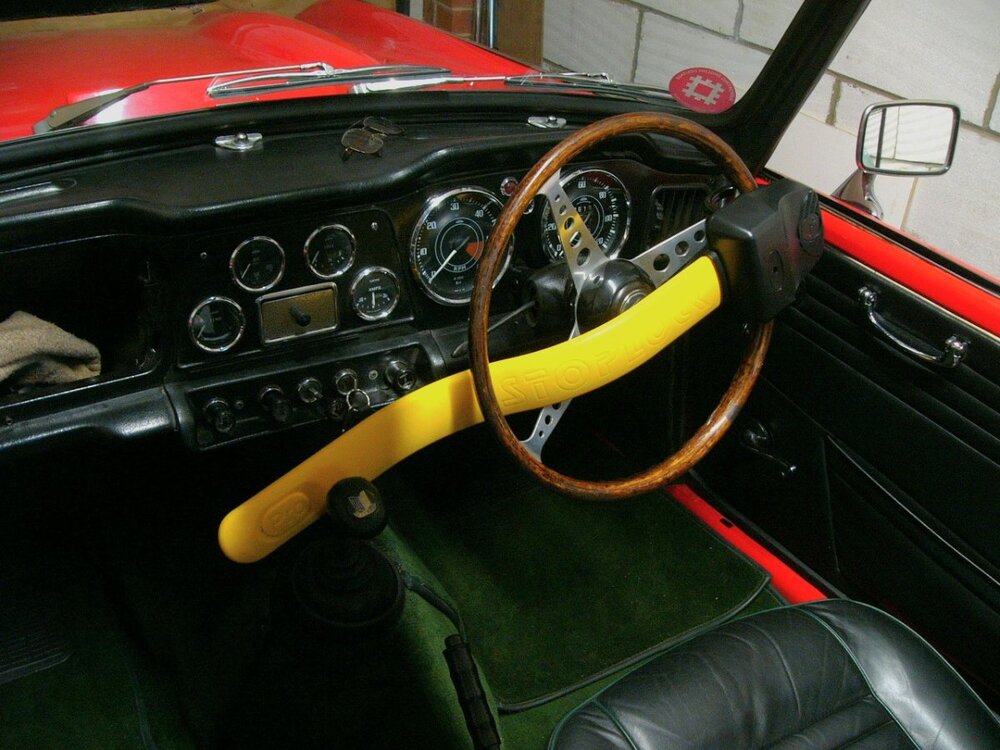
Either or both is of course only a deterrent, especially when steering wheels on classic cars may be wood rimmed with easily snipped through aluminium spokes, but it is quick n' easy to use, and an obvious nuisance to would be joy-riders, even though you may otherwise have an ignition immobiliser.
Because it's universal fitment - it also means that I can use it on other cars. Who knows I might even configure it around the frame and through the spokes of my motorcycle.
Food for thought perhaps ..and a great price from halfords.
Pete
p.s. I’m not telling the insurance company because they’ll insist it’s always on the car when parked.
-
Mine hadn't, to my knowledge, been refurbished. They came off ebay and I just cleaned them up and changed colour of the centre squab panels from light grey to black and retouched scuff marks and creases. The squab's side bolster, on the gearbox tunnel side, is a bit too flat, which may make them feel as if I'm less sitting into them. I wonder if perhaps yours also feel softer and more comfortable because they are cloth rather than leather.
Pete


I have to show you my new tool!
in General TR Technical
Posted
Thanks Marco, I'd not seen them before ..but I like it")