


Bfg
-
Content Count
1,802 -
Joined
-
Last visited
Content Type
Profiles
Forums
Calendar
Posts posted by Bfg
-
-
On 12/24/2022 at 9:58 AM, RogerH said:
If anybody is out there under their car on the big day please do post Why & What
Roger
Having no horse and hounds, and not being an advocate of blood sports anyway - I've instead been having my own chase...
Aren't intermittent electrical faults fun to track down ! Katie's indicator warning light sometimes continues to flash when the indicators are cancelled, particularly when the engine is running faster than tick-over. Twisting right handed upside down, under the steering wheel, by torch light simply adds sport to the endeavor.
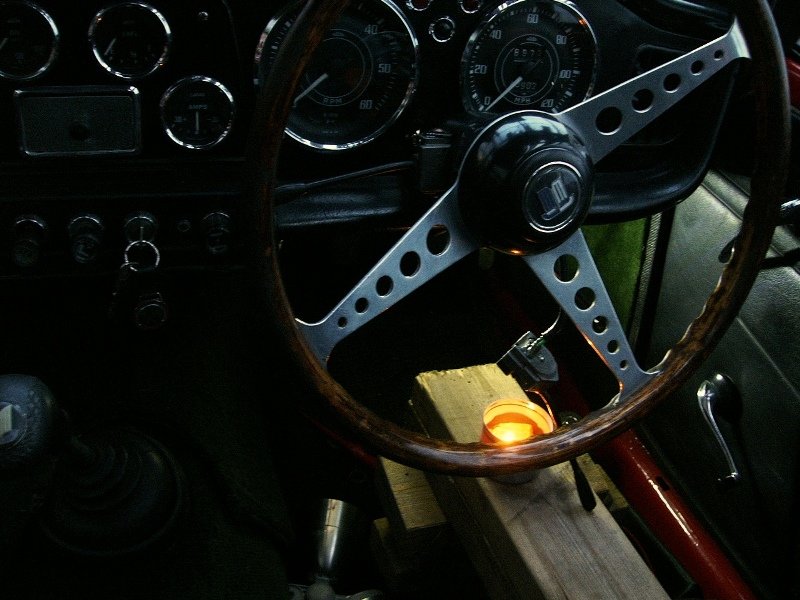
^ And to add a touch of Christmas festive ambience to the task - I'm using a candle's warmth to help set liquid-electrical-tape insulation.
Classic-FM radio station ..without a commercial advert all day, has been wonderful.
Bidding you a good'n
Pete
-
Likewise my thanks to all have freely offered helpful advice, encouraging support and necessary parts as I progressed to getting Katie roadworthy again during this past year.
Merry Christmas and I wish you all - a splendid New Year.
God be Praised and Long Live the King.
Bfg - Pete
-
I trust it's you in disgrace and not the car !
")
-
Faults back again, so now working by torchlight I pulled the indicator switch and played around twisting the connectors on it etc, to no avail.
39 minutes ago, Lebro said:If it's only 1 to 1½ extras, then that is pretty normal for that unit. if more e.g. 2-3 flashes then it is an early one without the mod, & get Duncan to replace it.
If it flashes continuously then there is definitely something wrong. Try indicating, then pull the connector off of the "L" contact on the flasher, & observe if flashing continues.
I'll take it as being normal then, as there are not 2-3 extra flashes. As before when the indicators or hazards are switched on - the warning light behaves correctly.
Pulling the 'L' connnector off the flasher stops it and the indicators working.
Just in case, I added an external earth wire to the relay's bracket, and it made no difference. The fault remains.
Could it be a fault within the flasher unit that responds to engine vibration ?
It's now 5-o'clock so I guess I'd better pack up for this evening. Starting the car every ten minutes won't earn me any neighbourly friends.
I was very careful when I soldered the connections onto the tiny hazard warning switch, but I'll pull it out and see if I can find a fault in those connections. It'll be a job for tomorrow.
Thanks Bob and Rob - I appreciate your thoughts.
Happy Christmas Eve,
Pete
-
There's not a lot of wiring to go wrong under there. The bullet are all soldered and this connector is just a few inches from the relay (screwed onto the side of the TR4's face vent), and the wire from the indicator switch goes straight into that connector. The hazard switch is not much further away (it is fitted into the bracket which was originally used for bonnet release cable).
With the engine running a faster than tickover, ie. full 12v power, the indicator warning light now does flash an extra one to one-and a half after the switch and indicators are off.
I was just about to pull steering column indicator switch out and see if I can see a fault inside that, but the fault has gone away again even when the engine is rev'd. That's a nuisance.. as I now cannot hope to find it.
Pete
-
26 minutes ago, Lebro said:
Pete.
If you are using the LED compatible flasher unit from Classiccarleds, then it is quite normal to get 1 extra flash on the dash bulb after the indicators are off.
It used to do more than 1, but I checked out the circuit, & advised a modifcation, which is now present in all the current ones.
If the extra flashing was prolonged, then that suggests a wiring fault somewhere.
Bob
Thank Bob, I am using the flasher and switch you recommended, and was just getting one extra flash after the indicators were turn off ..before I started the engine, and now the warning light continues to flash, not a solid flash but a sort of buzzy flash at tick-over. It becomes a solid flash as revs are increase.
Cheers.
-
Thanks Rob, the bullet connection to the switch goes to the indicator relay, so I'll follow the line of investigation you suggest.
Having just started the car the fault is back there.
-
Question for anybody ~ re. Electrical fault ? ~ indicator warning light continued to flash when the switch is off ..and the indicators themselves are off.
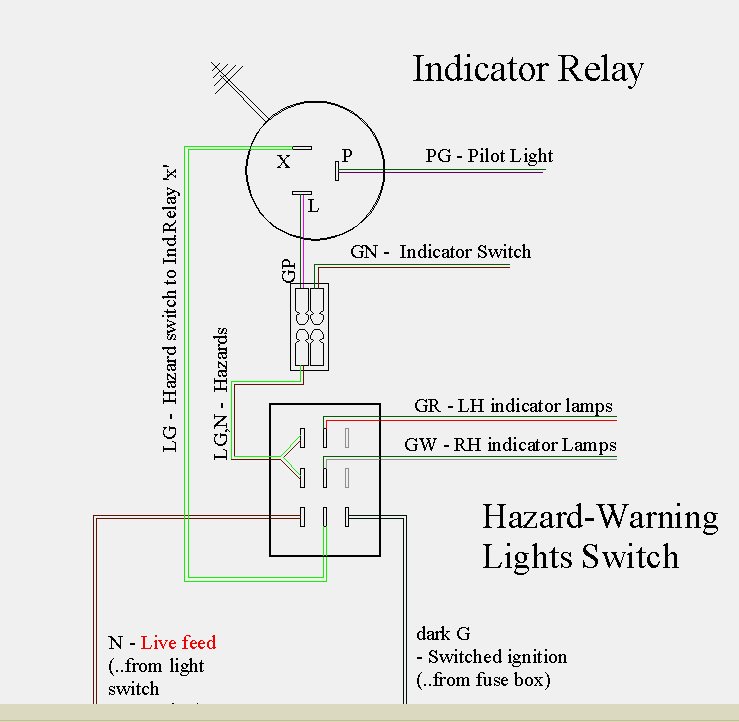
I disconnected the feed (G/N) wire to the indicators (at the bullet connector from the switch) while I was playing around with the wiper motor, and now that I've reconnected it - the indicator warning light fault is no longer there. Can anybody suggest where the fault might have been ? Aside from the standard indicator wiring Katie is fitted with Bob's Hazard warning lights (..as illustrated below) and the lamps are each fitted with LED bulbs. The wiring under the dash is pretty secure, and presently the indicators and the hazard warning lights each work fine.
Thanks in anticipation, Pete
-
Thanks Rich,
No problem with the 130 degree gearbox which gives 10-degrees more angle in sweep than standard. Very probably after fifty years of toing n' froing there's 10-degree worth of wear in the wheel boxes anyway - so we're back to standard.
")
Pete
-
2 hours ago, RogerH said:
Hi Peter,
deep memory here - if you look on the dome there should be a small indentation/raised mark that points down the length of the body.
This is your starting point for parking.
Or not as the case may be.
Roger
Thanks Roger ..your memory serves you well
. . .
^ I didn't see it in the cover's previous state - but once cleaned up I recall noting the slightly raised spot you talk of. That corresponds to the two rivets being aligned to the cable-drive, and although I've reassembled mine with this dot at the far rather than cable end, ie. 180 degrees out from what you suggest - either way around ought to offer least resistance to the motor starting to turn.
I appreciate your point that out.
Cheers, Pete
-
^ that's very nice Graham
-
Cheers Miles, a simple enough task ..if one is wary of the brush arms, its spring and insulators don't go ping ! Well worth doing though, as the wiper motor mechanism needs to be as powerful as can be, and reliable - in the very worst of conditions.
On 12/21/2022 at 6:29 PM, BlueTR3A-5EKT said:from when my dad rebuilt wiper motors for a living
Peter, from your insider perspective, I wonder if you might advise on the orientation / adjustment of the gearbox top cap, which of course sets / adjusts the drive-cable's crankshaft position when parked.
The workshop manual says "The domed cover is adjustable to give the correct park position of the wiper blades" ..but surely that is done by the positioning the wiper arm's spline on the wheel box. When installed on the RHD TR44/4A and presumably the TR5, the wiper's gearbox is mostly tucked tightly under the front wing - so access to undo its cover's screws, to adjust / rotate the cap, is not a reality. For practical purposes the cap needs to be positioned and the cover tightened before the wiper motor is fitted to the car.
I've preset set Katie's as illustrated below, which I feel ought to be correct, but I'd value your opinion . . .
^ to clarify what I have - I've Photoshop edited the above piccie (..from when I first lifted the cover off, and before I straightened the kinked cable) so that the two rivets, seen inside the cap (which correspond to the lay of the red wire soldered onto the outside) are in alignment with the drive-cable. So positioned ; the insulated / no-power patch (dark segment of the brass colour) within the cap sits to one side, and the crankshaft parks at the (bottom) end of its throw.
Then, when the motor is first activated - the torque required (movement of the cable turning the wiper arm wheels) is least. This makes sense but perhaps it not important and I'm over-thinking it, or am missing out on the fine adjustment of setting the parked wipers tight against the rubber.?
On Katie I have the driver's wiper parked against low down the rubber, but the cranked arm of the LHS wiper could do with being a few degrees lower.
Thanks for your consideration, Pete
-
Thank you Peter - That was a very kind offer (the red rubber insulated wire) but I'd done it with plastic insulation - which on Katie is barely seen anyway, once the motor was reinstalled. Thankfully, no smell from the field coils or the armature.
Also thanks for your advice on checking the alignment of the field winding. I headed this and did check it and it worked fine ..albeit seemingly slow. Since replacing the crimped connector on the power wire and the earth - it is now working fine.
On 12/21/2022 at 6:29 PM, BlueTR3A-5EKT said:Do not drench the bushes that support the armature with oil. If over oiled it may drip onto the commutator.
I smeared the bush arms with Vaseline, as they are an electrical contact. The commutator end of the brushes were of course left dry. The armature bearings and worm drive were coated with moly-lithum grease.
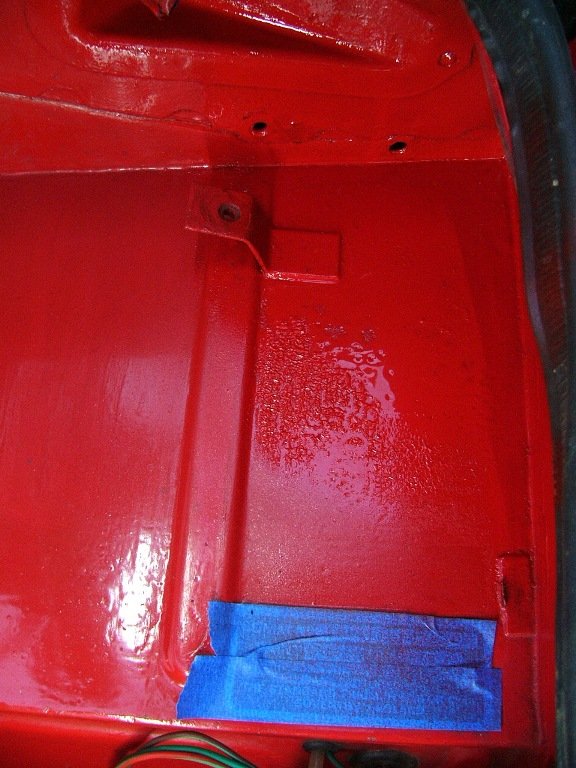
Before I reassembled the wiper motor - I wanted to clean out the back corner of the bulkhead shelf, which is usually inaccessible because of the wiper motor being in the way. It all went well, but then I noted some over-spray bloom ..further forward, and so added a little more paint over that area to smooth it out .. unfortunately (or whatever word(s) you might imagine I exclaimed !) that last patch ended up looking like this . . .

^ Not much I could do about this crinkling, in the cold and damp, so I've left it for another day. I want to flatten and redo the rest of these shelves anyway which show hand-painting brush marks.
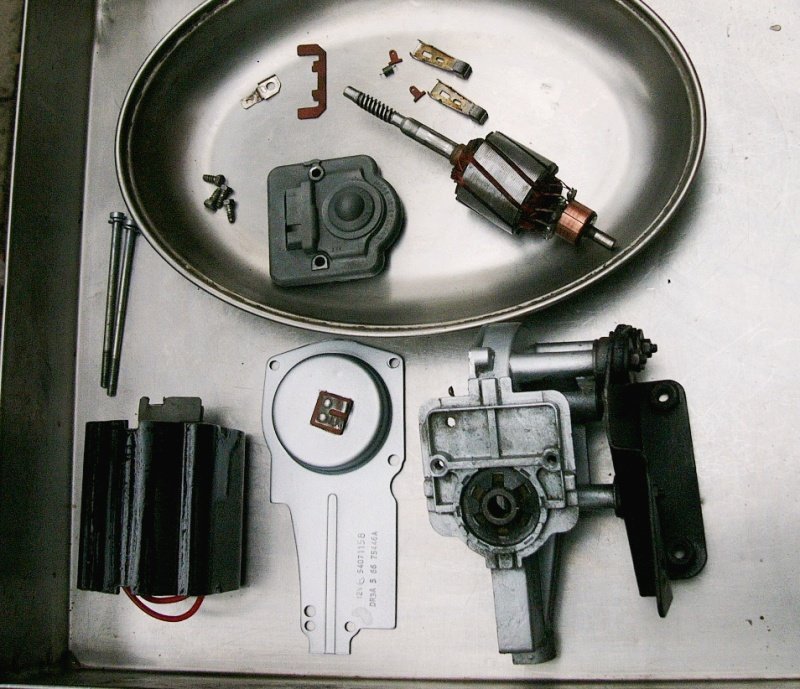
^ moving onwards and hopefully forwards this time .. the component parts were cleaned and tarted up ready for reassembly.
The armature - worm drive end, was reassembled into the gearbox and the field-winding carefully positioned over the armature (sans brushes).
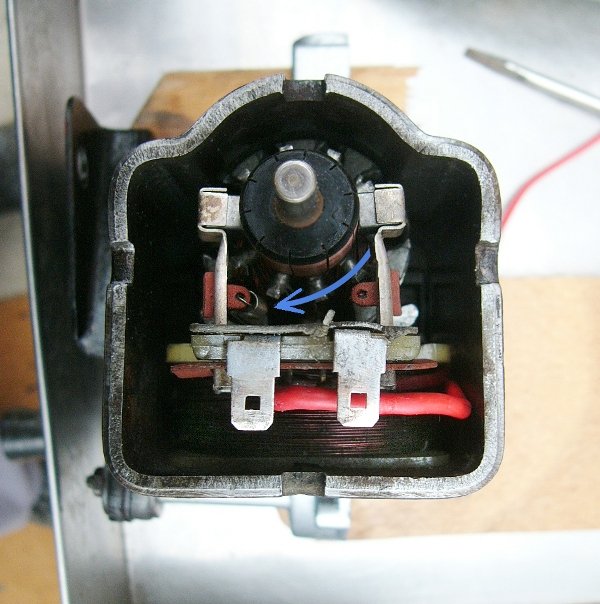
The brush arms were then reassembled, and the fibreboard fitted (behind the new red wire) which helps prevent the arms coming apart while the tensioning spring is fitted (blue arrow) ..or should that spring break at any time. It's fiddly holding the two insulation T-eyes in place and then hooking the spring into each hole, but it went easily enough thanks to a decent pair of needle nose pliers inherited from my father. Of course one needs to be careful that the spring's wire end goes right through each hole rather than just hooking on.
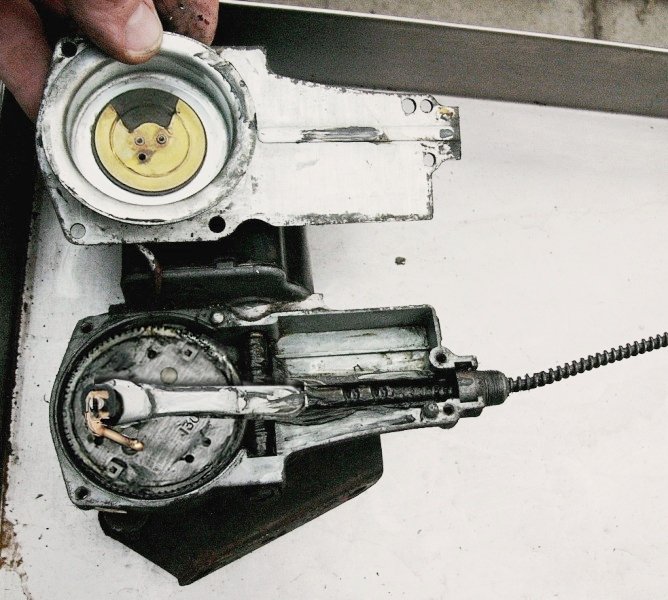
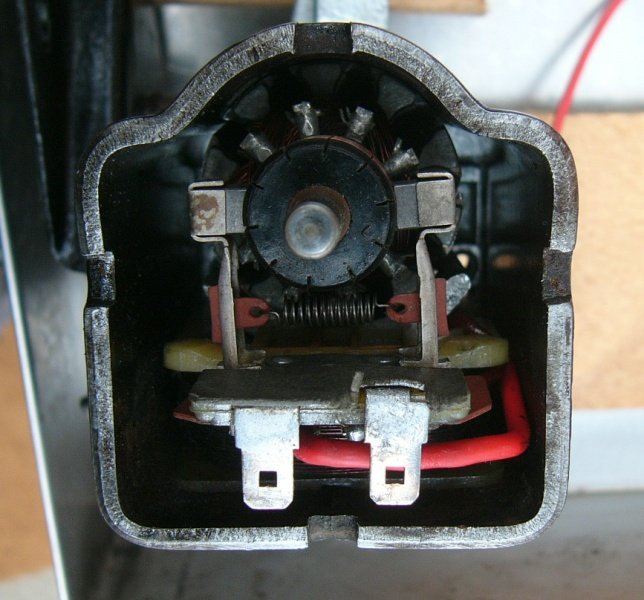
^ alternative views. The first hopefully clarifies my point about the E-shaped fibreboard holding the end of the brush arms onto their contacts (which I'd smeared with Vaseline), and the second showing the brushes sitting against the cleaned commutator. Note ; the red wire turns quite tightly to clear the end cap ..yet to be fitted but which projects further down than the terminal connectors. The wire's tail-end leads through a hole in the motor's other end, which is cast as part of the gearbox casing. Don't forget to refit the earth spade-connector, which sits under one of the end-cap's long screws (just seen in the piccies below)
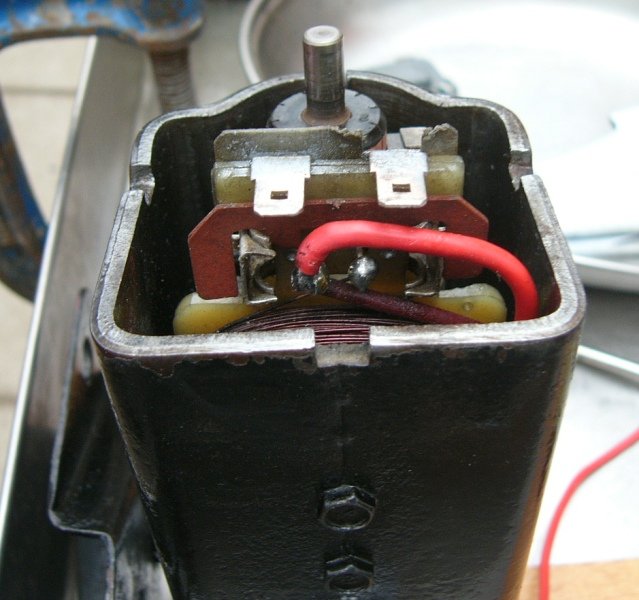
^ the end of the drive-cable was refitted, under the crankshaft's little-end pin, before the (now pretty
) gearbox top cover could be refitted. The red wire was cut to length and its tail-end soldered to the (park mechanism's) connector on the cap. As recommended by Peter W, I checked the wiper motor operated and the gearbox functioned correctly before refitting it.
Refitting the drive-cable back into its outer sleeve (undisturbed still on the car) was sticky-finger messy from the copious amounts of moly-lithium grease I wiped into the drive-cable's spiral winding.
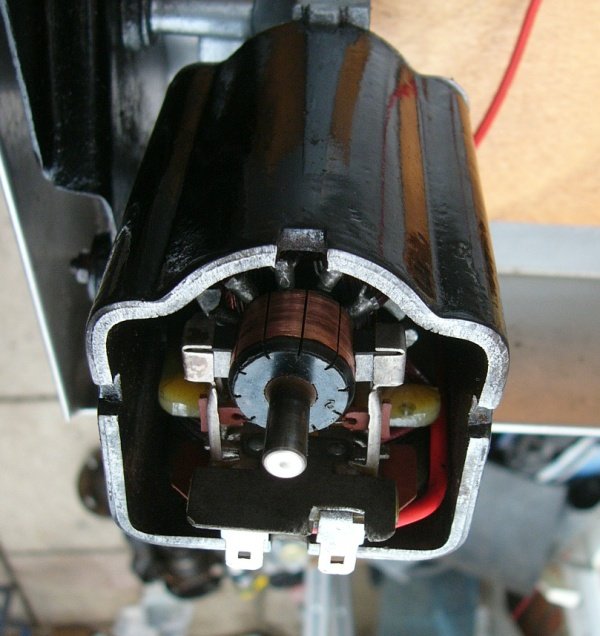
^ all back together again. Shame about the paint on this bulkhead, but all in all it is looking prettier and now works.
As I said above ; it seemed slow when checked I'd reassembled it straight, but subsequent to a new connector and a new earth (at the switch) it's now OK and seemingly good to go. Checking and re-lubricating the wiper motor was on my job list, so another item ticked off
I bid you a warm and comfortable evening,
Pete
-
Hi Jase, definitely not wanting to p on your parade, and I've not used one.. but looking at the photo suggests the Strongman Tamar has an awful lot of structure and gubbings to make access under the centre section of the car rather difficult. Arguably there's not a lot in that centre section that you need to get at ..save the gearbox mounts, the prop / driveshaft, the exhaust, seat mountings, possibly the trailing arm mounting brackets, and of course the chassis and body tub when paint is required. But might I ask what your primary requirement might be.? ..as it seems to me a lot of kit and a big chunk of money which may not be best suited to a rear wheel drive car with only 6" ground clearance.
Pete

-
Cheers Nigel ..i'd not seen that before.. strong stuff for those Black Country lads ..maybe it's why they talk all funny like
-
Thanks Stuart, yep I knew it was a single speed, and if a 2-speed was standard spec for the TR4A - then that accounts for the extra wires in the loom and the two-stage switch. Still, if I can get it to work reliably then I'll be happy to live with a single speed.
It does seem very much more "period" ..and goes well with the screen undemisters.
-
Hey Roger,
I hope you got it sorted, but in case not.. I assumed you checked that each wiper arm could definitely not rotate on its wheel box's spline ? Today i happened to lift mine off ..and consider they to be very suspect. If one arm slips around and then bites again, it would most likely stop the wipers from working. Just a thought that there may be excessive wear in, or ill-fitting of the arm's spline rather than issues within the wheel box.
Pete
-
After two weeks of freezing weather, over here in Suffolk we're back to sunshine and mild temperatures - so doors could be opened again.! And like so many households - in preparation for Christmas.. washing had to be done.
It's too damp to finish my painting the anti-fouling under the boat's keels, so today I opted to work on Katie. My most recent trips out, first to Norwich and then to our local TSSC meeting highlighted two electrical faults which each need to be urgently addressed. One was that the indicator's tell-tale light sometimes continue to flash when the indicators are cancelled, and the other being the windscreen wipers only work a couple of swipes and then stop ..and despite fiddling with the switch will not resume. When I got in after the club meeting I tried again, but this time I manually helped the wiper arm to move. It then swept the windscreen. From having gone through the wiring connections, I know that both the indicator and the wiper switches are 'iffy. My good friend Rich has used spares which I had hoped to pick up from him at the last meeting ..but I didn't make it.
In any case I'd not yet checked the wiper motor, nor lubricated the cable mechanism, so that's what I started on this afternoon. . .
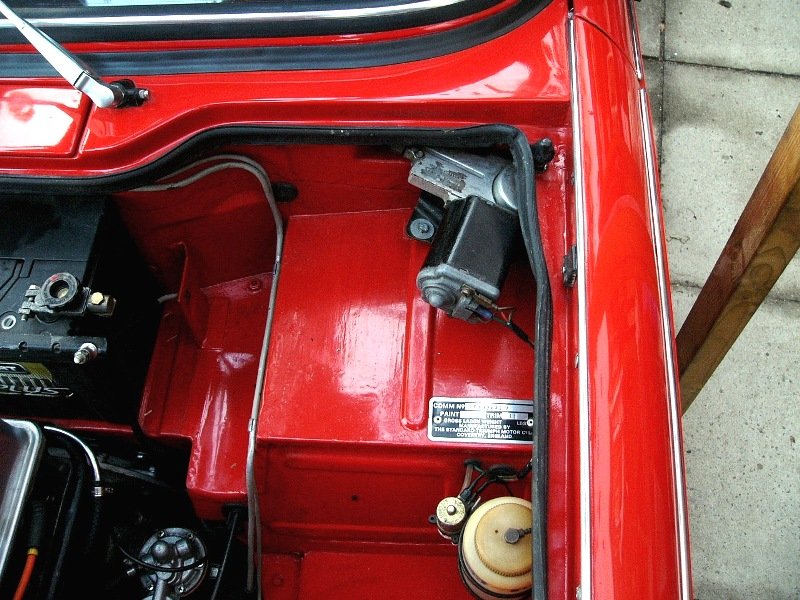
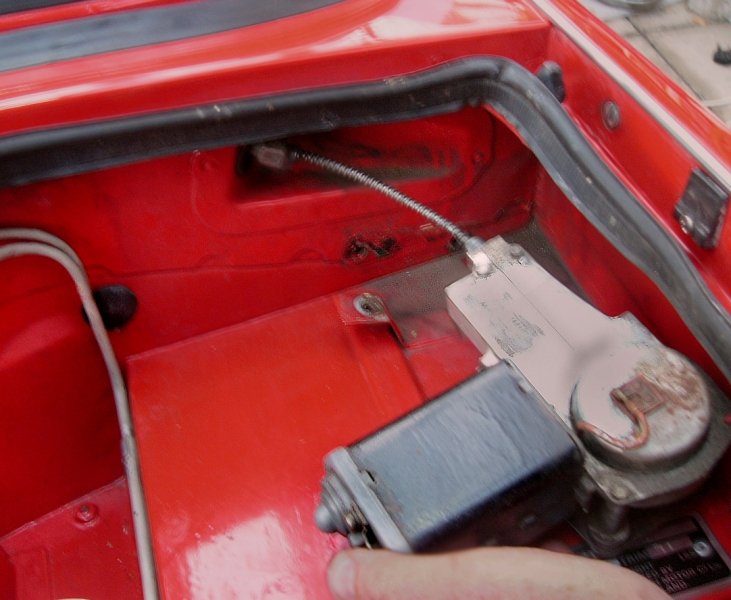
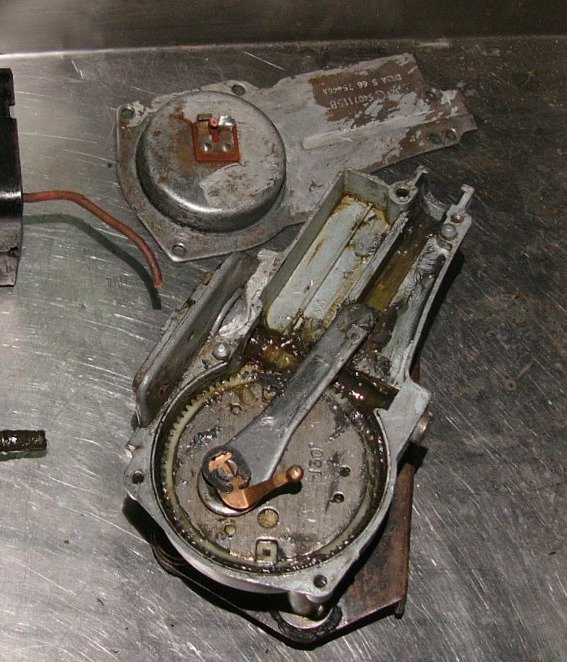
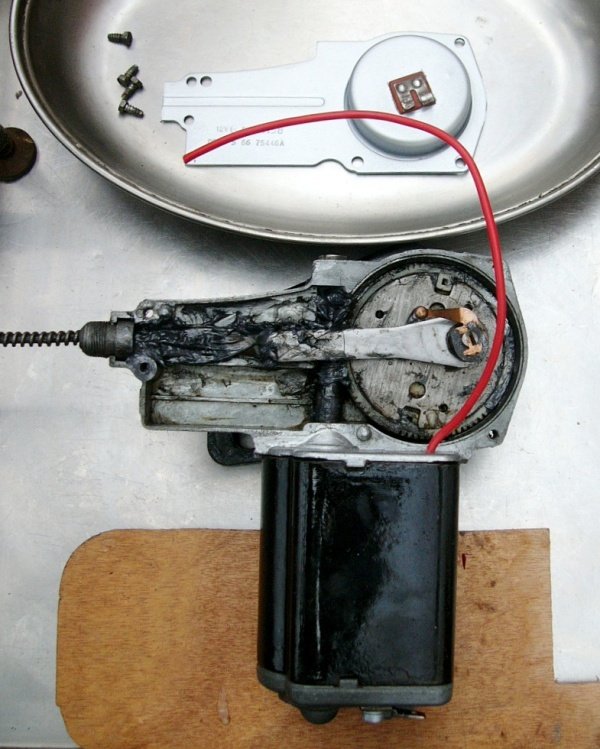
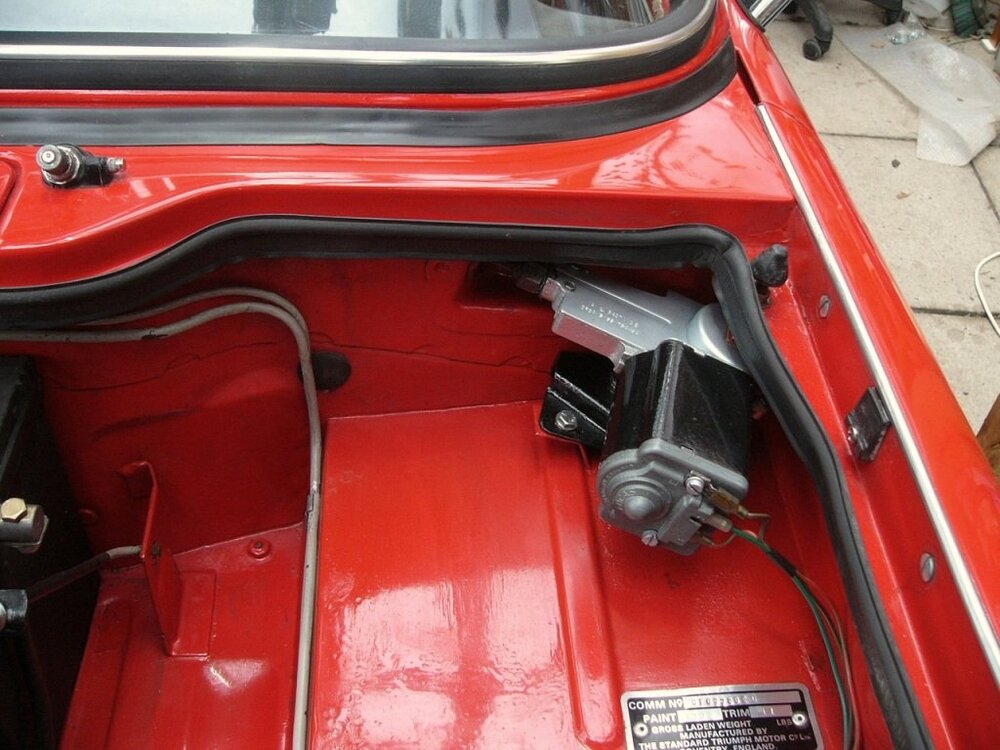
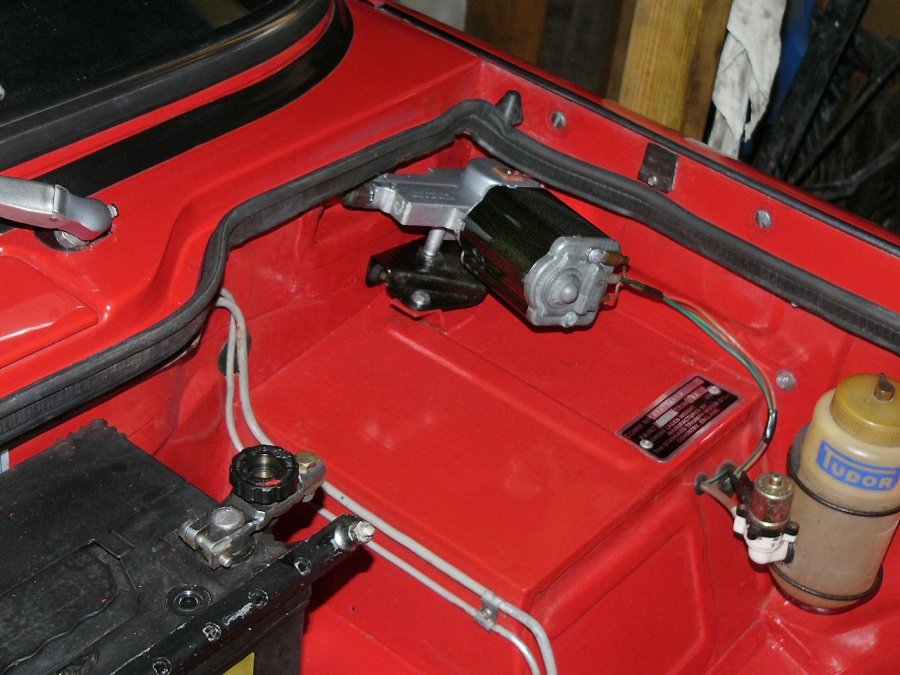
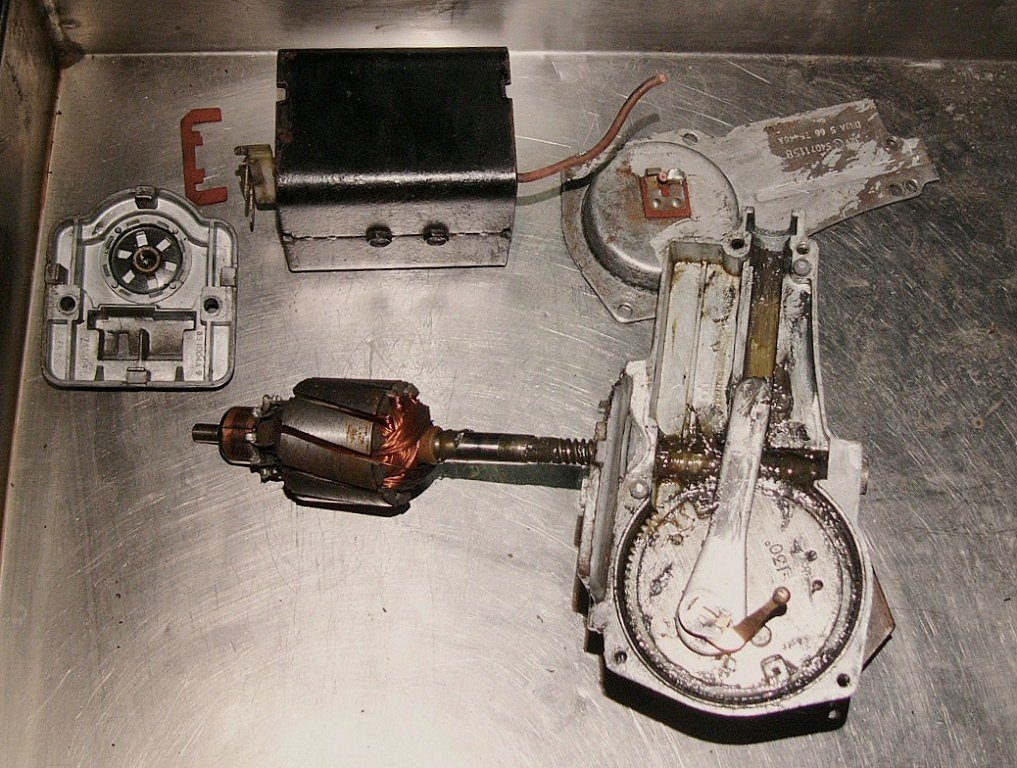
^ Katie's wiper motor installation. I wanted to remove it completely so after recording the wiring connections ; I removed those, I undid the large nut which attaches the drive cable, removed the hex-head set-screw with its big washer, you can see, which attaches the motor's black mounting bracket to the bulked shelf, and two set-screws ..reached from inside the car (under the dashboard). Those three set-screws each have captive nuts, but on this car - the one on the bulkhead-shelf took a 10mm ring-spanner and the two inside - a 7/16" socket. With the wiper arm's lifted off, so their drive-spindles can freely rotate, the wiper motor with its spiral cable can be withdrawn, leaving the cable's outer sleeve conduit and the wiper's wheel boxes in place and undisturbed.
^ The wiper motor's gearbox top-cover has four set screws (1/4" AF socket) which when relieved give access to the worm-drive from the motor, and the crankshaft which operates to push and pull the drive cable to the wiper-arms. I was pleasantly surprised to see that it was not caked up inside, with 50-year-old grease, as has been every other classic car wiper motor I've pulled apart.
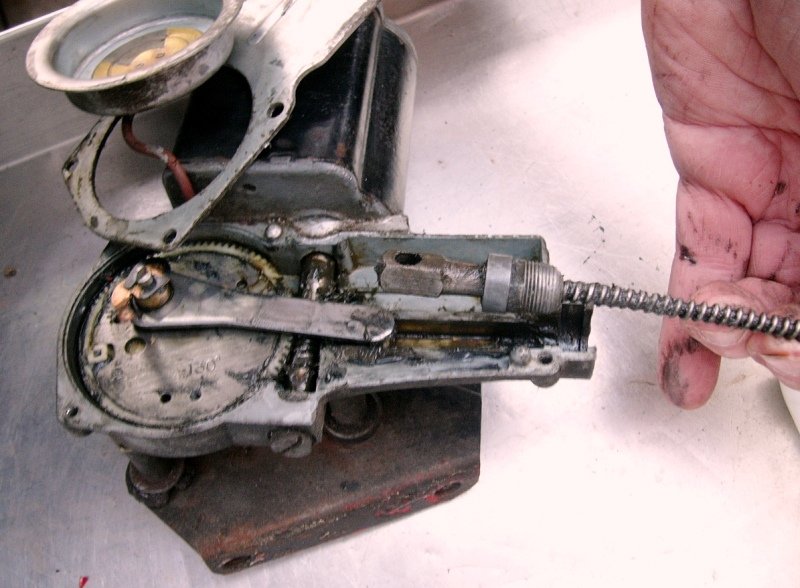
The drive cable had a hard kink though, just where it went into the wiper motor, so I bent that straighter by hand. Then, very carefully, I prised the little-end pin of the crankshaft up and out of the cable's end. The greasy drive-cable was put to one side, but again I was happy to see the grease on it wasn't at all hard-caked.
The (sorta of reddish) wire from the motor to the gearbox's top cap is for the wiper's parking. Its rubber insulation is cracked through in several places and so will be replaced. I cut the wire near the cap's connection - I'll un-solder it anon, but in the meantime it meant that the gearbox top-cover could likewise be set aside.
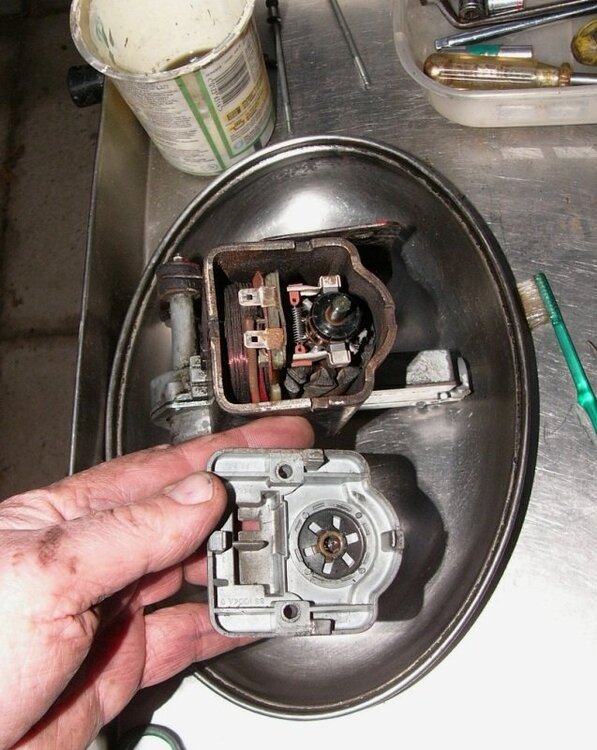
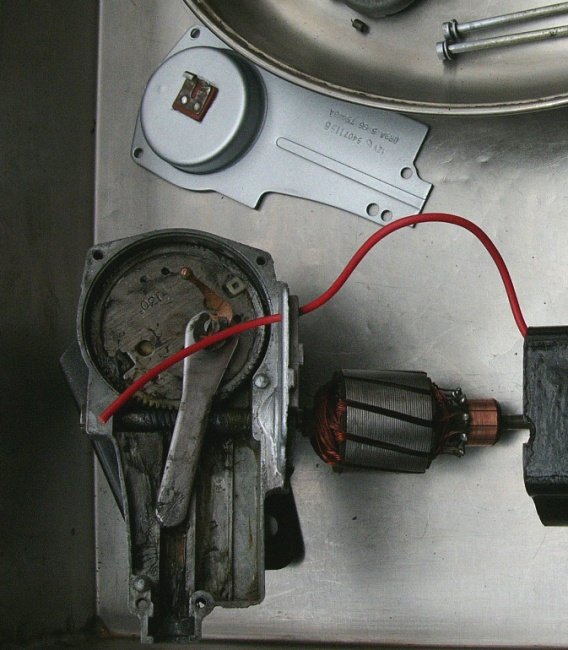
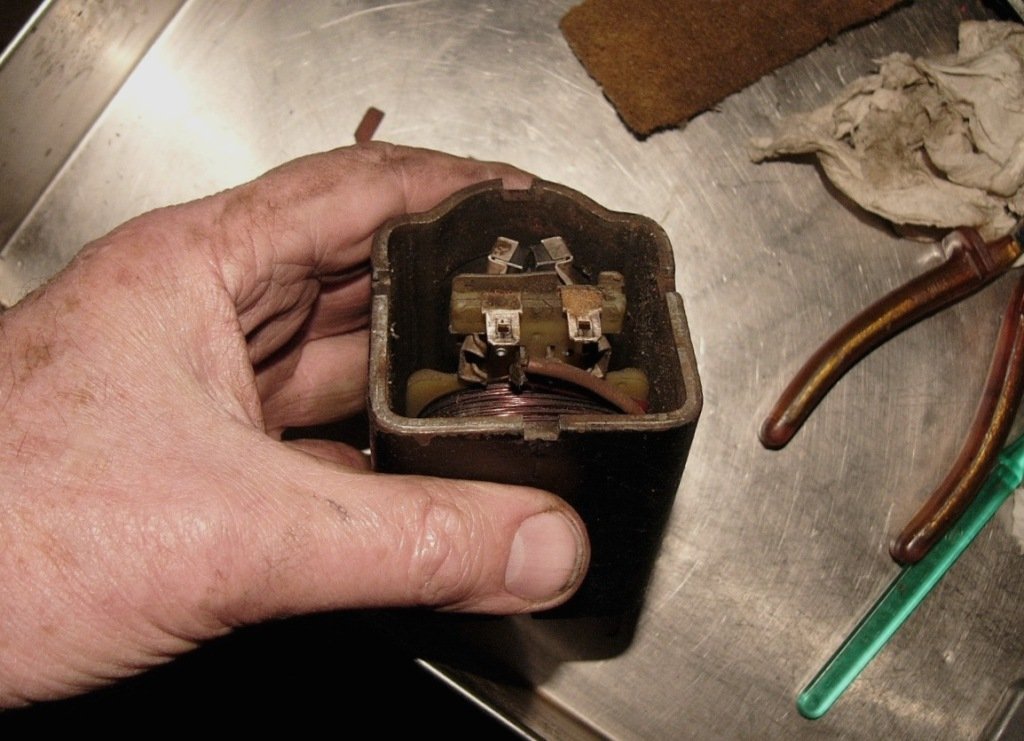
^ After some cleaning up, around the outside, to prevent grime from getting inside, I removed the motor's two end-cap hex-head (long) set-screws for access to the motor's brushes. I've seen very much filthier and the brushes are serviceable, but one electrical connector was rusty and the armature was not exactly shiny copper clean.
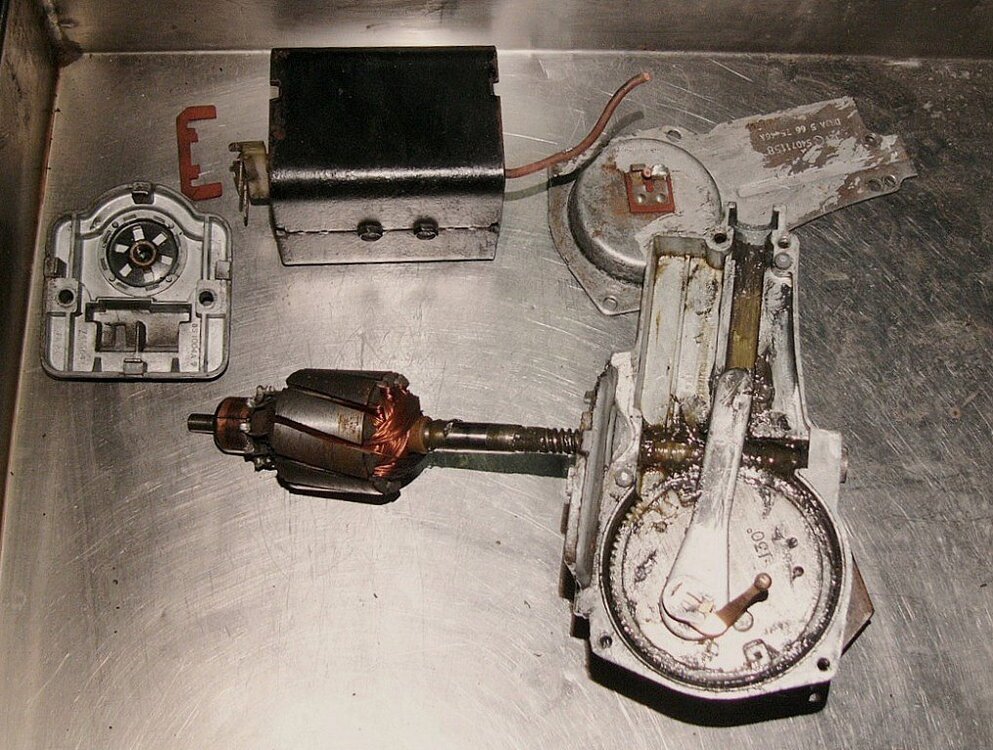
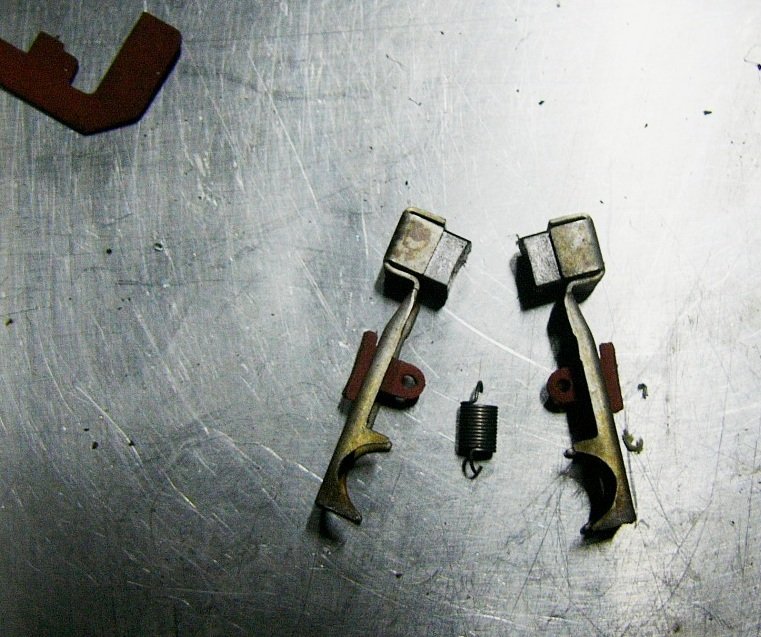
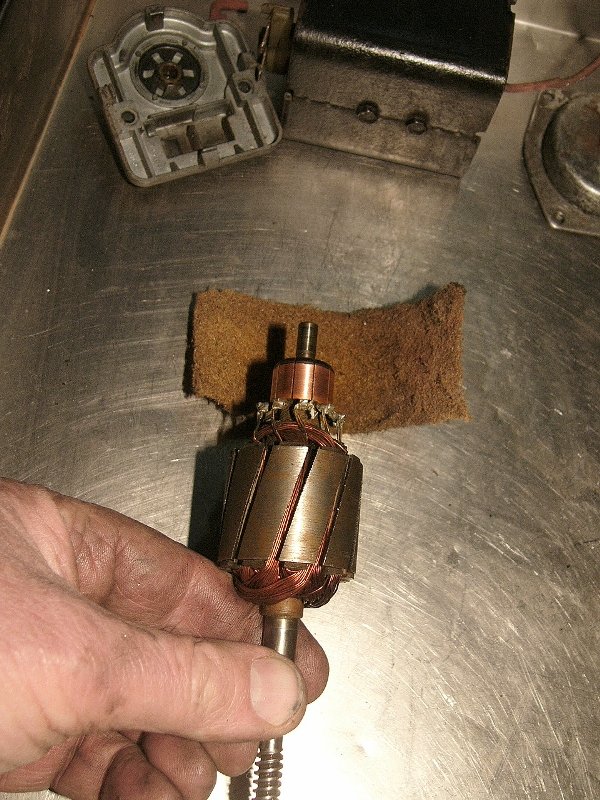
^ with the parking wire to the gearbox cover cut, the motor's field-winding can be withdrawn (with the wire) from the gearbox. The armature's worm-drive can then be pulled out / unwound from the crank-wheel. Beware the armature brushes, the two insulation T-eyes (orangy colour) and the tiny spring, which can drop out once the armature is removed.
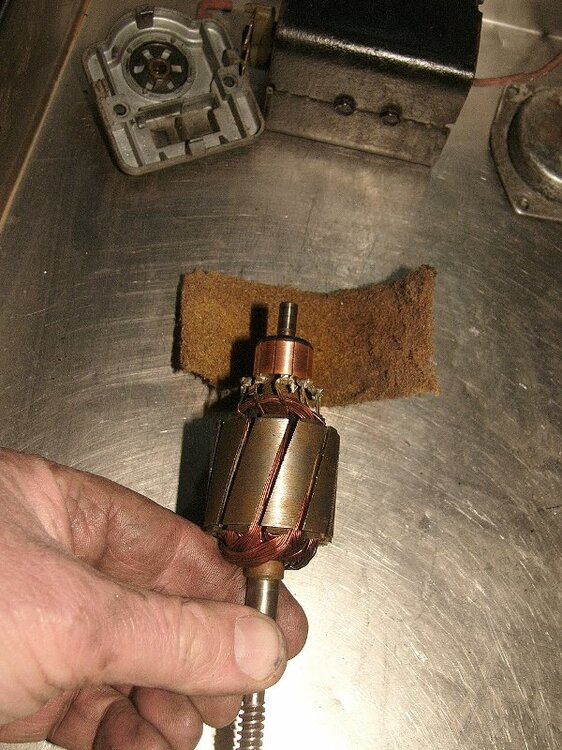
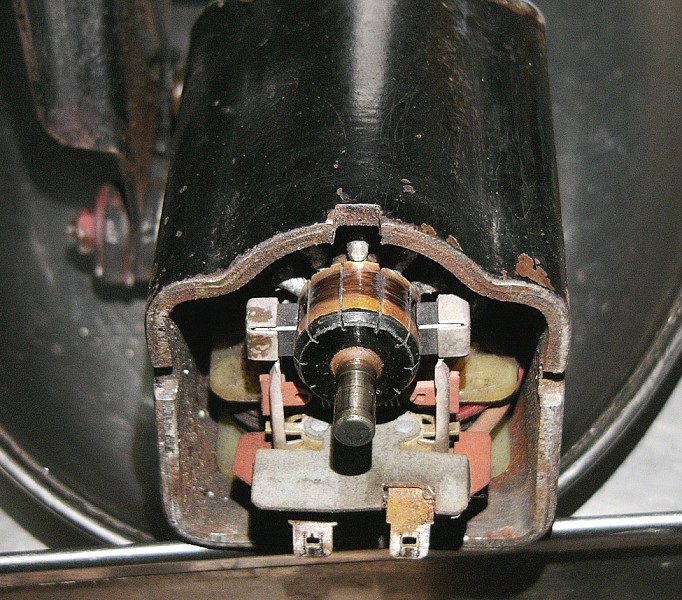
^ Turning the armature in my fingers, I used a scouring pad (wrapped around the copper contact surface) to clean it up.

^ next up was to clean the crud out from inside the field winding, to visually check things were in good order, and again I used the scouring pad to clean the contact faces onto which the contact brush arms seat.
All in all, a little fiddly and time consuming, and before you know it.. the daylight had gone.
I thought better of faffing around like a blind mouse, so packed up and made myself a cuppa tea ..and washed my hands before emptying the washing machine. A bachelor's work never ends
I hope to replace that wire, and finish this off tomorrow.
Cheers, Pete
-
Thanks both,
yep the dehumidifier is staying in the apartment for the time being. With air temperatures outside being what they are, there's next to no humidity out around the car anyway.
-
Car windscreen / windshield / head-up displays are not a new idea. Houses have had them since glazing was first used in the 13th century. . .

This morning's head-up window display in the kitchen tells me it's firkin' cold out
")
Pete
-
It arrived yesterday morning
..despite my not paying for 24 hour delivery. On this occasion ; the Marine-Superstore's standard two-day delivery (inclusive in cost on over £100 purchases) turned out to be next day.
On 12/13/2022 at 2:49 PM, Bfg said:Unfortunately the old cottage I now rent (the downstairs of) is both cold and damp, with night storage heaters &/or mobile electric radiators. Even with just heating the one room I'm in, is I think going to cost a a king's ransom this winter ..and so I thought I'd share with y'all a purchase just made < here >. It's a desiccant dehumidifier, and not cheap but is pretty quiet and of relatively low power consumption. It was enthusiastically recommended to me, by my friend Steve, who lives on a sailing boat down in Fox's marina ..which is very much more damp and cold than here - he's just bought one and after just 90 minutes the humidity in his boat's cabin has dropped from 90% to 55% He tells me that his old dehumidifier wouldn't get it down that low even after 9 hours.
Aside from the debilitating discomfort, humidity on the windows and walls, being unable to dry bedding and clothes (..and the salt and pepper grinders being too damp to work !) I relate being cold and damp with the arthritis my dear ol nan was crippled with. I don't want that.
£175 is a lot of money, but if feeling dry saves on the power presently being consumed by the electric heaters, then it may pay for itself over the nest four months. This sort of unit is small enough to be portable to go from one room to another, to use in the boat and even to sit inside the Triumph, in the polytunnel under its car cover (with drain pipe led out). I'll let you know how I get on with it in a couple of day's time.
Pete
p.s. I ordered it with inclusive of 2-day delivery from the Marine superstore, which cost £5 more than Steve paid from Fox's chandlery (who are hoping for new stock next week)..

Update / feedback (15th December) and important features to me were ;
- it's a desiccant dehumidifier, which operates from 1 deg c through to 37 degrees. The condensation dehumidifier, I used to have ..in the garage before I moved home, used to freeze up in low air temperatures, and then turn off while it thawed. In winter, let's say below 6 degrees air temperature that could take a long time. In cold foggy weather is when I wanted to keep the contents of my garage dry.
- Lowish power consumption of 300 or 650 w according to fan setting. I'm using it on the low fan setting because it has the noise of a fan heater, and like one of those the lower fan speed setting is tolerable but the high fan setting is I find noise intrusive.
- it has three humidity settings. the lowest offers a relative humidity of 60%. the mid setting aims for 50% relative humidity, and the highest setting is aiming for 40%.. Naturally the sensors would turn the device off when those relative humidities are reached, So on the lowest setting the device might cycle into standby mode which consumes 30w of power. NB. Relative humidity measures the density of water vapor in a space relative to the temperature in the same space.
- The water tank is just 2-ltrs (think family size milk cartoon) despite the unit's rating at 8-ltrs /day. A pipe can be fitted (not supplied) to drain elsewhere or into a larger pot. The unit does have a timer on it for ; 1hr, 2hrs, 4hrs, or 6hrs, otherwise it stays on. I might only guess that if one were to set it for 4-hrs (1/6th of a day) then that ought to be sufficient ..unless it's a really damp environment. It has a level sensor which turns the unit off when full ..rather than it flooding out over the floor.
I received it midday yesterday and turned it on in my lounge, where I hibernate during the day during this icy spell. After four hours, on mid settings, I emptied just a little more than 1 pint out of it (..using a half pint beer mug as a measure). Tbh., I had expected more, as cold tends to feel damp to me, but outside air temperature was so cold that ingress of dampness through the walls, would have been low.
As I sat down in the evening to eat, watch a movie and then to read my book, I moved the dehumidifier (emptied) to my bedroom for another four hours, when I went to bed (and turned it off). I visually checked the level through the pane and guess there was perhaps half-a-pint of water in the tank. I did not bother draining it. Perhaps psycho-somatic but when I went to bed the air felt nicer. I'd not thought of it as clammy before, but I guess that's what it comes down to.
This morning I got up and turned the device on mid-settings again, in the bedroom, as I settled back into the lounge. 2 hours later I checked and emptied the tank of over 2 pints of water. This would have been mostly condensation from my breath through the night. Drying the air from clothes and bedding has got to be a good thing. I've put it on again in the bedroom, simply because I relate it being dry in there as being healthier.
So there we are. I've not tried it in the car yet, which is parked in the zero-degree polytunnel (with its grp Surrey-lid in place) under a car cover. But as the internal volume of a TR4 is tiny - I couldn't really expect a lot of moisture to be extracted. However, it would not be much of an effort to place the car on a ground-sheet, and to close the sides of the car-cover - so as to use ..like a carcoon, with the dehumidifier to dry it out within.
Of course the distilled water from the (filtered air) dehumidifer might be good for ice in your Christmas spirits, for household plants, for lead-acid batteries, for screen wash or radiator refills, and perhaps for beverages and cooking too. Bonus
Pete
-
-
On 12/5/2022 at 7:20 PM, PodOne said:
So Pete when's the expected launch date?
Good question.. who knows Andy.. I'm not rushing, but to secure the berth I wanted to be ready to drop her into the water at the marina's convenience.
The boat yet needs recommissioning, new water and gas systems, replace the rigging, engine hasn't been used in years, etc, etc etc. but those things can be done with the boat in the water. I just like being on her even when just sitting there. In the meantime I need to get a boat survey, for insurance purposes.
Its too cold to do any epoxy or painting on the boat, and too cold for me to work on the car, or trailer, in the polytunnel. So this week I'm hibernating with a monstrous, authoritative but difficult to read, book on The English Castle 1066-1650 by John Goodall. Everyone to their own eh !
Unfortunately the old cottage I now rent (the downstairs of) is both cold and damp, with night storage heaters &/or mobile electric radiators. Even with just heating the one room I'm in, is I think going to cost a a king's ransom this winter ..and so I thought I'd share with y'all a purchase just made < here >. It's a desiccant dehumidifier, and not cheap but is pretty quiet and of relatively low power consumption. It was enthusiastically recommended to me, by my friend Steve, who lives on a sailing boat down in Fox's marina ..which is very much more damp and cold than here - he's just bought one and after just 90 minutes the humidity in his boat's cabin has dropped from 90% to 55% He tells me that his old dehumidifier wouldn't get it down that low even after 9 hours.
Aside from the debilitating discomfort, humidity on the windows and walls, being unable to dry bedding and clothes (..and the salt and pepper grinders being too damp to work !) I relate being cold and damp with the arthritis my dear ol nan was crippled with. I don't want that.
£175 is a lot of money, but if feeling dry saves on the power presently being consumed by the electric heaters, then it may pay for itself over the nest four months. This sort of unit is small enough to be portable to go from one room to another, to use in the boat and even to sit inside the Triumph, in the polytunnel under its car cover (with drain pipe led out). I'll let you know how I get on with it in a couple of day's time.
Pete
p.s. I ordered it with inclusive of 2-day delivery from the Marine superstore, which cost £5 more than Steve paid from Fox's chandlery (who are hoping for new stock next week)..
-
I wonder what sort of success the TR6 had in slaying monster fire-breathing dragons. Perhaps this one was used on the drag strip ?
If it had been another model of Triumph, instead of a TR, then the lordly scene may have been one of hunting ?


That was a year that was..
in General TR Technical
Posted · Edited by Bfg
Yesterday I'd pulled out the steering column switches and decided the wires were all too tightly squeezing back into the aluminium shroud. The wires' insulation is hardened and in places cracked so after straightening out the suspected-to-be-the-guilty-party (.. the indicator wires into the back of the switch) and a good brushing clean with carb cleaner & wiping dry with clean tissue - I coated them in liquid electrical tape.
^ drying that insulating / plastic coating with the warmth of a candle on Christmas day.
Regarding the too tight shroud (for the number and routing of wires)... Today I pulled the steering wheel and eased the steering column outer sleeve so that I could turn it for access to easing out the wire's through-routing. . .
^ When going through the wiring earlier in the year, I'd already eased a bit of the cowling away (first photo, red arrow) but I decided today that it was still far too tight, and unnecessarily so, as the switches are hidden under a plastic cowling anyway. 2nd photo shows how much further I've now taken it. This then gives ample room for the overdrive switch' wires (..which happens to be the switch I'm now using for the headlamps main / dip beam) as well as the wires for the indicators. I similarly opened up the orifice underneath this cowl where the wire come out of the cowl before heading under the dashboard.
Pulling all the wires out was a faff.. but all-in-all I think useful - as I don't like vehicle wiring to be unnecessarily pinched together, especially through places where there's no room for anti-chafe grommets.
Job done and all put together again, wires reconnected and checked to work correctly etc..
^ Test drive on a pleasantly dry & mild Boxing Day afternoon suggests that the issue I had, with the indicator-warning-light continuing to flash when turned off - has, for the time being at least, gone away.
The likely fault was as Rob suggested, was that the indicator relay was inadvertently being earthed ..other than when switched. And that would have been the wire from the relay to the switch - perhaps only-just (hence it's flickering) shorting out against the pressure die-cast switch body or perhaps even the aluminium steering column shroud. It certainly wasn't obvious to see but then possibly the electrical fault was via tracking across dirt particles.?
Either way, it now works as it should (one flash extra after the indicator switch is turned off), as do the windscreen wipers, all the lights and horn, etc. Success.")
Bidding you a good evening and a pleasant holiday.
Pete