


David B2
-
Content Count
123 -
Joined
-
Last visited
Content Type
Profiles
Forums
Calendar
Posts posted by David B2
-
-
It’s listed on the autopaintsbrighton site. I’ve successfully used them many times for cellulose and (when I’ve not Initially ordered enough) they have subsequently provided matching paint exact colour shade.
look on triumph classic paints. Under whites. It’s shown as elasquez cream but I’m sure this is a typo.david B
-
So far 4.67p per mile on my Tesla M3 but coming down as I’m now on a cheaper tarrif.
David B
-
Graham,
I also have a really good HVLP mini gun (maybe the same chinese make bought from Stoneleigh). It did the same thing. Paint spurting from the cup vent hole. It now still is a good spray gun.
I found that it needed cleaning better than I first did it. Not just the main fluid nozzle but also item 3, Nozzle Gasket (four holes) and the route the air takes to it via the pattern adjusting screw and onto the Air cap. Hole in gun at 5 o'clock. Pour thinners down into it and let it soak and wiggle the pattern adjusting knob.
Best of luck with the cleaning and painting.
David B


-
Stuart, Many thanks for response and advice.
I have chosen to do the painting piece by piece rather than strip down the whole car again as space is limited. Have done the rear deck and rear wings as photo. Now doing the boot lid and had hoped to go through the paint stages in a shortened span but will take your advice and let things settle between stages.
Yes, I can see there has been some sinkage in places as on the upper rear wings that have some metal repair sections let into them. Am working towards the front but perhaps another year I will do the rear again as per Forth Bridge. Stepping back it looks OK and is drivable though. When done will put the boot back on in Bondarust red for a few weeks and take your advice and wait. As you can see the rest of the car is a collection of colours and surface qualities so won't be a problem.
Car is being painted in Mimosa, Yes, I know its a TR4A but it came in from Texas where PO painted it in 'Yella Rose of Texas' yellow. Mimosa is the nearest.
David B

-
Clarification sought on the rules on overpainting within 1 day or wait 7 days. Currently DIY repainting my rebuild TR4A. Have used Bondarust successfully so far leaving it for the 7 day required time before overpainting with cellulose. Couldn't find the answer when searching so excuse this question.
I understand the need for getting a coat of primer/filler on within 1 day but do I also need to do the top coat as well within one day or can I do this top coat after say a 3 day gap or will this remelt the cellulose primer and also the bondarust underneath and cause wrinkles.
Many thanks, David B
-
Is the position you are using for the Seat belt warning buzzer put on for USA models??
do you have an switch or empty position on the side as seen on Drewmotty’s post. Seems like the solution.
David B
Switch referred to as Safety switch on wiring diagrams goes to seat belt module. Check wire colour codes as on www.advanceautowire.com on TR6 ‘73 onwards.
-
On 6/6/2020 at 4:15 PM, Scotland Director said:
Dear everyone on this thread,
Thank you very much for your encouragement and keeping me sane during this process. I will consolidate everything that’s happened and the part that the Forum played. I also need to tell EVERYONE what happened.
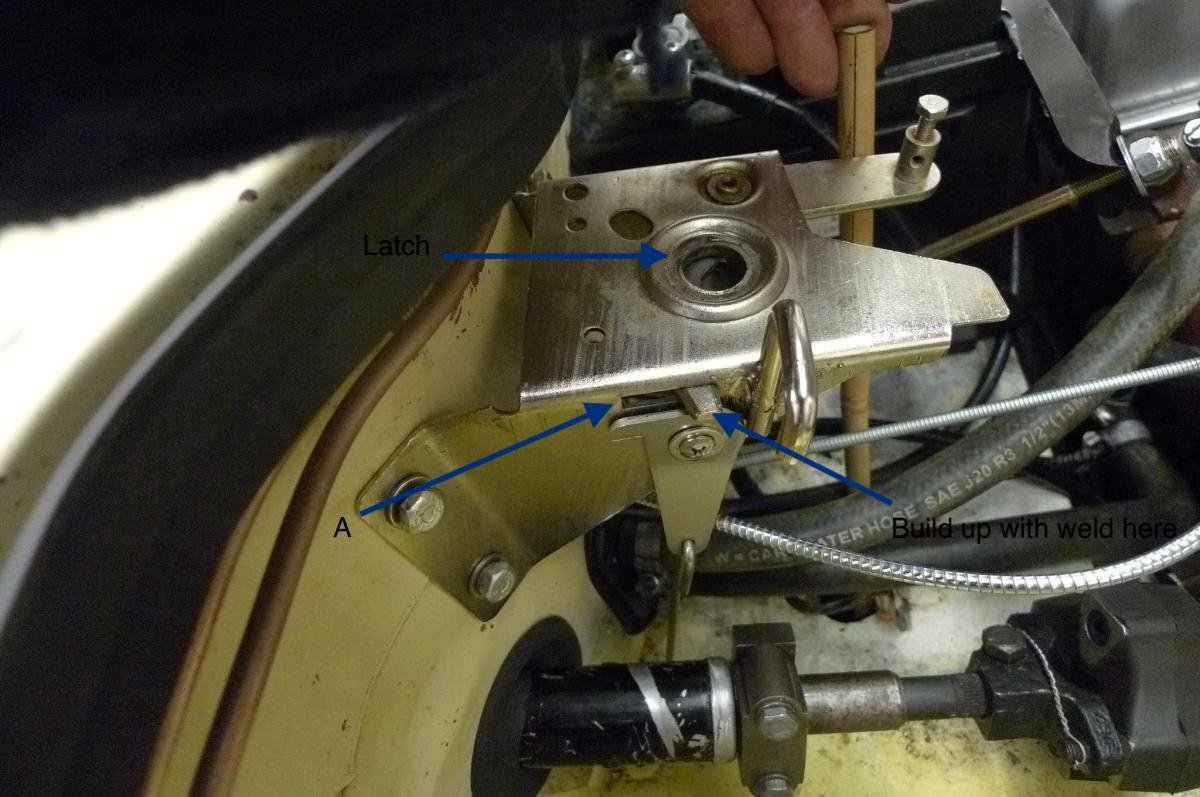
Hopefully you can see from the picture below, but what happened is the latch mechanism had hooked onto the bolt for the emergency opener !,!
What a nightmare, but feel chuffed it’s fixed now, just need to get a new grill from TRGB !
Thank you thank you thank you,
Stephen
Stephen,
Along with many others I have followed the saga and say well done for successful outcome.
Am impressed with the photo. Was it really taken using the £9 USB Camera gizmo as identified in may 25th posts by you and PodOne? And with the latch on its stuck position it must be with the bonnet down using the LED lights. If so I must get one.
David B
-
14 hours ago, Scotland Director said:
Latest update, bonnet still stuck shut. However, we’ve moved forward a bit. Endoscope is a brilliant piece of kit, hooked up to my computer and I managed to wiggle it up to the correct position. I can confirm that the cable is not snapped. When I pull the cable the latch moves and when I pull the emergency opener the latch also moves.
I wonder if the pivot on the latch is worn and thus does not move significantly to unlatch the plunger ?
I’m sort of doubting my original theory of the plunger being slightly offset and catching, on something because when the latch moves the plunger doesn’t move at all.
Any ideas for tomorrow’s efforts ?
Thanks Andy @PodOne
regards
Stephen
Stephen,
Re your thought that the latch doesn't move enough.See attached photo. The latch operates rearwards to clear the catch pin. So (i thinks) try and move the bonnet forward to clear the latch when operating and holding open both cable and emergency release mechanisms. a couple of levers down the gap between bonnet and scuttle, with thin sheet steel to suitably spread the load and minimise damage to the scuttle or bonnet. Jiggle forward and prise bonnet upward if you get my meaning while perhaps jiggling the release cable to rattle the whole mechanism. Clearly to mimimise damage to paintwork etc. The stuck bonnet scenario did happen to me on my rebuild and I used this method to release bonnet but body at that stage was stilll unrestored so no damage.
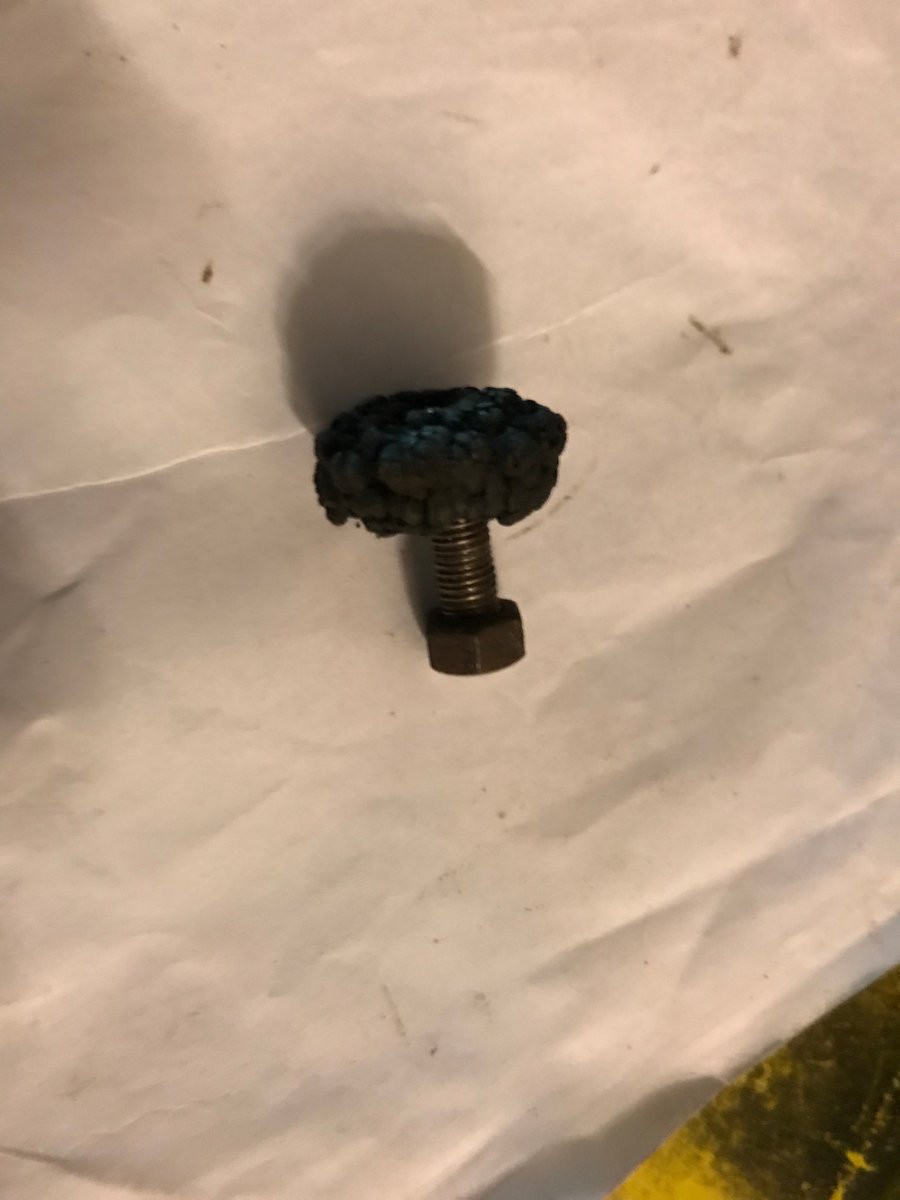
On the subject of emergency release mechanism, if cause is that it has gone over centre (and to prevent it happening again) then a tip i read on this forum was to extend the length of the actuating arm by say 1/8" with weld so that it still protruded from the slot when fully operated. It worked for me. see photos.
David B

-
Good idea to see what’s going on so you can get to the correct solution.
Last week I had a problem with my drains. Called in Dynorod to clear them. Cleared OK but then they followed on the job by threading a similar but suitable more professional camera down the drains to see cause of blockage. Got some great photos. Seems I have old pitch fibre drain pipe that had distorted over time and need replacing).
Sorry. Couldn’t resist. Thought there were similarities in the thread here!!!!
Best of luck . David B
-
Purchased a 305mm wide MMart one last year for bodywork repairs on TR4A as I have limited space. Used to make repair sections for top of wings, rear deck and other small parts. The slip rollers and the press brake are good and work well across the whole width but the guillotine is useless.
On balance a useful compact tool If you already have a giullotine. My job would have benefitted with a shrinker/stretcher as well for some of the tricky bends so think you have made the correct decision.
Have seen some really good stuff on www.rustybeauties.com on his TR6 restoration showing use of various metalworking tools particularly shrinker/stretcher. Worth a look.
David B -
Richard, and thanks from me too.
I’ve always thought it was done by the linkage bits inside the engine compartment even though it was a bit wobbly.
missed that between stripping the car and the rebuild when converted to RHD with alternate accelerator linkage. Will now do as designed.David B
-
Good day
just finished successfully refurbishing my poorly operating choke caused by frayed and kinked (stranded???) cable and worn operating rod. Many thanks to fabulous advice from threads on the forum particularly advice from RogerH. You’re a star.
threads “TR4a Choke Cable: May 2015” and “Stiff Choke Cable: March 2018”
Drilled out the crimps securing the old (stranded) cable to the brass rod. Purchased a length of 18 swg piano wire from a local model shop ( £1.00), crimped it in place using nail punches. Solid as a rock. Recut the teeth on the rod with needle file so that locking mechanism would operate again. Replaced and now the choke opens and closes fully and correctly. The threads even advised me how it was meant to be operated to lock and unlock. Never could work this out, I just jiggled the knob until it sometimes locked!!thanks Roger and all. Saved me a lot of pennies.
David B -
Hello,
dimensional chassis drawing are on pages 257 & 258 of TR4(A) workshop manual. PDF copy within technicals section ( under resources) on TR reg site.
David B
-
A set of spanners all made by 'Hank'. Very prolific in the South East he is.
Three ladies (half sisters) and one gent. The one on the right is mine.
David B

-
My spanner having a well earned rest after a run and meal.
David B
-
Keith,
ahh, I see now that it looks ok after you’ve cut the length down, will have a look what b&q have on my next visit.
Or ... as I have since your post been looking at alternates will weld a washer onto screw head and superglue a thick rubber pad onto it. Shouldn’t look too agricultural.
Thanks again. David B
-
Z320,
CD24540 is shown as in stock at DMG (triumph), my usual source. £3.60 less 10% TR discount.
Keith, good idea but as it’s going to be visible for the hood application will go as above.
David B
-
Thanks all,
Peter, I see it now but the schematic was misleading me as it doesn’t show an angled bracket on the frame arm. Not available from moss though.
Andrew , thanks but as you might expect not at the rimmer price.
Peter W and Stuart, thanks for the pointers to a bonnet buffer (which I need as well). 612962 seems to the pointed version from suppliers pickies but CD24540 shows it flat, correct thread into my welded nut and £3.60. I’ll go with that.
Hood due tomorrow so may have some other challenges!!!
Thanks all. David B
-
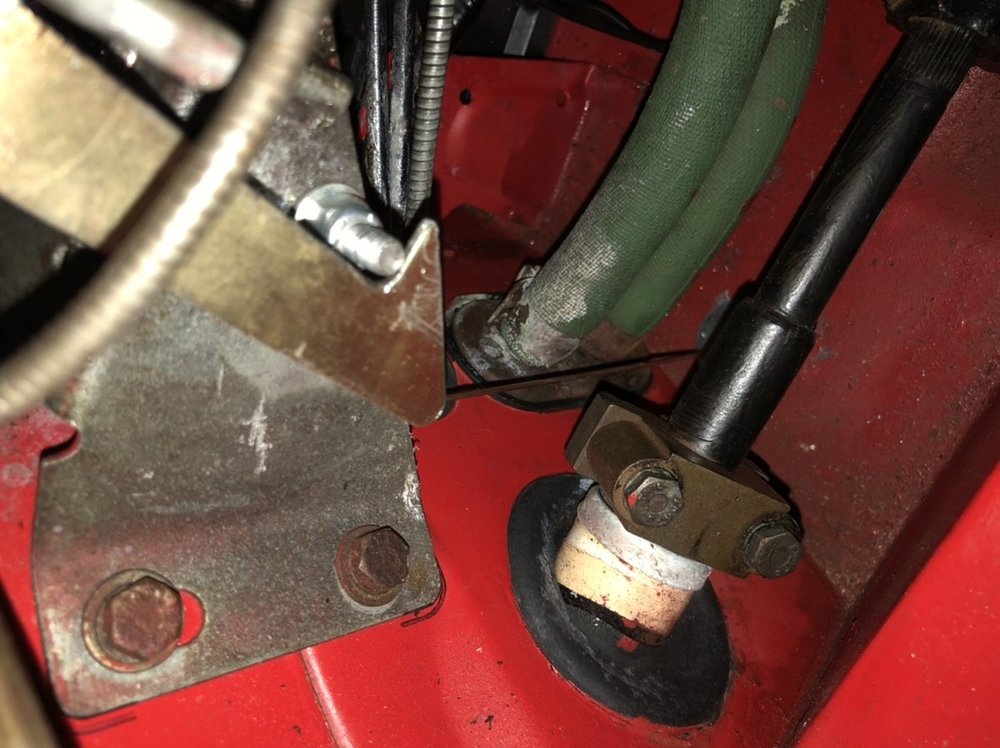
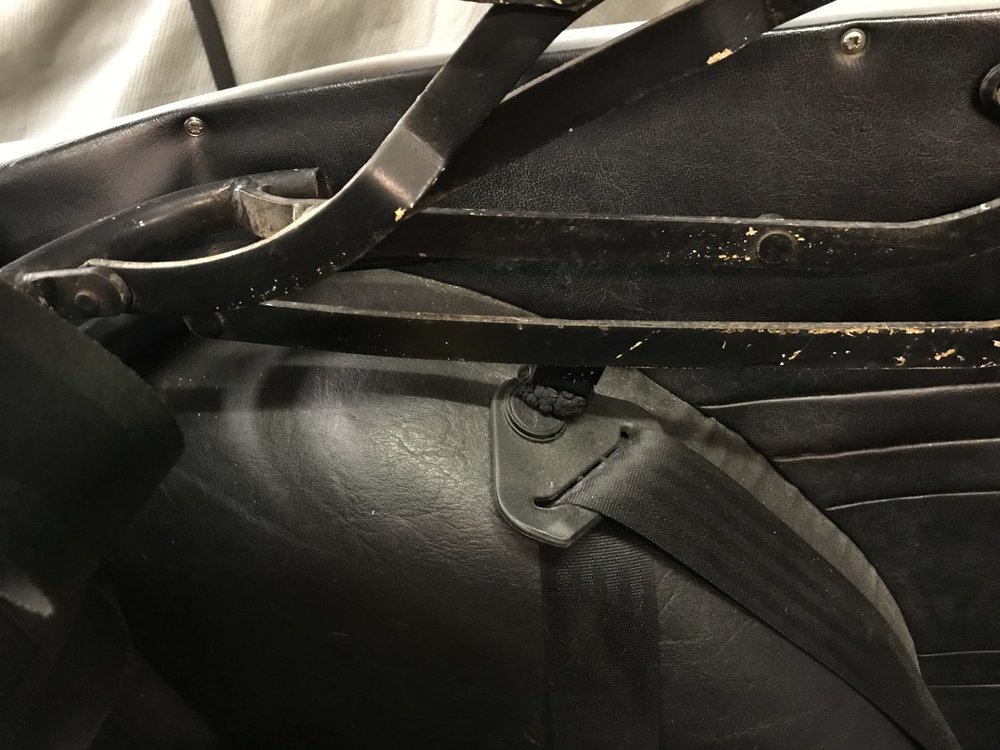
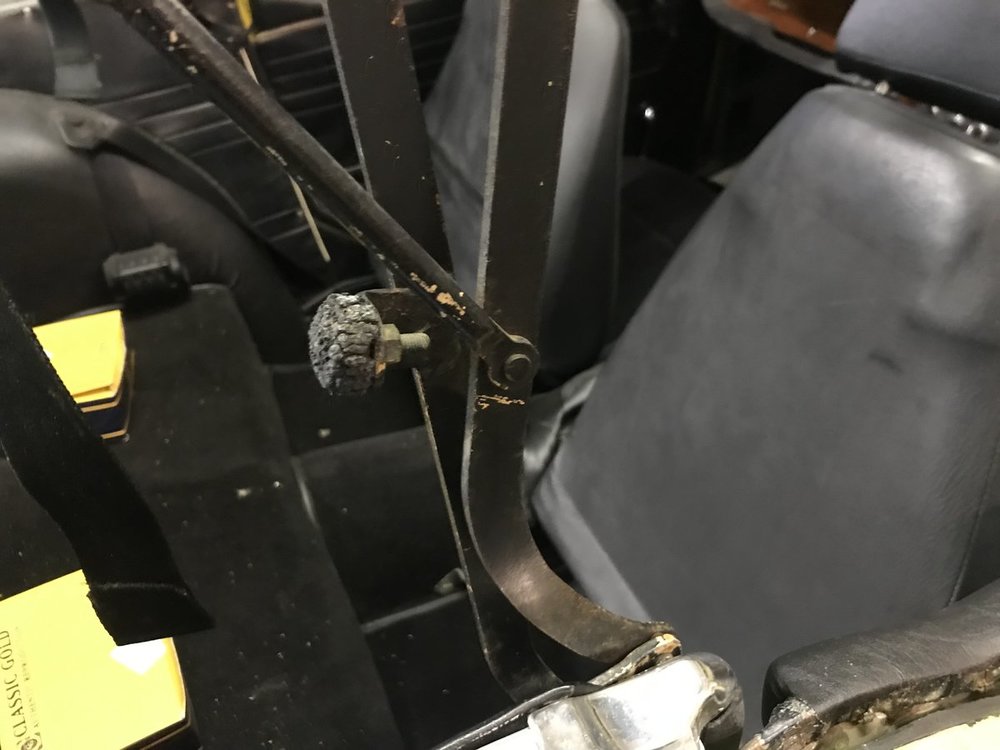
Good day all,
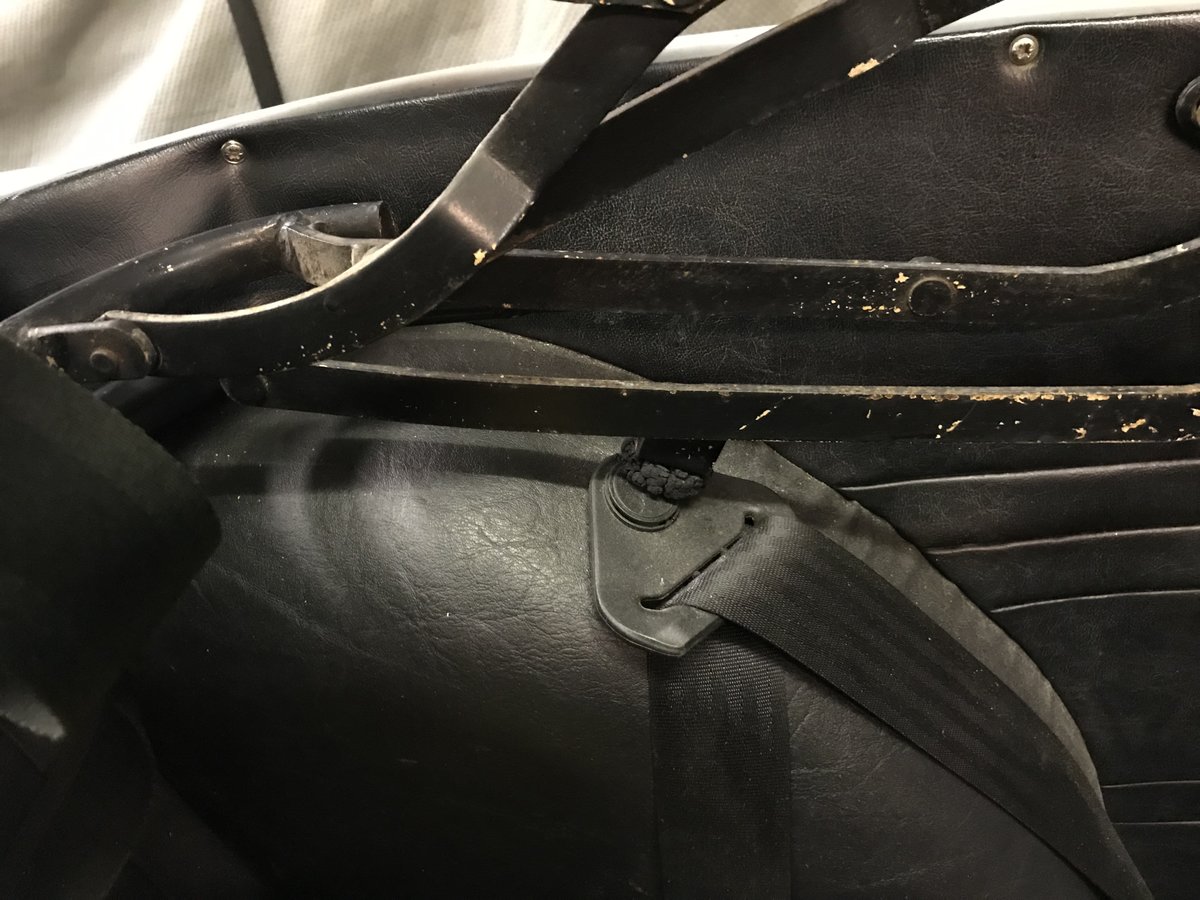
Finally putting my frame back on car with new hood to come. As with the rest of the car all the rubber parts have perished but cannot find details for this one fixed to angle bracket on rear of frame. It fixes to head of an adjustment screw and when the frame is down it sits on the rear wheel arch.
Cannot see it on either the Moss or Rimmer catelogues. Doesn't seem to be a home made add on.
Can anyone advise part number please.
Many thanks,
David B

-
And again, this time ex-Texas TR4A, let’s see some pickies. Interesting to see the condition as you say it’s a restoration project. Did it live up to the photos you saw before purchase?
David B
-
Geko, just looked at your profile and now understand your delivery comment. All the Best.
DavidB
-
Agree with Malbaby. Good deals available in USA. I bought one from Merit Cars, New York, last year. Purchase and delivery process all went well. Conversion went well. Restoration still underway. He has a rough TR4 for sale on his site. And tr3s.
David B
-
Richard,
My 'Mechanical World Year Book, 1969' says
13/64th. (.2031"). or 5.3mm (.2087")
David B
-
Simon,
Costs of minor items do add up. In addition to big items mentioned already For a TR4A and I guess tr5 would need same.
front amber indicator lights. £50 pair
rear amber lenses. £30 pair
front rhd headlights. £60 pair
Wipers and arms. £ 80 pair
tacho and speedo cables. £40
changing brakes and clutch positions means new hydraulics pipes. £150
I found that modifying the loom was doable as the main spine of the loom ran down the right hand side of the car so meant that I shortened most leads. The pvc was in good nick and still flexible. Some nibbling of the engine bay wires had taken place during the cars long term storage but all repairable. Having said that a new loom is not a huge cost so depends on your budget.
David B


Paint finish behind Grill
in TR6 Forum
Posted
Hitching onto this thread for a TR4A.
does the same apply for the 4a ? I’ve always assumed it was all body colour behind the grill. is that correct?
Have just googled for pictures and advice but cannot find anything so comments would be helpful to my project. Currently at primer.
thanks , David B