


roger murray-evans
-
Content Count
406 -
Joined
-
Last visited
Content Type
Profiles
Forums
Calendar
Posts posted by roger murray-evans
-
-
On 11/21/2019 at 7:58 PM, Charlie D said:
If you missed out on this car then there is always another..
How about this for £2000.....
Charlie
Charlie,
I work on the basis that if the wing attachment points on the front inner wings
are still there and the original battery tray still exists, then this is very much a
straight forward restoration.Even the floors are still there despite having been
cut in half! Post 60000 outer panel are not difficult to source.
If I was looking for one (I ain't) I'd be seriously considering this one, at least having
a look.
Cheers
Roger M-E
PS 3 hours to go, no bids!
-
Thanks Stuart,
I suspected as much from the various online photos.
Using logic, I have mine the other way around of course,
especially the wiper bracket (black!), as it's not possible to fit the
wiper attachment screws to the bracket without it's removal!
The dip switch bracket (Ice Blue!) because you CAN fit the switch
with the bracket in situ!
Out with the mini spray again!
Cheers
Roger M-E
-
Anyone know any of the following nerdy details?
A LHD 1953 TR2.
Dipswitch bracket. Body colour or ?
Wiper motor bracket.Body colour or?
Bonnet prop and safety catch including alloy hook.Body colour or ?
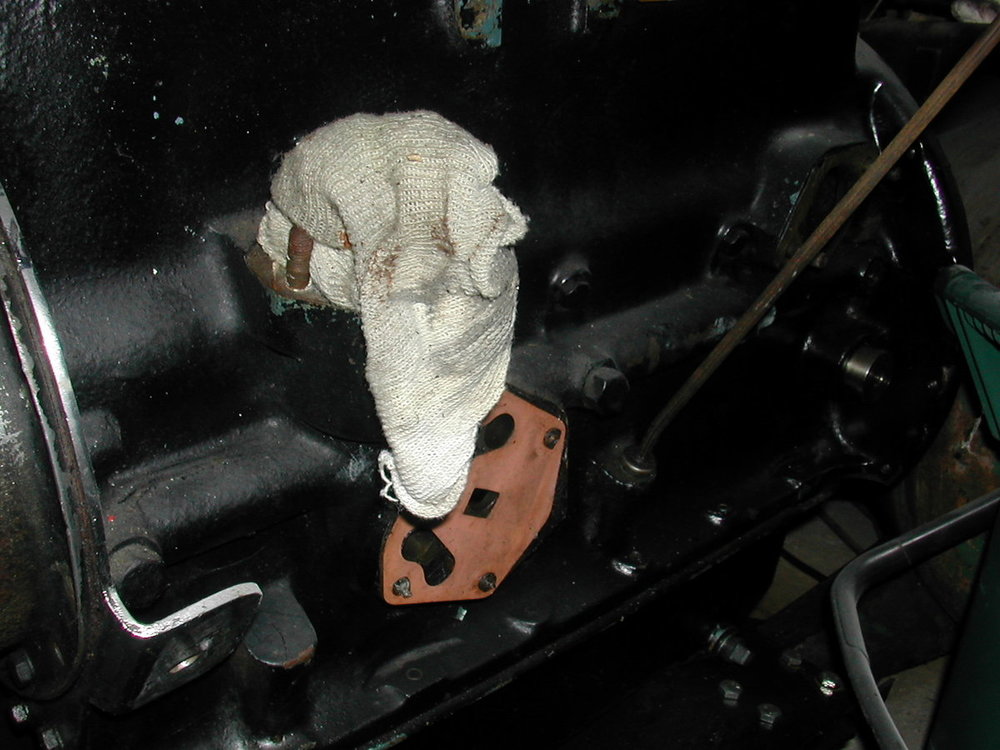
What is the purpose of the 2 small square holes on the flat surface of the
bulkhead either side of the master cylinder (and there's another between
the starter solenoid and battery tray.I assume they take a clip nut or some such,
but for what?
Thank you for any educated guesses.
Roger M-E
-
Russell,
I've always assumed they are handed, but having just had a look at mine, they appear
both Right Hand side assemblies with the Left Side having to have a redundant
bracket removed.That would seem to work with the part number situation.
I can't help with the loan unfortunately.
Roger M-E
-
13 hours ago, John McCormack said:
Thanks Roger and Jonathon. That is exactly what I am after.The cappings and tonneau will go on first week of December. The top and sidescreens after Christmas.
I have completed over 1000kms around town, on back roads and 110km/h freeways. She drives very well and has been totally reliable, so far. The slight overheating has been fixed with a 6 blade 'tropical' option fan.
By the end of January TS3732O will be complete for the first time since December 1966.
Hope the project has been a pleasure John.What was the '12 years of road use TR' like
when you started?
I've also fitted a 6 blade fan to my TR just in case the temp gets above the current 4C we
have here in the sunny south-east of England.Hopefully my project won't be too far behind
yours!
Roger M-E
-
Thanks Ian!
Roger M-E
-
Tempus fugit!
I've nailed all the missing parts for my TR2 project except for the Lucas
L471 rear light gaskets.
Before I cobble up my own, is it likely the SDF will be producing these in
the near future?
Cheers
Roger M-E
-
John,
I believe I have the unequivocal answer in the ST 1954 Workshop Manual.
Body section, Page 10, there are 3 excellent photos which clearly show the
elbow and side cappings over the top of the quarter trim panel, and the side cappings
also overlap the rear capping where they meet in the the corners.
Your question had been nagging at me also.
For what it's worth (a lot!) the factory spare parts manual drawing Plate AP in the body and
fittings section also show the same layout except it has a butt joint in the corner where
the side and rear cappings meet.
Cheers
Roger M-E
-
1 hour ago, stuart said:
Really? Ive never found that, especially on the 4 cylinder where there is lots of low down torque.
Agreed about "A" series engines, Frogeye Sprites went better on a single 1 1/2" than two 1 1/4" but why strangle the performance on a TR engine which is a totally different animal, its a sports car after all.
Stuart.
Stuart.
A bit of pedantry here Stuart, but weren't Frogeyes on 2 X H1 SUs?

Roger M-E
-
Doesn't the seller pay an auction premium as well?
Negotiable, like most things automotive, but usually 5-10percent!.
Makes the total changing hands quite a bit more than the hammer price.
MVC575 a bargain in comparison.
Roger M-E
-
Anyone have any experience of getting something like this made to pattern?
Unfortunately neither the ST or the 'not great' repro efforts are a close fit,
although they do look very similar.I have the old screen in 2 halves, and it does
have the compound curvature that the steel/glassfibre factory screens have.
If they could make them for a tiny product run such as the ally h/tops 60 odd years ago,
one would hope the expertise exists? Be nice to have a 'stiff' one instead of those
dreadful floppy jobs sold by retail chums!
Roger M-E
.thumb.JPG.1d325e7b7680a968e6762c5f8dbeb35c.JPG)
-
I too, made an impulse internet purchase of this small tome.1994 edition I think, and cost £2.56
inc. postage!Had a quick read thru, still has the 2 TR photos.
Shall wrap and give to my youngest boy, whose doing an MA in History, for Xmas.
Sorted!
Roger M-E
-
By extraordinary coincidence, I've spent the day farting around with the piping for
my Ice Blue TR2. Mine is early early as opposed to early, so although I'm not absolutely
sure what the correct core should be, the piping should be stitched up round (assuming 1/4") rexine/vinyl
covered string or hollow rubber core.The later type, and I don't know from what commission number,
early (not early early) TR2s, had T section body coloured plastic. FWIW, my TR2 ST parts book gives p/n
700947 and 4 unnamed colours to select. The TR3 supplement shows 'beading with tabs', which has to be the usual s/s
beading.?
I had previously painted some solid plastic piping from CompleatAutomobilist, using a plastic primer
and then a couple of coats of top coat cellulose.Result was paint pinging off in places.Presumably
because the primer is flexible and cellulose ain't.So, today I've tried super cleaning and abraiding a spare piece
of solid piping and cleaning again with panel wipe, followed by 'Plasticote' primer and then Ice Blue cellulose.I have also tried a
rexine/pvc stitched piping with a solid plastic core which I've given 3 coats of Ice Blue to which I had added a very small capful of 2K paint plasticiser. Both are drying overnight, so I don't know how they'll turn out.I suspect that the longer one leaves
fitting the piping, with all the flexing and pulling involved, the greater the chance of early failure.
I'm rather interested as to how the treatment of cellulose with 2K plasticiser pans out as it may provide a solution.
Future experiments in the event of failure, will be to get some 2K Ice Blue made up to match my cellulose, add the full
dose of plasticiser which is actually formulated for 2K paint and go from there.I suspect this is going to be the answer, as this is
what the modern trade uses for plastic trim/bumpers etc.
Roger M-E
-
Charlie, You can be and are forgiven!
Unfortunately, errors do find their way into the best of publications, usually
because the author has accepted a 'known' truth and put it into print.
I wouldn't have argued the point either had I not got a Phase 1 Vanguard
(Late 1950), still with it's original engine and having the dipstick at the forward
position and no rear boss for alternative dipstick position.
.I also have a spare Vanguard engine which has the dipstick at the rear but also has
the undrilled boss at the front.
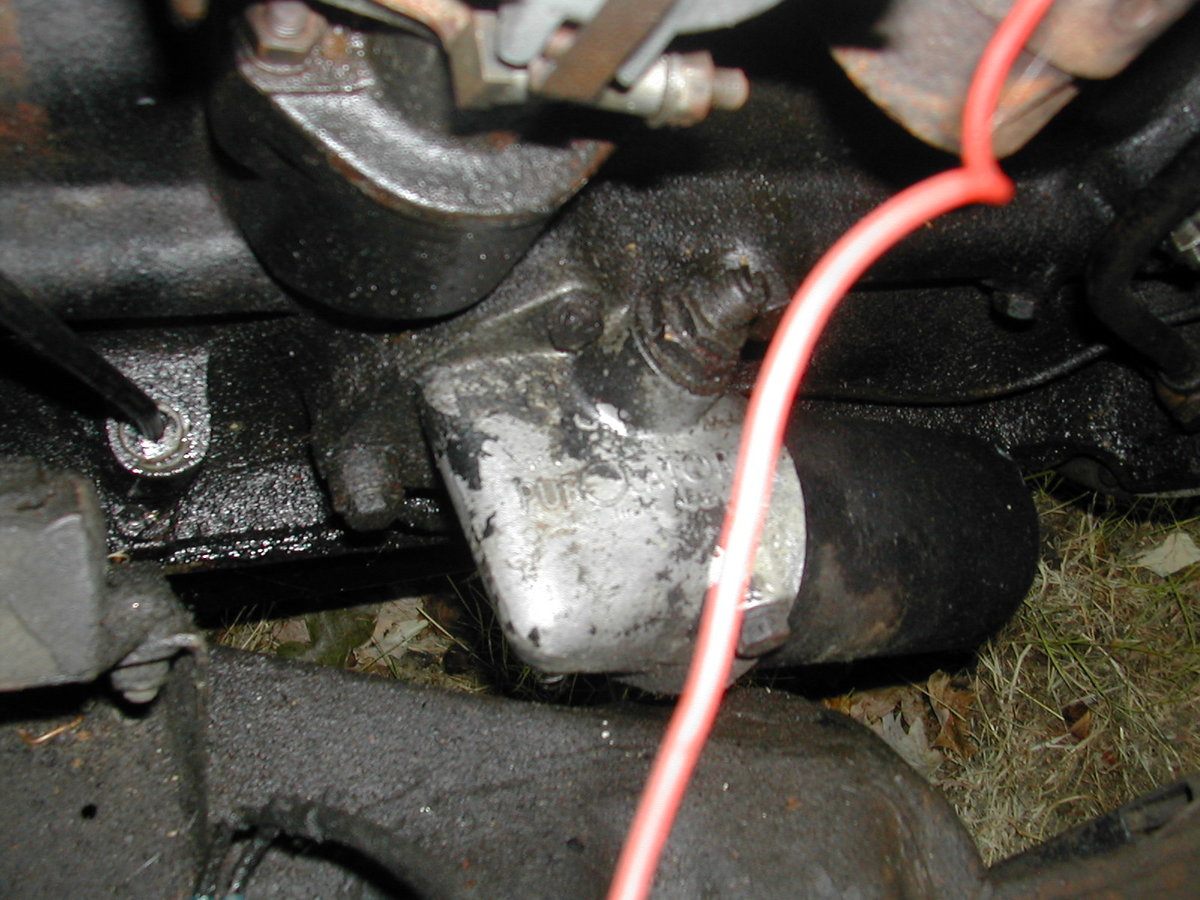
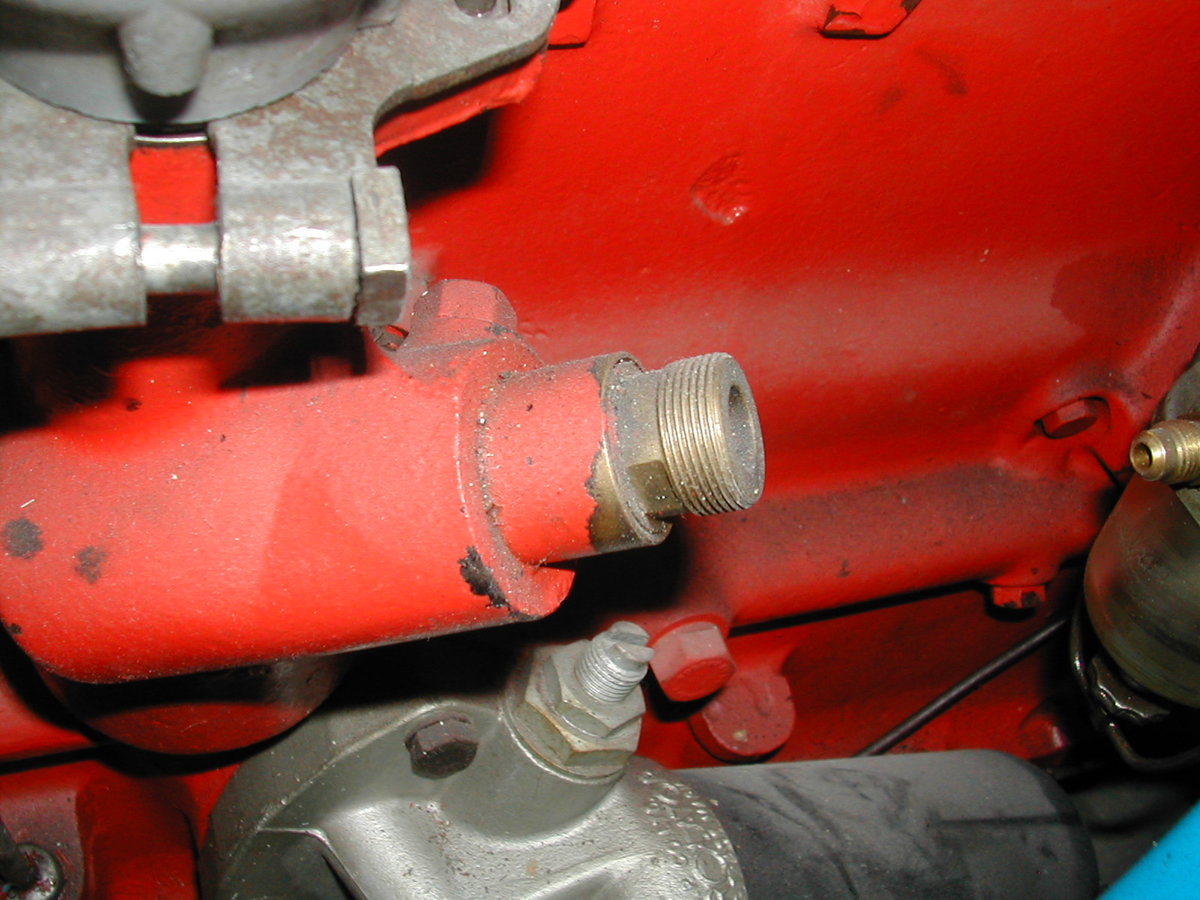
My attached photos show (1) My Ph1 Vanguard 1950 Front d/stick no rear alternative boss
(2) 1958 TR3 Block Front d/stick and alternative rear boss
and (3) my spare Vanguard engine (year unresearched) Rear dipstick and alternative front boss.
It's a can of worms!
Roger M-E


-
On 10/19/2019 at 7:55 PM, Charlie D said:
Hello Rich,
I think that the circular ports tend towards it being a Vanguard.
I have a head sitting on the floor of my workshop looking at me every time I go in there.
It has circular ports.
It came from a Vanguard engine I bought a few years ago, thinking it was the same as a TR. (Only cost £15, so not a problem…)
The holes for the cylinder head studs are a smaller diameter to that of the TR, so it would not just “Drop on”. I’m also sure that most people would not recommend it even if it could.
However…
Many (many, many) years ago I bought a scrap TR3 for parts.
I could never really understand why the head (a genuine TR item) seemed to be able to “Float” about a bit when dropped onto the block.
Reason was that the actual engine was a Vanguard, and the head was a TR.
Maybe that is the case with your friends TR.
One give away with the Vanguard block is that the dipstick hole is towards the rear of the car. The TR block had the dipstick at the front.
Both cars have the casting with a “Lump” cast in for either dipstick; only the actually drilling of the “Lump” tells you which block it came from.
Hope that helps a bit.
Charlie.
Arrrgh...
I type too slow...
Mick beat me to it.
(But still check the block !!!)
In the interests of historical accuracy, SOME Vanguards had the rear mounted dipsticks
and SOME have them at the front as per TRs.
Roger M-E
-
On 10/17/2019 at 9:39 AM, john.r.davies said:
***** PEDANT ALERT *****
It's a "pedal".
Sorry, had to say it.
John
You little tinker, John !
Roger M-E
-
Rod,
I'm very much with you on the 'do your homework' theme, when it comes to anything.
As I see it, these days the main problem, esp. with interior trim is to match the colours
of the various differing materials, on top of guessing the correct shade of the particular
trim one's car was originally done in, what with the availibility of original cars and a guarantee
that they represent 'original' if one should find one. Without getting too precious about it I'm leaning towards
doing all upholstery and trim in leather.If one does happen to go the TR specialist route then
you have to hope(!) that their reputation/s will provide instant gratification, but at a price.
I'm in the process of trying to nail down the correct colour trim for my car.I had a search done
by the Standard Motor Co (of which I'm a member) and was given Geranium.Since then, I've
been advised by a trustworthy authority that it was Grey, so I have a bit more checking to do!
If it was Grey, then I'm thinking that possibly includes the use of 'metric', a few fragments of which
came with car along with a great deal of very stretchy scarlet vinyl.I'm really not overly bothered
whether it originally was Geranium or Grey, but in the first case, as much as I'm drawn to a red hue
there's already quite a few Ice Blue TR2s around with red trim but I'm also going to have almost
insurmountable problems sourcing metric cloth to go with the leather facings if that's how my car was
finished.So possibly all leather in grey.
Fortunately I've given myself until end Feb before making a final decision, as I've still to flat and polish
the paint (by hand) and refit everything possible.Wiring could be tricky without the trimmed dash in place.
Oh for a magic wand!Roger M-E
-
Thank you Gentlemen,
Apart from your responses, others have also quoted similar leather/leatherette
combinations, so I have to believe that 'leather' means 'some leather but a lot of
leatherette'!
I had read in one of the many publications that ' the early TR2s were all leather interiors'
which could be read as all the early TR2s were all leather interiors or that the later leatherette
substitutions for the various facings had not yet become standardised.
It does seem that Skinners trim do produce the correct combinations if I wish to go in that
direction.
Next problem will be where to source 'Ice Blue' weather equipment!
Roger M-E
-
As my project progresses, I'm giving thought to trimming the beast.
My car is numbered TS70L, and it is my understanding that 'very early'
TR2s were only fitted with leather upholstery.
Can anyone tell me if that means ALL leather in totality or was there any vinyl
used, seat backs, draught excluder etc etc?At this stage it's easier, and cheaper,
to get the details right first time if possible.
Many thanks
Roger M-E
-
Bob,
That was my understanding too.Before I posted the above I had a quick read of my
factory WSM which gives .010/.012 on P22 (To set valve clearances)
The reference to high speed .013", which was news to me, is P24 (last para of 12. (k) and
it's literally an afterthought.Also .015" to set the timing in the absence of timing marks,
so a pretty good spread of feelers required .
Roger M-E
-
I've always been a bit mystified by the rocker cover decals that have .013"
valve clearance on the early cars.
Surely it was .010" inlet .012" exhaust for normal operational use and .013"
only for 'high speed' use?
Roger M-E
-
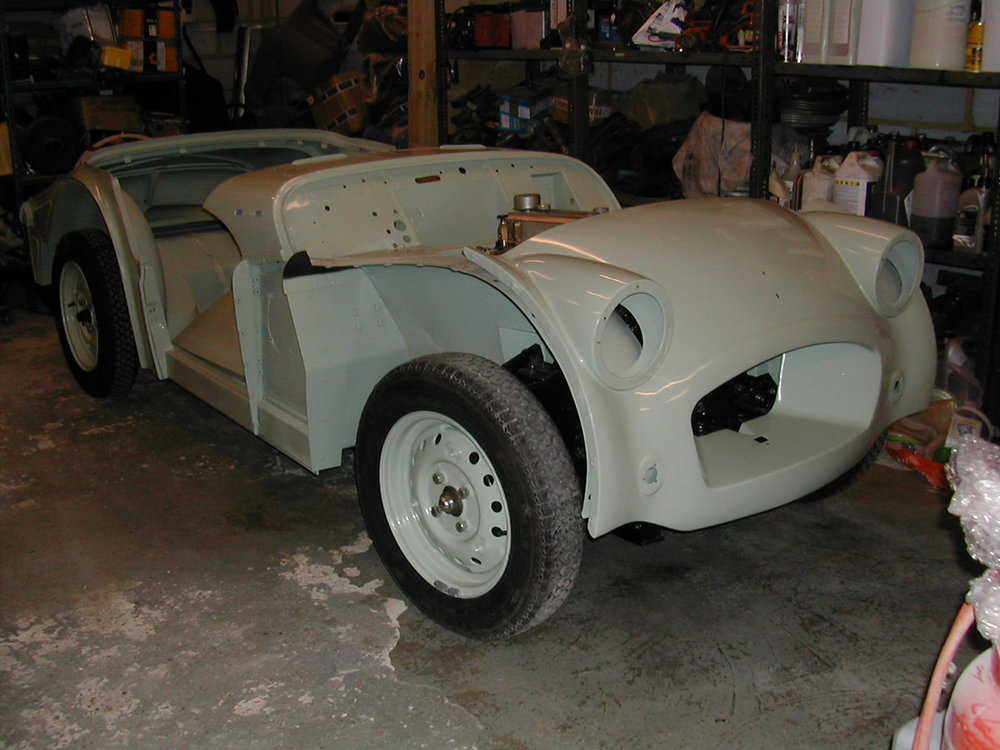
In my defence at what would otherwise be a display of overkill,
the complete rolling chassis, with engine and gearbox, were situated
behind the body, so the whole shell had to lifted above rocker cover height
in order to allow the chassis to be rolled forward under the rear apron and floors
and then forward to the engine bay.If the body had started at the rear of the chassis, i could probably
have fudged the job on my own.One of those things that doesn't occur to you
when spreading the carcass around!
Roger M-e
-
No quarter asked.None given Bob!
My bodyshop man was instructed to fit bracing bars, but he
pooh-poohed the whole idea.My bodyshell being pretty much
rot free, and with all the impact damage body repairs being conducted on
a straight chassis, he completely relies upon his judgement and
an accurate measuring stick.Based on a great deal of previous experience,
I let him do it his way, but I know that bracing the doors, as a minimum,
is usually the way to go, and if i were doing my self, that would be my chosen
route.The truth will out when the panels are refitted and gaps come back under
scrutiny.
I do, however, have complete trust in his work.
Roger M-E
-
I don't know what all the fuss was about.
5 blokes and 4 women.Took around 55 seconds and
zero damage!
Roger M-E
.JPG.1b55eb3c47661abb92a32c72698b413e.JPG)


TR2 basket case/barn find auction
in TR2/3/3A/3B Forum
Posted
Charlie,
That's an interesting question. I suppose one would start with
picking the brains of our registrar about what options are available,
but it has to be possible, given that lots of people 'create' vehicles or
have to start again with an old car that's been stored for donkeys years
with no ID.
Don't forget that this car is missing some major mechanical parts so,
whilst shopping for the missing parts, quite an inventory of receipts
should be built up, even if the end result is a Q plate, its still a TR you
could drive.
Someone will be along,I'm sure, to tell the tale of how it's done, legally of course!
Cheers
Roger M-E