


john minchin
-
Content Count
121 -
Joined
-
Last visited
Content Type
Profiles
Forums
Calendar
Posts posted by john minchin
-
-
I had a similar rattle, it was that the fan extension on the front of the engine was wobbling about as the massive bolt was loose. Good luck, John.
-
Some gaskets say TOP on them. Maybe the others do not matter so long as the holes line up.
I have never put jointing component on a head gasket and I have never had one blow. My dad always put a smear of grease on, I have continued that practice, but what good it does I have no idea, I suspect none. John
-
I stripped mine many years ago as the bearings were rusty and pitted. I put new bearings in and adjusted the shimming to fit as you will, I ended up with about 3 I think. Before you do that have a good look at the rocker shaft, the rocker shaft peg and the rocker shaft bush. I changed the bush and reamed it out to size and although the rocker shaft was slightly worn I put it all back together and it is remarkably play free. Definitely do the end float on the bench and the rocket shaft similarly, no steering wheel required. The most difficult bit is getting the steering wheel on at the correct angle to the steering position as this has to be done before you drive the car as the stator tube has to be out of the car to get a socket on the nut, having said that the tie rods can be adjusted.
The stator tube only touches at the top and bottom so it you can connect it to the head and get a oil resistant seal at the bottom I can not see a problem, beware they crack at the top where the slot ends. Obviously a few (5?) wires go down the middle so don't have the ID too small.
-
Stuart, I have been almost fearing that you would spot that detail. It starts and runs, now I am down to the interior which I am not too enthused about. But keen to get it as good as I can, over my lengthened Christmas break I intend to crack on with this aspect having bought a kit from John Skinner.
The body is all back together after a partial strip to get the engine in etc and looks great. It is a constant source of surprise that although the car was in regular use before the rebuild how much attention almost every part needs before reassembly. I'm enjoying it which is the main thing but it will be ready in July, which July nobody knows. John
-
Very interesting thank you, the capping goes up where the webbing is, I assumed mine was adjusted in its past, I will leave that aspect alone.
Neat idea with the seat belt webbing though. John
-
Tony and Ralph, Thank you for your replies. This is like a jigsaw, by gleaning the bits of information you do not have it all slowly starts to fit together.
So the fitment / alignment order is door cappings, elbow cappings, rear sides (located at least in part by the same screw as the back of the elbow) and then the long capping across the back which is above the lift the dot pegs.
Tony, if you could show on a photo how the webbing is arranged where it attaches to the body that would be most helpful, also any photos from the inside of the car showing where the screws are would also be handy. Am I right in thinking that there are no fastenings on the outside of the car which secure the cappings ?
I really want to know what the objective of my endeavours should look like.
-
I am in the process or rebuilding my TR3a and I have bought a set of coverings for the cockpit cappings. I carefully removed the vinyl coverings which had been stuck on with contact adhesive. Copious amounts of petrol softened up the glue and so now the steel and aluminium cappings are ready to recover and fit.
As with everyone who goes through this the aluminium is soft and I am not the first person to have ago at this feature on my car so although the dash one is good the three aluminium ones which go at the back are not quite the same shape and fit as made for Standard Triumph back in 1958.
Has anyone got any pictures of how they should fit and be secured both inside and outside the car and quite how the hood webbing gets involved. Ideally some pictures could be posted in the forum as an answer so all can see or a PM would be gratefully received.
The pictures I have seen on the internet so far show that the cappings are quite clear of the lift the dot pegs, this was a surprise to me as for 20 years my car has had the pegs touching the cappings. No doubt every car is different but mine are not right.
Thanks in anticipation. John
-
Thanks gents, the 'O' ring idea is excellent I have found a supplier on ebay already.
I'm get my vernier on the gauge and order accordingly. Although the glass domes may need a more conventional approach as indicated by Roger.
-
I am in the process of cleaning up the 2" gauges for my sidescreen car. When I take them apart there appears to be perished rubber seal between the bezel and the glass plus the one which goes between gauge and dash.
Also I am missing a couple of domed glasses. I have being on the internet for some time now to no avail.
Please could someone identify where I could get these 2 seals for each gauge + a couple of domes. The difficult bit being the glass to bezel seals.
Thanks for your help.
-
Bob,
That is great thank you. Basically behind the battery box for the cross car one. It soon turns into a confusing array once the tacho, temp gauge etc get involved.
Thanks for the prompt response, no excuses for hanging around now. John
-
Hello, I am in the process of rebuilding my TR3a, now a right hand drive. I have a new wiring loom from a trusted supplier so I am sure its is almost mm perfect. I am trying to get the wiring loom fitted, most of the routing is self explanatory however under the dash / bulkhead area is rather a mystery.
So relative to the underside of the battery box, heater and the like where does it go ? The sections I am thinking about is the main bit which crosses from the pedal box area to the passenger side, the dip switch extension which appears very long and the dash/gauge extension itself. There are various tags I see under there but it does not make any sense.
Pictures would be ideal but descriptions are also good. Thanks in anticipation.
John
-
Food for thought there. Judging by the responses a about 2" or more higher at the front and some of Revingtons rears.
Now for the last question about the hybrid car. The bulkhead / gearbox is the same as the 4 cylinder as it is dictated by the gearbox position which is unchanged. The front is where the fun starts, if my memory serves correctly you need to create some engine mounts on the rear of the spring turrets, I used a scrap TR6 chassis for the brackets and measurements. Then the TR6 steering rack needs locating in the TR6 location along with the radiator, once again the TR6 chassis was invaluable. Also TR6 steering arms and lower steering column. I also grafted in a TR6 dished offside inner wing as you never know what I may do with the manifolds/supercharging/ injection. I think the car is excellent as it combines the purity of the original TR4 shape with the sound of the 6 cylinder.
See the picture below if I can post it.
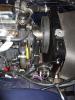
Do you want any more detail please ask.
-
I have a TR4 and the ride height is low at the front and high at the back.
It is further complicated by the fact it is a deep dish rear spring TR4 with a TR6 engine fitted. It had new deep dish springs fitted in 2002 and since then has done 8500 miles so they have settled as much as they are going to.
Following advice I intend to fit standard shallow dish rear springs to sort the back out. For the front I have figured out the relationship between spacer thickness and affect on the suspension height ( following repeated trials several years ago). I have some spacers to turn to the desired thickness.
The question I have is
What is a good height from the centre of the wheel arch to the top of the tyre tread ?
Mine is currently 2cm/1" which translates into about 5cm/2" chassis to ground clearance which I consider to be too low.
Concerning the back axle has anyone got a set of axle U bolts + the plates which go under the spring and have the shock absorber bolt holes in. These can either be TR2/3 or 4 items as I think they are the same.
Regards, John
-
Stevson Motors looks like the way forward, thank you for you advice. I'll get them off the car and take them down to see what they think.
I am also tempted by the fork oil. If it worked for you then the worst that can happen is the seals leak.
Thanks, John
-
I have a TR4 which suffers from vibrations at various speeds. Large improvements have been gained from tightening the front shock absorber top bushes, carefully routing the exhaust through the chassis and taking excess material out of the hub caps which was put in during the rechroming. The wheels are very recently rebalanced.
The rear shockers may not be controlling the back axle enough as although both sides are roughly similar in stiffness I can move them by hand with reasonable ease. I am only after standard perfomancestuff. They do not show any signs of leakage. So 2 questions really.
1. Can I test them by hanging a weight on them and timing how long to complete to the stroke ? If so how much weight and time ?
2. Supposing they are sub standard can I change the oil to stiffen them ? If so what and where can I get it ?
John
-
The test drive showed an improvement, it still shakes a little but is much reduced.
To confirm I did 2 things, tightened the top bush of a front damper and also removed a hubcap from the back which had a 'fair bit' of material added by the chrome platers when they improved the surface to enable a successful plating operation.
Thank you all for your ideas. John
-
I have checked all the shockers and the fronts were very stiff and the rears quite easy to move but the same side to side, these rears lever arms were never very stiff I understand.
The only potential I found was the rubber bush at the top of one of the fronts was not compressed dispite the nut being tight to the stop. I inserted a thick washer to tighten it all up.
Tomorrow night I will hopefully fit in a test drive and try the out of gear / overdrive variances to see if the engine has any effect. (after its rebuild and balancing I should hope not !)
Thank you for the advice, the prop shaft wear is a red herring I think as it was the original from a car which was 40 years old and did not have its original engine and gearbox indicating a hard life.
I'll tell you the result of my test drive, John
-
Thanks for the ideas.
To clear a few things up and possibly of interest to others thinking of the mod to their cars, fitting the TR6 engine to a TR4 keeps the gearbox in exactly the same place, the engine extends futher forwards requiring the TR6 rack, rack mounts and lower column to be fitted.
In answer to the questions: the TR6 engine and 'box is fitted complete with larger thickness flange but no strap or weights, the prop length is standard as the gearbox is in the correct position, I think that the original prop was wrecked when I put it back on during my restoration, I changed the UJ's but ignored the spline.
I spent most of the weekend getting the exhaust to pass through the chassis without touching and raising the gearbox 3mm so it is not resting on the removeable cross member.
So I will be checking out the dampers, the front ones were new 3000 miles ago, the rears are recon standard lever arms.
Any more ideas ?
-
I have a TR4 which is a deep dish spring rear axle type and has standard steel rear wheels and a set of Verdestien tyres. Ever since it was restored by myself approx 5 years ago it has suffered from vibration / resonance at various motorway speeds. Since then I replaced the propshaft which made a massive difference.
The wheels are balanced only yesterday.
The car still suffers from reasonances and is only smooth at an indicated 58mph and another above that. I am not expected new car standards but a moderately easy drive like my sidescreen TR.
Any ideas as to what it could be causing the vibrations and / or how to test various bits ?
-
My dad had a TR4 in the 60's and 70's and it broke its crankshaft. He tells me with evident pleasure how he brought a tractor crank and fitted it. It was a daily driver back then and it seemed to work OK. A source of 20 or so crankshafts even with the different seal system on the back should be taken advantage of in my opinion.
What is there to lose ?
Regards, John
-
I tried a thinner oil last year, the leak rates were much worse.
So I am back to 20/50, Halfords classic.
John
-
I have had a bad rattle on my 4 cylinder, it was the pulley extension - tighten the long bolt.
The other time was a piston with the crown cracking off.
Good luck.
-
Tony,
In my experience as I have tried this on my TR4 you have to fit the lower wishbones and vertical link as a set. The TR6 wishbones leave a gap too small for the TR2/3/4 trunion and the bushing is different at the trunion end although the inner (chassis end) is the same for both top and bottom.
But this biggest problem is the different ride height given by the TR6 trunion and vertical link. The hole for the wishbone and axle pins are at very different heights between the TR2/3/4 and TR4a/5/6 uprights. My TR4 with TR6 front suspension (top and bottom wishbones, shock absorber, spring pan, trunions, uprights and ball joint) gave a ride height which meant the chassis was very low to the ground.
I changed the spring pan back to the TR4 original as this was different with no real improvement.
The shock absorber, although on a TR6 provides bump stop control on a TR6 does not work on a TR2/3/4/ chassis as the wishbone hits the chassis (as mentioned previously). So I now have TR6 shock absorbers, TR4 lower bump stop, TR4 spring pan, TR6 trunions and upright, standard TR4 spring 210903 and rubber collars PLUS a 22mm spacer made out of a spacer 107682 (from a kind forum user) used for the shorter spring TR4 set up and hacksawed off and then releived on the inside with a series of drill holes to provide the seating into the top of the suspension turret.
The 22 mm spacer thickness was derived after many trials with no spacer, full 107682 spacer and bits of MDF then plotted on a graph and cut as I had one chance to cut the spacers and now it rides a fraction lower than my TR3a but looks OK. The TR6 engine in my car apparently wieghs no more than a TR4 engine as the TR6 front spring rates are the same.
So in my experience yes it can work and the above should short-cut you to the desired set up. No one else has mentioned the trunion and vertical link difference which intriges me as the difference between trunion pin (the wishbone link) to axle pin centres is 68mm on a TR2/3/4 and 101mm on a TR4a/5/6 according to my measurements and this must make a difference !
Any questions please ask.
-
I forgot to mention that the steering arms are different lengths for an early to late TR as the rack is further forward on a later car so perhaps Rods garage is using the wrong length steering arms.
John...gain

'Rope' Filler in B Pillar to Attach Trim - What Is It ?
in TR2/3/3A/3B Forum
Posted
I am in the process of trimming my TR3a and when I took it apart in a slot just behind the door on one side was a strip of twisted rope type material which seemed to be on the receiving end of a few tacks to hold the seal or trim in that area.
The one I am missing I am intending to replace with a bit of old pallet wood.
My question is - What should it be ? Thanks in anticipation.