


MilesA
-
Content Count
1,218 -
Joined
-
Last visited
Content Type
Profiles
Forums
Calendar
Posts posted by MilesA
-
-
Tom
+1 for Neil and Viv. Guess how I know...!
Miles
-
This may simply confuse or be irrelevant, but with advice from Roger and other sages here, I added an additional fuse box to my modified TR3A which uses a 35 amp alternator. My concern was that that all the original electrical items plus add ons (electric fuel pump, Kenlowe fan, windscreen washers, 12v socket) were all running through a single, original exposed fuse block. I reconfigured things so that I now have 2 enclosed fuse boxes with all the add ons running off the second fuse box. If you are interested, PM me you email address and I can send my wiring diagram. I retained the ammeter but if you want to fit a Voltmeter for the reason Peter mentions I do recall that the wiring has to be slightly different.
Miles
-
As Rod's video obove demonstrates, a good modest investment for the GoPro is a small external microphone. Ideally, this can be placed in the cockpit or under the dash to eliminate the wind noise and pick up the sound of the engine. Not sure if there is a socket on the Silvercrest model.
Miles
-
Paul
If you fancy a run out to Hampshire try Tom Airey (just Google for details). Old school. Not cheap. He sorted out my set up above. It was running terribly and within a short time it was transformed and the next 40 minutes just tweaked everything right.
Miles
-
Yves
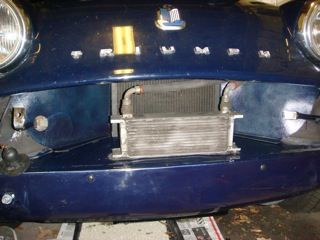
The PO of my car fitted an oil cooler to my 3A. Personally, I think it has minimal impact on the overall cooling of the engine in its present position shown in the first photo below. I think incoming air either flows through the oil cooler or around it. I did suffering from high engine temperatures but this was pretty much eliminated once I installed the missing cowl around the radiator. which can also be seen in the first photo.
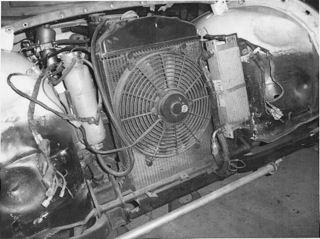
I do not express a view about the wisdom of fitting an oil cooler, but if you still wish to and are still worried about the overall cooling effect of fitting it in front of the radiator, the vertical positioning shown in the second photo might be an alternative. However, you will lose the benefit of the overall cooling effect of fitting the cowl unless you can mount the cooler vertically and forward of the cowl.
Miles
-
Not a 4, but my 3A is fitted with an Aldon 4 - LU 142A Ignitor unit, sports coil and Weber 45s (plus electric fuel pump and pressure regulator). These were already fitted when I acquired the car. Never had a problem with the Aldon. The key for me has been getting it tuned by someone who knows what they are doing and knows Webers. Now it runs very smoothly from idling onwards. Esso petrol (without ethanol) seems to make a bit of a difference. Obviously, this set up is not an economy option though...
Miles
-
Hopefully the link will work http://www.ebay.co.uk/itm/Land-Rover-Range-Rover-Remote-Fuel-Pump-Inertia-Switch
Try and get one with the wires attached as it makes it easier to connect into the supply to the fuel pump, mine is wired in to the supply for the pump relay.
If you are missing the plug with the tail wires, Autosparks sells them.
Miles
-
Me too for the first time since November around the Surrey Hills. Great to be on the road again. Fired up 3rd time after 3 months - Esso fuel.
Miles
-
Not sure if the factory made changes along the way, but early fitted suitcases had different handles to those shown in Don's link..
They were an arc shaped type of bracket in white plastic (probably Bakelite). The lift was made with 4 x fingers underneath the handle and the thumb on top.
Lost my original pics years ago when a hard drive spat the dummy.
Viv.
Viv
Here are some pictures of mine which show the handles you refer to. Another couple of differences: webbing rather than metal lid restraint and raised internal pices to seat the lid securely.
Miles


-
Thanks Rod - that sounds like experience talking!
Miles
-
Hi Clive
I am very fortunate to own an original case.
I have lots of photos including close ups as well as detailed measurements of the case and location of components like hinges and handles etc., all of which I prepared for a member in Germany who is building a replica case.
If you pm me your email address, I will happily send you a selection of photos and dimensions to get things going and we can take it from there.
Miles
-
An alternative that works for me is as follows.
If I want to post a photo here I export it from my Mac to Photobucket. The Photobucket exporter allows me to resize the photo before exporting. I resize to 'medium'. I then post the photo from Photobucket here.
Ironically, I have not worked out how to post a photo here from my iPad (need to study the recent thread on this more carefully!) which is what I am using now. But an example can be seen on the TR2 - 3B section on the thread I started yesterday on loose pegs. That is a medium photo.
Miles
-
Thanks guys.
A learning experience as usual: didn't know about the wooden insert and never heard of the Nutsert tool, which looks really useful.
Mine is post is post 60k so unfortunately it (probably) will not have the wooden backing (will check anyway).
Welding is not an option (I can just about solder!) and I will save Alan's suggestion for when I have more time.
So will probably start with a small plug (used previously) and a dollop of Epoxy (not used previously) before working back up the list.
Miles
-
The peg shown in the photo has become loose - it is the one that screws through the top of the roll and into the scuttle - the securing hole has become enlarged (I have tried a new peg without any improvement). It gets quite a lot of use with the tonneau coming on and off.
As it is of the self tapping variety I assume I cannot get access below the scuttle to replace it with the version that uses a nut. I have used a couple of different bodges on other occasions but wondered if there is a 'professional' (ie permanent) solution.
Thanks
Miles

-
Thanks Roger
I will practise blipping just before disengaging the O/D!
Miles
-
I am pretty much with Pete on this except that I alway declutch on deceleration to avoid the 'thump' on the basis that thumps are 'not good'.
Having said that, I used to declutch when firing up the TR on the basis of general advice about ease of start up (especially in cold weather). Then an esteemed forum member pointed out that on the TR this delayed oil pressurisation on start up (I think) so I no longer do it on any of my vehicles.
So I may be wrong and it may be that the thump on decelertion is not a bad thing...
Miles
-
OK, getting close to this task.
I have been trying to work out the relay arrangements for high / low beam.
Does anyone have a revised wiring plan they could share with me?
From my initial research / thinking looks like the relays are placed after the dipper switch, I use the supply from the light switch via the dipper switch to power the relay switches and take a new 12 v power supply for the lamps from somewhere like the starter solenoid switch with perhaps a fuse before it joins the relays.
But...electrickery not my strongest point so this could be completely wrong! As ever all guidance appreciated.
Miles
-
Roger
Deeply impressed with (and jealous of) your engineering skills. If I had a 4 and a Surrey top, I would be first in line for a pair...
Now there's an idea!
Miles
-
That's tough Pete, but thanks for sharing the photos. Not seen this before.
Better add another £ to to your signature photos.
Miles
-
Thanks chaps.
Hope you find a solution Brian - I know this temperature business can be very irritating.
Miles
-
Menno
I think that Tom (Fireman) installed a hose in the side of of his aluminium duct to feed air to the carbs.
From personal experience, I agree that installing the often missing duct makes a real difference so it seems a bit counter intuitive to then reduce the amount of air being forced through the radiator by installing a hole in the duct.
As the duct was an original (if hurriedly implemented) part of the 3A design, I suspect absence of an air feed from the duct would not affect a car running on original carbs. However, my car has Webers which are a bit air-greedy so rather than reduce duct effectiveness, I am thinking of installing a 3" hose directed at the carbs which scoops air from a position next to the radiator, under the platform at the bottom of the front grill (sorry cannot for the moment think of the correct term!). No doubt I will be advised that the benefit is marginal but it's an otherwise harmless mod' so indulge me.
Miles
-
Peter
I couldn't agree with you more about an effective archive of photos that are posted to the forum. We all know how valuable they are to illustrate points, guidance, advice, etc. We also know that people move the locations of the original photos for perfectly good reasons.
Having read Kevin's explanation in TRaction of why we cannot have a digital edition, but promising all sorts of other digital goodies, perhaps he could comment on improving this existing form of communication and having photos posted here properly archived. I know he reads the Forum comments so I am sure he could comment on the issue and it's feasibility (or otherwise).
Miles
-
Rod is correct and if you go down the alternator route that involves a whole set of other issues principally because the Control Box becomes redundant. If you go for an alternator, get someone who understands electrickry in these cars to do it.
I have an alternator and copied Guy's idea of two fuse boxes: one for the original electrical componemts and one for all the ancilliaries added over the years: electric fan, electric fuel pump, etc. I had rather less space than is shown in Guy's photo because his car is a left-hooker. I also had a lot of help from Guy and others on the wiring. For my own benefit I have drawn up a couple of wiring diagrams of the alternator / twin fuse box set up and have some photos of how I squeezed it all in even without the Control Box (no room to use as a dummy). So if you decide on an alternator and would be interested in the diagram and photos just PM me.
Miles
-
Jeez, there are so many parts to a TR3A that I didn't know even existed.
Another one to add to the winter list
Me too! I thought they were drain holes at the bottom of the door!
And I know what Peter means about the draught from the A post; that I would like to stop.
Miles
TR3 Video
in TR2/3/3A/3B Forum
Posted · Edited by MilesA
Austin
My 3A has door mounted mirrors on both sides. Worst thing a PO did. Utterly useless. Can't see the nearside one and have to lean out to use the offside one which cannot be seen with the side screen on. Don't do it!!! If you can mount one at the base of the windscreen stanchion that in my view is the most elegant solution.
Miles