Now the wiring loom was laid into the car and all the wires were roughly in the right location, the rest of the engine could be reassembled. By far the most complex part of this process was the installation of the Electronic Fuel Injection (EFI) system, so I'll cover this in a chapter of its own, but the rest of the ancillaries are relatively straightforward (I know this as although Protek put it all back together, I was the one who took it all apart in the first place!). Most ancillaries were simply cleaned up and reinstalled, but I did add a few upgrades where I felt they might be required.
I replaced the TR6 Clutch master with a new original stock item and paired this with a Triumph GT6 slave cylinder as I understand that this makes the clutch action a little more controllable (whether this is true or not I don't know, but it certainly seems to work well on my car). One thing to watch when doing this though is that there are two bore sizes for the TR6 master cylinder, so you need to match the correct diameter bore between master and slave.
The waterpump was rebuilt by EP Services in Wolverhampton (http://www.ep-services.co.uk/), and rather than clean up and repaint the old waterpump body, I purchased an aluminium one from SC Parts. I had a new aluminium radiator made by Alastair at Coolex in Nottingham (http://www.coolexperts.co.uk/motor-vehicle/) as I figured that it wouldn't hurt to help the cooling system a little when in traffic. I also fitted an electric cooling fan and Coolex even added the appropriate brackets for me and bolted the fan in place against the radiator to save me having to put cable ties through my new radiator to attach the fan, as you need to do with the standard installation. The old radiator and water hoses were looking a bit tired so I replaced them with silicone ones which had a 'wrapped' effect as they looked a bit nicer in my opinion. I replaced the heater control valve with a HVAC4-Season unit (74648) which I had to buy on eBay and get shipped in from the USA, but it is a direct replacement and is much smoother in operation than the standard one.
I sourced an uprated alternator from Burghfield Starters and Alternators (https://www.burghfieldstarterandalternatorcentre.co.uk/), which was tested on the bench to output up to 85amps. This would be complete overkill for a standard TR6 of course, but this one would have some enhancements which would draw a lot more current than the average TR6. I also fitted a sports coil just to ensure a good spark and made up a set of pure copper core HT leads with NGK BP6ES plugs. Also, from an aesthetic point of view, I managed to source a new original stock Austin Healey 3000 distributor cap, so the HT leads come out of the side, rather than the top.
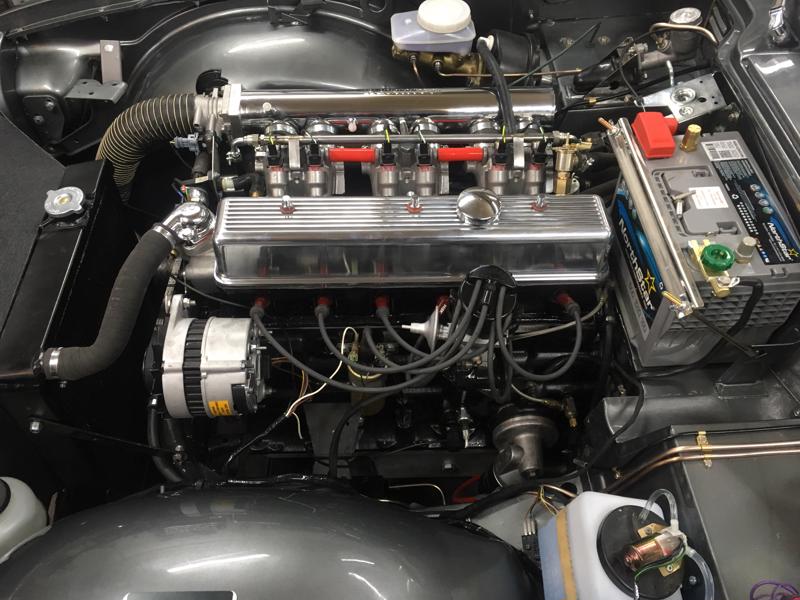
Finally, I managed to source an original aluminium SAH (Syd Arthur Hurrell) rocker cover from Lucas at TR Shop, which I think looks much nicer than the modern alloy rocker covers currently available. The only issue was that it needed a bit of 'tlc' and I didn't particularly like the 'Le Mans' filler cap that it was fitted with as it didn't match the 'Monza' filler cap I was using for the petrol tank. A local engineering shop provided me with a solution to this and machined a new collar which allowed me to fit a matching 'Monza' cap instead, and once the case was sprayed up and the chroming company had put a high polish on the vanes, it certainly looked worthy of installing into the pristine engine bay that Glen had assembled.
