In The Garage February 2021
Feb 2021 Issue 12
Welcome to Issue 12 of In The Garage, which comprises a bit of a Northern bias. We are always looking for content so please let us know what is going on in your garage especially if you are a new contributor.
In The Garage isn’t published at fixed intervals but rather when we have enough content to make a reasonable read. Contributions don’t need to be a novel about major project; simple hints and tips or a picture and a few words of explanation are welcome.
Andrew Willmott – TR4
Front Wing Corrosion Repair “Grows Legs”
When cleaning under the wheel arches of the TR4 I noticed that road dirt had built up in the front bottom corner. As I poked out the compacted dirt the blunt screwdriver that I was using went straight through the otherwise very sound metal. A few moments thought confirmed that the best way to repair the resulting hole would be to remove the wing.
It sounds like a big step but on a TR4 the lights, grill and bumper can all remain undisturbed so the only parts which needed removing were the foot well trim (for access to 3 of the wing securing bolts), the bonnet side buffers and the aftermarket wing liners which were fitted by a previous owner. All the fixings were well covered with cavity wax so the wing was off in about 15 minutes.
As usual by the time that rust is spotted it has already spread, and further poking opened up a large hole.
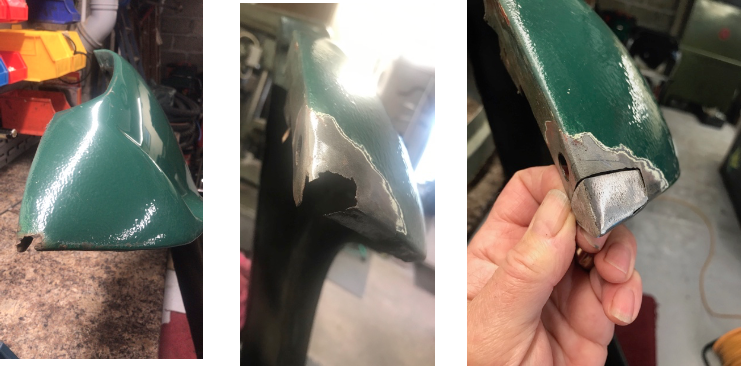
The area was cut back to sound metal with a cutting disc and a small repair section was fashioned from a sheet of scrap steel. Paul Gibson was kind enough to offer to weld the repair section into place so a quick trip to Croyde saw the wing sound again and just needing the finishing applied prior to refitting.
A coat of Bonda Primer was followed by a light coating of stone-chip, prior to touching in with Conifer Green 2K body colour. The wing was now ready to re-fit but that would be too easy wouldn’t it?
The plenum drain and the bonnet gap channels both drain rainwater into the void between the foot well side panel and outer wing just in front of the A-post. The water escapes between the outer wing and sill, which sees no air flow and consequently remains damp for some time making a nice little rust trap.
The cure is to direct the water through hoses and out under the car.
A hose connector was made for the bonnet rain channel by cutting off a 15/10mm plumbing reducer at 45 degrees and soldering it to a brass sheet with a hole drilled through it. Once soldered, the hole in the brass sheet was opened up to match the fitting with a Dremel and the assembly was boded over the drain hole in the inner wing with Tigerseal.
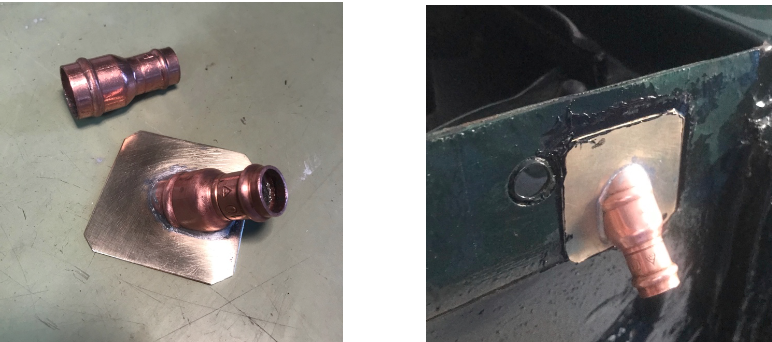
A hose was clipped over the fitting and joined to the plenum drain with a plastic 10mm Y connector. The outlet was then hosed through a hole made in the top of the sill and out under the car through a second hole in the inner side of the sill.
While the outer wing was off I took the opportunity to clean off all the old cavity wax and under-seal. The whole under-wing area was then painted with green Hammerite and enclosed areas treated with cavity wax prior to re-fitting the outer wing and accessory wing liners.
The next job will be to replicate the new drains on the other side of the car. Lets hope that I can complete the project without it too “growing legs”.
Woodworking Skills Get Tested
I have often struggled to make a neat soldered joint between two wires just because of the difficulty in holding two wires, a soldering iron and solder with only two hands.
Five minutes with a bit of ply, two clothes pegs and some glue have made the task a bit easier.
Future developments will include some sort of flexible mount on a magnetic base.
The Most Over-Engineered Grommet Ever
This little mod should raise a few smiles...
I had been washing down the TR4 and subsequently found a puddle of water in the driver’s foot well. Contorted investigations revealed that the water had got onto the bulkhead panel under the bonnet and found its way past the grommet for the emergency bonnet release rod.
I obviously didn’t have much to do that day so a 1⁄4” unf stainless bolt was modified on the trusty Myford lathe to make a guide complete with O-ring seal.
The head was removed and a hole drilled up through the centre to take the actuating rod. A stainless nut was then recessed to take an O-ring before being screwed onto the threaded section of the bolt and bonded into position with Loctite sealant.
It looks like that bulkhead paintwork will need a bit of attention soon. I think that there may have been a bit of residual Silicone brake fluid on it when it was painted twenty years ago, as the blisters in the photo aren’t hiding any rust.
Andrew W
Paul Gibson – TR6
Differential Drain Plug
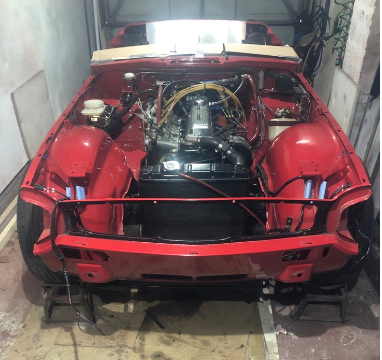
Paul’s “Lockdown Refresh” has continued unabated and he has taken the opportunity afforded by the removal of the bodywork providing improved access to complete a few jobs on the rolling chassis while they can be completed without crawling under the car.
Unlike the earlier solid axle cars he TR6 differential is not provided with an oil drain, and although the oil doesn’t need a routine change, being able to drain the oil down occasionally allows it to be inspected for debris, and perhaps catch a problem before it lets you down or turns into a more expensive exercise.
To this end Paul removed the diff and with the cover removed drilled and tapped a M8 drain hole to take metric drain plug with copper sealing washer plug. (I’ve failed miserably to convert Paul back to imperial for TR work).

Once the differential had been replaced and the chassis had seen a bit of retouching in areas not normally accessible, the body tub was replaced with a bit of socially distant assistance (luckily a TR6 is longer than 2 metres) and will soon have its outer panels replaced and start looking like a TR6 again.
Oil Temperature Sender
Paul’s car has enjoyed the benefits of an oil temperature gauge for some time but he’s been unhappy with the temperature sender being fitted direct into the sump drain port requiring removal for oil changes.
Half a day’s work saw the sump removed and an extra port welded in next to the drain to take the temperature sender. The original drain plug can now be refitted with its magnetic insert so that any ferrous particles in the oil can be spotted when the oil is changed.
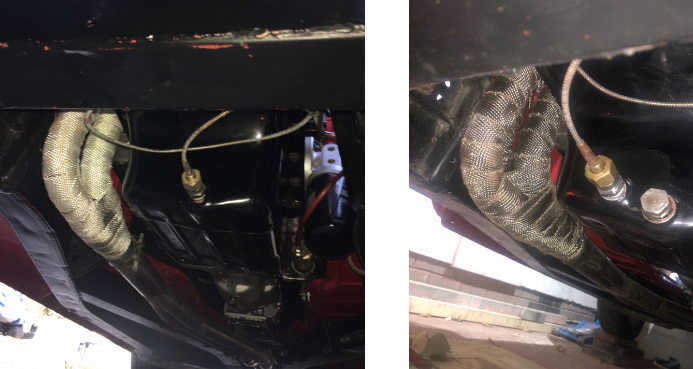
The old setup is pictured below alongside a picture of the modified sump.
While he was working in that area Paul found that the eBay bargain exhaust wrap had gone brittle over time and it was replaced with a better quality and unsurprisingly much more expensive branded product.
John Blake –TR4
Heater Valve Mounting Improvement
John Writes:
A long time ago I changed the nasty iron heater valve adaptor on the back of the cylinder head (part number 133061) for a cobbled together selection of brass connectors that I had to hand. The result wasn’t pretty but worked well and allowed the pipe to be rotated and tightened at any position rather than rely on a number of winds of PTFE to make the old one both watertight and directionally correct. I really didn’t like it.
Unfortunately, when I swapped cylinder heads recently, I found my brass adaptor to be fractured along the threaded section and when it was taken apart you could see it had been held together by about only 20% of the threaded wall. Amazingly it hadn’t been leaking.

I looked to my spares department for a suitable upgrade and found I had a number of the pipe adaptors that are used on the four pot engines to connect the back of the water pump housing to the heater pipe that runs around the side of the cylinder head (part numbers 101343 & 101302)
Fortunately, these parts have the same 3/8” BSPT thread as the hole in the back of the cylinder head, which was a good start. The downside was the internal bore that was machined to suit the old 1⁄2” heater pipe and now needed to take a standard domestic 15mm pipe and olive which would then mate up nicely with the heater valve.
This just required a couple of visits to the pedestal drill to first drill both sections out to 15mm (all the way through the nut but only just into the adaptor) & then I further recessed the large adaptor with a 17.5 mm drill to provide a suitable angle and depth for a conventional 15mm olive to seat properly. There is plenty of meat on this piece to allow the over-bore.

All that was left was to solder a couple of bits of copper pipe into a 90-degree elbow and join it all together adding a layer of heat resistant loom tape to tidy it up.
The outlet pipe to the heater valve can now be angled exactly as required and the compression nut tightened up to seal the olive. The other benefit of this arrangement over the original is that you can remove the head adaptor for servicing which you can’t do on the old version without removing the cylinder head retaining nut adjacent to the adaptor!

John
As a parting shot can you spot why this home mechanic’s car wouldn’t start after he had fitted a new battery?
You – Your Car
Thanks to all our contributors to this issue.
Contributions and feedback (positive or negative) are always welcome.
What’s happening in your garage?
Please make a few notes about your garage exploits and email them to me for the next issue. Contributions are best managed by sending in plain text with attached photos or in Word format.
Mail your notes and pictures to: andrewawillmott@gmail.com Andrew W