


AndrewP
-
Content Count
790 -
Joined
-
Last visited
Content Type
Profiles
Forums
Calendar
Posts posted by AndrewP
-
-
Ok..for those playing at home I'll answer my own question.
The union needs a 1/4" BSP self centring bonded washer (or dowty seal).
Hopefully that will solve my fuel smell in the boot (already have the barricade lines everywhere)
-
Hi Everyone,
I have a small fuel leak at the junction of the fuel pump outlet and compression fitting on the Lucas Fuel pump.
Does anyone happen to know the size so I can source locally?
Im hopeful that someone has jotted the size down when they replaced theirs.
Thanks
Andrew
-
Thanks all for the nice comments.
On 11/15/2018 at 5:37 PM, stuart said:Looking good Andrew, did you get the Jenson finished as well?
Stuart.
The Jensen is sulking at the moment at the lack of attention its getting but its next on the list for a bit of TLC. It needs a bit of work doing with the welder so I`ll wait until winter until I begin that epic..but I still have it and love the difference between the waft and V8 of the Jensen, and the more frantic and go-cart like experience of the TR.
Tom,
Thanks for the tip. I`ll cut and polish then apply the decals as the last 'icing on the cake'.
Cheers
Andrew
-
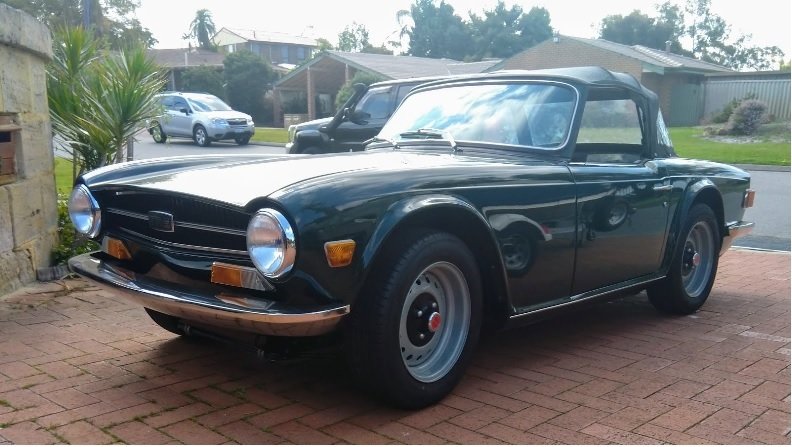
So its been a eventful week or so in TR6 land.
Without boring everyone with the details, the original plates for my car were on 'retention' after the accident for the duration of the restoration. This means the equivalent of the UK DVLA take the plate and store them until you apply them to a vehicle.
We dont have a yearly MOT type test, but, if and when the car registration lapses and/or you get stopped and the vehicle is found to be non-compliant, then you have to go through a major test.
For some reason, they decided that this was no longer the case and sent me a letter saying basically I had until the 19th Nov to register the plates, or they would be destroyed.
There is nothing unique about the number, nor the plate, but I wanted to keep the 'originality' so...last Thurs, the car was passed (first time...naturally) and now is road legal.
I just wanted to say a heartfelt thanks to everyone on here (and no longer here
 ) that has offered advise, information, assistance, and general encouragement when it started to drag and you wonder if it will ever be finished (and those bloodied knuckles will ever heal!).
Its warming up here for summer (38C tomorrow) and so shes ready just in time for the good weather.
A few jobs still to do, mostly cosmetic (haven't applied the TR6 rear decals yet until I can wet sand and cut/polish) but for the next few months its enjoying it, tweaking and ironing out some of the niggly bits that are bound to pop up after a nut and bolt restoration.
Once again, thanks everyone.
Cheers
Andrew
-
Well..the overwhelming responses to this post must means no-one has had to do this?
Anyway..answered my own question today and yes, it can be done.
Not an easy job and a pair of extra hands would really help, but do-able.
-
Has anyone replaced their soft top webbing without removing the actual vinyl roof material?
I need to replace as when previously fitted to the car, the frame must have been in a different spot as no matter what I did, the webbing would not stretch to accommodate locking into the hood rail.
So...can it be replaced with the hood still attached?
Any tips or advise appreciated.
Thanks
-
Hi,
I'm about to pull my driver's seat apart and have just yesterday finished the passenger seat. I have a few pics but let me know if there is anything specific you need.
There's plenty of photos on Ed,s tr6 site (http://bullfire.net/TR6/TR6 TOC.html) as well as Bob's site http://tr6.danielsonfamily.org that I have used a number of times.
Let me know of specific shots you need if you can't get the info from the above sites..I've also used the Moss and Rimmers catalogues as a guide also.
Cheers
Andrew
-
Hello everyone,
Thanks all for the compliments. Its not 100% there yet, but not far off.
Im fighting my own OCD-ness and just making sure everything is done right. The final job will be to wet sand and polish the paint up as its currently wearing the gun finish so a few orange peel bits here and there.
Andrew, yep all recovered-ish. I've had 4 operations in total and the nerve endings in my cheek are never going to be 100% right but mostly all OK.
Craig, the WA police normally do a great job, but unfortunately it would seem that for both mine and your cases, the standard wasn't up to scratch. I took my incident as far up as I could muster the energy to do at the time, but short of a civil case, the police didn't do anything to help my case whatsoever.
What was the outcome with your TR6? Did it get repaired and is it back on the road? If you need anything then give me a yell as I have a shed full of bits now (not intentionally) after the rebuild so If I can help?Cheers again everyone. It`ll be a red letter day when it gets re-registered and I get the plates back on it.
Andrew
-
Hmmm...I replied to this yesterday but its since vanished?
Anyway...I had just said thanks to you both Len and Ed. Makes sense when you can see how it 'works'
I second Terry's comments as well. Ive used your site Ed a number of times when even though I must have taken in the 10's of 100's of photos, theres always one you dont have!
Thanks again
Cheers
Andrew
-
Evening everyone.
Im at the stage of recovering the seats..last bit now.
Ive pulled the passenger seat apart, cleaned and painted it all up nice and when trying a test fit, the cotton white panels seem to have no apparent use.
The original covers (at least they look original with the original Dunlop 'pillow' foam still there) didnt appear to have them so what purpose do they cover?
The panels are the white, cotton squares that have been sewn into the covers in the below pic. The lower cover also has a panel (not pictured)
Appreciate any advise before I go in with the contact adhesive.
Thanks
Andrew

-
Hi Mike,
Agree, but it's slipping in all gears.
I think what's happened is for whatever reason the slave has gone beyond its limits and can't return fully as even with the arm disconnected, I can't push the slave rod back.
Probably a strange bit of luck as well finding the master was leaking too before it did damage to the paint.
Anyway, a night or two in the garage will see it fixed and hopefully fully functional again.
Cheers
-
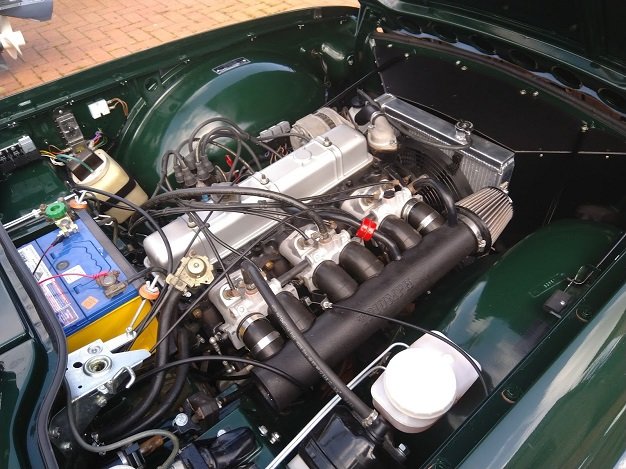
Air filter is on my list of things to do. Just got to fab up a bracket.
-
2 hours ago, foster461 said:
Almost there Andrew. Just in time for the summer. My eye was drawn to the three relays on the front left fender. I have three just like them on my TR6 and TR3.
Stan
Hi Stan,
Yep..no doubt picked up from you or someone else on here. Just remember thinking 'what a good idea!' and so when the time came I made a small mod to add relays for the hi and lo beams and cooling fan. The O/D is another relay up by the wiper motor plus a couple of spares relay bases for future.
In hindsight and a bit of planning I would have put all the relays together and got autosparks (the loom mfg) to modify accordingly.
Instead I had to un-bind and strip the loom back and then re-loom to get the relays on the fender.
Anyway..thanks for the compliments.
-
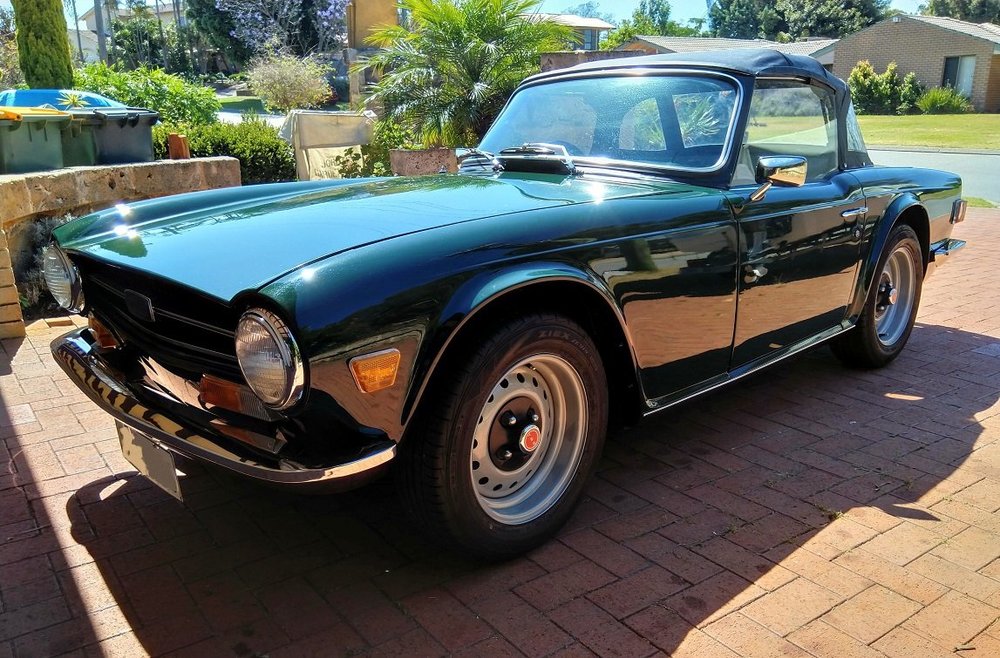
So..its been a while. Nearly 6-7 months actually since my last post...but its finally nearly there.
Im currently stripping back the seats, passenger side first, but carpets are in and the car is driveable (albeit round the block only).
The time taken on the little things...getting stuff lined, up, folded over, tweaked here, tweaked there and even after ALL that, still not 100% is moral draining stuff.
On good days, beer in hand you stand back and look and go..ahhh...that looks awesome. Other days, you find all the bits only you know about and think about 'fixing' them.
Anyway..a pic for the record of where we are:-
Engine bay looks good too..
It needs a proper shake-down and the recently discovered clutch master and slave rebuilding but almost there.
Thanks again for everyones help along the way...not quite there yet, but not far off.
Cheers
Andrew -
Just a minor update,
I had another chance to take the car round the block yesterday and to somewhat my relief it slips in all gears.
Further checking showed that the slave rod was way too far protruded and not returning back fully and I can only assume loading the clutch.
Then..further checks show the master weeping, and so its a complete clutch hydraulic system strip and rebuild
Fingers crossed it will fix the issue and Im able to test when Im next able to get it out.
-
Well done..looks great in the blue.
-
Standard PI rear boxes have 2 x inlets so if you have a single pipe from front to back, it wont work.
Perhaps the standard US spec rear box might work as they are single from front to back if I remember correctly?
-
Hi Mike,
Many thanks for taking the time to reply with the info. The OD is one of those items that makes 95% sense to me, but it's the operation of the sprag bearing that confused me.
I admit I'm not 100% clear in my mind but I'll assume the statement that it's so that engine cannot speed up during the OD is engaging.
Somewhat reassuringly the statement of " If your engine is able to speed up when you engage the OD, then the sprag clutch is not working" in my case sounds like it may be the OD lining rather than the sprag bearing chewing itself up as it's when the OD is disengaged and accelerating in 2nd in my case.
Either way a few more drives should assist with a bit of diagnosis.
Thanks again
Andrew
-
Forgot..one question/clarification.
So if whilst driving it slips with no OD engaged (so all the power being transmitted through the OD clutch) and no slip when in OD...this indicates its the OD clutch lining on its way out?
If I drive and lightly press on the clutch pedal and it slips (or flooring it in 4th) then it's the main clutch (engine to gearbox)
What would a test for the uni-directional (sprag) bearing be?
Thanks
-
Thanks for the replies.
I`ll go through the basics and see what it throws up.
I may drop the filter off the OD and see if there are any worrying bits.
I have checked that all the inhibitor switches work and that the solenoid clicks in and out smartly, so Im happy that if the UD bearing is knackered its more old age rather than reversing and damaging it.
Never a dull moment!
Andrew
-
I am getting close to getting the TR6 re-registered and back out there on the road.
A few cursory test drives around the block highlighted a few things to sort out, but the most worrying is that I get what feels like clutch slip but only in 2nd gear.
Having used the search function, the worst case seems to be that it could be the uni-directional bearing is shot but the overdrive was rebuilt not long before the car went off the road and the diagnosis was all OK in the overdrive and box. Its probably done < 5,000 miles since. Clutch was replaced at the same time and there are no noises or anything that would suggest a problem.
I havent had an opportunity to do the basics like check G/B oil levels since its been re-fitted, but out of the car (prior to mating it up to the engine) the level was checked and no noticeable leaks have occurred since.
It didnt do this before it went off the road either.
Are there any other checks I could do before stripping the box out again to replace the uni-directional bearing?
Could it be the A-type clutch being dry after 4+ years of inactivity and drying out?
Breaking it to me gently, but what else could it be?
Thanks for any advise.
Andrew
-
Yep..another vote here for direct to Harrington. Hassle free and very helpful.
Unfortunately I had the same poor service experience with TRshop.
-
No problem..I missed the CR part in the title. The CR spindle should have a stop screw per end plate to stop the butterfly closing fully.
If I understand your solution then I'd strongly recommend these:
https://rimmerbros.com/Item--i-152889XK
It removes all the wear issues you have experienced.
Glad you have it sorted
-
Ive re-written this post a few times trying to get across what Im saying, but here goes (and hopefully this makes sense without coming across as teaching you to suck eggs). I think like most, you go through this process when you first learn and then you find a way that works for you. Sometimes its even cathartic
Firstly, is this a CP or a CR set of bodies? I`ll assume they are CP as the CR has individual throttle stops.
OK..so back to basics.
As a few have suggested above, do a visual check on the spindle play. If you havent had the units fitted with sealed bearings/bushings then there will be some play (if they are old) and even new, they need a small bit of play to allow the brass shaft to expand at different rates to the aluminium housing and prevent it from binding up.
Excessive play however results in too much airflow (leaking past the spindle wear) so I dont think this is your problem as you'd probably see the revs rise too much in this instance.
You can check for inlet leaks by careful use of an hydrocarbon based spray (something like carb cleaner or 'start ya bastard') localised to the areas you think could be leaking and if the engine is sucking in air, it sucks in the carb cleaner and the revs will increase slightly.
If the flowrates between pairs of butterflies (i.e 1&2, 3&4, 5&6 ) differ, then the spindle may be twisted and so you`ll need to replace or carefully twist until they both flow the same or they are leaking air somewhere.
Once you've checked for spindle play and sync between butterflies you should ensure the butterfly discs are seated properly.
Carefully loosen (don't remove) the two screws per disc for both butterfly's on each throttle body, remove the vertical rod (connecting the butterfly spindle to the throttle linkage) and 3 or 4 times snap the spindle shut to seat the butterfly discs centrally in the throttle body throat. The last time, do not move them again until you have nipped up the screws.
Before you connect all the vertical rods back up, check for excessive play in the knuckle at both ends as the original type wear the hole in the spindle and throttle plates oval. A much better option is the ball/socket replacements offered by Moss etc.
Once connected, If you turn the rod on 1&2 to increase the vertical rod length, does 1&2 open at all? If not then theres something wrong badly. The return spring on the throttle cable is far stronger than the spring on the throttle spindle. When you increase the length of the vertical rod, it will overcome the smaller spindle return spring rather than the bigger throttle return spring (which should also be hard against the throttle stop screw anyway). This should cause the butterflies to open.
A gotcha is when you go the other way. I.e shorten one of the rod lengths to a point where the butterfly disc is hard closed. It has no where else it can go so the knock on effect is the throttle linkage shaft moves and is held open and not returning to the stop screw position. This causes the other sets to be held open (this is the bit I found was hard to explain). You then go an adjust all the others and find that it see-saws between too much flow and not enough.
So, finally (if you've read this far) this is how I have done it numerous times.
With the engine off;
Close off the air bleed screw completely.
Check the choke cable and choke cam are fully home and the stop screw is not interfering with the linkage (wind it right away from the cam)
Check the throttle linkage stop screw is wound out and not touching the stop.
Check that the throttle cable has a little bit of play and not pre-loading the linkage (as this can also artificially pull on the throttle linkage throwing all your adjustments and flow readings out)
Loosen all vertical rods so as to increase their length ~3-5mm
Check that all the butterflies are a little bit open (shine a torch and visually check)
Carefully turn the throttle stop screw until you just see the throttle linkage rod move. Dont touch this until you are all adjusted as it provides a datum.
Start the engine - it will be all over the shop and probably rev a bit but work with it;
Quickly adjust each TB in turn by shortening each of the vertical rods until you get a low-ish flow reading on the butterfly nearest the linkage on each set.
IF you go too far and shorten the rod too much this will cause the throttle linkage shaft to move and you will hear a difference in engine rpm (as it opens the other butterflies more).
Shorten the rod back a 1/4 turn if you get to this point as no matter what you do its possible you wont be able get the butterfly disc to totally seal.
Once you have a similar airflow across all sets, then set the RPM to 1500 (using the throttle stop screw) and re-adjust to balance all 3 sets.
As I say above, if they flow different across the same throttle body (1&2, 3&4, 5&6) then the spindle is bent and/or the disc is not seated correctly and/or air is leaking in somewhere.
Bit of a lengthy post, but hope it helps and hopefully it saves you spending money if you dont need to!
Cheers
Andrew

CARPETS AND SEAT MISALIGNMENT
in TR6 Forum
Posted
There are two holes on the pivot points that you need to get right.
Driver Side Inboard
Driver side Outboard
Only other thing that can cause issues are (as Ed says) seats swapped, mounted to the floor wrong or the catch tabs have been moved (easy to remove and fit back to front).
Hope it helps.