

hpremote
-
Content Count
351 -
Joined
-
Last visited
Content Type
Profiles
Forums
Calendar
Posts posted by hpremote
-
-
Hope this isn't too much of a thread hi-jack. I spent a couple of hours on Sunday failing to start the 3; it had been running great when I put it away a couple of days before, so I thought the damp of a couple of days' deluge was the cause. After having pulled, cleaned and re-gapped the plugs and tested the high and low tension circuits, I discovered the coil HT lead was arcing through the rotor arm. So I rootled through the spares boxes and uncovered two rotor arms, one of which looked unused. Fitted that one and the engine roared into life. Took the car for a 25 mls test run and on the way back into the suburbs, the engine began misfiring and died completely; fortunately my momentum carried me into a pub carpark where the bonnet could be raised. A small, interested crowd came out to watch...
Blow me down - another failed rotor arm... fortunately I'd thrown the second spare one into the glovebox and that, when substituted, got the engine going.
Yesterday, first thing therefore, I was on the blower to Martin - aka the Distributor Doctor - and ordered one of his red rotor arms (they're now additionally stamped 'DD' to avoid cheapo copying). He also talked me into getting one of his magic condensors, too. Total bill incl. VAT and package, came to £19 - and the bits arrived in the post this morning. Great service from the DD.
Tim.
-
Just got the 3 taxed for the coming year, this morning. I'd received the usual reminder with registration details on, etc., but there was no confirmation on that sheet that my car doesn't require an MoT; just a generic remark that some cars don't.
Anyway, I got to the Post Office counter, passed over the reminder plus my Insurance Cert. and mentioned that I don't think an MoT cert. is necessary. The assistant then produced a small form, V112, which is a signed declaration that my car with *** *** registration, does not need an MoT because under category 'o', it is pre-1960. Thereafter, all went straightforwardly.
I'll still get an MoT test when it falls due, though.
Tim.
-
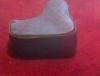
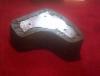
Interesting pics, Mike - and while I'm not confident in saying that the wide end looks an improbable fit, I am fairly sure that the other (pointy) end won't seat into the caliper/wheel cylinder; much depends on the internal mating joint, and the end is flat for a good reason, I reckon. The size, by the way is confirmed as 3/8x24 UNF (see Peter's advice, above).
Good luck in getting what you need from Goodridge, though (those braided hoses look great). I got my new (rubber) hoses this afternoon and have just tested them; they are a perfect fit. Just in case it helps, their code is GBH108; they cost GBP18.22 all in.
Regards,
Tim.
-
Then it sounds like your new Goodridge hoses may somehow be metric at the backplate end, Mike.
I've had some possibly hopeful news today from my local classic parts factor 'Sports Car Supplies' in Gateshead; their supplier sounds like he knows what is needed - BUT let's wait and see; the hoses are to be delivered there tomorrow.
In the end I decided to forego the indulgence of braided hoses - this after having read the 'Brakes' section on the TR Technicalities CD, last night. There are advantages to having rubber hoses (elasticity both ways, is one) - and I really just want the 3 back on the road as quickly as poss; there seem to be more potential imponderables with the Aeroquip-type.
Your pics would be interesting to see.
Thanks,
Tim.
-
Peter: that's brilliant; many thanks for the speedy response.Will have a look at the pins, too - that's a useful tip.
Doh! - hadn't thought of the Technicalities CD; I'll dig it out this eve.
Cheers,
Tim.
-
Wondering if anyone can help; some years ago I bought two Aeroquip-type front brake flexi hoses for the 3. I'm off to Jabbeke in May, so with the weather nice and sunny this pm, time to take off the rubber hoses and fit the aeroquip. Not so fast, lad! Getting the old hoses off the car went well enough. I then discovered that the aeroquips don't fit - in any respect...
The issue is, I'm sure, that I changed my Lockheed car to Girling and used TR6 calipers - some years ago. Interestingly, the Lockheed hoses bolted straight up to the 6 units.
But I'll need to buy a new brace of braided hoses which exactly replace the worn-out rubber ones I've just taken off.
Please could anyone tell me:
a) the thread sizes of the end which fixes to the chassis/banjo? The threaded section is ca. 16mm long and the outer is 15mm in diameter; this thread is for the locknut. This outer then has an internal female thread (coarser and ca. 9mm diameter) into which the copper piping end of the chassis brakeline fits;
the thread size of the end which fits onto the caliper? the section is ca. 10mm long and 9mm in diameter.
I'm asking this in case I the usual suppliers can't help and I need to go to somewhere like Demon Tweeks to have hoses made up.
Cheers, in advance -
Tim.
-
Hi, Steve: the red one is from a 3; the blue from a 3A. 'Triumph' is missing from the latter, as the 'TRIUMPH' letters were mounted separately on the front valance.
Cheers,
Tim.
-
Ditto for me with the solid fuel pipe between the banjo bolts to the float chambers; so much so that running repairs were needed - at least three times, and irritatingly mainly when I had the TR abroad. The problem consisted of the solder becoming fatigued through vibration, letting go mostly at the front banjo as I recall. But despite sometimes heavy-gauge leaks I never got the thing to combust...
Anyway I gave up eventually and cut a section out of the solid pipe, substituting transparent flexi fuel line with a couple of jubilee clips (transparency helps with checking fuel feed, particularly when hand-priming using the fuel pump lever).
No problems since, though of course it doesn't look as elegant.
Tim.
-
Hi, Martin: commiserations. Yep, your n/s shaft has gone west - this is what Lockheed halfshafts are always liable to do, and in my experience, always without warning. I had three such incidents with my '55 TR3 - two of the breakages occurring within about twelve months of one another. It was these which led me to chuck the Lockheed axle and go for the Girling one, about seven years ago. The result has been very de-stressing, since Girling = bombproof.
The other positive about the change was that it encouraged me to fit TR6 discs on the front of my car. These are another de-stressor when descending mountain passes, as brake-fade has also become a thing of the past.
The one snag, I suppose, is that doing these mods detracts from the originality of your TR2 - though if you were to follow suit, you can always keep the original components on one side for a return to manufacturer's spec. at some future point.
If you want to stay faithful to Lockheed, it would be best to fit two new replacement half-shafts together, since otherwise the offside one will suddenly go 'thud' too - and possibly quite soon.
I believe that Revingtons do strengthened Lockheed shafts these days; at the time I used Rev's to supply my used Girling axle and the discs, etc. They were a good buy...
Good luck,
Tim.
-
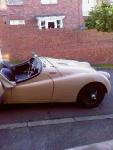
I just bought my six individual letters/numbers in black and stuck them directly onto the lower part of the front valance, under the grille aperture and slightly to the offside. Never had any questions over the last ten years... Suppose it helps that they stand out visually quite well, the colour of the car being beige!
Tim.
-
Agreed, Frank; indeed they appear to thrive on abuse.
That said, there may be a significant difference between abuse and neglect. Neglect, my car can hardly accuse me of...
Tim.
-
Well, folks: I trust this will be the last in the series of updates following the breakage of the oil pump driveshaft dog and its ingestion by the pump rotors as I travelled with gusto along the A1 a few weeks ago.
The remedying has been long and laborious mainly because of my enforced stay in London during the week. However, this afternoon I finally got the car out for its test run after having installed a mixture of pump components old and new; I drove it for about 35 miles in urban traffic and at speed on the open road and was most relieved to discover that the oil pressure sits at 70 lbs/sq.in. at sustained high revs, dropping back, as it always did in typical ambient UK temperatures, to around 18/20 at idle.
So I've bought another gallon of 20/50 and a new spin-on at Halfords and dropped the new oil out. Next I'll examine the new filter (to which I'd attached a couple of good magnets) before discarding and loading up with the freshly bought items.
Many thanks for the good, detailed advice and general encouragement from all of you who answered my Qs. You have been an immense help. Now, fingers crossed!
It's too late to use the 3 for the run to Classic Le Mans, but I can pack even more gear into the TVR...
Cheers,
Tim.
-
Rejoice, rejoice! Problem overcome; engine has spun (unstarted), to build up good oil pressure. Cranking it over sans plugs worked a blooming miracle - I'd never heard such a scream before.
So then I've merely fired up the engine and immediately shut down for now, to check that I'd got the spark/TDC timed right.
Will test properly and then drop the hot oil and filter, next weekend, to check for undesirable particles still in circulation from the old, lunched pump.
You've been a great help, guys - many thanks for the usual steady, sound advice, ensuring I persevered.
Tim.
-
OK, folks: the latest follow-up regarding my oil pump destruction.
Everything now reassembled, with new oil pump rotors in an old pump.
Tolerances checked and OK; oil pump primed with 20/50 and new long driveshaft from the distributor engaged with the pump's short shaft.
New oil in; new filter separately filled with oil by hand, and duly spun-on.
Engine cranked over without hi-tension cables, to build up pressure - and hey-presto: no build up of pressure, despite lots of cranking.
Checked oil pipe to dashboard pressure gauge; predictably, no oil coming through. So the pump ain't pumping.
My only conclusion is that while I've been away this week, the pump has lost the oil with which I primed it.
So: ideas for fixes, please! My thinking is to drop out the new oil from the sump and this time, pack the pump with grease - or vaseline?
In which case how full do I stuff the thing?
Just between the rotors, or down through the chamber of the pump as well?
Your advice would be much appreciated, chaps!
Ta,
Tim.
-
Fingers crossed - I trust this will work!
Tim.
-
Mike: I'll try and get photos (will need assistance from the youngest kid, who's revising at present) before too long. If push comes to shove I'll send them to your Email address via my BB.
An indeterminate wait will now follow...
Tim.
-
My two penn'orth:
when in '75 I got my 3 (built in November 1955) it came with two shaped seat squabs which fit into the recesses behind the front seats and against the prop shaft tunnel and rear of the 'footwell'. So they essentially have three straight sides and a curved one to fit the inner rear wheel arches. They have a thick plywood base and are foam cushioned with beaded vinyl covering.
I always thought they were original occasional rear seats, as they looked old (the plywood was warped and delaminating); twenty-odd years ago I had them revitalised as per 'original' - and my kids always said they were quite comfortable, when they were of the age and size to fit in the back!
Now reading the above, it seems they may well not have been original fitment - or has anyone else encountered this sort of arrangement?
Tim.
-
That's most useful, Ian and Roger - thank you both. All I need now is time to do the operation; in theory a double bank holiday should be ideal...
Tim.
-
OK, folks - the latest!
I talked to Neil at Revingtons and have gone for the 'old pump body - new rotors', which Neil says they do all the time with their own engine building. These bits arrived promptly and with no fuss - well done to Revs.
The only challenge for me will be the possible levelling of the faces of the pump and rotors - which I've never had to do in previous engine rebuilds.
I understand that this true-ing is done by trying out the faces against a piece of glass and any adjustment effected by judicious application of coarse grit-paper; which to my sensitive nature, sounds a little brutal...
Can anyone supply a bit more detail, please?
Thanks in anticipation,
Tim.
-
Very good point, Peter; thanks. I've visited that territory before, the first occasion I rebuilt the engine, in '83. That time there'd been multi-breakage of piston rings and after I got the whole lump re-assembled and running again, for several weeks I'd get a low oil pressure reading out of the blue - and I quickly learned the routine of whipping out the pressure release assembly and freeing it of errant piston ring fragments. God knows where they'd been hiding, because they certainly hadn't been in the sump (which I'd practically surgically sterilised...).
So I'll keep a weather eye out for that; anxiety and paranoia rule whenever I mess with the engine.
Tim.
-
Thanks for that, Alec. I'll defer deferred gratification for a future topic, then.
Tim.
-
An interim report-back, for anyone interested. It appears that no supplier can get oil pumps for love or money at the mo. Delivery time seems to be about three or four weeks. One supplier offered to sell me a second-hand pump body with new rotors, which feels a bit outre, even for me. Revingtons have a couple of second-hand units on the shelf and have offered to check their interior clearances, which seems a possible way forward. Or there is the 'deferred gratification route' where I wait... and wait...
Bearing in mind that the manuals say a pump is generally good for 200k miles, I am inclined to go with Revingtons' suggestion, if they can pull out an old pump with interior specs. which are within tolerance.
Your thoughts, anyone?
Tim.
-
Fantastic feedback and constructive ideas, all - many thanks. I like the range of suggestions and definitions of 'the minimalist approach' - very helpful, to balance what for me resonates as more 'belt and braces' against my more usual intuitive (and probably foolhardy) radical non-intervention.
Thanks for the reminder about priming the pump, Neil.
Peter W: I'm not sure how old the pump is - as I didn't do the last engine rebuild in 2003 when it was equipped with 87mm liners and a warm cam; I suppose it could be a dodgy repro pump, but it has seen the engine through 9 yrs of abuse (albeit with v. regular oil and filter changes). Memo to self: check with supplier that the new pump's rotor shaft is pinned, and not just pressed to the rotor.
Mick: that's sensible advice re. not going in immediately with new bearings; plus flushing with 20/50 to provide a representative guide to oil pressure.
Bill: I think I am convinced to inspect the inside of a couple of bearing caps, now.
Peter: that's a reassuring observation about the effects of the instantaneous pump failure.
And Roger: I will deploy a magnet against the new oil filter.
Alec: I will decant, filter and funnel the drained oil - and apply a magnet as the oil passes through. There is no evidence of crud under the rocker cover.
So all in all, your assistance and moral support have left me feeling cautiously optimistic, folks. I will keep you posted as I work further. I'm just garage-bound to put the sump back into place (I have to be back in London tomorrow); then it's down to some ordering of parts...
Cheers,
Tim.
-
Just a follow up to my oil pressure loss on the A1 last Saturday. I took off the sump and oil pump today and I have a new exhibit for my 'chamber of horrors' on the mantlepiece - along with a knackered piston, rear spring pin and graunched Lockheed axle tip...
The pump is absolutely lunched. It seems the bottom of the pump drive shaft sheared in the slot at the top of the short shaft which emerges from the pump. The sheared piece appears to have insinuated itself into the rotors of the pump, stopping it from rotating, but creating a bonny pattern of metal imprints on the inner rotor lobes before the two rotors locked. The outer rotor has a crack from top to bottom. Lovely. I need not only a new pump, but also the long drive shaft down from the distributor. I have yet to take this shaft out; I assume I'll have to wiggle it up past the camshaft and tacho drives.
However, that's not the bit that worries me; the nightmare fantasy is what damage to the bearings has been done by the small shavings of steel which must have gone into circulation around the engine in the (relatively short) time before I saw the danger and turned off the taps (there were no untoward noises...).
Now, I'm a coarse, not to mention lazy, Tr-ist and never do anything beyond the bare minimum to keep the car going. There appeared to be virtually nothing by way of metal in the sump when I inspected it closely today.
What do you reckon, sage ones? Cross fingers, fit new pump and trust my luck? I guess that if bearings have been damaged, it'll show in pressure lower than the 70 lbs/sq in. which I normally have when the speedo is off the clock?
Your thoughts would be welcome.
Tim.


TR3 on the bay
in TR2/3/3A/3B Forum
Posted
Looking at the 3's underbonnet generally, its finish is rather unhappier than the pristine exterior. It also appears to have no brass body and EB plates - and the commission plate looks unorthodox, too. That front valance above the grille aperture is wrong - for the asking price they should've done the resto work on it. Anyway, £25k is the stuff of fantasies, imo.
That said, I like the way the trimming's been done - as well as the colours; we shouldn't forget that you could have had any colour-combo you wanted at that time.
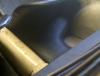
But the big no-no for me is that photo of the passenger side inner wing. Don suggests it might have been in a prang, and this shot could be the big indicator. It would be useful to have some views of the underside now...
The yellow 2 looks a really honest car - though I reckon there's no way that's olive yellow! The underside looks closer to the shade, being dingier...
Tim.