


TR Man
-
Content Count
100 -
Joined
-
Last visited
Content Type
Profiles
Forums
Calendar
Posts posted by TR Man
-
-
Martin,
I have the Mk2 Escort rack on my TR3A but I believe they are getting in short supply now. You are welcome to look at mine any time.
Mike
Thanks Mike. I live in Ireland so probably could not make it to view your TR. However can you tell me the width of your rack and does the wheel turn 2 or 2.5 revs?
Regards,
Martin
-
Thnaks, Viv. This is a good tip. Will investigate.
Regards,
Martin
-
John & Jean,
Thank you both very much, you have simplified matters and I more understand the issues now, following this discussion.
I will try and lengthen the tie rods before driving the car but will wait until later before sourcing a shorter rack if it is necessary.
Cheers,
Martin
-
The criterion to minimise bump steer is more than just the distance of the steering arm from the disc, if any.
Suggest you sketch the geometry of the steering from the front, as in diagram below. AC and BD represent the upper and lower suspension arms, with Y the knuckle joint on the steering rack and X the ball joint on the steering arm.
For minimum bump steer, both X and Y should be on the lines between AB (the upright) and C and D the suspension arm brackets. Moreover the ratios of their postions on those lines should be the same, thus: AX/BX = CY/DY
If you make up a simple cardboard model and play with different positions for X and Y, you will soon see how the distance XY changes as the suspension moves, if the ratios are not as described above. This is the source of bump steer.
John
Nice diagram, John. Sounds a reasonable theory but references would be nice. Assuming it is correct, if you look at the image below it is easy to see that X is more or less in line with A&B but Y is not in line with C&D as Y (steering arm joint) lies about 5 cm outside C&D. You can't see Y because of the rubber gaiter. Also as far as the ratios are concerned AX/XB = 19/9 and CY/YD = 19/9 so this is nice, presumably. Therefore in the set up we have at the present everything is as your theory prescribes except that Y is about 5 cms outside its prescribed line. A less wide rack would improve this sitiation but it can never be made perfect as Y almost encroaches on the pinion joint in a TR rack and pinion steering set up.
With your experience do you think moving the track rod end outwards as much as possible would improve the bump steer or make it worse?
Martin

-
Revingtons were supplying original arms bent slightly outwards but I believe they are now having some cast with the bend.
Stuart.
Good one, Stuart. Thanks for that. Will contact them.
Regards,
Martin
-
Hi Martin
Top job well done
may I ask where you got the radiator from?
Hello Neil,
I got the radiator from Daryll Uprichard a few years ago. Can't remember how much I paid. It has an electric puller fan on the rear. I do not know where Racetrorations source these radiators but have seen them on images of other TRs from time to time.
Regards,
Martin
-
I also have the Revington r/p on my 3A and the rods are extremly close to the disks. I have removed the dust shields as they are in my opinion of no use.
If I remember well on later cars with r/p the dust shields have a cut out to give clearance to the rod ends. I would not try to bend myself the steering arms, it's a task for experts. Maybe you can convince Neil to exchange them for a little extra
they are nice people
Thanks, Jean,
I think that's a good suggestion. I want to purchase Revington air box for the Webers so I am sure they will cooperate if I do that.
Regards,
Martin
-
Hello All,
Just though I'd show you a few photos of our new exhaust system which is stainless steel and coated in 'Performance Sterling Silver' by Zircotec. They claim that this coating reduces under body heat by 30%.
The exhaust is coated as far back as the joint near the rear of the cockpit. The job cost £345 and Zircotec were very efficient and charming to deal with. (I have no association with the firm).
Also for your interest some photos of our 'beefed up' body fixing points to take the roll cage when it is fitted.
Regards,
Martin
-
Thank you Neil, Stuart, Robert and Tim. We have a set up based on the TR4 as observed by Tim and as supplied by Racetorations. I wonder how dificult it would be to bend the arms? Perhaps we should try what we have initially and make a change if necessary as intimated by Tim.
Thank you all again.
Regards,
Martin
-
Which firm's steering rack conversion have you installed?
David
David it was bought as far back as the early 1990s from TR Bitz. The arms are inverted from the other side but not bent.
PFenlon - thanks for your experiences with Revington. I still have the 'worm' but as you can see I have bought the R&P ticket for the time being. I will avoid speeding but would still like to have a comfortable drive.
Does anyone know if the arrangement in the photo will be adequate?
Regards,
Martin
-
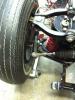
Hello everybody,
During our 'Nut & Bolt' to 1959 TR3A, we have added rack and pinion steering. The body will soon be ready.
We have done some measurements on the garage floor that indicate that we should have minimum bump steer.
However please have a look at the gap between the track rod end and the disc cover plate. Is this too wide?
I have heard that the track rod end should almost touch the cover plate to minimise bump steer. Is this true? Any informed advice would be appreciated.
Regards,
Martin
-
You will be amazed how easy it is to bend the lid into shape.
I would remove the lid, apply pressure in the necessary areas and keep assessing the fit.
Tony
I agree with Tony. One push of your knee in the centre and that boot lid will fit. Whatever you do don't spend any more money on bootlids. I'd fix that in a half hour. If your'e not brave enough get a friend who knows how to do it. You'd be surprised how simple it is.
Martin
-
Hi Guys
Thought you guys might like to follow this one as the 5 refurb went down well
standby Stuart
what do you think of the gaps mate? As requested Alan
Am I the only one who can't find the link to theses photos? Love looking at gaps but don't see any!
Martin
-
There is a series of 3 articles by Brian Richards from Australia on 'Cooling the Sidescreen TR' which appears to be the 'definitive' article and is well worth reading. Here is the link: http://www.tr-register.com.au/Files/technical/cooling1.htm
Regards,
Martin
-
Phosphoric acid reacts with rust, iron oxides, to produce ferric phosphate, a relatively insoluble compound, unlike, say, iron chlorate or sulphate. Thus, the acid does not continue to attack the workpiece as those acids would, and the layer of phosphate on the surface dries to a stable coating that is a good base for further paint layers.
However, a coat of black phosphate may hide more rust beneath, and vigourous brushing even wire brushing is recommended to remove the phosphate layer until all oxide has gone. If after soaking and drying with no wash-off with water there is a white coat of acid crystals on the work, then this is a sign that more brushing is needed.
Phosphoric acid is used by dairy farmers to clean their milking machines, and is sold by farmers' supply stores in 5 litre cans as "Milkstone Remover" for about £10. That is a LOT cheaper than proprietary, phosphoric acid based, products though some of them have the advantage of being a thixotropic jelly. It is also a LOT safer than mineral acids - phophoric acid is used in foods, to give that sharp taste familar in CocaCola. It gives Coke its reputation as a rust remover, but you would have to buy a lot of Coke to de-rust a car!
John
Go by what John says above - he is correct.
Regards,
Martin
-
Well done, using phosphoric acid is the best way to get rid of rust. I have used phosphoric acid a lot on my TR3A restoration. I agree with you about the water, but maybe if you rinsed the door with water and then immediately dried it with a hair drier or a heat gun it would probably be ok. I must say all I have ever done, having used phosphoric acid, was to clean it off with a dry cloth immediately after the reaction took place. It never caused any problems with paint afterwards. You should apply anti-rust paint immediately.
If you are using phosphoric acid again just paint it on with a brush and it can be agitated with some stiff bristles over the bad bits. You can wipe it off and then re-apply over the now smaller more resistant areas of rust and agitate again until all the rust has been neutralised and lifted. I have never dipped car parts in phosphoric acid and I don't think it is necessary to leave them soaking that long (i.e. over night) though I am certain it won't do any harm and I am sure you will have no rust remaining!
Regards,
Martin
-
Hello Dan,
I am surprised you have not had a flurry of contributions on this interesting subject. If your'e getting a roll bar I feel you should get a good one which will be a safety feature as well as help stiffen the car. I bought a Cambridge Motor Sport roll cage from Racetorations. It has two hoops - a big one at the rear, with a diagonal strengthening bar, which fits inside the hard-top, and a smaller one in front under the scuttle. There are two connecting pieces which bolt the front to the rear, just inside each door; these restrict access to some degree but don't have to be used all the time, although they complete the 'circle' and turn the car into a strong and stiff 'box'. We bolted the front roll bar to brackets we welded to the underneath of the scuttle and hopefully this will stop any shake and stiffen the car further. The lower part of the cage is bolted through the floor to the four chassis outriggers. There are also connections to the wheel arches at the rear. We strengthened the four chassis outriggers by welding vertical plates to turn them into box sections and we intend to further increase their strength by introducing a metal tube interiorly, when we source tubing of the correct diametre. I'll try and get a photo of these for you next week. The tub has gone to the body shop for final filling and fairing and I cannot take photos at present. I will try and take some when the car has been returned and is partly assembled with the cage in position, but this could be a good few weeks away yet at the rate the work is being done.
Good luck with the project, I think it is well worthwhile.
Regards,
Martin
-
Hi Everyone !
Just discovered my interview during the NEC Meguiar's Club Showcase 2008. Quite a suprise, and wanna share it !
Regards,
Congratulations, Raymond. That is an excellent interview and the car looks fantastic. You really got the chrome looking well - very shiny! Especially the instruments. Really good work.
Please publish a series of photos on this site, showing all the details inside and out, from various angles, so the rest of us know how high to aim for in our restorations.
Regards,
Martin
-
Brilliant Job Martin, and I'd like your OK to pass the story on to the editor of our Australian TR Register magazine, "Sidescreen", with you acknowledged as the innovator. I'm sure some of our senior TR owners with a bit of arthritis creeping in will be very interested.
Regards,
Viv.
No problem, Viv. Disseminate as far and wide as you like.
I'm currently working on an automatic gearbox (only joking!).
Regards,
Martin
-
You have to admire someone who has the skill and interest to start a project like this. Please write it up for the magazine, it looks fantastic. Good luck
Thank you, Richard for your comments.
Thanks for your suggestion, Ian - will do.
Regards,
Martin
-

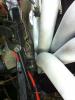
Left side – overall view

Right side view without roll bar in position, cable ties

Left side view, no roll over bar, battery box in position
-

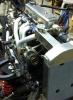
Brackets – left side view

Side view of steering column

Showing attachment to pedal box – left side view

View of EPS motor

View from behind without wheel
-
Hello All,
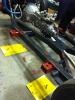
Here follows a description of fitting an Electric Power Steering unit to a TR3A. My motivation for this modern extra is to allow easy parking. The beauty of this unit is that it can be turned off and you are able to experience normal direct steering whether you have a worm or R&P. You could in fact only use the EPS for parking if that is your desire. We are restoring a 1958 TR3A which was originally from California and used to be a LHD so originality in this car is not a priority. We therefore have decided to include as many modern comfort and safety items as possible while still retaining a traditional Triumph TR appearance.
We finished the basic fitting of the EPS unit last week and have some pictures below. I have included a few taken at an early stage where the unit is being supported by cable ties. We had not fitted the under scuttle roll over bar at that stage and it will give those of you who do not have a roll bar an idea of how easy it would be to make up a rear bracket using the original ‘anchor’ fitting. I would say that it would be just as strong and robust as our fabrication.
Requirements for Electric Power Steering for TR2, TR3 or TR3A
1. Opel/Vauxhall Corsa B EPS unit with EPS ECU (cost us €115 used, delivered)
2. After-market assistance control ESG unit (€44.99 new, delivered)
3. Length of steel plating (600 x 30 x 4 mm) – rear end support – vertical and horizontal
4. Length of angle iron (245 x 20 x 2 mm) – horizontal front end support
5. Length of steel plating (180 x 20 x 2 mm) – vertical front end support
6. Nuts & Bolts
7. Welding and cutting equipment
General
This Corsa B EPS unit is used with great success in Ford Escort rally cars and is well tried and tested. We connected the rear of the EPS unit (i.e. the steering wheel end) to an under scuttle roll over bar, however the original steering bracket would also be ideal and probably less steel plating (No 3 above) would be used in the adaptation. Conversion of a LHD car would be slightly different and would necessitate turning the EPS unit upside down otherwise the motor would not fit because the heater would get in the way. In a LHD car the rear bracket would have to 'enclose' the steering column however this would not present any problems. The front end would basically be fabricated the same way with slight changes. The variations would not present any major problems as this Corsa EPS unit fits very snugly between the dashboard and the bulkhead of the sidescreen TR. There is a universal extension which will connect to the original steering column, the upper part of which will need to be shortened and ‘squared off’ to fit the Corsa extension. We don’t envisage any problems with this as it should be a straight forward task. Accurate alignment between the Corsa EPS unit and the lower steering column is not necessary because of the universal extension. This makes the fitting of the EPS unit very easy. In fact in the Rally Escort conversion the universal extension bends, in a C shape, around the pedals before it connects to the lower steering column.
Description of fabrication
There are four fixing points on the Corsa B EPS unit, two at the front and two at the back.
Rear end support (i.e. steering wheel end)
We fabricated a U-boxed shaped support bracket using No 3 above. The lower cross member of this bracket takes up a slanting position, estimating the angle of which becomes obvious during fabrication. This is because the EPS unit takes up a position where the front end is lower than the back end. The upper ends of this U-box are welded to the roll bar. We fabricated the verticals in two short pieces and bolted them together so as to be able to make adjustments if necessary. We will eventually weld these plates together. One probably would not weld these in the case of a LHD so the unit could be dropped easily when dismantling.
Front end support (i.e. bulkhead end)
The pedal box is ideally placed to help support the front end of the EPS unit. An angle iron (No 4 above) is bolted horizontally to the lower back edge of the pedal box (see one of the side views at a slight angle) and the inner end is welded to a vertical steel plate (No 5 above) whose upper end is bolted with two bolts to the front left (inner) vertical part of the original steering bracket.
With all the nuts tightened it is impossible to move the unit – it is totally rock solid and very strong. We will eventually use Nylock nuts throughout the assembly.
I am sure there is probably another way of securing this EPS unit to the sidescreen TR and we would be interested to hear the views of any other interested parties. We will not get a chance to try out our new power steering until later in the year when we have the car back together again. We will report to you again then with our verdict. If anyone else has already fitted one, or fits one in the meantime, we would be very interested in hearing your views.
I am off to Amsterdam for the weekend and will look forward to any comments (or abuse!) on my return.
Regards,
Martin

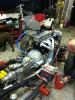
Right side view back bracket

Attachment to pedal box from underneath

Assistance adjustment control, ESG, original EPS ECU

With beautiful Corsa steering wheel – for positioning purposes only!
-
Same thing happened to me. I just filed the back flange until the noise stopped. No big deal.
As TR4Tony said, check the studs positioning. I had to work on the holes in the drums a bit too.
Badfrog
Thanks for relating your experience, Badfrog. Just what we were looking for - a cheap and cheerful answer to the problem. This is where we will start.
Kind regards,
Martin


Avoiding Bump Steer
in TR2/3/3A/3B Forum
Posted
Stuart,
I have sent an email to 'Quaife' enquiring about a heavy duty Mark 2 Escort rack. Have you ever heard of them?
Regards,
Martin