


TR Man
-
Content Count
100 -
Joined
-
Last visited
Content Type
Profiles
Forums
Calendar
Posts posted by TR Man
-
-
It's very good of you Menno to go to all the trouble of finding out about this Dzus mirror and posting the photos. I would be very interested in purchasing one of these. The morror is well positioned and yet out of the way. It can be removed very easily and not probably something to be left on while the car is parked somewhere. Nonetheless it is well worth having and I, and I am sure several others, would be very grateful if you would post the seller's contact details if he doesn't mind. I am sure he will do a bit of business.
Thanks for going to all this trouble, Menno.
Regards,
Martin
-
Yes, Stuart makes a lot of sense about 4 mm door gaps in a long door TR2 because of the extra flexing - I hadn't thought of that.
You still can use 3 mm gaps for boot and bonnet. It is a great chance to get everything correct before you re-spray. It's too late afterwards and it would be eternally irritating for you if it doesn't look right after the finish has been completed.
Regards,
Martin
-
4 mm looks too big. I think 3.5 mm is the max any gap on a TR should be. 3 mm looks the nicest.You may have to weld on some metal to get this all around the door. Try and get it too look even all the way around. It is a lot of work but well worth the effort. Under 2.5 mm and you may get rubbing.
There is nothing nicer looking than a 'sidescreen' TR with even narrow (3mm) gaps.
Purely my personal opinion and not based on 'originality' or anything like that.
Martin
-
Yes, the chrome trim with the badges looks quite acceptable, perhaps even better than the original bumper. However to leave a 3A with bare holes alone makes it look unfinished and slightly ugly, I assume you won't do that.
Your six looks magnificent with the towel rail and spoiler - meaty and mean. Very nice nice wheels too!
Martin
-
If this was my car I wouldn't change any of the panels as they look great and there is no rust.Tub looks lovely and straight and has no major dents, and the wings and bonnet also. I got good sills from TR-Bitz and baffle plates from Moss for my 3A and we fixed the B posts by fashioning some steel bought in B & Q.
I would give your car a good rust preventive base layer followed by good filling and finishing before a lovely paint job in your favourite colour. It's nice to use your original parts and they are much more solid than the new ones which are over priced big time. Good luck with the job and let us see the final paint job.
Regards,
Martin
-
Well done Rodbr.
This is excellent, especially the price.
Things have become very expensive for TRs when compared with Austin Healeys, MGBs etc.
We need a new cut price supplier!
Martin
-
Disclosure statement - I'm a old land rover guy and have made fun of triumph guys polishing their cars between gusts of wind at the local ABFM.
I was driving along a country road this weekend on my way to pick up a winch and out of the corner of my eye spotted a small car under a lean to with a bunch of **** stacked around it. Asked the owner about it. He tells me its a triumph tr3 and he had it since 1973. He tells me he used it to tow dirt bikes to the trail then when he got a pickup he parked it. He tells me he will sell it and what he wants for it. I donno anything about triumphs but it seems like a good price. Looked it over, determined that it was not very rusty, was complete, and the engine turned over. Went back the following day and drug it home. Needs some tinkering, but I think I can having driving in a weekends worth of work.
Attaching pics below.
Did some research and was trying to determine how original this car was and what options were. It has a rear seat, overdrive, heater and wire wheels. Not sure what other options might have been. I donno how to determine what engine it came with (Ive seen references to two different displacements) The VIN is TS8888LO Car also needs a windshield. It seems like maybe its not quite flat. Is there a source for these that isnt 300 bucks?
Thanks for your help
-Ike
The best think about your car is the fantastic condition of the panels. They look like they have never had a dent. From what I can see the panels gaps are also very good and the bonnet is an almost perfect fit. Amazing really.
Well done, it should be a beautiful car when you have finished restoring it.
Martin
-
Hi Guys,
Just a question about advance timing, seems to be a bit confusing for me.
The manual is telling us it must be 4 degrees static or 10 degrees with a running engine with about 850/1000 rpm.
These figures are based on "old" petrol with an octane number of 80.
But how much would it be in your opinion with our modern 98 fuels....?
Looking forward to your answers !
Regards - Raymond
Dear Raymond,
We just started and tuned our reconditioned fast road engine with Weber Carbs last night and the ignition timing was 14 degrees TDC at 1000 revs. This gave a very smooth running engine with an 800 rpm 'tick over' no over-heating, nice exhaust temperatures and no 'funnies' when ignition was turned off.
Regards,
Martin
-
Next thursday.Tap and die set.Magnetic trays.
Ok so not professional grade but Might be usful for cleaning threads, but Aldi tools seem surprisingly good.
No ALDI near me, but LIDL tools are of a high standard and very reasonably priced. German standards most of them. Parkside electric tools are excellent. They sell high quality steel drill bits, for a very low cost.
TR Man
-
There are 20 bolts holding the shell down. 2 at the front 4 on the turret support tubes in the engine bay, 2 in the front of the footwells, 8 in the main outriggers, 2 in the rear centre of the floor and 2 at the very tail end .
Stuart.
Thanks, Stuart & Brian,
Didn't know about the ones in the turrets, footwell and the rear of the floor.
Regards,
Martin
-
On my 1958 TR3A with the one-piece steering column, I did not have to remove the steering column. (I have to admit that it may be another story for the later two-piece steering column). I loosened all the bolts from the far deep end of both foot-wells plus the 4 near the "A" posts. I removed the two in the rear floor area, the 4 near the "B" posts and the rear bumperettes and the brackets plus bolts for these. I didn't touch the fuel line which was (is) still the original steel pipe that came with the TR new. Then I used my rolling floor jack and a piece of plywood under the spare wheel well and lifted the tail about 8" inches. This gave me enough space to slide the original springs off the rusted-in bolts and to slide the new ones into place. This was in 2000 with about 130,000 miles on the TR from new. At 80,350 when I did the full body-off restoration, the famous bolts were rusted into place but it was easy to work on the springs because the body was off. Since 2000 when I replaced the rear leaf springs with the rear end lifted, I have driven another 55,000 miles. I calculate that these springs will need to be replaced again in about another 75,000 miles and that will take me till 2026.
Don Elliott, TR Register Member since 1987
Original Owner, 1958 TR3A, TS 27489 LO
Thanks for the reply, Don.
I don't know of the bolts securing the body to the chassis that you describe at the "the far deep end of the footwell". Am I missing somthing here? We have fitted a new floor and there are no holes at the front end of the footwell to fit bolts to the chassis. Can you confirm that there are 8 fixing points for the body to the chassis. Two at the very front, the four outriggers and two at the rear of the car.
Regards,
Martin
-
The body needs to come up enough to clear the pin by a couple of inches which is actually quite a lot at the tail end and needs to be done evenly not just on one side. It does involve a bit more than just undoing the bolts as you do really need to undo the fuel line and the steering column.
Stuart
Thanks, Stuart.
Good points. I think it is probably best to make sure the pins will be able to slide out easily by using copious copper grease rather than have to lift the body.
regards,
Martin
-
Hi Martin,
if you put "tyres" into the search box for TR2/3/3A Forum you'll find an awful lot of previous discussion in respect of wheel and tyre fitment possibilities for sidescreen cars, the pros and cons, etc etc. I reckon most angles have been covered over the years, and regular contributors can't raise too much enthusiasm for repeating themselves yet again . . . .
That's not meant as a sarcasm, by the way, it's just that there is rather more in-depth technical stuff stored here than is the case with many motoring Forums - more than a few folks with decades of experience who've made the effort to offer their thoughts. Damn good resource !
Cheers,
Alec
Thanks Alec and Brian,
Good points and I will go through the previous discussions.
Regards,
Martin
-
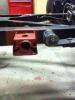
I have at last managed to crawl under the car and take some approximate measurements of the Escort rack. The track rod length is about 7.5 inches between ball joint centres (approx, by feeling in the gaiters) and the distance between inner ball joints is about 22.5 inches. This equates closely to the dimensions of the original steering and for this reason I have left the steering arms as they are. The pinion is about 4 inches from the rh joint. In order to achieve this from a standard Escort rack the track rods need shortening by about 8cm and rethreading to 1/2" unf to take the Mini track rod ends which fit into the original steering arms.
The steering wheel turns just over 3 times lock to lock which compares with 2.5 for the original. A TR7 rack would turn 3.9 times. IMHO some of the lightness advantage of r&p steering conversions comes from the reduced gearing rather than the r&p itself. I don't know what the corresponding figures are for TR4 and Mini rack.
For the sake of completeness, I use an intermediate shaft from the Moss conversion and a TR7 top coupling.
Mike
Thanks for taking the trouble to do all of that, Mike.
This info is very helpful.
Regards,
Martin
-
I had a brand new Standard Triumph Chassis and the pins would not move even with some serioud heavy hammers. I fitted the body and when a spring broke I was able to undo the body to chasis fittings on that side and jack up the body enouogh to slide on the spring. It was easy.
I noticed that the main agent had cut out the rear inner side of the cill on a previuos occasion. This makes the rest of the cill exposed to rain and rust.
As long as you used stainless bolts to hold on the body you will have no problem with this alternative fitting method. It is also quick.
Good Luck
Thanks, Richard. That was going to be my next question - how much of lift would do it? It's nice to know that is relatively easy.
Regards,
Martin
-
EASY peasy, PROVIDED you make sure that you can withdraw the pin, You MUST have the pin fully withdrawn and a well lubricated fit to the chassis tube.Grease it well now and it should not give trouble.
A lot of people use a stainless steel pin again well lubricated. Personally i would use the original type steel one but lubricate with never seize or Coppaslip. I am suspicious of the action of disimilar metals.
I had even considered having a grease scroll machined onto the pin shank, anything that keeps a lubricant as a barrier.
Also consider the fitting of the front location washers sold by Revington.
I am sure others will have more ideas but I have just done my pins after 18 years in position.
If you do not do this you may need to cut the spring eye and the pin off and then drill it out, not something to contemplate if at all possible.
Forgot to say to make sure to grease the front eye metalastic bush so it is also free on the pin!
Thank you both Stuart and Rodb,
I am glad I asked this question as I did not realise that there was a pin to come out internally. It is so well painted onto the chasis that the head looked like a permanent fixture rather than a pin. Since your replies I of course had a look at the original Triumph Parts Manual where it is detailed in an excellent diagram. Something I should have done initially.
I will now scrape the paint of the pins and make sure both pins are mobile and well greased.
The power of the Forum!
Regards,
Martin
-
Hello All,
We have fitted uprated rear springs to a 1959 TR3A, however the body has not been re-assembled as yet. It did strike us that if we found the new springs too hard would it be easy to change them?
Does anyone know is it possible to change the rear springs without seperating the body from the chassis? Doesn't look easy to me.
Regards,
Martin
-
I have the Konig Rewinds 16X7 (Graphite with a polished lip) running 205/60 Yokohama Avid TRZ tyres on my TR6. They are definately alot more affordable than the Panasports. Here is a pic of them on my 6.
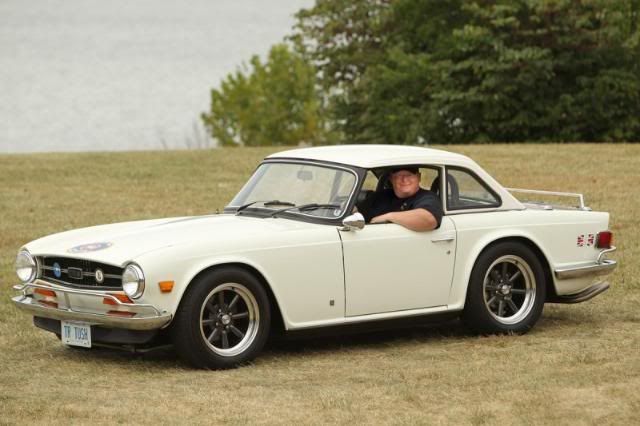
There is no way that these will fit width wise on my TR3A. The car currently has a set of wheels made in the UK (M.A.G Product) that are 6 inches wide running 195/60/15's.


I don't think that it would be possible to go any wider than that.
You got me Mike :-) Just saw that you dug an old post up and I was responding to the original poster....
Will wait for the experts to answer but here is my guess. Yes I think that the 5 1/2 will fit on your car however if you were planning on the same for the spare, I don't think that it would fit. I had bought a set of 60 spoke 5 1/2 inch chrome wires for mine and decided to sell them after I decided to keep the "vintage racing" look to my car....
Cheers,
M. Pied Lourd
Hi M. Pied Lourd,
I have just posted the following query under another topic about rims/tires and did not read your contribution until now. Looking at the picture of your 3A chassis (frame) are these tires 195x60x15? Do you have plenty of clearance and is there any interference with the body. Are these 6J TR6 sized wheels? They certainely look very wide! Have you any opinions on the issues below?
Regards,
Martin
"Here are a few more questions rather than answers. Not-with-standing all the problems that one may experience with wider tires such as heavy jiggy steering (we have fitted EPS so the heaviness isn't an issue) what is the physical size limit that one can fit to a modernised Sidescreen? Is there someone out there who has used 6J in a Sidescreen without interference? We are currently building a 'fast road' with a normal TR3A chassis (not a TR4 chassis) so in theory there is plenty of room. The suspension has been lowered which may give less room but also has been stiffened which should allow for less variation in ride height. Do centre-laced wire wheels move the tire further out towards the wing and is this an issue? Roger Williams says that a sidescreen can easily accomodadate a TR6 5.5J wire wheel (185x70x15) and I wonder would a 6J also fit with slightly lower profile, say 195x65x15?
Regards,
Martin"
-
I have a new set of 5.5x15 knockon mini lights to go on my 3A. These came a from a London Tr shop and I would be interested on any experiences using these wheels and what tyres are the minimum width I can safely use to avoid either body alterations or scuffing. Prefer to stick with 165's if possible.
As these are for winter use mainly an all round tyre would be the preferred one rather than summer only.
Any advice or suggestions appreciated.
Here are a few more questions rather than answers. Not-with-standing all the problems that one may experience with wider tires such as heavy jiggy steering (we have fitted EPS so the heaviness isn't an issue) what is the physical size limit that one can fit to a modernised Sidescreen? Is there someone out there who has used 6J in a Sidescreen without interference? We are currently building a 'fast road' with a normal TR3A chassis (not a TR4 chassis) so in theory there is plenty of room. The suspension has been lowered which may give less room but also has been stiffened which should allow for less variation in ride height. Do centre-laced wire wheels move the tire further out towards the wing and is this an issue? Roger Williams says that a sidescreen can easily accomodadate a TR6 5.5J wire wheel(185x70x15) and I wonder would a 6J also fit with slightly lower profile, say 195x65x15?
Regards,
Martin
-

i usually use my tr3 through out winter but it deserves to be put to bed for now just cleaned it to much salt this year
Congratulations on your car. Very few old TRs have the gaps right. It's so refreshing to see a car well turned out with the bonnet sitting properly. It makes such a difference to the appearance.
Well done!
Regards,
Martin
-
Martin,
I suggest that it would be appropriate to emulate the TR4 R&P installation. The workshop manual gives the dimensions betweeen the track rod ball joints (the ones inside the concertina gaiters) as 26.78in for the TR4. The 3A chassis is 4in narrower than the 4 so the equivalent R&P dimension for your car is 22.78in but something reasonably close should do.
The thing that concerns me is that on full lock the pinion may run out of rack and get damaged if the suspensiom steering stop is not reached first. (When checking first make sure that the rack is correctly centred). For a RHD car this is likely to happen on a left hand turn. The solution is revised steering stops (reduced turning circle)or shorter steering arms.
Since you plan on using EPS with a smaller steering wheel than normal TR4 3 degree castor steering arms should suit. A check on running out of rack would still be advisable.
Moss seem to indicate there may be a problem with availability but the other usual suspects are worth trying. If stuck it might be worth contacting TD Fitchett (01952 619585) for second hand ones.
Tim
Thanks,Tim.
I tried the steering, full lock to full lock, and everything seems to work well with no obvious problems.
The width of the rack is about 24 inches (i.e. through the gaiters 'joint to joint' by feel).
I have the original arms (3A) fitted but it is easy to change over to the TR4 ones as you suggest and will shop around and see if I can get a pair from TD Fitchett. Thanks for that tip.
Thank you again for your help.
Regards,
Martin
-
Martin
This is a good topic!
FYI the TR4 and TR4A workshop manual contains general arrangement drawings on the zero and 3 degree castor suspensions together with some component dimensions. Having studied these, the Moss catalogue, and previous comments I would like to offer the following observations (hopefully useful).
With a TR4 sized steering wheel (16in diameter) 4A-6 steering arms p/n 307211/2 would be my favourite. They satisfy the appropriate bump steer charistics and, being 1.5in longer than the earlier type, give the steering a lighter feel. The only reservation is that a check on full lock each side should be made to ensure that the suspension stops are met before the rack runs out. In fact I suggest that this check is made no matter which steering arms are used.
If using a TR3A sized steering wheel (larger than TR4) then the early type (P/N 129836/7) of 3 degree castor steering arms could well be better. They would need to be swapped L to R and R to L just as Stuart indicated in his earlier post. The manusl contained no info on the later type (P/N 134541/2) but I like to think Triumph had adopted the above swap and and used different part numbers - but that is just a guess.
You should note that if the only available steering arms are those for the zero degree castor suspension then the ends should be bent down by 0.25in.
Finally it would be nice to hear what kind of arrangement you are planning for the horn and indicators.
Good Luck,
Tim
Thanks Tim, this is good information. I looked up Moss' site and see that the number you quote (307211/2) is a TR4A part and on their diagram appears to be much more swooped downwards than the 3A equivalent. It seems to be 'N/A' currently though. I will be fitting a smaller steering wheel than normal as we are also fitting EPS. I hoped to be able to fit a horn in the centre of the steering wheel but am not quite sure how this will work as yet. I am happy to have a switch with a long stalk (right and left) to work the indicators and fitted to the outside (right) of the dash board within finger reach of the steering wheel. It would have a light and a loud 'clicker' to warn that it is in use.
To get back to the rack and pinion. Having had a look at the image would you fit a narrower rack as well as use the 4A steering arms?
Regards,
Martin
-
Martin,
I am away for a few days but when I get back and if I can get into my garage through the snow I will take measurements for you.
Mike
Thanks Mike. I would be interested to know how near the right hand inner tie rod joint is to the pinion box (if that's the correct term) when the wheels look straight ahead.
Don't rush I have pleny of time to wait for a thaw!
Regards,
Martin
-
Will do. Thanks for your help, Stuart.
Regards,
Martin

Tr3a hard top
in TR2/3/3A/3B Forum
Posted
Kel,
I also cracked the old screen when extracting it but it was slightly shabby anyway, though possibly could have polished up. The new Moss screen is nice and shiny but is definitely a bit smaller and a bit thinner than the old one and I would say that is the main problem and it is barely hanging in there using the Moss seal. I would hate to drive the car at speed without the sidescreens in position. I have just ordered the seal that Stuart has recommended (thank you Stuart) and hope this will make things more secure.
Regards,
Martin