


stevefmyers
-
Content Count
35 -
Joined
-
Last visited
Content Type
Profiles
Forums
Calendar
Posts posted by stevefmyers
-
-
2 minutes ago, john.r.davies said:
Ah! missed that. Only half the manifold does point to the carb on that end!
Jhn
Gentlemen, they say the simplest solutions are the easiest to overlook but fiddling around just now I found that the rear idler screw was fouling on the throttle linkage. I remember seeing in a video how someone doing the conversion (from Stroms to SUs) had to cut out a small piece due to this fouling problem. Not sure yet whether it will be the solution to all my problems but it does explain why there was no throttle on the rear carb - the more I turned down the idle speed the less room it had before hitting the linkage - it seems like I only had a few mm of throttle on that carb. It does beg the question however of how it was running before I put it away. In my defence I can only say the engine was tuned by a member of our Belgian Oldtimers Club who admittedly struggled to set it up. Sadly, we are no longer in touch with this chap so I am now looking for another local mechanic who likes tinkering with old cars.
I'll let you know whether this 'adjustment' resolves the issue. In the meantime, both pistons give a satisfying clonk so I reckon they are both centered ok. Firing order is fine. Fingers crossed as I put the linkage back together.
-
1 hour ago, nigelcurry said:
Ahh now it’s beginning to click into place for me ,so do I just open the door that bit wider when the pin is out and undo the six bolts securing the hinges to the door
nige
That's the idea but I would mark round the existing hinges to save time when putting the doors back (assuming the current set up is showing equal gaps round the frame).
-
13 hours ago, harlequin said:
Timing your engine to 4 degrees ATDC I assume that you still have a vacuum retard unit fitted to your distributor. This runs on a vacuum port on the underside of the stromberg flange. SUs normally have the vacuum port on the top of the flange to operate a vacuum advance unit.
If you have connected the retard unit to the port on the top of the SU your retard unit will be retarding the ignition when the engine requires advance. Try disconnecting the vacuum unit, plug the port on the carb and set your timing to say 10 deg BTDC and see how it runs. If this works OK either get the distributor set up with a vacuum advance unit or get the carb flange drilled on the underside for the retard unit and use 4 deg ATDC
George
Hi George
Having set the timing at 4 ATDC at idle with vacuum connected I then disconnect the vacuum and blocked the port on the distributor and she registered 12 BTDC. If I block the the port on the carb instead should I also block the port on the distributor at the same time? Not sure whether this would cure the problem I have with one carb as the front carb seems to be operating perfectly.
-
16 hours ago, Andy Moltu said:
Manifolds will glow red.
If you have ever run in a new camshaft by holding at 2000rpm for 20 minutes you will definitely see them glow.
The odd thing here is that not all are looking the same.
Without stating the obvious have you got the plug leads with the correct fitting order?
Is the fuel in the float chambers at the same level?
Do both dashpots contain oil.
The first thing this morning I went out to check the plugs leads! As you say, pretty obvious but something that does not spring to mind! Result- all in the right order.
Will check the float chambers when I check out the needle and jet.
Oil is the same level in both dashpots. Perhaps I'll try a lighter grade of oil?
Thanks for the pointers.
-
16 hours ago, BlueTR3A-5EKT said:
Lift the piston fully in both carbs and let drop - there should be an audible 'donk' as the piston hits the carb bridge. If not the piston is sticking and needs attention be it bent needle, needle centring, dirt or perhaps a missing carb suction chamber spring.
Search the youtube for balancing SU carbs - lots of methods on there for MG, Triumph and Mini.
Peter W
Was wondering if that could be the problem. Will check with youtube to see about checking these out. Might also explain why the piston in the rear carb does not move up and down with the same ease or to the same extent as the front one when under acceleration. Thanks for the advice.
-
17 hours ago, john.r.davies said:
Steve,
Red hot manifold <<<< Timing retarded far too much. The fuel is still burning in the exhaust! This retard may account for your other problems.
I suggest checking that TDC is correctly indicated by the mark on the pulley. The pulley has two functions, the second being to act as a damper for torsional vibration in the crank. The outer part was bonded by a rubber ring to the hub, but age and the hostile environment under the bonnet may have caused the outer ring to slip around and show TDC where it is not. If you can locate TDC by the Piston Stop Method (QV) then you can know if your pulley is correct or not.
John
My question is why that would appear to effect only the rear half of the exhaust manifold? Surely, if the engine was retarded too much then both halves of the manifold would get hot? Also I did use the static as well as the dynamic timing and they were both in agreement. Can retardation affect only part of the timing?
-
I have been trying to recommission my 1976 USA TR6 imported to here in Belgium since a respray and several mechanical improvements. I am being frustrated in trying to get the carbs balanced. The Stronbergs were replaced several years ago with SUs (nothing unusual in that) and before the work done on the car they were working fine.
I started by checking the points and timing. I set the dynamic timing to 4 ATDC at idle and checked that with the vacuum tube removed they fell back(?) to 12 BTDC which is what various experts seems to recommend. So far so good. I then moved on to the carbs and this is where it all went wrong. Firstly, I checked the level of the jets with dashpots removed and the top of the jet level with the surface. I marked the adjusting nut and unscrewed both carbs by two full turns. I used full choke and the car starts. However, when it comes to balancing I am going bananas. I get the synchroniser up to the same point on each carb so they are sucking in the same amount at idle. Then when I try to accelerate there is a hesitation and the occasional backfire out of the rear carb. Also I noticed the rear half of the exhaust manifold heating up to red hot!
Reading some online forums have left me very confused. Some say it is due to too lean a mixture whilst others reckon it is due to being too rich. Can it be either or?
Another thing I have noticed is that while the front piston in the carb moves freely up and down when applying the gas the rear one is more reluctant. Its as if it is getting stuck but I've checked and cleaned the dashpot and it moves freely enough. I've checked the plugs and they all seem ok - perhaps the rear are showing signs of a leaner mixture but not drastically so.
I would really welcome some advice to point me in the right direction.
My next step, I guess, is to remove the rear carb and check that the butterfly is working properly. Could it be as simple as the type of oil in the dashpot? Although both have the same oil.
Thanks in advance - and if any of you happen to know a nearby (I live near Ghent) mechanic I'd be delighted to hear from you!
-
18 hours ago, John L said:
I'm thinking you will have to take off the little jump red wire, as on the Rimmers photo, and the small wire on the car harness from the key switch will go to that black connector on the starter motor.
If you have a volt meter, set it to ohms, and place one end on the centre of the lead of the battery negative terminal and the other end to any part of the engine iron the meter should read almost zero, that will test how good all your wires and connections are.
John
Thanks John. That's very helpful. Not something I would have thought of. It's a bit too cold outside today so will try tomorrow and let you know what happens. Seems like the earthing is a major cause of most electric faults on the TR6 although probably not limited to the TRs. My mate has a P4 and his problems were all down to the quality of the earth.
-
5 hours ago, John L said:
Who's high torque starter did you fit? There are some wire changes depending on which type of starter solenoid you have, any chance of a picture of the wire connections on the starter pls
John
It's a Power Lite starter motor from Rimmers.
I think I have got to the bottom of the cables. The two extra wires that were attached together with the red from the positive pole on the battery were both white/orange. Looking at my wiring diagram, one of them goes to the 'bulb test' relay while the other goes to the 'seat belt module'. As far as I am aware neither of these two were working and therefore I think I can safely leave them off. The fourth wire is White/red coming from the ignition and has the Lucar connector.
I've cleaned up the earth connections to the body and the engine, replacing the star-washers so all seems well in that department.
I also noticed that the red cable from the battery was showing some bare wire which I've sorted. Just wondering if it was shorting itself on the body of the old starter as the plastic shroud was a wee bit melted. Fingers crossed I can now install the motor. Being a lefty I don't have the same problems when it comes to access although it will never be easy trying to reach those parts other beers cannot reach!
-
43 minutes ago, John L said:
Who's high torque starter did you fit? There are some wire changes depending on which type of starter solenoid you have, any chance of a picture of the wire connections on the starter pls
John
Thanks John. In the process of uncovering the car and will post a photo of the new starter together with the cables that connected to the old one - it's a late model TR6 so had a 2M100 with solenoid attached.
16 hours ago, astontr6 said:Hi Steve,
I do know what part of the UK you are in? If you are I would take that battery out and take it to your nearest Halfords and ask them to test it you will know strait away what the situation is? TR's never had a ballast resistor fitted but used a resistive wire in the harness, when cold it passes 12v then it reduces the voltage to 9v. My 1973 TR has 2 wires fitted to my Wasp starter motor one to activate the solenoid white /yellow with small Lucar and the other to power the S/M the big red one with nut termination. Has your car been modified to use a 12 coil?
Bruce.
-
Thanks everyone for your helpful guidance. I shall now dig out the car again and see how far I get. One step at a time seems to be the watchword.
When I bought the new motor I also ordered the optional shim (just in case as there is nothing worse than having ordered one thing you discover you need something else and as I have to order everything over the internet from Rimmers or whoever it pays to overorder rather than pay twice for the postage). Question is do I really need that extra shim? One obvious way to find out is to fit it and see but I'm not sure what I am looking for. If I try it without the shim and it doesn't close then it is obvious but if it does fit ok then how do I tell whether I should have fitted the shim? Or am I overthinking the problem?
-
14 hours ago, astontr6 said:
Hi Steve,
I do know what part of the UK you are in? If you are I would take that battery out and take it to your nearest Halfords and ask them to test it you will know strait away what the situation is? TR's never had a ballast resistor fitted but used a resistive wire in the harness, when cold it passes 12v then it reduces the voltage to 9v. My 1973 TR has 2 wires fitted to my Wasp starter motor one to activate the solenoid white /yellow with small Lucar and the other to power the S/M the big red one with nut termination. Has your car been modified to use a 12 coil?
Bruce.
Actually Bruce I'm stuck here in not-so-sunny Belgium. I live here but under normal conditions I would be popping over to Blighty every month. Sadly, circumstances dictate that I have to stay here until such time as both the UK and Belgium appear to have the virus under control again. I will test the battery to make sure she is delivering power and that without the starter motor connected I have full power with the lights etc. As various people suggest I will also check the earth strap. There were a total of four cables to the starter motor, three to the main pole and one to the Lucar. I assume I connect it up to the new starter motor in the same way. I will also check the earth once the motor is installed although that shouldn't be a real problem - he said famously!
-
12 hours ago, Keith66 said:
Hi Steve
A similar but not quite same problem.
So I struggle to get my car to start as well, also its running on all original refurbed Lucas. Now my car is just out from a, well fairly lengthy home restoration by me so that probably explains it all.
But the battery is good, fully charged and about 12.6 or more V on the multi-meter and i've checked the earths as well.
Testing the V at the pump I’m getting 1 or more V less. Well that’s the prob then, voltage drop via the new (quality) harness. So def worth checking that. But the solution is simple direct feed (via relay) to the pump all should be well.
Now I’m getting 12.3 or 12.4 V at the pump, but it still won’t flipin start.
But I can get it to start. Battery in the boot connected directly the the pump. If I let the pump run for couple of mins it starts fairly easily but it won’t rev very well.
If I let it idle for 5 mins then remove the boot battery and connect it up as normal and then try to start it, well its starts pretty easily and runs and revs ok, if a little roughly.
So I’m not really sure what the problem is but I’m going to get some help and look at the fuel system first.
Cheers Keith
Thanks for that Keith. I'm not sure mine is a fuel delivery related problem as I seem to have enough fuel in the carbs. However, when I was trying to locate starting problem (before the the power loss problem) I did realise that the choke cable was not fully engaged which probably accounted for oiled-up plugs after trying to turn the engine without a properly enriched carb setting.
-
17 hours ago, JohnC said:
Is your earth cable from negative battery terminal to the engine well connected? You're describing the exact symptoms I saw, but I noticed the heater control cable got very hot.
John
Good point. I shall put that on the top of my check list.
-
Dear Fellow Members
Having finished putting my 1976 TR6 (US import to Belgium) back together I managed to start the engine without too much hassle. After a couple of weeks I was getting her ready for the MOT equivalent and found she refused to start. With a new battery I tried turning over the engine but she failed to 'catch'. I then checked and cleaned the plugs - very oily and tried again. At this stage the starter motor refused to turn the engine giving all the signs that the battery was dead. Charged the battery overnight and tried again the next day. Same problem. It is as though the battery is still flat - it's not but there is a huge power drain. Thinking the starter motor was at fault I ordered a new one with high torque. Before I fit it I wondered what I should be checking? I did notice the earth cable from the battery got a bit warm. I do not wish to invalidate the warranty on the new motor so if there is anything I should be checking please point me in the right direction.
I should add that I have had several earthing problems with the lights but these have all been sorted now. Concerning the condition of the old starter motor. There was no rubber end cap or washer so the axle was free to wobble all over the place. There's also an metallic scraping noise when I try turning the pinion. Definitely not healthy.
Also wondering which cables I should attach to the starter motor. When I removed the old one it had three leads to the one point on the motor including the major red one from the battery and a smaller one with a Lucar connector. I assume that I still connect all three main wires to the same point on the starter and the smaller cable to the obvious Lucar connection on the motor? The old ballast resistor has been taped up and isn't in use anymore.
As usual will be grateful for any guidance or advice you can offer. While searching for a similar problem on the forum I did read about the fitting of the new motor and found several useful pieces of advice on the fitting so hopefully I shall be well-equipped to get the thing on once I pre-check everything else.
Steve
-
Thanks for the pointers. I managed to get the right indicator working and flashing properly by taking the earth wire from the left side indicator and connecting it to a proper earth. No idea how that works! But still left with no left indicator. No flashing, just rear and side indicators light up and the front left side light. I think I might have a look at the indicator unit on the steering wheel next. After that? Perhaps check the earths on the rear lights? Just as logical as finding the solution to the right indicators.
-
Hi Fellow Members
I'm in the process of sticking everything back together again on my 1976 USA imported lhd TR6 and been having a few problems with the electrics. Fortunately, I seem to have solved most of them but am now left with one that has got me totally frustrated.
As indicated in the title it involves the indicators. When I indicate left I get the rear and side indicators coming on but instead of the front indicator I get the side light. When I indicate right I get just the side and rear indicators lighting up. When I try the Hazard lights I get one ping from the relay and then not much else. None of the indicators are flashing.
One clue is that under the dash I have located a green/red (could be green/brown but is so similar to the front left indicator I think it must be green/red) wire with a connector. Currently it is not connected to anything and I have a suspicion this might be the root of the problem (or at least part of it). Tracing it back it comes through the middle lower part of the bulkhead together with a green/white cable that goes to the heater switch. Not idea where it goes after that (unless it does end up going to the left front indicator?).
I've checked the relays (hazard and indicators) and they seem ok but not sure how one tests them. Can anyone point me in the right direction for that loose cable please? Everything else seems to be working ok now apart from this blinking (or rather not blinking) indicator/hazard issue.
Thanks in anticipation.
steve
-
I agree that if you only ordering a small number of parts then the postage element is far too high. One option here in Belgium is to go to one of the local suppliers (there are a number of outlets that provide spare parts for Triumphs, MGs and other popular classics). They do tend to be quite expensive but if it is only for a small part you might find it cheaper than the combined cost of p&p and spare part.
One excellent alternative was Rimmer's offer of delivering spare parts to the Classic Car Show in Antwerp for free! Unfortunately, that only happens once a year (naturally cancelled this year) but worth bearing in mind. Don't know whether they attend shows a bit closer to Denmark but worth looking into for the future.
I like the idea of clubbing together with other members of your local TR Club (or similar) so the P&P becomes a smaller element. The trouble is that you usually want just one part and you want it now and that means paying a price that doesn't necessarily reflect the true cost. I ordered some clamps from Holland a week ago. The postage element is one third of the total cost and I have no idea when the delivery will arrive - best indication is 'during week 21' which I think starts on Wednesday! Postage might be cheaper but you end up waiting a lot longer. At least with Rimmers, Moss and other UK suppliers it usually arrives within two or three days.
-
Have been installing and de-installing the side windows on several occasions in the last week or so. Not sure why you are having problems with the runners not fitting the rail. That does sound as though there is a problem with the width of the rail. To fit my rollers on their runners I first undo the triangular fixing releasing the back half of the winder mechanism. I then get an assistant to lift the glass, lifting it a lot more at the back than the front so it slopes down at a steep angle. I then wind the window mechanism to about halfway until (with a bit of fiddling) the front roller slides into the rail. Once the front roller is on, the back one slides on easily enough (you may need to slightly adjust the winder mechanism again). Having done it so many times in the last weeks we can manage to do it in a couple of minutes.
-
The gearbox keeps slipping out of reverse. I am assuming this has something to do with the spring and plunger mechanism in the gearbox cover. Having removed the gearbox cover I referred to the Workshop Manual where it show three screws that hold the three spring/plungers/ballbearings. On my cover there are no screws. I don't know whether they changed the design of the fittings (I have one of the last production models) but I appear to have three indented caps with no obvious means of removal. Does anyone have any idea how I can unscrew a screw that has no slot (assuming they are indeed screws)? I was thinking about using a chiesel or something similar to try and turn the 'screws' but don't want to damage anything if this is the wrong approach.
Cheers
Steve
-
Hi Andy
I don't know if it helps but I had exactly the same problem last year. Part of the solution was the reversion to standard ignition parts (it seems the electronic ignition wasn't working as it should have done). Part two of the solution was to replace the Strombergs with a pair of SUs. You already have SUs so replacing them won't help (although it could be they need servicing?) but perhaps the fault lies in the ignition?
Steve
-
Just thought I'd let those who gave me help over the last week or two that "Charlie" is back on form. She managed to do about 50 miles last night and I almost had to restrain her, so keen was she to exceed the speed limit on the motorway! It did raise a couple of other problems. One is the run-on when switching off the engine. I will adjust the mixture and check the timing but it looks as though I will have to invest in an anti-run-on valve. The other niggle now is a squeak that comes from the bonnet. How picky can you get?
We're off on a "rally" tomorrow and will end up doing around 300km - it's not a timed rally but more like a treasure hunt - so it will be interesting to see how she performs.
Many thanks to all those who guided me.
Steve
-
I have now connected all the pipes up and it started second time. Needs some minor adjustment but will take her for a spin this afternoon and then check the mixture. I have a feeling she's running a bit on the lean side. It will be interesting to see whether I have cured the occasional but very annoying pinking/misfiring problem. I also took the opportunity to put a bit of oil on the advance/retard mechanism after checking that the vacuum hose was not leaking. Of course, if it's still misfiring, even it is only three or four times in 50km, then I'm back to square one again.
Perhaps, someone knows of a rolling road in the vicinity of Ghent, Belglium??
Steve
-
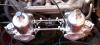
Hoops, forget this detail : the inlet pipe is always the one who is closed by the needle valve, the oulet pipe is the one who is in the middle of the float lid.
Chris.
Hi Chris. I hope you can see from the attached photo that I have fitted the carbs. I've attached the fuel pipe to the float chamber and the vent pipes on the main body to the rocker cover. I'm not sure that you can see there is a second outlet pipe on each float chamber (its been painted silver to match the rest of the float chamber!) which is parallel to the second pipe (which I've attached to the fuel line) but comes from the centre of the float chamber lid. I have no idea which car the carbs came from as I purchased them as reconditioned units on Ebay! I have connected up the second float chamber tubes as I need longer tubing which I'll fetch tomorrow. I also need a "thingy" to hold the choke cable but that's a minor point. I guess if worse comes to worse I can just try and start the car and see what happens! If the fuel and other pipe need to be reversed that shouldn't be too difficult.
Cheers
Steve

Unbalanced carbs and red hot manifold!
in TR6 Forum
Posted
Thanks John. But I'm not sure I would have noticed the problem without going through all the other checks suggested by everyone. I like to think cars are logical beasts and if one takes the right approach you are bound to come across the solution. Anyway, now got both carbs working together. Will take it for a ride tomorrow to clear the old carbon build up that's probably hanging around the cylinders! Dieseling is one of those problems I 've always had with this car and its still there. Watching a video I saw someone using 'Seafoam' to clean out the carbs and cylinders. Only trouble is no-one over here has heard of that! Anyone know of an alternative? Whilst it is an import from the USA it came with no anti-run-on valve (before anyone suggests reconnecting it - it ain't there!).
10 brains are better than 1.