

jbenajes
-
Content Count
225 -
Joined
-
Last visited
Content Type
Profiles
Forums
Calendar
Posts posted by jbenajes
-
-
The Brantz sensor is supposed to have at least four reference points to pick up on. Mine works on the four bolts for the disc. It's for more accuracy. I think it depends how serious you take your rallyes. With the Brantz you can calibrate the trip if you change wheels/tyres and also calibrate to be the same as the organiser's trip.
Maybe you can show us a picture of your vélo computers in the car, Jésus ?
For increasing resolution in the distance measurement (to distinguish distance less than the whole wheel circumference, i.e. around 2 meters), one can still glue more than one magnet and cheat the computer by inputting the actual wheel circumference divided by the number of magnets.
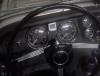
I posted one photo in my first comment (last input in page 1 of thread). I have only one unit installed in my TR3A to check for actual velocity.
Jesús
-
qim,
They can display many parameters: actual speed, distance (daily trip and total), average speed, maximum speed, drive time, etc. It depends on the type of computer.
The basis for the computing is the number of wheel turns that the system records (per time). Here you need to calibrate the computer by entering the circumference of the wheel. The error in distance and actual speed is the same as the error you make entering this circumference.
Important is to use a computer with the correct speed range. Most of them just indicate up to 99.9 (mph or kph - too low in the second case). SIGMA computers exceed this limit. There is even one specific for motorbikes, ranging into the 300 kph oir mph (not strictly necessary for our TR cars).
Jesús
-
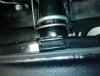
A very cheap solution is to fit bicycle computers. You only need to glue a magnet on one of the rear brake drums and the pick-up sensor on the back plate, and then to route one wire to the dashboard (see photos).
With only one ensemble magnet-sensor you can run as many computers as you wish (a diode must be wired for any additional computer).
I have used this for rallying with a great success.
Jesús
-
Several years ago, I purchased from Vehicle Wiring Products in the UK, whose shipping costs to Spain were reasonable at that time.
http://www.vehicle-wiring-products.eu/
Jesús
-
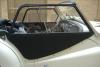
Can anyone suggest a source for the channel that fits inside the metal sidescreen U section frame? The sliding perspex screen will run inside it.
I assume the covering material is trapped between the channel and the metal frame ?
Any advice welcome.
Yes. The channels keep the vinyl in place, even though it is wise to glue the fabric to the metal, as well.
I did a fully restoration of my sidescreens from scratch (including drawing, cutting and sewing the covers) and have collected some useful information from the web. Of course, I would be happy to share it with you.
Jesús
-
Jesus I forgot I had posted that well done to Stan for finding it.
Stuart.
Then thanks, Stuart, for the effort in writing. I will add this information to my collection.
Jesús
-
Great that you posted the complete sequence, Stuart. It is more detailed than mine.
Jesús
-
Zbigmak,
My experience was that the installation of the dashboard is not easy unless a given sequence is followed (at least so did it work for me).
I wrote the different steps, but unfortunately in Spanish. I can translate the text if you need it, but will not be able to do it before a couple of days.
Jesus
-
In the attached pdf file you can read the lenghts of the pipes (in cm, sorry - to convert into inches,divide by 2.54).
I do not remember where I got this information (maybe I meaured them by myself, and then they would correspond to a TR3A and Girling system).
Jesus
-
Peter,
The hardest task is sewing the front edge of the screen between the two sides of the vinyl cover.
When I recovered my sidescreens, I brought them to a sail maker who was able to sew through the material. However the sewing machine did not reach up to the corners, and I had to finish the job manually.
Hence, in the limit the sewing of the whole front edge can be done manually, drilling first the holes in the cobex and later threading across the vinyl with a suitable needle. This manual procedure is perhaps even recommendable in case that you do not find a trustworthy and skilled worker.
Jesús
-
Hi Jesus
Now I know what to ask for it will be much easier to get it locally.
Thanks
Dave
Dave,
You may find the tape at shops like Leroy&Merlin, BricoMart or BricoDepot. If you fail to source it, I can send one roll to you.
Jesús
-
Hi Don et al.
Seems like the popular solution are plastic tie wraps like you use to group small cables together with, so that is what I will do as that doesn´t need to take the suspension down to get to the inner ones.
Thanks All for your responses and ideas.
Dave
Dave,
Self-amalgamating tape is very common here in Spain (you may search for “cinta autovulcanizante”), see for instance:
http://www.mocap.com.es/cinta-autovulcanizante-x-treme.html
http://e-ferreteria.es/otras-cintas-adhesivas/11167-cinta-caucho-autoamalgamante-6-7x19x0-76.html
http://es.rs-online.com/web/c/adhesivos-sellantes-y-cintas/cintas/cintas-de-autoamalgamar/
In fact, this is what I used I renewed the bushings and the new seals in the kit lasted a couple of days, and perished by themselves, even before putting the car on its wheels.
Jesus
-
Thank you all for your interesting and useful comments. I will use the standard steel pistons and change the fluid. I used initially DOT5.1 and will stick to it.
This all started because some jerky braking at low speed. When restoring the TR3A I used the original discs (rotors) and some NOS pads. I cleaned the calipers, the chromed pistons and put new seals.
Now I plan to install new discs, new green-stuff pads and the said pistons with a new seal kit. Hope to get a better and uniform braking.
Jesus
-
Thanks Roger for your advice.
Really, I drive the TR3A very, very little. At the ast rates, in 10 years I will have drive less than 3000 miles. With climatic conditions in this region, probably I will never drive in rain or on wet roads. So, if the main issue is splash water onto the calipers, those standard pistons would last forever.
I am more concerned for the long periods of stillness.
Jesús
-
Hello,
I made an error and ordered standard caliper pistons instead of stainless-steel ones. The pistons I got are not chromed but have a matt dark grey finish that is supposed to be less prone to pitting. I could send the pistons back and change them for the SS, but twice shipping costs and VAT between Spain and UK is going to be expensive, I guess more than 50 pound.
Are SS pistons so superior and recommendable? My TR3A is driven only very occasionally, and brakes components stay still during weeks.
Thanks for your responses.
Jesus -
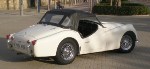
Just spent three days driving the 3A for 553 miles touring with stops, in the mountains in Andalucia.
Dave, was that the rally Alfas del Pi to Granada of last week? Any photos to share?
By the way, maybe you know that your car (included driver and navigator) is pictured in
http://www.carlosimagen.es/fotografias/166
on occasion of a recent meeting in Alicante. (scroll to the bottom).
Best regards.
Jesús
-
For an interesting alternative of producing a face in KMH, you may look at the thread in the "other forum":
http://www.britishcarforum.com/bcf/showthread.php?94885-Instrument-Faces&highlight=speedo
(scroll down the various pages).
Jesús
PS: Hope not to be irreverent for citing the “other forum”
-
Stan
I put two imperial gallons in my tank and took the reading on my dipstick, (gauge has never worked) so that I can use that as a reserve level indicator.
Dave
Hi Dave,
Can you tell me the measurement on the dipstick with only two gallons ?
Do you have any other volume-dipstick mark reference?
Jesus
-
Thanks, Rog and Stuart.
Jesús
-
Hello,
Anybody can tell me the threads-per-inch value of the thread for the jet nut in the SU H carb lower jet bearing?
Thanks.
Jesús -
Dave, I found the same maximum deviation on the hub. The only reason for changing the drums was an intermittent braking at low speed. Otherwise, the ride has been always very smooth.
Jesús
-
I have drilled the other drum more carefully (again with an industrial stand drill press) and had to drill up to 15 mm (0.590”, definitely more than the recommended 9/16”) to get the drum sitting on the hub.
Dave, thanks for the suggestion. I did the test with the DTI and found that the maximum deviations on the drum surfaces and rims is of about 0.3mm (0.012”), which I accept as correct.
Now, I have finished the installation and will do a test drive today.
Jesús
-
Thanks for all the comments and suggestions.
I drilled the drums with a robust stand drill press, so the off-round holes should not be the problem. The figure of 0.56252 is what I missed, but going step wise, I had to drill larger holes for the shanks (0.5905”).
Initially, with too small holes, the drum cocked on the stud shanks, but even with large enough holes (0.5984”) the drum sits not perfectly on the hub flange, and this is what upset me
.
I have found that the cause is a slightly warped hub face, and the drum can tilt slightly when offered over the studs before bolting the small retaining screws.
I hope that the two small retaining screws will bring the drum in its correct position, and that it will remain so if the wire wheel adapter is bolted down carefully.
Jesus
-
I am installing new Girling 9-inch brake drums to the rear of my TR3A.
As it is well known, the drum holes for the wheel studs need to be enlarged for the stud shank. In order to reduce any eventual excessive clearance between studs and drum orifices, I am proceeding stepwise, drilling from a small diameter on. So far, I have drilled three times up to 15 mm, and the seating of the drum against the axle face is still not perfect, apparently due to some interface with the stud shank.
The recommended diameter for these holes was given in the old Moss-Europe web page (I cannot find it now in the new site– well, right now, I cannot see anything related to rear brakes, even using different browsers).
What is the correct drill diameter for these orifices?
Thanks for the comments.
Jesús


Sidescreen window repair
in TR2/3/3A/3B Forum
Posted
Dirk,
The thread in “the other forum” can be of help (long but worth going through it):
http://www.britishcarforum.com/bcf/showthread.php?81211-Back-to-TR3-Sidescreens
It was very useful for me when I fully rebuilt my sidecreens.
Jesús