


rpurchon
-
Content Count
471 -
Joined
-
Last visited
Content Type
Profiles
Forums
Calendar
Posts posted by rpurchon
-
-
Hi, can somebody tell me something about the fit of the fibreglass panels for the TR6 that Quiller offers?
They offer a bonnet skin that has to be mounted on the structure of an existing bonnet. How is this done?
Thanks a lot!
P.S. No, it's not for my car!
Tom
heres another company that make fibreglass panels including the frame www.smithanddeakin.co.uk.
richard
-
Hello again,
While I'm windscreen hunting, I'm getting cracking on the cylinder head. The rebuild kit has arrived... Which brings me to the valve guides. Haynes isn't particularly helpful on this front. I realise I can drift them out (apparently... but Haynes do like to drift things...), but what about fitting the new ones? Is this something I can do at home, or should I take the head and guides to my local motor-factor?
Thanks in advance.
i fitted mine using a hammer and drift .no problems.
richard
-
Just noticed this on Ebay http://cgi.ebay.co.uk/Triumph-TR6-electronic-Ignition_W0QQitemZ390150568437QQcmdZViewItemQQptZUK_CarsParts_Vehicles_CarParts_SM?hash=item5ad6c939f5. At that price I'm tempted to get one as a spare in case my Aldon Ignitor expires at an inconvenient moment. Has anybody fitted one of these?
yes i have one fitted works fine.
got mine from simonbbc on ebay item no 110476950165.
and slightly cheaper £24.99.inc post
if you get one file/sandpaper the bottom of the rotor arm if reqd.
richard
-
HI
if my new project goes ahead it will need bumpers for the front and rear
what are the new repros like as i have heard get old ones and re chrome them as the repros from taiwan etc are not so good
dont want to pay out for the stainless option
any thoughts
david
i bought a new rear one from moss. as i left the shop the bloke behind the countewr said,
they are guaranteed against corrosion for 12 months.
12 months later but only 6 months on the car the right hand started to bubble and the left one 6 months later.
went back and complained and the young lad behind the counter said they were all like that?
richard
-
Would a saloon diff fit? ebay saloon diff
I take it that even if it did fit, a spitfire diff would be too weak? ebay spit diff
yes if you fit the front and rear from a tr
richard
-
Okay, thanks. I'm going to pull the head this weekend and start to pull it apart and see exactly what's what. Can I get in touch with you in say, a weeks time, and I'll let you know the state of play?
Regards
yes no problem.i have been looking at delivery costs and can send complete from £15.
if you dont need it its open to anyone who may be interested.
richard
-
Is it more or less ready to fit? So rockers on etc then bolt on to the car? How much are you looking for?
Regards
Benjamin
is it ready to fit yes and no.there are no springs and caps with it but i can fit some single springs and caps if you want.
however the last and only one i posted i had to strip everthing of the head, to get the postage weight down and send valves etc seperate.
any way i would like £140. for it. the casting no is 219015.
-
Hello,
The cylinder head on my TR6 isn't well. I can foresee a rebuild coming up over the winter. Number twelve valve seems to have at the least a bent stem. In the meantime, does anyone have a usable head that they're looking to sell? 1973 TR6 all standard.
Thanks,
Benjamin
yes i have a cr one its been skimmed to clean it up. valves ground never used since.
huddersfield.
richard
-
they are a tapered thread.try a sharp chisel to get them turning, they will become loose very quickly.
or drill through and use a stud extractor.
why do you want to take them out anyway.
richard
-
I have 5 or 6 left of last years reprint by GT and they are genuine GT manuals. Yours for £10 inc postage, but beware, GT says he won't support or supply parts to people who buy their manuals from me (why??) (its a Very Very long story) - send me a pm if interested.
mike
are they worth reading
richard
-
I'd be really interested to know if anyone can identify what my overdrive (28/115872/092293) was originally fitted to, I've searched everywhere I can think of and can't find anything that originally used the 28/115872 set up.
most likely a 2.5 pi saloon.
richard
-
if the serial no on the left is mk*** its a saloon.stag are stamped ld or similar on the right.
the input shaft is a saloon.more than up to the job,and youl probably get a better clutch plate.
the id tag is missing from the od oppsite side to solenoid.will be 25% or 28% if your lucky.
the rear flange wont match the tr prop shaft and the speedo drive gears in the back of the od will be wrong.
and lastly they all look in good order looking down inside,even the ones with knackered layshafts
and broken tophats.
richard
-
Hi,
My synchro in second seems to be shot. My gearbox (with J-type OD) changes up smoothly without any troubles. However on downchanging it's impossible to get second gear, even double clutching and trying to match revs. She just wont go in unless you hold the clutch in and wait patiently. She will go in eventually, about 5 seconds later well after the apex
My question now is what to do.
Along with the inheritance of the car came this Stag gearbox http://www.tr-register.co.uk/forums/index.php?showtopic=18762&st=0&p=129154&fromsearch=1entry129154 of which I know nothing of its history or origin.
I am reasonably mechanically minded, but have not pulled a gearbox out or apart before. I have the brown bible, several resources on line and Roger Williams' How to Restore TR6 tome (which does not seem particularly informative on the matter!).
Should I:
1. Take gearbox out and replace relevant parts
2. Swap gearboxes
3. Take the car to a TR bloke who comes recommended but I have never used.
Thanks in advance!
have a go your self they arent too difficult.
and when you have done one youll be a expert.
if you have a genuine j type box it will have all steel bushes.
and the only thing that should be wrong with it is the second gear baulk ring.
if it has bronze bushes its a earlyer box.
the top hat bush on second gear breaks in two on early boxs.
pull your spare one in bits to practice, its not a stag one. it will be excatly the same as tr box apart from the input shaft.
i would use the bits from the spare box to repair yours against buying new parts.
when its in bits push the baulk ring onto the gear, they should grip so you cant turn them.
and you may need a screw driver to get em off.
dont be too hung up about having a big gap between baulk and gear if they grip theyre ok if not theyre no good - no synchro mesh.
before you pull the tr box apart make sure you disengage the odrive when its not under load.
richard
if w
-
Yes there will be variations in the gap between bearing cap and crankshaft.i would need to know the following.with the correct amount of end float 6-8 thou.[ ie- set up with new thrust washers].crank pushed forward touching the rear thrust washer. measure the gap between rear bearing cap and crank.if the gap is 15 thou. and a +5thrust washer is 100 thou i would need to cut a recess 85 thou in the bearing cap.this would leave the thrust washer 15 thou proud of the cap. Ricard.
This is not a very reliable improvement. The only way to do the job properly would be to measure the block grove depth and mark this against the cap bolted in place. Otherwise I do not see, when it arrives in the post, that you would know exactly where the cap is going to be positioned - within a thousandths of an inch. Your calculations (if accurate) would then only apply to this set of thrust washers. Most people would want the option of mixing washers of different thickness front / back, to set the end float, which I think should be max of 4 thou (8 is just too much). At any rebuild in the future who is going to know what the new cap requires, in relation to the block; we may need two different thicknesses, how can you even measure that. In the worst case scenario you could still be left with one (+ front) washer doing all the work. I like your idea of the washer captive in the cap .. but a better bodge would be to machine accurately for Toyota 6 cylinder washers which are thicker and have a location tag.
the end float has already been set, to whatever clearance you want.
the bearing cap is bolted in place.
the crank is pushed forward touching the the upper thrust washer.
the gap between the crank and the rear of the main bearing cap is whatever it is.
how else could it be measured.
good point about different washers on rebuilding.which would be twice as long.
so if you had a std washer in the rear.
the cap would have to be machined for a std washer.etc
thats presuming the gap isnt too large ie oversize washers would have to go in the rear where youd put them anyway
i only put down a +5 washer in my example because theyre 100 thou=easy example.
i agree that it might not be to 1 or 2 thou.because if you asked 5 people to measure a gap with feeler gauges youd get 5 different measurements similar but not the same
richard
-
Yeah, I know,
Just thought I would mention mine is one engine that had been neglected in it's past, and point out one particular method of repair.
cheers no problem.
a bit ott? you could emery paper a +5 down a few thou.
if it had done that much damage to the cap, do you think the crank has been replaced.
richard
-
The historical repair to the cap was to skim off all the chewed up material, bolt in an insert and machine flush. Seems to have worked very successfuly. My engine must have had it's TWs neglected in the past.
Richard.
the new bit thats been bolted on is to stop the rear thrust washer from rotating and falling out.
end float should be 0.006-0.008 thou according to haynes manual
richard
-
Thats interesting. Assume it would be rear facing. How do you retain the TW in the cap ? Could there ever be variations in the depth of the block grove, which may then not match the new bearing cap ?
in reply to your question. the thrust washer is loose in the cap but unable to fall out untill there is excessive wear.
excatly the same as the original ones.
yes there will be variations in the gap between bearing cap and crankshaft.
i would need to know the following.with the correct amount of end float 6-8 thou.[ ie- set up with new thrust washers].
crank pushed forward touching the rear thrust washer. measure the gap between rear bearing cap and crank.
if the gap is 15 thou. and a +5thrust washer is 100 thou i would need to cut a recess 85 thou in the bearing cap.
this would leave the thrust washer 15 thou proud of the cap.
lets say the end float ends up at 10thou.the new thrust washer will fall out when there is 76 thou end float.
but by this time the thrust washers will be completly worn down to the steel backing and us.
ntc asked if it should be pinned .no because i dont cut a full circle in the bearing cap.
the original rests on the bearing cap as normal.
if i did cut a full circle [which would be easier] it would need pinning.
this isnt good in my opion as the only thing stopping both rear thrust washers from spinning is a couple of brass screws.
richard
-
Go to the company's website, they are using the same picture to sell two different TR6's!
no theyre not .
ill borrow that coat too.
-
Its possible but even a small amount of the isocyanate can be very harmful as it causes septic pneumonia. I know that filters are available for ordinary masks to cope with this but I would never use anything other than airfeed to spray 2pack with.
Stuart.
i have sprayed my car a panel or two at a time,with 2 pack using a non airfed mask as reccomended by the bloke in the paint shop.
ive been through all this 2 pack painting discussion on here a year or so back. been called a fool etc
by other forum members.
so i thought id buy a airfed mask.devilbiss make one just the job ,
but when you read the small print,NO GOOD not suitable for 2 pack paint.
the reason is the paint can get in your eyes and cause conjuctivitis.
you have to have a full airfed visor.
so i bought a new devilbiss one complete with water trap regulator tear offs etc on ebay for £120.
i had a good trawl of the internet about 2 pack paint.check the h&s web site out.
lots of case study on there.usually its the girl in reception whos most affected not the blokes spraying with masks on.
according to h&s the main problem is it causes occupational asthma.
interestignly the most dangoures job breathing wise is working in a flour mill.
one thing i didnt know was that cyanide is releaded after painting when its curing.
ie- when your walking around the car thinking mmh good job or **** not another run.
personly i think for the amount of ocational painting i did [not every day all day] the non airfed mask the bloke in the paint shop sold was up to the job breathing wise,but just like a airfed mask not suitable because of eye protection.
all you cellulose sprayers are probably thinking, glad ive used cellulose.
but if youve done it with a tea towel wraped around your headyou will probbably be just as bad off.
richard
-
I have converted a 1973 CR UK spec TR6 from RHD TR6 to LHD. This leaves me with indicator, overdrive & beam switch on the "wrong side". Anyone who have converted LHD to RHD and want to swap parts?
i see no one has replied to your post.
i converted my cc 6 from lhd to rhd.
i used all the same switches on mine.
the cowling just turn it over 180%
the indicator is just the same.swap sides
the od switch take it of the column,have a good look at the contacts and swap the contacts around.
the light switch is tricky. i desoldered all the contacts on the white plastic bit with the holes in,
then moved the copper rivet like contacts to rhd configuration tricky. easier to buy a new switch.
richard
-
Thank you for advice - I have played with idle setting but it does not seem to make any difference. I have had the timing checked by two 'experts'. I have not tried higher octane petrol but will. Julian
have you had unleaded valve seats fitted?
richard
-
Hi
as some might know i fast road / better than 125 BHP engine
i now have my spare engine which is CR813
stripping it down at the moment
The front plate fitted between the timing chain cover and the block is extended and has mountings on it
The original mounts are not there
what sort of car do you think it was fitted to
i noticed the exhaust was a single pipe
so my theory is the guy who rolled it possibly had a yankee car and put a CR PI engine into it keeping the yankee fittings ??????
as we know how some guys over the pond like to tinker with things or just bodge it
as the car was not available i thought it would be interesting, i will try and get some pictures tonight
also the block doesnt seem to be recessed ? god knows what i have
any ideas
regards
david
sounds like a engine from a pi saloon/estate.132bhp. check canley classic website.engine identification.
good engine apparently
richard
-
It might last better if you found one to fit the standard airbox, because the right-angled air intake means that the heavy water droplets can't make the 90 degree turn, so they fall out of the airflow and the element doesn't get wet. I think the pretty well unrusted interior of the unrestored box illustrates the point.
Mind you, the paper element in the standard TR6 airbox only gets grubby at the two points where the intake pipes enter the box, so if one is inclined towards saving pennies one can turn the element round at least a couple of times to present a fresh surface. Perhaps the mesh filters flow more air... so they say.
Ivor
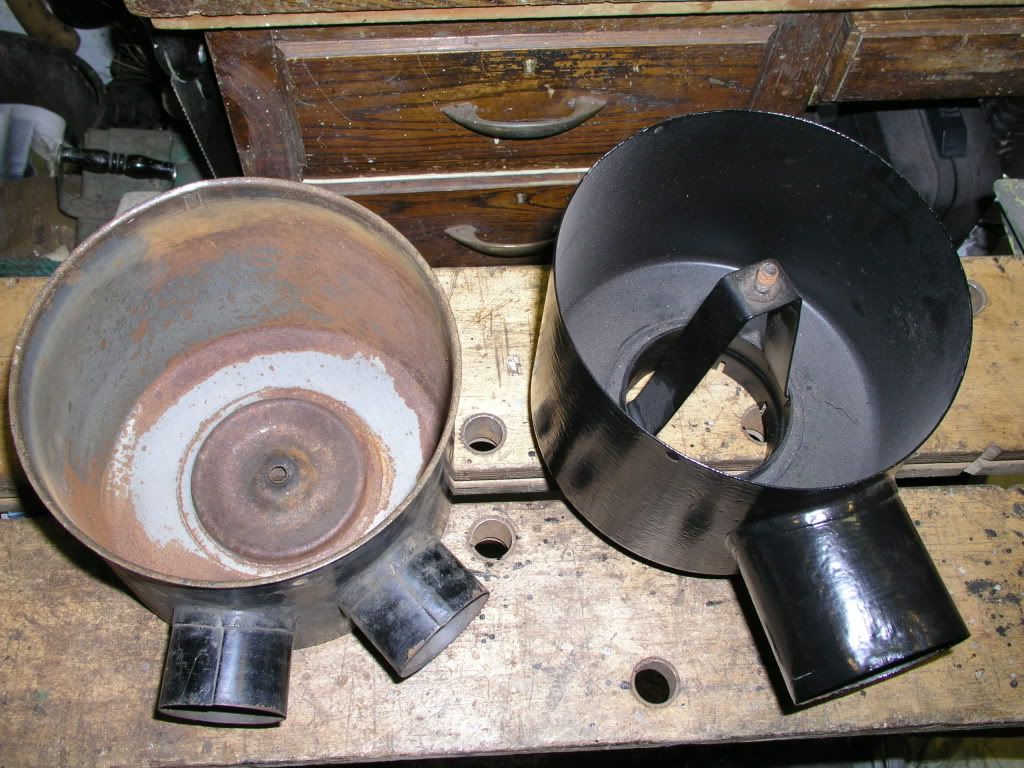
ex usa car so no pi airfilter box. SUs home made airbox fed by pipe to front mounted filter.
need to buy another filter. dont know wether to buy k+n or cheapo flea bay one & bin it when necc.
richard
-
Well, if it's like K&N they should be oiled every year.
And I'm sure the mesh in a K&N is stainless. I wash the filters on my Landy, and leave them to dry overnight before annual re-oiling, never seen any hint of rust.
Is it in the standard airbox, or stuck out on its own?
Ivor
thanks for reply you must be the only person using k+n.
every one must still be using paper elements.
its stuck out on its own.id have thought itd be stainless, wont be buying another green.
richard
Engine Rebuild
in TR6 Forum
Posted
there should be 2 thrust washers eack side of no4 bearing.
they sit in a recess in the block and the main bearing cap sits on top. to stop them rotating.
hope this helps.you can justcsee them in the attached photo.
richard