


gloide69
-
Content Count
95 -
Joined
-
Last visited
Content Type
Profiles
Forums
Calendar
Posts posted by gloide69
-
-
Is it possible for the driven nylon gear and the plate with the drive peg can be assembled 180deg out?
-
8 hours ago, John Morrison said:
Hi Paul,
This is a photo I took of mine when
doing teh top end, plunger looks the same as yours?
John.

Hi John
Yes my parts are identical to yours, did you find any difficulty selecting reverse? Maybe I'll leave mine as it is and see what its like with the lever fitted.
Cheers
Paul
-
I was using the Buckeye Triumphs Gearbox "Top Cover Overhaul" as a reference during my strip down and I noticed that the picture for the TR6 top cover detents, has the same profile, I therefore assumed that this plunger is a TR6 item. I also spotted that in the Moss catalogue the TR4 reverse plunger is part number 106481, but for the TR6 it's 136990. (Unfortunately there isn't a picture for this one). This made me think maybe someone has fitted the wrong part, but I guess it could still just be wear?
Cheers
Paul
-
Hi
I'm on to replacing the gearbox selector shaft O rings (a bit of a rest from body work). I made sure I was careful and not mixed up the various parts, bagging them as they were removed.
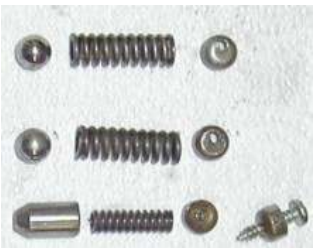
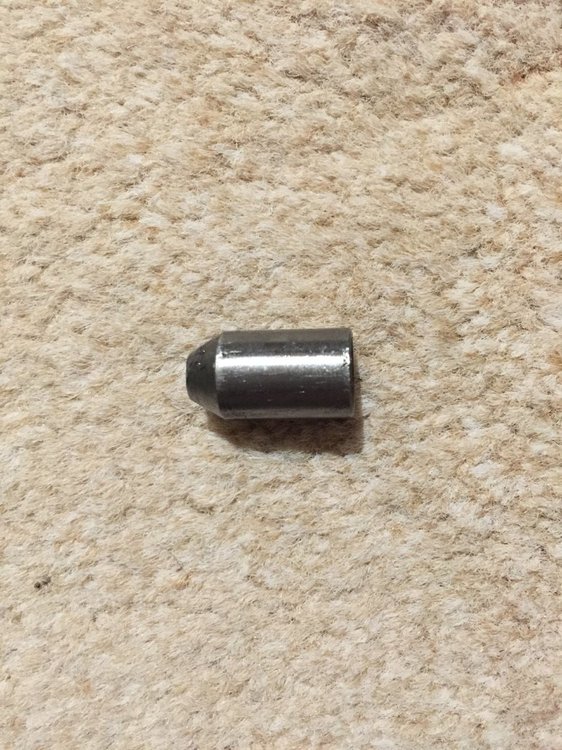
All was going well, putting it back together, until setting the pull force on the reverse detent. With the retaining plug screwed flush with the casing, far too much force is require to move the reverse selector. I took the plunger out and examined it, and noticed that is different to the 3/4 plunger, with a flat (see picture) instead of being pointed. My gearbox is stamped CT22645, so I think the 3/4 and reverse plunger should be the same part?
As a test, I tried the 3/4 plunger on the reverse selector and it performed OK, force required as in the manual.
I guess the simple answer is to replace this part, but I'm wondering why it was in there?
Thanks
Paul
-
Thanks Stuart
More cutting and welding for me :-)
Paul
-
Hi
Can anyone help with a picture for how the top of the B-post, Inner wing and Rear Deck all come together. Both sides of my car have a hole, that I think should not be there. Here is a picture of the worst side, (probably because, I've have changed the B-post and deck forward section), it looks like the gusset is in the wrong place, I am considering modifying it to close and weld the hole up.
Thanks
Paul
-
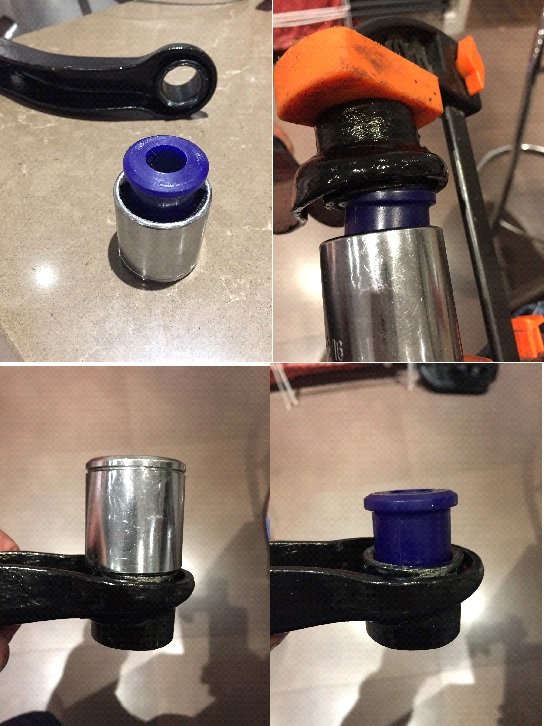
I went and bought a set of poly-bushes from Moss, and I thought I'd share how I fitted them to the upper arms. I struggled at first as they need a fair bit of pressure to get them started in the hole and with the grease they slipped around quite a bit and were difficult to constrain. I used a large socket to contain the bush as shown in the pictures, then if was fairly easy to get the bush started in the arm, once started they pushed home easily by hand.
Cheers
Paul
-
Hi
I'm just cleaning up and painting my front suspension parts, (1963 TR4), and I'm putting together a list of new bushes etc. I need to replace. The upper wishbone inner bushes I've removed are steel/nylon, I don't think this is standard? I'm considering of replacing these with poly-bushes, but would I still need the steel sleeve? Is there any advantage to keeping them nylon?
Thanks
Paul
-
Thanks, good to know.
-
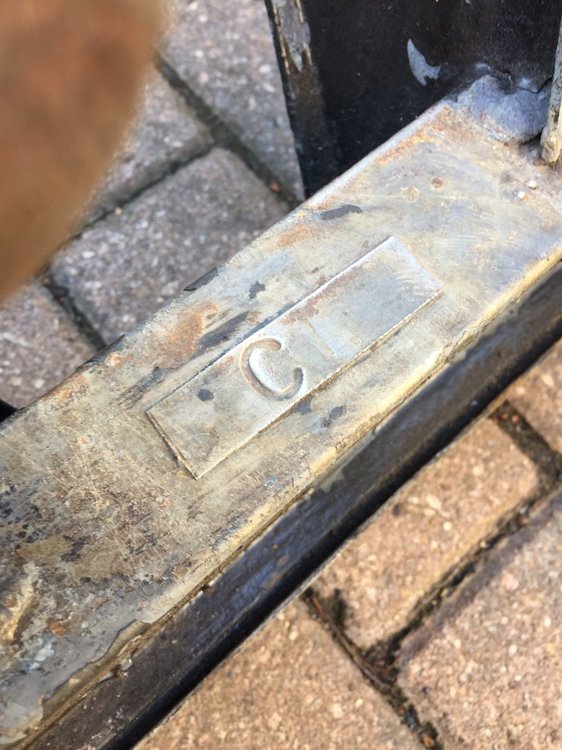
Hi
Yesterday, as the weather was good enough to work outside the garage, I started to prepare the chassis of my TR4 for painting. It's in really good condition, in comparison to the body, which I'm still repairing after nearly 12 months work.
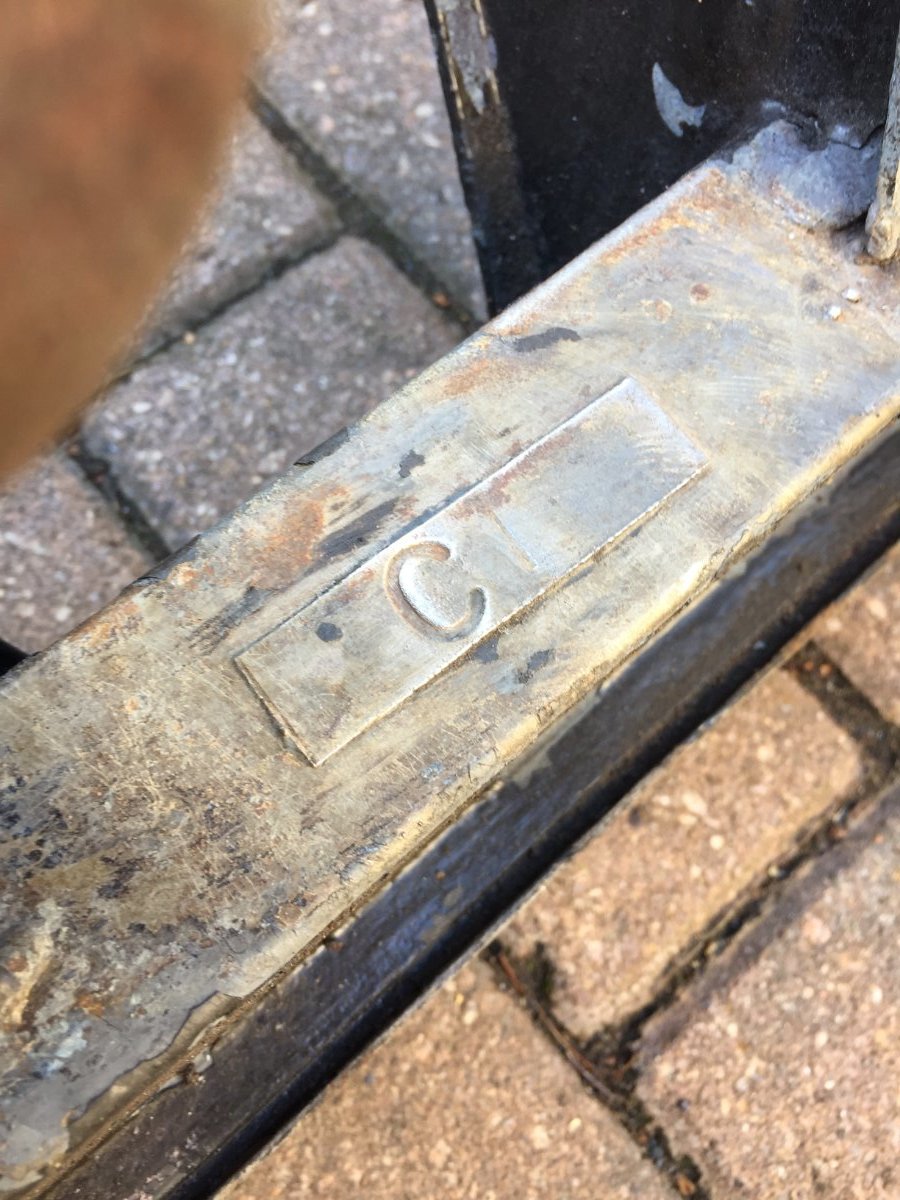
There is an ID plate on the front cross member, stamped with a clear "C" and a very faint "T", see picture
Would I be correct in assuming I have a CTM replacement chassis?
Thanks
Paul
-
On 9/26/2020 at 2:50 PM, rvwp said:
Hi Guys,
Need to replace the bump stops on the body of my TR4A resto project nearing completion. Yeh
 . Looking at what was on the car, certainly since 1982 when it was last on the road, the bump stop seems to a have a alloy spacer and a longer stud than the replacement bump purchased from Moss?
The Moss catalogue makes no reference to a spacer. Is this original or added as a aftermarket item?
Thasnks
Rich
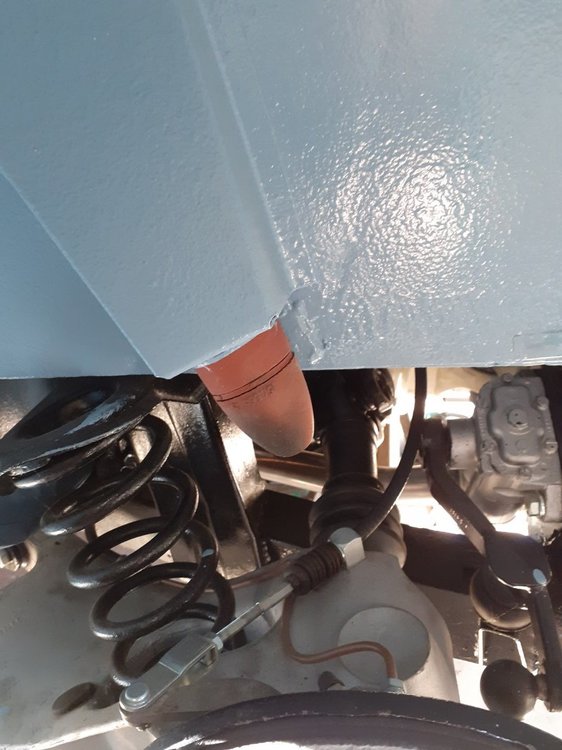
Is there a chance the brake line can get hit by the bump stop, or is it just the angle of the photo?
-
Thanks Peter
I managed to get it out tonight, it was quite stubborn. The pin looks a little bent which probably explains the difficulty.
Thanks
Paul
-
Hi
I'm trying to remove the pin that secures the planet gear shaft into the differential carrier, of a TR4 Girling axle. It looks like the pin/carrier has been peened over at one end to secure the pin.
I can move the pin a back a forth a few millimeters but it doesn't want to move any further. Before I get the big hammer out, I want to check if the pin can be knocked out from either side of the diff carrier or whether it will only come out one way.
Is there a technique to get this pin out?
Thanks
Paul
-
Thank You, I very nearly tidied this away with the grinder.
Is the bump stop rare, or just that its not a listed part?
Cheers
Paul
-
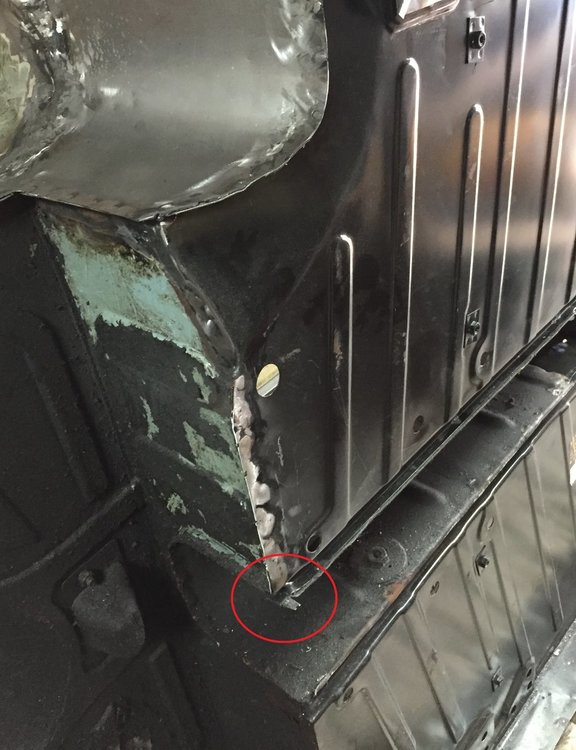
Hi
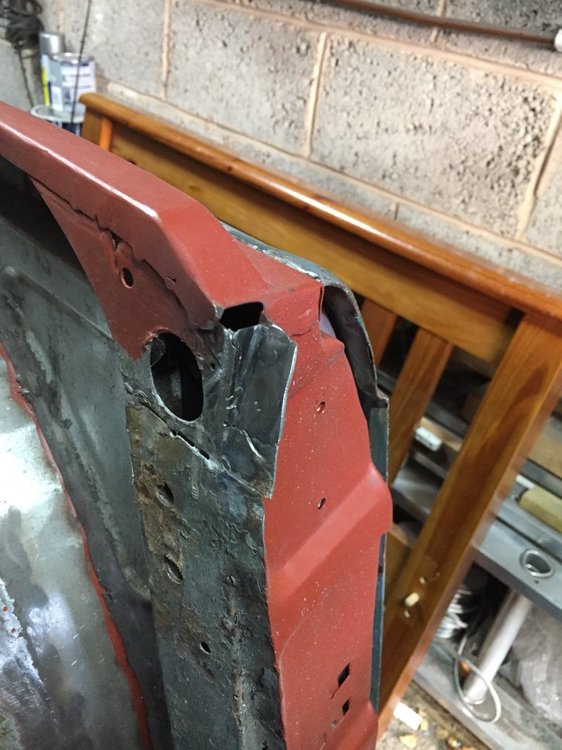
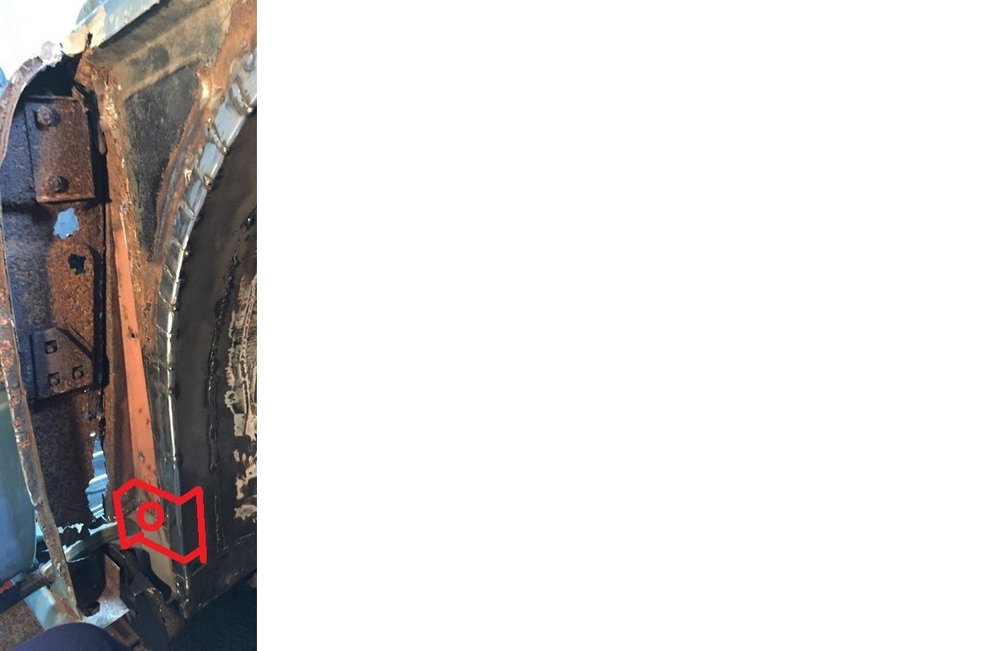
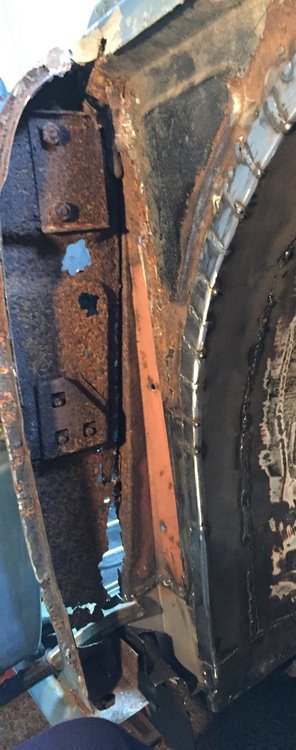
I'm still doing lots of repairs to the body on my TR4, and now have it on its side to finish welding in the floors etc. Whilst working on the tunnel / heel board, I have a little extra metal on one side, see picture, is it a fastening feature for something?
-
Hi
As my restoration of my 1963 TR4 continues, I'm stripping down and removing the rear axle.
The first thing I've noticed is that there is no drain plug on my my axle, so I'm presuming that it's not the original 63 axle.
I've drained the oil, and not a lot came out, (it has been leaking from the pinion end). I looked through my WSM to see what should be in there, 1.5 pints, which is probably less than I expected. Does the oil find it way into the axle tubes and its waiting to run out on me when I remove the Hub and bearing carrier?
I also read a note stated something like, "draining the diff is no longer required due to new factory lubricant used, only check and top up if necessary." Is this why they removed the drain plug?
Also I'm wondering if I should go to the trouble to removed the hubs from the half shafts, or just leave alone as there is no evidence of any leaks into the brake drum etc.
Thanks
Paul
-
The red wire also looks to be frayed or melted near to the module
-
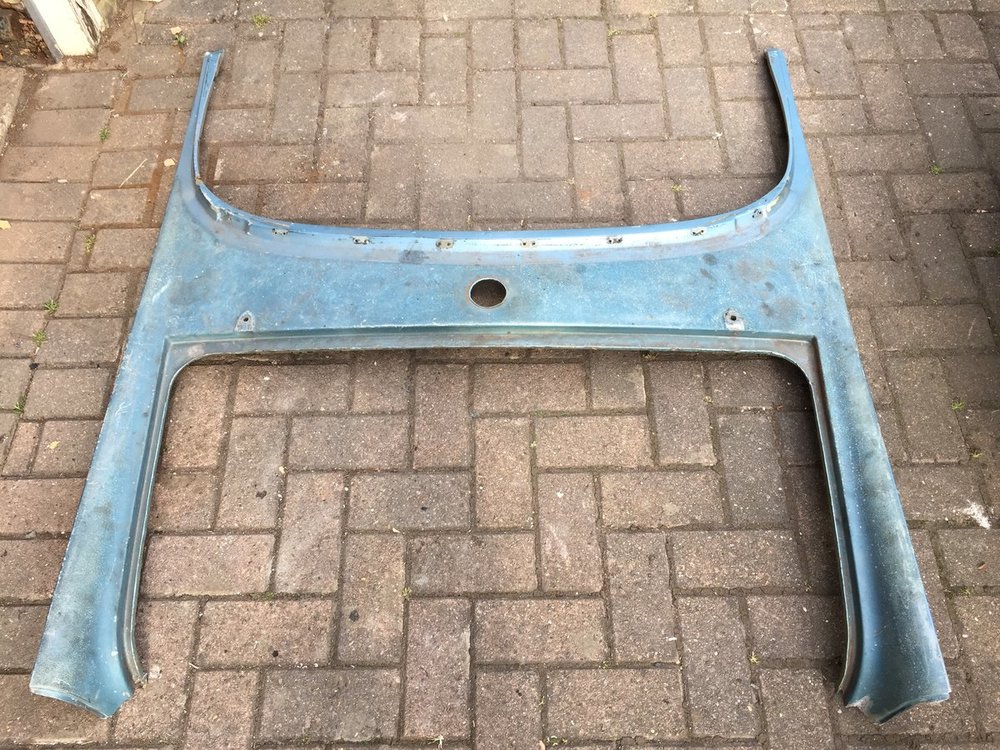
Hi
Would anybody be interested in this fiberglass rear deck I have removed from my restoration project.
Just want to check, before I send it to the tip.
Thanks
Paul
-
Some Progress,
I've gone for the later type seat belt anchor plate, as my new B-Post Back was notched to accommodate it.
I followed Stuart's advice and fitted the B-post back first and then the front, but it took me all day to get them close to fitting.
I still need to work on the top and bottom of the front, where it fits with the sill and rear deck but I thought I'd try fitting he door latch to see if the door would close. Unfortunately the door hits the latch, as thought the B-Post is too close, but it can't go any further back. It looks to me as thought the depressions in the B-post are not as deep as the originals.
Has anybody come across this? and what is the best way to correct it? (try to deepen the pressing, or cut and re-weld the flange)
Thanks
Paul
![IMG_0686[1].JPG](https://www.tr-register.co.uk/forums/uploads/monthly_2020_03/1361698796_IMG_06861.thumb.JPG.bd45830fdb173edc459f0c22cd4707ea.JPG)
![IMG_0689[1].JPG](https://www.tr-register.co.uk/forums/uploads/monthly_2020_03/948414656_IMG_06891.thumb.JPG.5baaccfb14f848b67ed3099201040672.JPG)
![IMG_0687[1].JPG](https://www.tr-register.co.uk/forums/uploads/monthly_2020_03/861670901_IMG_06871.thumb.JPG.37dabc2511016c79be8a1eb35492f1d8.JPG)
-
Thanks for the picture
It was the picture of the part on the Rimmer Bros web site that is confusing me, as I can't see how this would fit.
That said, I should be able to make something similar to do the job
Thanks
Paul
-
Many Thanks for your advice, I'll get the parts (likely to be from Moss) and see how it goes.
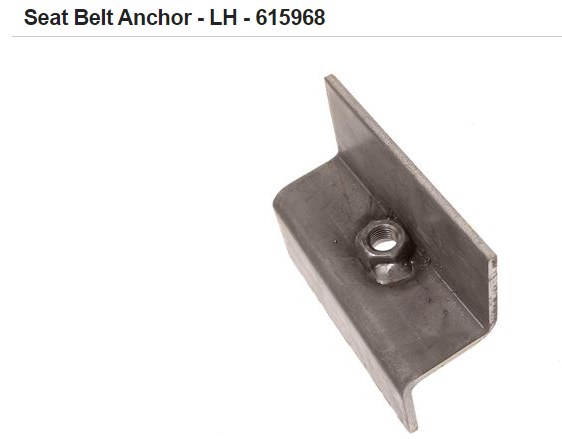
I have another question with regards the seat belt anchor at the bottom of the B-post / Inner wing. There is no evidence of these on my car (63 TR4), were they fitted to all models? I will be fitting belts, so I intend to make and add these mounts, do they fit similar to the TR6 like this:
Thanks
Paul
-
Hi
I think I need a replacement LH B-Post front as there is probably too much work to repair the existing one:
I've read that the replacements are a poor fit and they are not that cheep
Do they need much cutting etc to get the door to shut correctly?
Thanks
Paul
-
Cheers Mick
I think I will make one of these before I start.
Did you use alloy as its easier to turn or to protect the liners?
Paul
-
I am in a similar situation with a seized TR4 engine. I tried a few weeks of penetrating oil down the bores and rocking the car in 4 gear. I also tried a breaker bar on the pulley bolt, but I was afraid of it snapping. I also removed the head and used a block of wood to hammer the pistons, but this did not not free it either.
As I have the interior stripped out, I fastened a long length of square tube (about 4 foot) to the gearbox output flange and used this to lever the engine. Maybe it was just an accumulation of everything I'd done, but this is what got the engine moving. Putting the gearbox in and out of 4 gear allowed me position my bar, so I could swing on it, getting the engine to turn backwards and then forwards bit by bit. After a while I got it to turn through a compete revolution. However my engine it is still too "tight" for me to think it is freed, but I guess it will be good enough to make it possible to strip the engine down on the bench.
Just a point of note, I didn't have the cylinder liners clamped and they never moved during this process, so I'm expecting it is going to be difficult for me to get them out.
Paul


![IMG_0686[1].JPG](https://www.tr-register.co.uk/forums/uploads/monthly_2020_03/1282534197_IMG_06861.JPG.8b479a9636b3fb49bf1b70266b902233.JPG)
![IMG_0689[1].JPG](https://www.tr-register.co.uk/forums/uploads/monthly_2020_03/660006704_IMG_06891.JPG.16d52ce509ebccd50c0e9d00c4e58665.JPG)
![IMG_0687[1].JPG](https://www.tr-register.co.uk/forums/uploads/monthly_2020_03/1864919238_IMG_06871.JPG.cea19c0ae6695570d2f70c6a40da7fcb.JPG)


Reverse Detent Plunger
in TR4/4A Forum
Posted
Just a little extra bit of information to answer Rogers question
The profile of the notch in the selector shafts matches that of the detent plungers. I thinks this confirms that the parts are correct and matched.
I've put the reverse plunger back as it came apart and when the lever is fitted, it's a bit clunky compared to 3/4, but not too difficult to to select reverse
Thanks
Paul