


adriantr4
-
Content Count
144 -
Joined
-
Last visited
Content Type
Profiles
Forums
Calendar
Posts posted by adriantr4
-
-
Hello
I have been making some progress in stripping down my '4 to allow some welding work, and later on mechanical work. This post is a sort of brain dump of what I've been doing and a request for any comments.
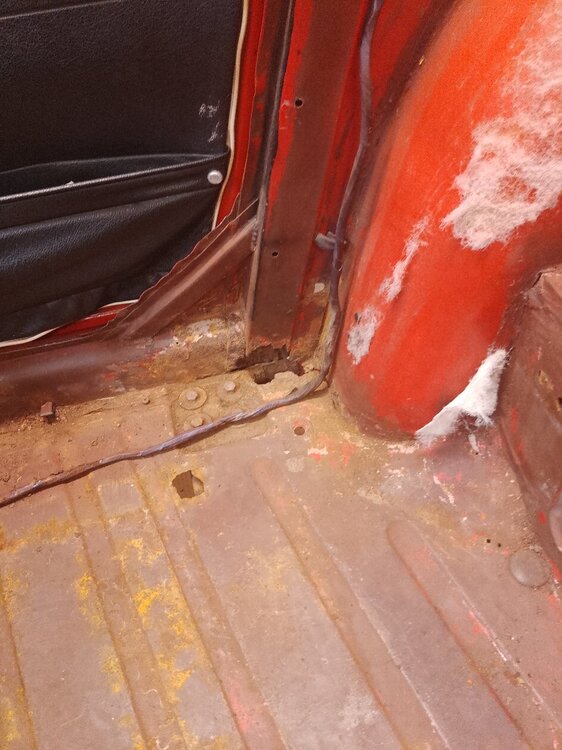
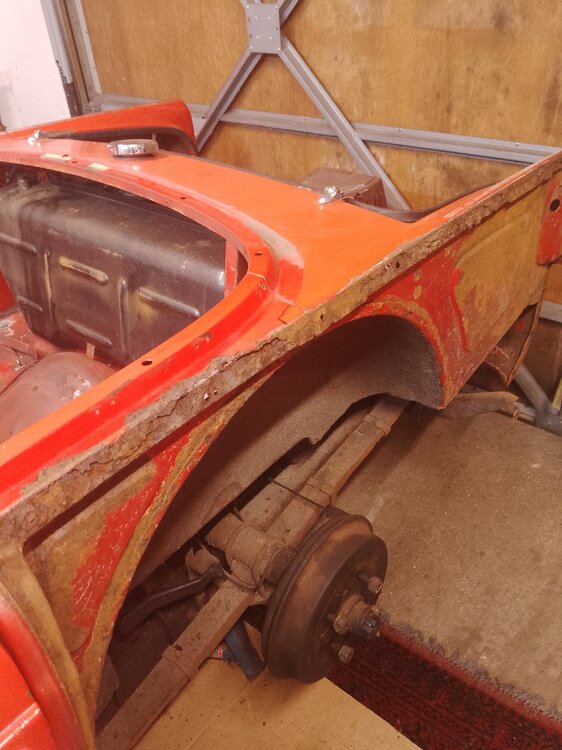
I took the car off the road as the gearbox layshaft bearings have given up, I think, plus the tops of the rear wings had failed. I have removed all 4 wings and the interior trim.
Essentially, the tub is (mostly) ok, excepting the bottom of the A & B posts, and to a lesser extent the top flanges which is the join for the rear wings. Sills ok-ish, sill ends ok, and the notorious plenum drain within that box behind the front wing baffle is fine. The front wings will need repair sections, I have some replacement rear wings which offer up ok. I am in contact with a local mobile welder for the holes, and have a line on a local metal worker for fixing up one of rear wings which is a bit dented plus maybe putting the repair sections on the front wings. That, I hope, is the plan.
A specific question: jacking the car up much higher to give the welder better access, and so I can get under it to do some scraping/painting. I have axle stands at the rear such that the axle rests on the 'Y' of the stands. At the front the chassis is resting on axle stands minus the Y to spread the load. I'm nervous about resting the front end on the Y of axle stands, will it dig in, or slip? Is there a better way? I hope to borrow a proper garage jack to really lift it.
Thanks, Adrian
-
Thanks and appreciated, all understood. I'll crack on ...
Regards Adrian
-
Hello
I'm doing work on my '4 and am having a bit of trouble in getting access to remove the rear wings. I've got the rear bumper, rear lights, trim/hood frame off, but can't easily access the nuts at the top of wings inside the boot. Access is almost zero - what's the technique please? Stepped spanner - no room for socket? Hacksaw from the top?
Some of this perhaps moot as the wings have largely rusted at the very top anyhow, hence removal.
How did they do this on the body-build line? Special 7/16" narrow socket tool?
Thanks, Adrian
-
Thanks for the input, I'll investigate but other things to address first.
-
Hello
I'm doing some work on my '4, and on removing the rear wheels I noticed that a wheel stud (ie: what the wheel nuts screw on to) is loose. I can rotate it about an eighth turn easily by hand.
I can't remember how they are attached to the hub (reverse threads?) I assume the half-shaft needs to be pulled?
Thanks, Adrian
-
Hi
Stumbled on the following - the '4 is being broken for parts! This seems unnecessary.
Triumph Tr4 Running Engine Complete | eBay
Triumph TR 4 / 5 Hard Top | eBay
I have no connection to either of the above
-
Thanks very much to all posters, all points noted and understood.
However, I am now in a bit of a quandary as what to do next. My original plan was to run the car until the end of the autumn and then attempt a full rebuild, but I don't think that's strictly necessary. The fallback option is to partially strip it but leave the body on the chassis. It's unrestored, but strong and straight. Engine runs well with good compression, drives well - but rear wings and sills need attention/welding. It looks rather rough, but tub & chassis fine. Boot floor, boot, bonnet, floors, engine bay all good.
Of course, getting into it might reveal problems....
Regards Adrian
-
Hello
After a run I have noticed the gearbox making very odd noises in 1st, 2nd & 3rd. 4th seems fine, clutch, selection & overdrive also ok.
Layshaft bearings failing?
The box was partially rebuilt 30 years ago to include an overdrive, think the layshaft was changed then - probably a swap from another unit rather than new. Not too sure about this, but at the time the overall condition of the box was considered ok. Don't think it's out of oil.
Thanks, Adrian
-
Thanks to all posters, much appreciated. Drove car again - guage now working again, so I suspect fair wear and tear. I'll keep monitoring it.
In today's news: sealed beam unit that is just under a year old has failed. Another poor after-market product?
Lastly, I have bought o-rings on eBay, very easy and cheap.
Again, thanks
Adrian
-
Hi
Back from a long run in the '4. Car running well but on switch-off the oil pressure gauge is stuck reading 50. It was working fine during the journey. Any suggestions? It is 60 years old, so ....
Thanks, Adrian
-
Hello
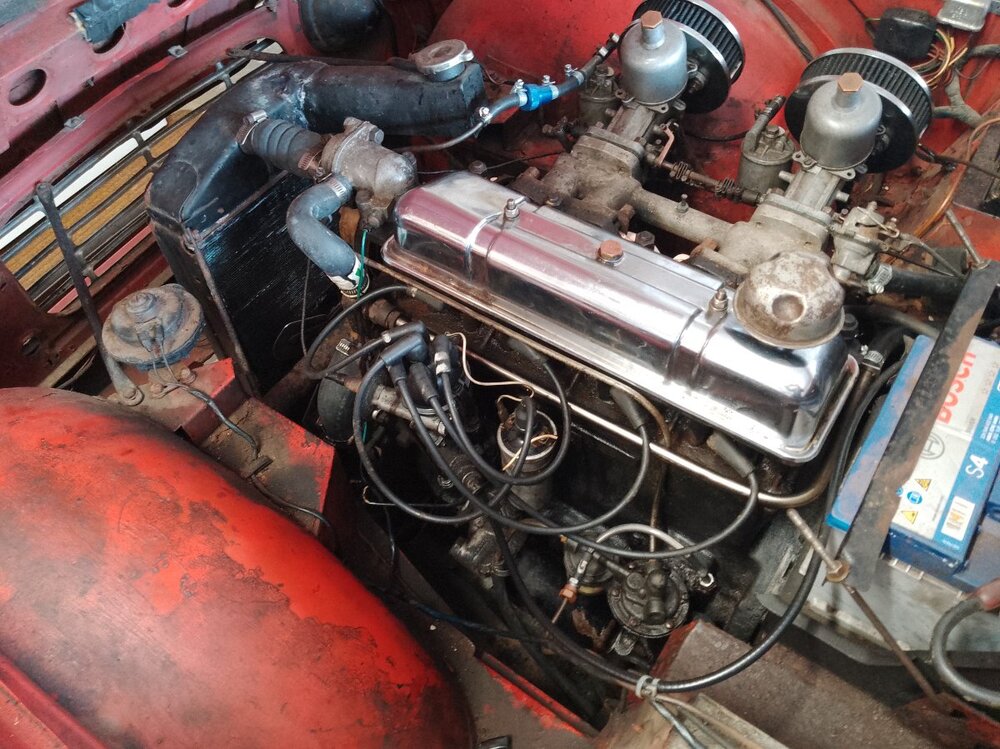
My rocker cover leaks have stopped. Adjusting the rocker cover for a better fit was a key step.
Thanks to all the posters, all points noted.
regards, Adrian
-
Hello
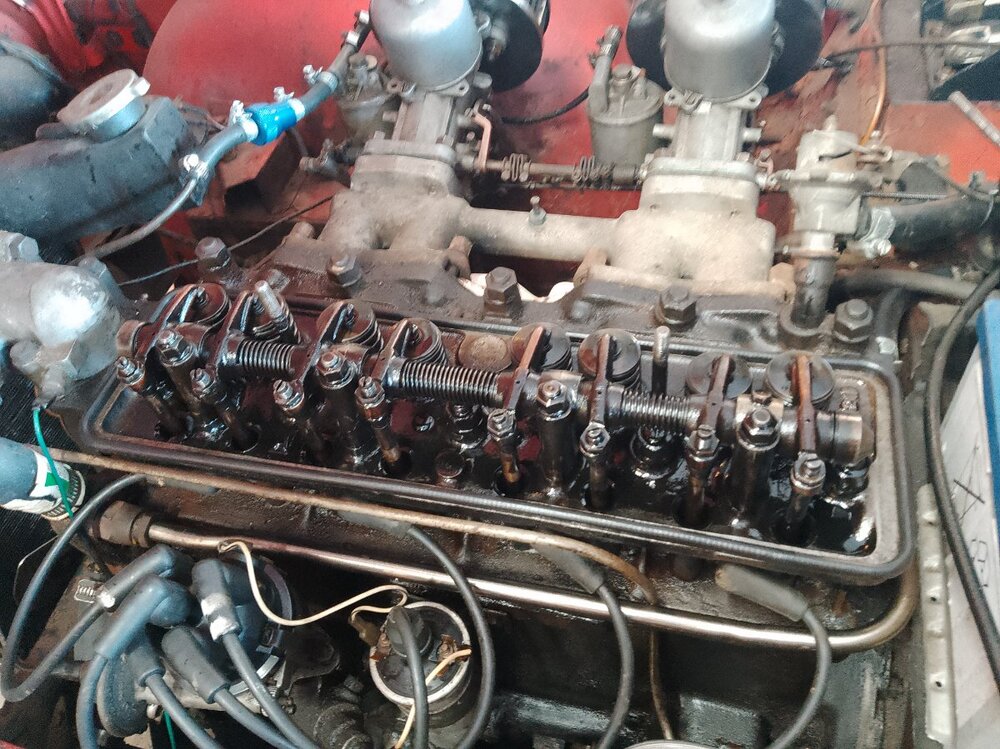
I have been having long-term trouble with leaks from my TR4 rocker cover, and had tried regular gaskets and then in desperation bought a neoprene equivalent from Ebay.
However, I think the actual problem is the early-TR4 rocker cover is actually a shade too big, plus had bowed out slightly. I have corrected this to get a slight bow inwards plus eased the rear mounting hole a shade to get it to sit a bit better. Now much improved.
I think I have taken a step back with the neoprene gasket though as I induced a more major leak in a different spot. The gasket is well made and the correct shaped cross-section, but it unfortunately is a little too long. Trying to fit it is like trying to wrangle a large and uncooperative rubber band.
Anyway, I have tried again and the couple of pics show what I have been up to. If this doesn't fix it then its back to a normal gasket.
Fyi.
regards, Adrian
-
Thanks to the previous posters for the excellent advice.
In my case the exhaust and manifold was sound, but the amount of oil under made it very fumy. I am ashamed to say .... However, no carb air leaks either.
I have rectified a leak from the rocker cover, and got a car wash place to wash underneath it.
No problems since, but in due course I think I need to consider a full rebuild. It runs well but is a strong contender for a wooden spoon competition. (Remember those?)
regards, Adrian
-
My thanks to Ralph and Stuart for their advice. Ralph was on the money for his diagnosis of the sticking jets - as described (my carbs are H6 ) I think the jet was jamming in the top cork seal/gland AUC 2120.
I bought a (H6) rebuild kit, but also invested in "viton seals to replace cork gland seals AUC 2120"
I disassembled the jet system in-situ, but putting it all back was was a bit of a struggle. When I've done this before I've had the carbs on the bench. However, the car now runs much better. Ralph also mentioned new springs - I have ordered these. The existing ones have enough strength, but are not stretched enough in the resting position. A side problem is that my linkages are worn due the pivot points ovaling.
I scored zero points when initially tuning the carbs as I had a missing plug lead, so I was doing the adjustments on 3 cylinders ....
My top tip, discovered my accident - listening to the carbs hissing when balancing them is much easier if there is a small funnel attached to the tube - you put your ear against this.
regards, Adrian
-
Hello
Although very obvious with hindsight, my front carb didnt seem to be weakening its mixture. This is because the jet is sticking after the choke is closed, and sticking quite hard. So, opening the choke (ie: richening the mixture) works fine, but closing the choke leaves the jet stuck and wont return the last 1/8 of an inch. The mechanisms are fine and not fouling it, and the rear carb and choke system works correctly. The piston on the offending carb slides down with a clunk, as expected.
I'm a bit puzzled by this, and I think its been present for a while. I'll take it all apart to try and see whats going on (a fair amount of force is required to return it to the normal position).
I wondered if anyone had experienced this before?
also: rejoined the Register!
regards, Adrian
-
Hello
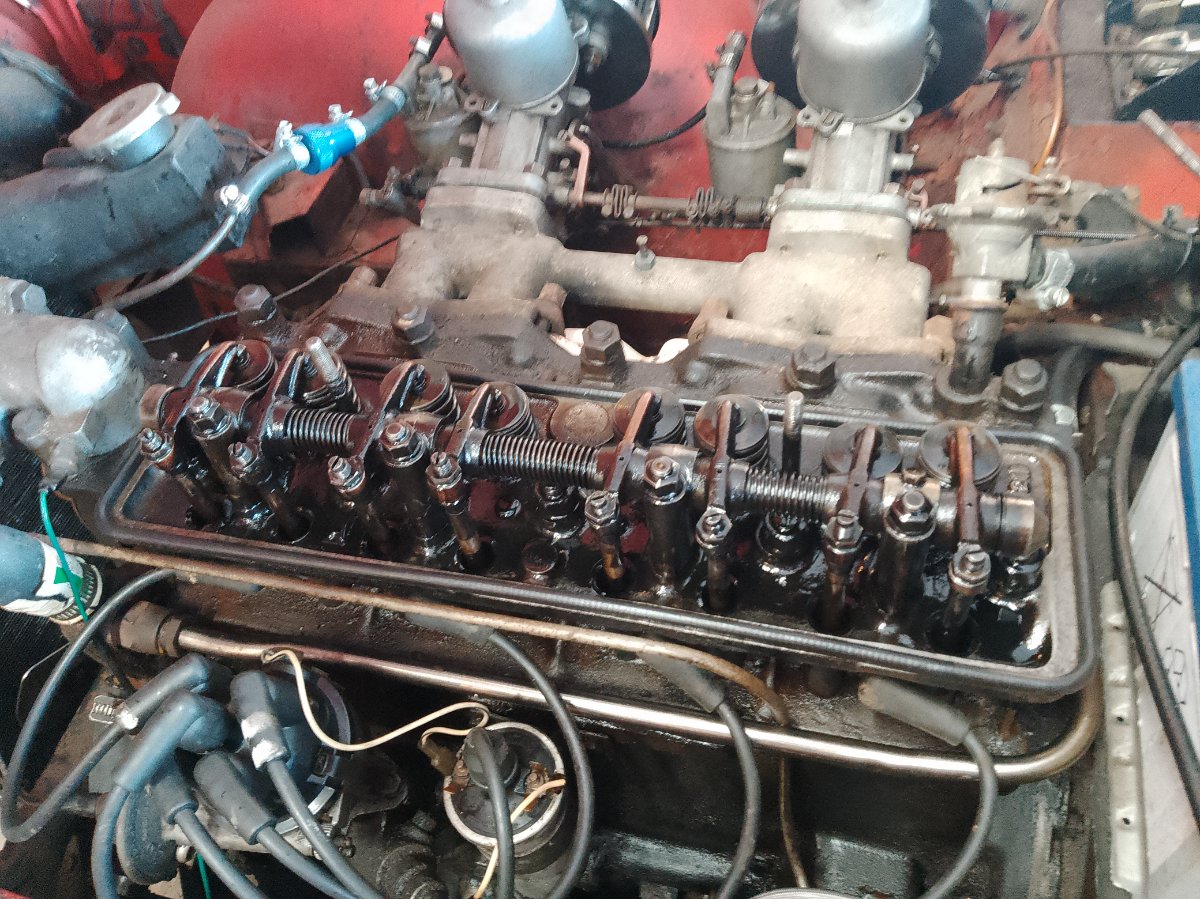
I have been recommissioning my very worn '4. There has been quite a lot of effort around the fuel and brake systems, plus hoses, etc. All things considered it runs strongly and seems to drip more oil than it consumes.
I'm going to turn my attention to the manifold gaskets. It was always a bit exhaust fumey, but during and after a drive yesterday it was pretty bad, but I don't think it's blowing really badly, just leaky. That area hasn't been touched in some 30 years.
I would like to ask a few basic questions as this isn't something I have worked on before, although I have read some related threads. And the idle has always been bit high - air leak?
Also, what's life expectancy of the oil filler cap on the rocker cover? It's a '3A engine with those carbs and manifolds. I think the exhaust pipe system is ok.
So: although I'll take the carbs off to get more access, do I need to? I assume no sealants required? How tight does it all need to be on reassemby - cast parts?
Any other comments on manifold gasket swaps, or on fumey engines?
Thanks
-
Hello
I'm happy to report that I had the pipe (brake master cylinder to 5-way splitter) remade with both ends re-flared. I did both ends as the 5-way end was an odd and incomplete shape, plus the master cylinder end was the original problem.
A local garage did the work for a few pounds,and I asked about fitting flares and explained that I couldn't get a good seal. They were surprised, but said when I tightened it up in the bore, I would feel it compress. And this is what happened - all ok now.
This the second time I have had this pipe flared. The difference, perhaps, is that I cut the pipe with a hacksaw and another garage did the flare after a minor clean with a file. It didn't seal. This time, the ends were cut with a pipe-cutter, so much cleaner (and a right-angle?).
A clue?
Anyhow, I have checked all the unions and bled the brakes. My thanks to JF of Wessex TR Register for assistance and advice. And thanks to all posters as well.
-
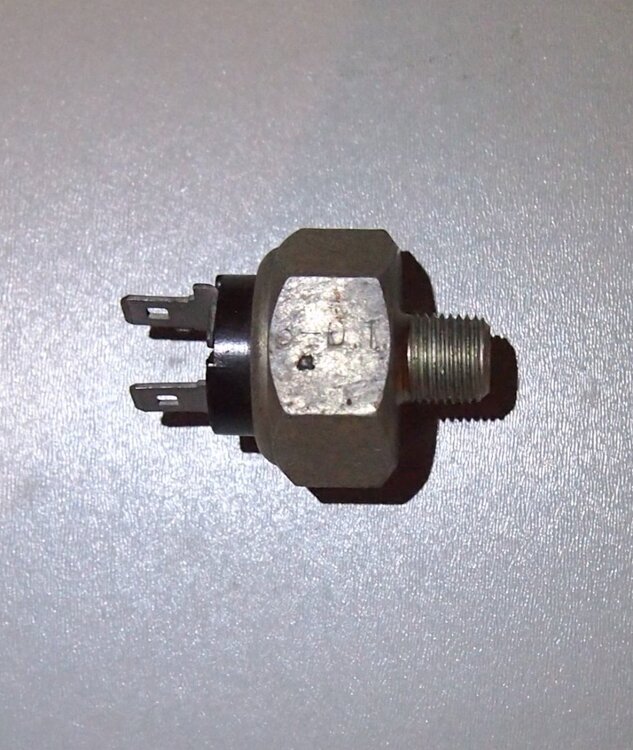
I have written an article of sorts on Brake Switches. I had hoped to post it directly here, but Tables dont seem to be supported. Hence its a pdf.
The images show the 3 types of switch (I have cheated a little) and some instructions. All comments welcome. Thanks.
Please wait while image is uploading...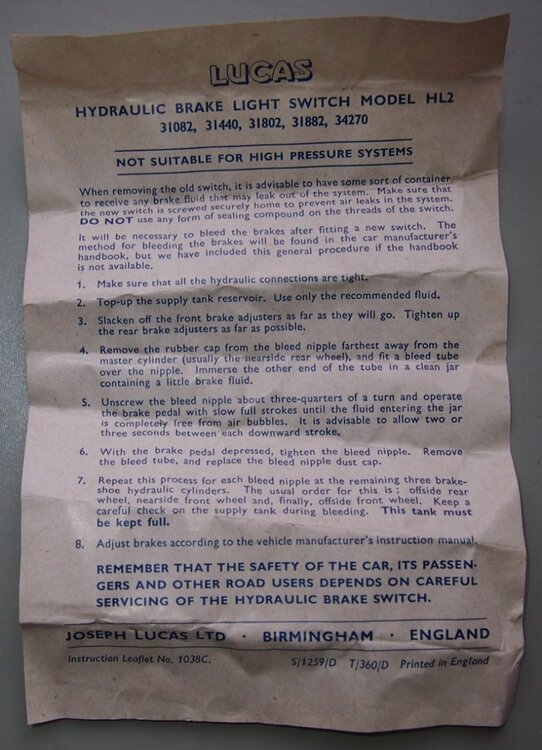

-
Thanks for all the information and suggestions. I eventually avoided the leak problem by putting my original switch back - it works electrically and seals properly.
I've been thinking and reading about hydraulic brake switches and hope to write out some conclusions in week or so.
-
Hello
I would like to thank all contributors for their input, it is much appreciated.
The master cylinder has a counter sink away from view, as expected. I am also fairly confident that the screw connector and flare is correctly bottoming against the bottom of the hole. On the other hand, if I had a pound for things I was certain about but then proved wrong, I'd be rich....
I am also rather embarrassed about how grubby the connector is - just took a quick snap to support the initial post.
Here is the plan: I've ordered a new screw connector, although I suspect the original is fine. I'll cut the flare and have new one put on. I'll inspect and clean the master cylinder threads, etc.
If that doesn't work, then I'll change the master cylinder.
I'll report back in a week.
-
Hello
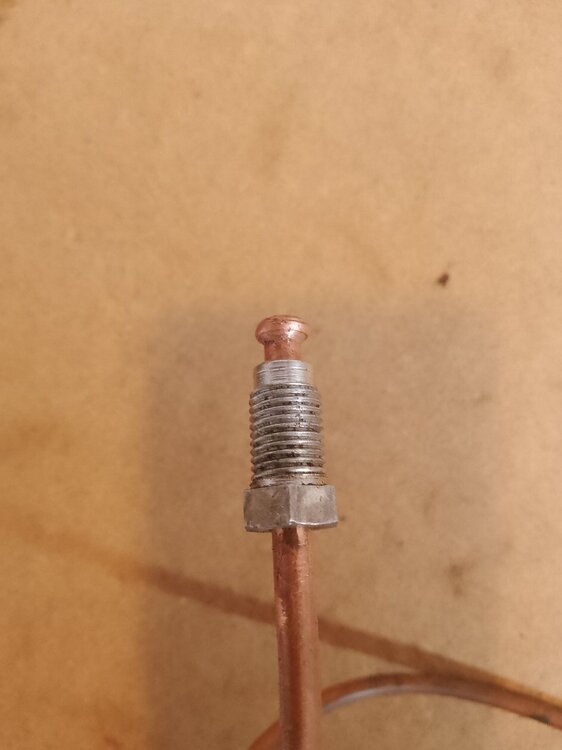
I'm still progressing with my restrictor valve/brake light switch efforts. I got it all back together, but I can't get a good seal where the "copper" brake pipe screws into the brake master cylinder. It's up tight, and I've checked the connections on the rest of the car, all seem ok
I got this end of the pipe remade by a friendly local garage, as I was forced to cut it when removing the old master cylinder. Even with the old master cylinder on the bench and plenty of freeing oil over a week or so, it wouldn't let go.
Anyhow, what is my next move? Cut again and get it flared? Buy a new pipe?
Image below - looks ok?
Thanks
-
Hello
I have been continuing to work on my TR4 Brake Restrictor Issue.
TR4 Restrictor Valve 116197 - again - TR4/4A Forum - TR Register Forum (tr-register.co.uk)
I couldn’t get the restrictor off without removing the 5 Way Connector (Y2 – 107069) and with the usual struggle, but on the bench it all came apart and I converted the restrictor into a tube by removing its innards. Another issue I had was that I thought the Hydraulic Brake Switch (Y6 – 126845) had failed – I also had a rear brake cylinder leak at the same time so wasn't too sure.
Anyhow, with it all apart and years of muck removed, I thought I’d play safe and buy a new Brake Switch. The forum has mentioned this subject in passing in the past.
TR4 brake light switch - TR4/4A Forum - TR Register Forum (tr-register.co.uk)
However, things become a bit murky – there have been a number of hydraulic switches, says Revington:
BRAKE SWITCH TR3A-4 UNF (revingtontr.com)
So, I bought a new TR4 126845 switch, and it fitted very well into the connector. I wasnt entirely convinced as the screw depth into the connector seemed a bit short, but it was the same as the one I had removed so I pressed on.
Sure enough, despite tightening it as much as I dare, it is leaking hydraulic fluid through the threads. I’m a bit puzzled by this. Now, I didn’t accurately check the two switches side-by-side, but at first glance seemed ok.
Does this sound familiar to anyone? Here's a possible clue … copper washer?
Switch, brake light, hydraulic (moss-europe.co.uk)
All suggestions welcome.
Thanks

-
Hello & fyi
This is just a note to say that I too have run up against the “Restrictor Valve 116197 in the brake line” issue on my TR4: intermittent stuck brakes. As other posters both here and in the US have previously noted, it can misbehave leaving the brakes stuck on.
The solution is to remove its innards so it just becomes a tube. Thanks to IanC, RogerH and Stuart for their past input.
Brake restrictor valve - TR4/4A Forum - TR Register Forum (tr-register.co.uk)
Brake restrictor valve - TR2/3/3A/3B Forum - TR Register Forum (tr-register.co.uk)
TR2/3/3A - Brake Restrictor valve? | British Car Forum
In addition we couldn’t get the brake bleeder kit to work - this version pressurises the system via a spare tyre. The restrictor (I think) stopped the flow, but pressure via the brake pedal enabled brake bleeding as normal. But now of course, having spotted the intermittent problem, I have to get the restrictor fixed up then re-bleed .....
-
Hello again
Yes, it's the cylinder. I put a piece of paper under the car after removing the shoes. Obvious drip. Moved the paper the following day and another drip mark. Why blame (my installed) axle seals - it felt like I had gone round in a circle. Not logical I know.
However, these rear cylinders are less that 6 months old, and less than 500 miles since installation.
On inspection all seems ok, but the cylinder bore perhaps looks like it hasn't been smoothly machined more than half way down, and perhaps one or two microscopic marks on the smooth part.
And yet it appears well made, and fitted perfectly.
Many thanks to all, all points noted.
Let's close this thread.
Regards, Adrian


TR4 refurb and jacking up
in TR4/4A Forum
Posted
Thanks for the help, understood.
I've had a closer look at my front wings, and although the lowest edge area behind the wheel isn't great, I think they could be fixable.
Regards, Adrian