


Josh
-
Content Count
25 -
Joined
-
Last visited
Content Type
Profiles
Forums
Calendar
Posts posted by Josh
-
-
On 6/13/2021 at 5:15 PM, Phil H 4 said:
Is the fuel resistant?
Phil,
Seems we share similar problems with fuel smell.
I agree with the advice you have received, definitely looks like the gland is not fully tightened and as has already been mentioned by Waldi, it is not the thread that seals the fuel, it is the mechanical action of the pipe, olive, and tank coming together in compression....
Will call you to schedule a get together, given you are in CSP, and I'm in GX...
Josh
-
John,
Thanks very much. The tank is out and yes, I am planning to put a copper washer on the drain, plus PTFE tape, as well as changing the fuel sender gasket to a viton one.
I'm replacing the existing copper return that runs from MU to tank with Kunifer tubing.
I'm also changing the old R6 rubber tubing to/from tank/filter/pump to R9 Mocal which I obtained from ThinkAutomotive, who produce it. They sell various sizes by the metre. I was very impressed with their service, when I visited earlier this week, as I am geographically nearby to them. No connection, but I'd certainly recommend them for pipes & connectors, and their bespoke automotive plumbing service.
One other thing that I have discovered after taking the tank off is that the 2" (50mm) rubber hose fuel filler from the cap into the top of the tank continues to smell significantly after several days off the car.
In summary, I think the smells that I have been expereinceing have been due largely to old aged R6 rubbers throughout the boot. I look forward to getting things back together again this weekend, and post an update on status hopefully early next week!
")
-
Nigel,
Thanks much appreciated.
Unlike the game at the weekend - I'm a Quins supporter - unfortunately we let Tigers get too far away to claw it back. Great game for Tigers though....
-
Thanks all
I have already got an isolating tap to go on it.
I'm still minded that I may give it a chemical clean and slosh just the floor of the tank, to stop it getting any worse.
-
Thanks Andy
-
Having rebuilt and refitted one myself, they are effectively sealed. I do not believe there is any lubrication needed.
This applies equally for where the square drive fits into the GB housing, or the output side to the speedo cable.
There are comments in other threads, explaining not to put any lubrication in the speedo cable output side, otherwise the lubricant will track up the internal walls of the cable and find its way to your speedo, with unhappy consequences!
Hope this helps
-
Thanks Clem
So is that a vote for the leave it camp, or replace?
To give context, I should say that I've only owned the vehicle for 4 years, and believe this tank is at least 10 years old.
So hoping to extend for a few more years yet.
-
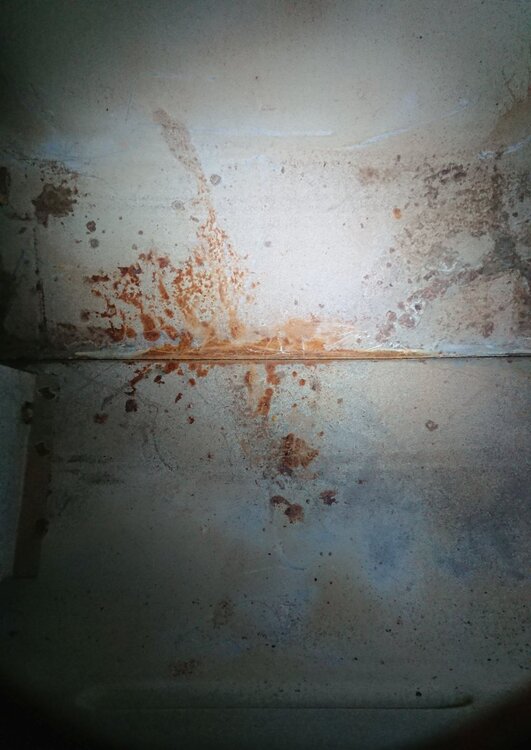
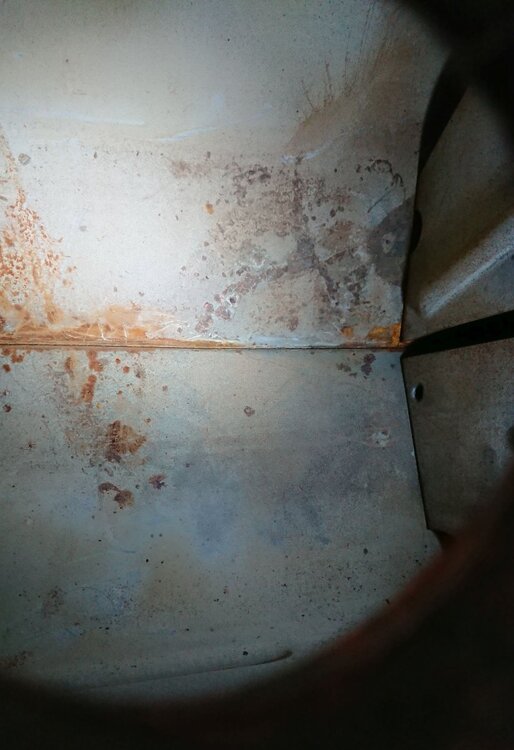
As part of getting to the bottom of continuous fuel smells in the boot, I have completely removed and drained the steel fuel tank from my 74 TR6 PI.
As can be seen in the photos, there is rust in the floor of the tank, which seems to track along the bottom seam of the tank.
I would like to treat the rust, but not sure of the best approach, but feel I obviously need to do something, given the acidic/hygroscopic nature and impacts of ethanol in modern fuels and levels are on the rise. So this rust will not cure itself by leaving, or just refilling with fuel.
I have considered 3 stage cleaning process; degreaser, etch, then slosh just the floor of the tank. But I'm not sure if just doing the floor is sensible, or feasible, and wonder if it could create a way for the fuel to get between tank and sealer. My thinking and main reason for not wanting to do a full slosh of the whole tank is that there is no way I can be certain to keep the return fuel pipe that goes down into the swirl pot, which is behind the baffles. So if t gets blocked, then I'm off for a new tank, with all the issues of Alu Vs Steel.
So are there your thoughts on what I should do here to remedy this and stop further rusting?

-
Bruce, and Mike,
Thanks very much, so that sounds like a very strong recommendation for needing to stick with R9/R14 hoses then !
-
Thanks all.
Based on comments, I may amend my plans and use an R14 to/from the pump, and fit copper elsewhere where there is negligible movement.
-
Yes Peter, I am planning to put sufficient loops and length on the replacements to provide plenty of flexibility.
-
I have had enough of the smell of petrol fumes from the boot. I have replaced the tank 2" filler pipe,and sender unit gasket with a viton seal. I have narrowed down the source of the smell to the R6 rated old rubber piping in the boot which goes to & from the fuel tank & fuel pump.
I know that the increase in ethanol levels has caused problems with old rubber pipes, and seen the threads discussing R14/PTFE reinforced pipes to minimise the permeability of fumes, but I'm not entirely convinced, so I am planning to replace ALL the existing rubber 5/16" supply as well as the 3/8" return pipes from rubber to fully copper at all points, with compression joints. I am hoping this will stop all fumes....
I am also in th eprocess of fitting a firewall to be absolutely sure that the above works 100%.
I'd be interested to know if anyone has considered, or done this with any success?
-
Thanks both Martin & John,
Yes, just checked on Moss website, and as you say it is on backorder.
-
Thanks very much John,
I have already replaced the rubber filler neck, together with new clips.
Gaskets and pipe connections are next in line for further investigation.
-
Mike,
Thanks, I am definitely keeping the steel lines in place. The smell is definitely coming from the rear end - inside the boot - every time I open it, the smell is intense, its permeated the carpet, and anything left in the boot gets a strong odour.
I haven't experienced any fuel vapourisation on hot days. There are no smells discernable from within the engine bay, when engine running and I've had injectors rebuilt,although I think MU could do with a tweak to help the engine run a bit more lean.
Will continue down the path of checking fuel tank, sender and fuel lines as next step...
-
Like many, I have experienced over a number of years significant fuel smells in the cockpit of my 74 TR6 PI.
I am running with what I believe to be the original boot-mounted Lucas fuel pump, steel fuel tank and rubber fuel lines. All of this sits behind the standard hardboard “bulkhead”.
I am planning to remove the bulkhead and replace with a metal bulkhead, and intumescent sealer, to completely seal the boot off from the cabin. I will of course check the state of the tank for any rust holes while doing this.
The main area I need help is with the specification to help me order a number of lengths of fuel pipe which I believe is the biggest contributor to my fuel smells in the boot, which then seeps into the cabin.
My initial plan is to use different sized Gates Barricade 4219BF to replace all existing runs and returns everything from tank to pump, PRV, in and out of the boot towards the metering unit. Can I please ask what sizes (internal diameter), lengths, as well as details of what fittings I will need to completely re-fit all fuel lines within the boot area?
Before I embark on this refurb project, I would gratefully appreciate any/all advice and guidance from all contributors.
Thanks in advance
Josh
-
Roger,
Many thanks for your kind offer of assistance, which I'd be delighted to take up, given that I am still a TR novice only having had my TR6 for a couple of years, and I'm finding problems that built up over time and were not addressed by PO.
Ordinarily I would like to work alongside you and learn from those of you who are much more experienced on the forum, but unfortunately, I am shielding a family member with COVID. But I would still be very happy to order the lip seals and I could drop the top cover assembly round to you for your machining expertise if that would be ok?
If you could let me know how best to proceed, I'd really appreciate it.
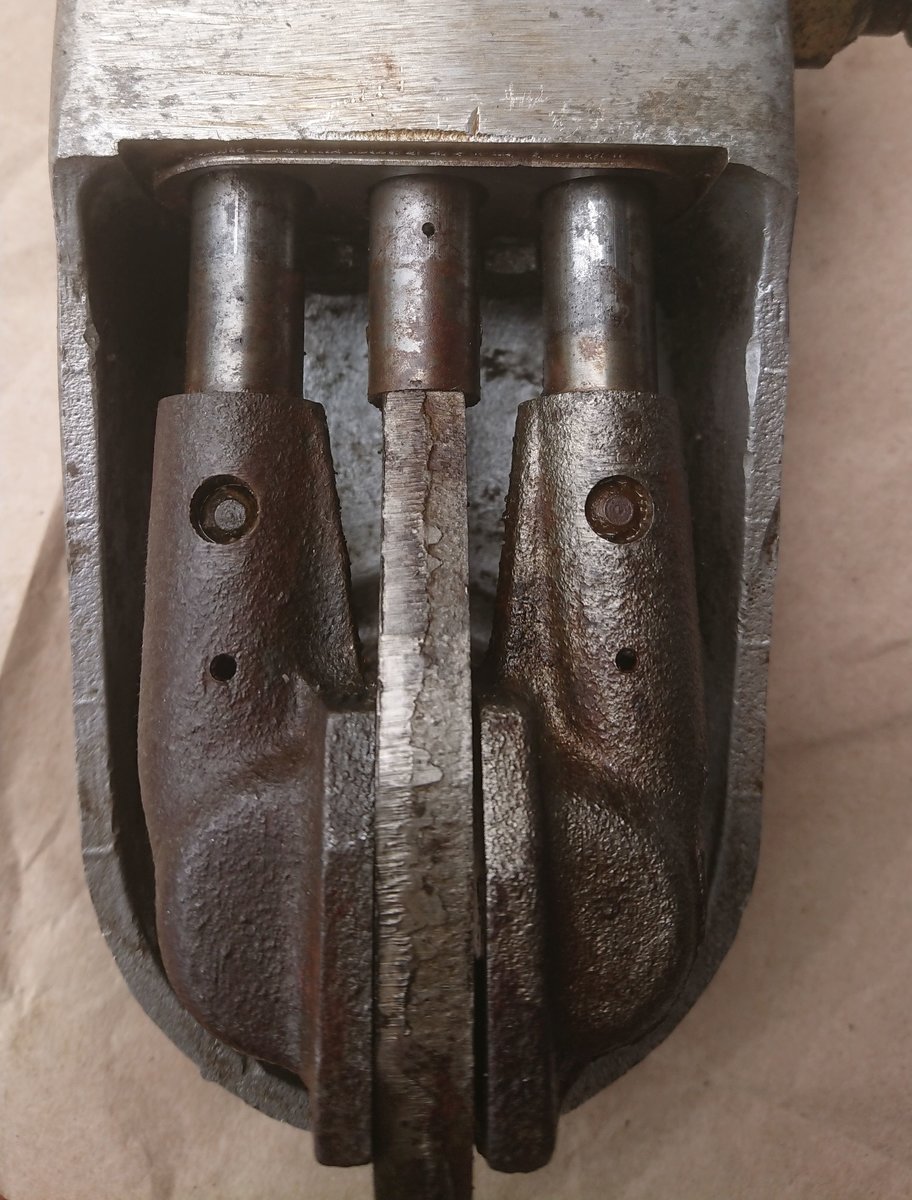
I've attached another picture of the rods having done an initial clean up of the selector box now I have separated it from the gearbox
Many thanks
Josh.

-
On 7/2/2020 at 1:51 PM, RogerH said:
Hi Josh,
firstly sorting out the 'O' rings is not straight forward but easy enough if you are adventurous.

See here for the 'O' rings Item 100 3 off 'O' rings
You need to remove the selector rods so as to get at the 'O' ring counter bore. This is not complicated but MUST be done is a particular sequence. Ask if you need to know.
If you go down the 3/4" lip seal route you will need to either obtain a special milling cutter with 1/2" pilot of we can sort something out - where do you live.
The lip seals can be obtained from most Bearing/Seal suppliers - I used Brammer. Part Number NBR07505013A
Roger
Roger,
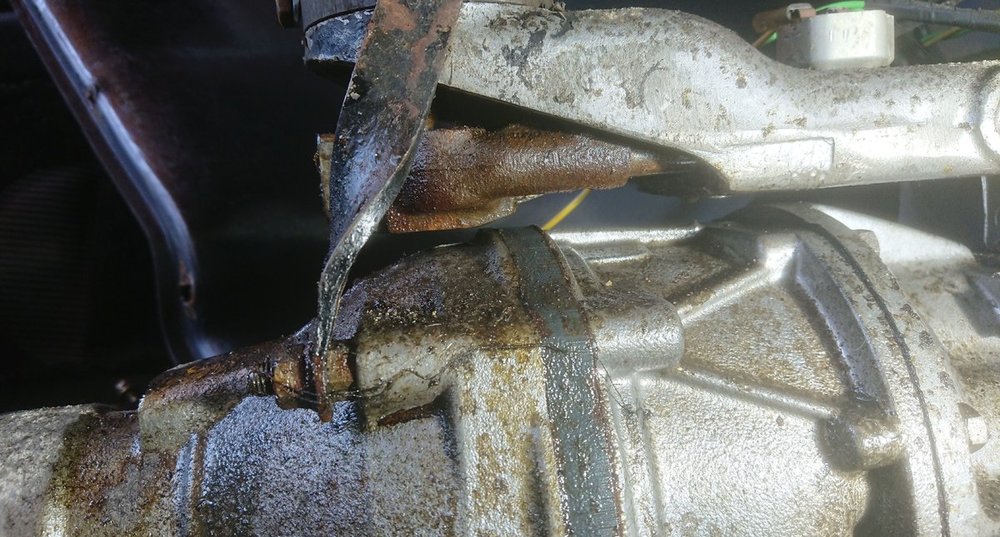
Many thanks, and many apologies for my belated reply, I have been tied up recently on a range of unexpected family business, so this has had to take a backseat.
Anyway, today I have finally got round to taking the tunnel off the gearbox, to find that I do indeed have a significant amount of oil being supplied from the selector rods (see picture) which would suggest that I have selector rod seal problems.
You mentioned that dismantling needs to be done in a specific sequence - I assume this the detail you shared on another thread with Z320 (Marco from Stuttgart) with details from Buckeye website?
Also, I'm thinking I'd like to pursue the 3/4" lip seal route provided that is a more robust/long term solution than just replacing existing seals.
Or is it possible to combine the two solutions in one?
Do you have any sense of how long I should expect normal seals to last and how to go about installing?
I am based in Gerrards Cross, Buckinghamshire, so not a long way from West London.
I'd be interested in your thoughts
Thanks
Josh
-
Roger,
Many thanks for your suggestions. Unfortunately I didn't get to it as planned, but hope to have another crack this weekend.
In the meantime, having not opened up the top cover, you mention 'O' rings may be the problem, when I get inside, which I will certainly check.
Also, could you enlarge on fitting of 3/4 x 1/2 lip seals - Where do these fit, and where can I source these if needed?
Thanks again
Josh
-
Rob, Thanks for the swift reply.
-
I have been under my car this weekend checking out two problems:-
1) An oil leak on my 1974 TR6.
2) Odometer working intermittently, whereas the speedo continues to work normally.
1) The oil leak
My initial investigations showed the oil to be coming from somewhere around the J-type Overdrive, possibly the angle drive for the speedo takeoff. I believe the angle drive may be part of the cause of the oil leak. The Angle drive appears to have a relatively large amount of movement on the joint below the collar which screws into the overdrive, which I would not expect.
Is this a possible leak source? And is any amount of movement on this collar joint normal?
Further investigations today from below suggest the oil may be coming from topcover above the overdrive. Further investigations are ongoing, think I need to take the tunnel off to check from topsides today.
2) Odometer working intermittently
I have noted that the odometer had been stuck on 43999 for some while, but finally tripped over recently after being stuck for 20 odd miles, whereas the speedo appears to be working fine.
In my oil leak investigation, I have found the outer casing of the speedo cable has been melted in one location by the exhaust, having not been supported in one location. I wonder if this may have had some internal impact to the cable, and be a contributary cause for odometer not working correctly? Or is the speedo head the problem here?
Any thoughts/comments gratefully appreciated.
-
Just a brief update to thank Bruce for his helping in person to identify and fix this issue, which turned out to be an electrical supply/wiring issue from the ignition switch. So I was seeing zero volts being delivered to the LT side of the coil.
Regards
Josh
-
Thanks to you all for your helpful suggestions.
I have comnbined Tim's and Roger's suggestions and connected another battery from another running car.
I then turned the car over for 1.5-2 minutes with no response from the engine. I then removed the distributor cap and turned over again to find no spark being generated at the (new) set of contact breaker. Additionally the starter motor started to smoke while the car was turning over. I am therefore thinking I may at least have a starter motor problem.
I now need to do some further investigations to try to isolate the reason why there is no spark at the cb.
Any further suggestions welcomed.
-
I’ve just this week joined the TR-Register.
I am having problems starting my 1974 TR6, which I have had for a couple of years, which has always struggled to start from cold (original starter motor, not hi-torque).
It had recently started to misfire occassionally which progressed to misfiring badly just over a month ago. I briefly checked plugs, and electrics, which all appeared to be fine. So I then moved my attentions to checking fuel supply, specifically injectors, to find one of the injectors had disassembled itself, but all parts were still intact inside. I removed all injectors, and had them refurbished, refitted, and bled them. Since refitting, I have not managed to get the car into life since replacing the serviced injectors, which I believe are now in fine fettle.
My initial throught for the car not kicking into life, was the fact that the injectors are now set NOP @ 60psi, whereas they were previously in the range 52-60PSI, which I wondered may be causing issues further down the fuel line. However, I have so far decided not to touch either the Pump, PRV, or Metering Unit after the injector refurbishment.
The car has not run for over a month. Before going down the route of checking/adjusting what to date has been a working Pump, PRV & Metering Unit setup, I decided to recheck electrics, to find there does not appear to be any sign of a spark at the plugs. There does appear to be fuel getting to each of the pots, because when I turn the engine over, I have pulled each plug out and found each of them are fuel covered, having not fired!
I have checked and replaced coil, points, & condenser. HT leads appear to be electrically intact end to end, if I believe the results of my multimeter testing, so I have not yet changed distributor cap, or HT leads.
I have done continuity & voltage checks, which show there is now power to coil, LT & HT, and HT @ the distributor cap.
One final thought for concern is that the main battery lead to the starter motor does get extremely warm after multiple attempts to turn the car over, - just wonder if a problem with starter motor could be contributing to reducing available power for fuel pump, and power at plugs?
I’m now starting to doubt my own fault-finding as the car still does not appear to be firing!
I’m based in Gerrards Cross, so any help, guidance, suggestions would be gratefully received.
Josh


Fuel hose failure
in TR5/250 Forum
Posted
Denis,
I would suggest using readily available R9 Vs R14. Both have a permeability rating of 15 g/m²/day, the key difference is that R9 is rated at 100PSI, whereas R14 is a lower pressure pipe, rated at 50PSI, not suited for injection usage.
I have used R9 throughout my vehicle and petrol smells in the boot have.............. gone!!!
Supplier who I used was Think Automotive in Ashford, Middlesex. I have no affiliation with them, but they know their hoses and fittings.
Good luck
Josh