


Adie TR3A
-
Content Count
25 -
Joined
-
Last visited
Content Type
Profiles
Forums
Calendar
Posts posted by Adie TR3A
-
-
Peter
Thanks for the prompt reply with the answer, i was beginning to think they had got into the TR parts from a previous restoration
Regards Adrian
-
Just making sure all the metal trim pieces fit before applying the vinyl to them
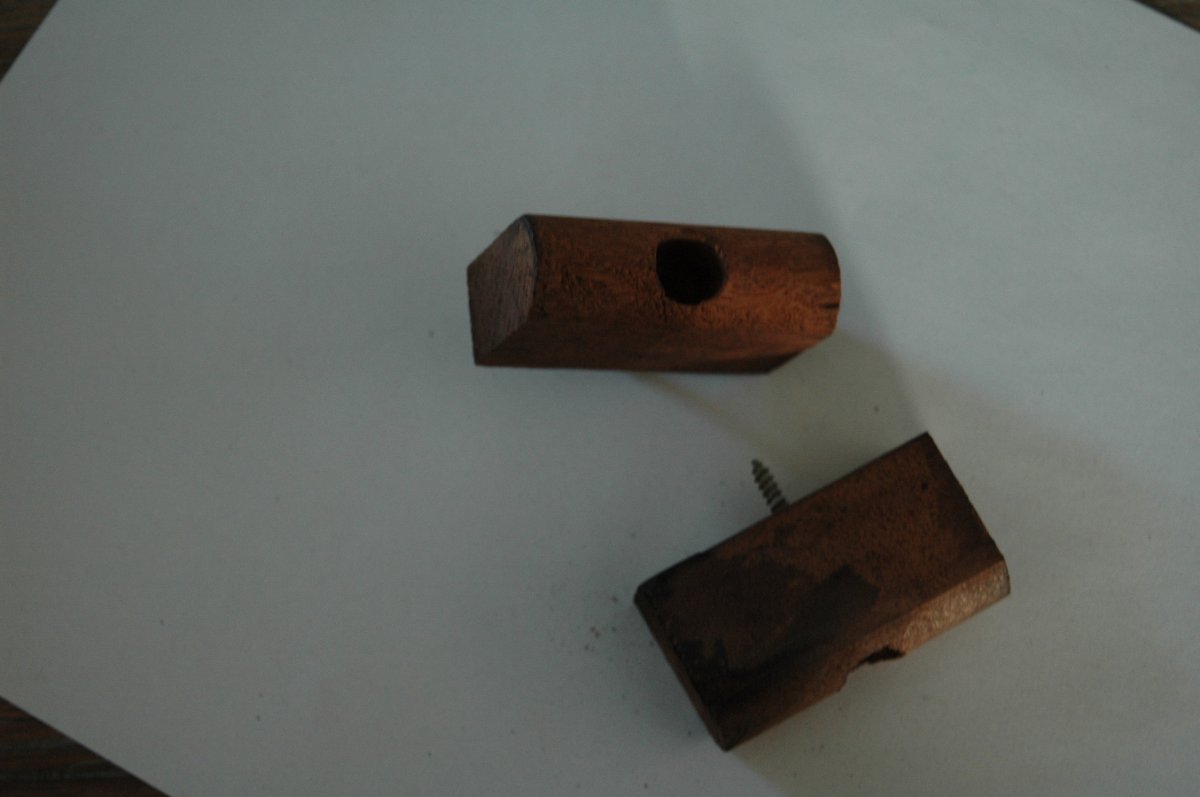
In the box of pieces i have found these 2 wooden blocks which when i took the car apart 18 months ago i marked Top Of B Post
Just cannot see where they go, the screws in them are wood screws not self tappers, don't appear to have any screw holes i cannot identify as likely fitting points
ANYONE ANY IDEA'S PLEASE
Regards Adrian

-
I have a Dolomite Sprint gear lever with o/d knob on my 3A. The lever is drilled for the wires so out of sight ONLY downside is you may need to shorten the lever to suit you. I did this on my TR4 with no problems
The G/L that came on my 3A is drilled down the shaft about 4"/100mm so only needs a hole drilling for the wires to exit, as the Sprint G/K is fitted on a spline not threaded as the 3 i am considering machining it to fit this lever
Regards Adrian
-
Thanks to all who replied, looks like i already knew the answer " you only get what you pay for" so I'll stick with Derby Plating as i have seen their workmanship at my pal's and when this current situation eases it's only a short drive from Leicester
Regards Adrian
-
The screen surround etc on my 3A looks ok from a distance but close up the whole assy is tarnished and having spent a small fortune on a bare metal paint job it needs re-chroming.
My pals at RH Classic's always use Derby Plating on their customer cars, the finish is excellent BUT £££££'s
Saw a Coventry Co called Marque Restore on one of the TV car shows the other week, any one used them or can recommend anyone else in the Midlands
Regards Adrian Salisbury
-
Brian
I was going to make an adaptor myself using GT6 mounts and flat plate but when i collected my refurbished box ( Dolomite Sprint with J type od/)from Pete Cox he had already got the Moss type mount so i went with that. On reflection with the time lost messing about would have been quicker to have made my own
Regards Adrian
-
Hi Roger
The R tech tig welders are great pieces of kit i have had one for some time now and have done all the body work repairs on my 3 with it.
Obviously you are using AC and pure tungsten or zirconated electrodes sticking out about 5mm from the ceramic shield
What gas are you using
Are you balling the end of the electrode before welding ?
Feeding the filler rod took me ages to get the hang of even now i have good and bad days. I found that the WP16 torch that came with the welder somewhat heavy when doing welding on the shell and changed it for a smaller lighter WP9 (R Tech or ebay) also changed the ceramic pots for glass Pyrex ones, eBay again(you can see through them when welding). Have you got an auto dimming welding mask?
It's practice .. practice perhaps doing some welding on 1mm steel sheet would give you some practice
Regards Adrian Salisbury
Roger
When tig welding Al you do not have a sharp point on your electrode but a ball/rounded end. Most people just touch the electrode to the work piece to melt the end, same result as when you do it accidently. This is covered well on U tube sites for tig welding Al
I found when doing my 3A bodywork i was constantly buying gas but the guy i get it from suggested i go to the largest cylinder which contains more gas per £ but the cylinder deposit is greater.
regards Adrian
-
Brian
Had the same problem with my installation not helped by having the Phoenix big bore system 2" dia with the 4 branch manifold
I fitted 6mm spacers under each side to get clearance on the exhaust pipe also enlarged the hole in the cruciform both ends for clearance.
The slot in the side for the solenoid needs opening out for more clearance as i was concerned there was not enough if the rubber mounting settled
regards Adrian
-
Hi Roger
The R tech tig welders are great pieces of kit i have had one for some time now and have done all the body work repairs on my 3 with it.
Obviously you are using AC and pure tungsten or zirconated electrodes sticking out about 5mm from the ceramic shield
What gas are you using
Are you balling the end of the electrode before welding ?
Feeding the filler rod took me ages to get the hang of even now i have good and bad days. I found that the WP16 torch that came with the welder somewhat heavy when doing welding on the shell and changed it for a smaller lighter WP9 (R Tech or ebay) also changed the ceramic pots for glass Pyrex ones, eBay again(you can see through them when welding). Have you got an auto dimming welding mask?
It's practice .. practice perhaps doing some welding on 1mm steel sheet would give you some practice
Regards Adrian Salisbury
-
At the point in my restoration on deciding which wheels to fit. Car came from the USA with wires but not all the same width or number of spokes ,so will have to be rebuilt or replaced. I have one original size wire wheel that will fit the spare wheel opening
If i go the alloy wheel option then a 5.5 J wheel will not fit the spare opening so would need to find an original steel wheel as a spare, as it's not a space saver i am not sure if it would be legal??
Modern cars come with space savers and certain Volvo S40 also V40 with 15" dia wheels have the same wheel 4 stud pcd as the TR. Any one considered this option, obviously i will need to check the rolling dia of this compared to the TR dia
regards adrian Salisbury
-
David
There are a s/h pair for sale on ebay right now item number 164183632226 with good photo's
Think the alloy frames may be wedge type only bur as the locating arms are screwed on it would be an easy change to the Dzus type
regards adrian
-
Thanks Stuart
Although not original i think i will stick with these, the s/h steel ones i have seen for sale look like they need a lot of work.
I will get the frames polished locally and then have them anodised.
The bottom flap looks an easy enough job for my local trimmer to redo
Knew about woolies and baines but not seals direct should be able to find something at one of these
regards adrian
-
My early 3A (oct 57)came from the states with aluminium side screens fitted. These have no covering on the window part just what appears from the bits left a "T" shaped rubber seal that fits in a groove on the top edge from front to back. There is an upholstered flap that fits on the bottom edge. These are wedge fitting frames.
Questions:
are these correct as they are ie anodised aluminium as others i have seen are steel frames that have been covered
Any idea of a source for the rubber seals
Regards adrian
-
Thanks to those who replied i now have the parts
regards adrian salisbury
-
Thanks to those who replied i have now got the parts i wanted
regards adrian
-
Want to convert my 3A to a 4A etc type handbrake so i need the handbrake lever and the bracket that is welded to
the prop shaft tunnel
regards adrian salisbury
-
This is the clip that holds the Foam rubber seal to the door bottom and top of A post. On stripping the car mine were either missing or just rusted away.
The current price of these from a well known supplier is £1.61 EACH and you need in the region of 30+, do the maths!!
Found the same item at Vintage Supplies Ltd part number 453 paid £19.32 for 40 inc p&p. www.vintagecarparts.co.uk
Look the same to me as one i saved BUT please check yourselves
Regards Adrian
-
Changed the calipers on my 3A for the later split type and now need the correct mounting brackets as the caliper mounting holes centres are different
regards Adrian Salisbury
-
Before i go the route of later calipers on a cost basis for my 3A restoration i am looking at alternatives
In Roger Williams book on improving TR2-4's he mentions the use of Toyota 4x4 front calipers as a conversion as they have a greater piston area being 4 over the OEM 2
Anyone done this mod and if so which calipers do you use
Regards Adrian Salisbury
-
Thanks to all who replied so quickly, looks like it is original production line process then. Intend to have shell dipped when panel work finished on the shell , have to find out if this removes the lead work
regards Adrian
-
Just returned to TR's after selling my TR 4 (john Weedon now runs it) with a late 1957 TR3A . It's an ex USA car advertised by the dealer as a 3 but the registrar confirmed what i thought, it was a very early 3A ( did not tell dealer of course!). I imported it back end of 2018 and it's the usual DRY STATE car, if so why am i fitting new floors, sills etc!!
Question for you all:
One thing that looked good on all the photo's of the car prior to buying it were the door gaps, wing fits etc. From contacting the previous owner its sat around for years before he sold it to a dealer and a lot of the paint appears to be original. When i started on the repairs to the tub first, i found that the door to B post gaps were good because the B post edges have been lead loaded ( a devil to remove the residue to weld new metal to original) under what i believe is the original paint. As i removed the rear wings i found this practice had been continued in the area around the rear lights and down where the rear panel meets the lower rear wing.
Was this the practice on the production line in the 50's at Triumph, in those cash strapped times would not have thought so??
Any thoughts anyone
regards Adrian
Side Screen Flap Material
in TR2/3/3A/3B Forum
Posted
My Oct 1957 ex USA came with aluminium aftermarket side screens which i intend to keep as the aluminium is in good condition and i only need two new flaps making plus some new Perspex.
I have persuaded my hood supplier (Carn Bosavern Garage)to make me two new flaps out of the same mohair matl as the hood they are making for me.
Issue they/I have is the the current vinyl flaps have a stiffener between the inner/outer vinyl which looks like thick cardboard, not the most waterproof of materials Any one made their own flaps and if so what did you use for this stiffening piece that can be sewn into the flap
Once again thanks to those who replied to my unknown pieces of wood yesterday, problem solved and now screwed firmly in correct location
Regards Adrian Salisbury