


CK's TR6
-
Content Count
163 -
Joined
-
Last visited
Content Type
Profiles
Forums
Calendar
Posts posted by CK's TR6
-
-
Flame trap? on an alloy cover?
-
I fabricated a piece of light gauge aluminum sheet that fit on top of two of the rocker cover hold down studs. It had a slight bend in it upwards to spring it against the cover. That provided a gap on each end for ventilation. Stopped the mist, weeping completely. Downside is I have to shove a flat blade screwdriver against it to add oil.
-
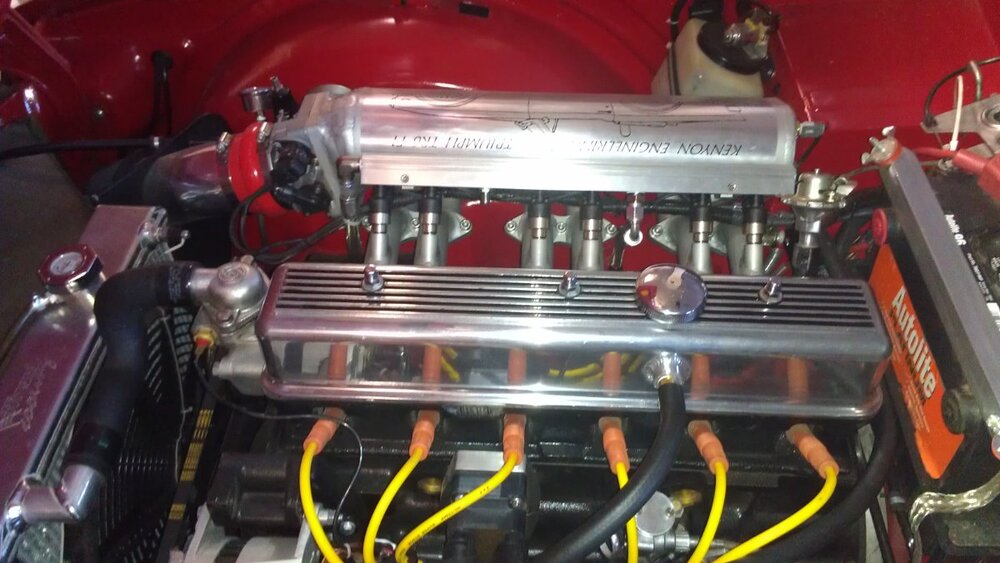
I have EFI with a Megasquirt 3X ecu. I obtained an old unused distributor body and modified it to 1. retain the cable drive for the tachometer and 2. provide a “cam” sensor for sequential injection. Essentially cut the weight pivot plate down to a single tooth and mounted a hall effect sensor on the side to detect the tooth. 3D printed a cap to keep any debris out of the body.
-
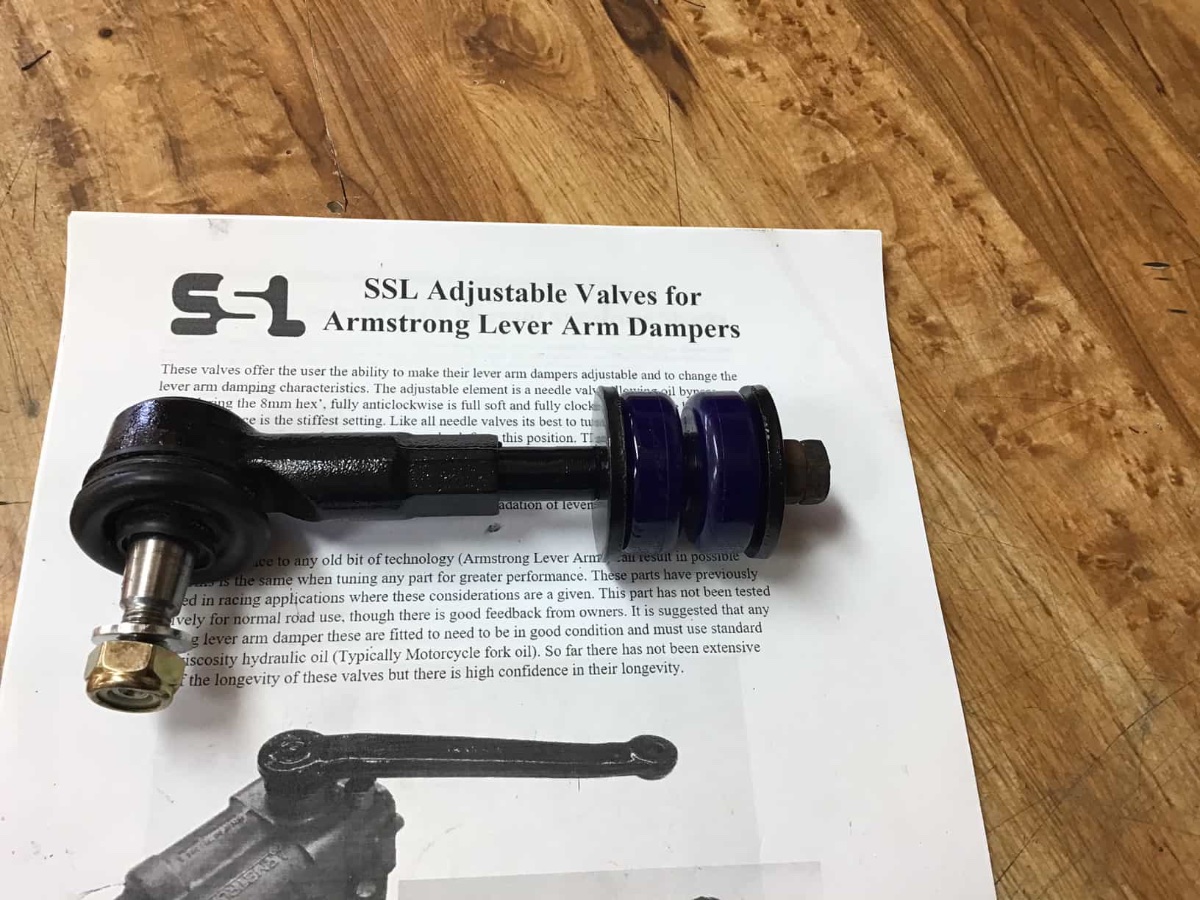
If you are sending them off, I would suggest having the externally adjustable valves put in. I have them, and it was nice to be able to dial in that last bit of damping. I liked them so much, I bought a second set of valves and put them in my back up (spare) pair.
-
When I rebuilt my front end, I went round and round with the steering stops. And my OEM stops were offset, by 0.005" . Many measurings with a caliper. Both were the same. And once I had marked the stop at max/min, installed the stop, adjusted the stop and there was no more fouling. Very subtle, not detectable by the naked eye.
-
grace, space and pace. the difference in driving experience from a S3 to a TR6 is like the difference from a TR6 to a Europa Special.
-
It is nice to see both the increased interest and the increased availability of EFI solutions. The Jenvey offerings of three different approaches are very nice. Ramtech is also a good option, looks a lot like the Teglerizer intake. With well over a decade of experience with my installation my observations are, crank fired ignition is a worthwhile endeavor, sequential injection was an improvement (cam sensor maybe needed), not all O2 sensor systems are created equal, and lastly, for me, robust knock sensing is an area that needs much investigation. The picture is from 2011?2012? original installation.
-
Holy hell! I hadn’t heard of the sycamore gap tree felling. I hiked past that tree and took pics. And I live in the US. Those miscreants should be strung up in public from the felled tree like being put in a public stockade.
-
Nice! or double Nice! well done.
-
measured the taper with digital caliper. went through the whole Moog catalog of tie rod ends to find a tie rod with 1. a taper within thousands of an inch 2. geometric configuration that would work 3. internal thread that was close to the outside diameter of the link (I didn't want to go find a metal lathe) 4. was short enough to fit in the vertical length.
Therefore, not a TR rod end, and I have no idea what the application is.
You might be surprised at the number and configuration of tie rod ends, probably at least 500 or so.
-
Links, cleaned out dampers with 20wt hydraulic oil, and adjusters.

-
Toby, maybe a little. The threading part of this didn’t go exactly smoothly. So, I went as far as I cared and made sure both were the same length. Tool count, hacksaw, thread die, vise, and wire wheel to clean off the rust.
-
Toby,
I took an old set of rear drop links, cut the ball end off then threaded the rod. Put a tie rod on that had the appropriate taper. I am in the US and bought the rod ends from RockAuto, $6
.
-
my friend and I had both our cars repaired from underneath on jack stands. we had the jack stands on top of cinder blocks and the stands were sized for a USA pickup. steady as a rock and plenty of room. I made a sheet metal template that held one pin in place and used the back pins for location. the welder we hired welded the pin around at the top, then did a bottom plate and then boxed that in. I believe the trailing arms were removed.
-
Toby, truly high class. A little vignette re Konig Rewinds. The red TR6 stickers for the late OEM centers (available from Roadster Factory) fit the Rewind caps most excellently. However, the Konig center caps are all plastic, and have a tendency to break off the mounting tabs in a most non-excellent manner. So, you get home and lo/behold you are missing a cap or two. A close friend lost two caps on a spirited drive, wheels were 2 weeks old..... The infuriating part is this, I ordered a set of caps from local distributor, took 6 months to get them. My friend was over a month and half. I don't think yours would fall off very easily. Well done, and they look smashing.
-
22 hours ago, BaulyCars said:
Has anyone tried the Wilwood/Goodparts brake master cylinder set-up, maybe that's a good upgrade in terms of pedal force/feel?
https://www.goodparts.com/product/dual-master-cylinder-kit-tr250-tr6-5-8-bore/
yes. feel is linear. force is nearly the same. is has three positions for the force/travel. adjustable bias front to rear.
-
pinstripe tape. automotive paint supply store or sometimes found in a local auto parts store.
-
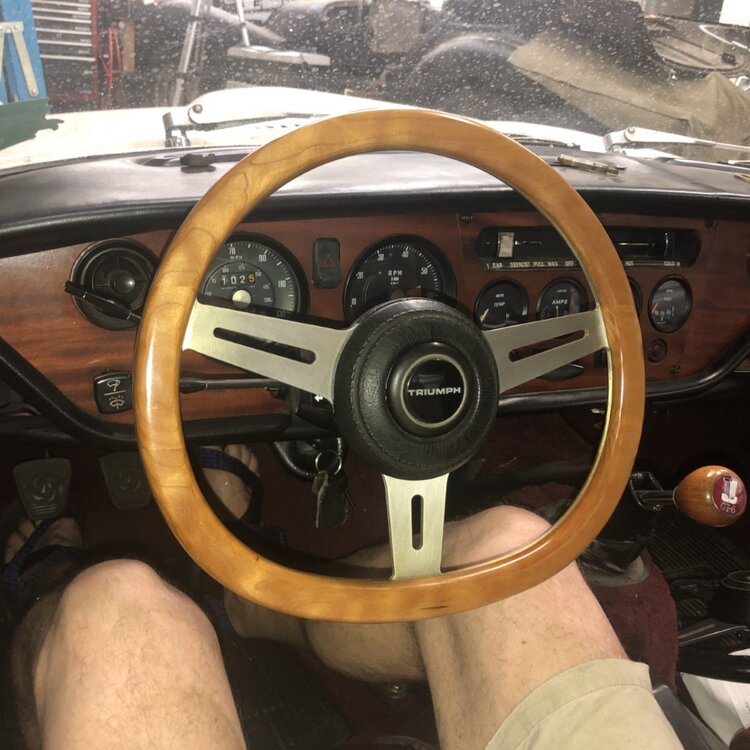
I made a couple of the steering wheels. I have the aluminum cores for several more laying about. As for the oil temp gauge, pretty flimsy mount, like really flimsy and nothing to block it from folding right up. I do find it useful as with the Racetorations sump, it takes some time for the oil to get to 150f. I don't go over 2500 rpm until then. And when trucking along at 85 mph for an hour or more in the desert when it's 110f outside, it's good to see what the temp is.
-
different solutions for different reasons.

-
if you are handy, I will send you a 6061 al core that bolts in. Glue a front and back on and you are set. you cover postage. if the front and back rings are masonite, shape them then cover with leather. post n duty will be the biggest expense.
-
Wouldn’t it be easier to just have a bolt in steering wheel (no adapter needed) that was sorta flat at the bottom?
-
I believe that for US market cars, it prevents the steering rack from moving easily aft in a frontal collision. The amount of give in the steering shaft is only about 3-4”. The reinforced rubber donut is not going to come apart so any movement in the steering rack aft, just make the steering wheel and shaft ever so closer to your chest.
-
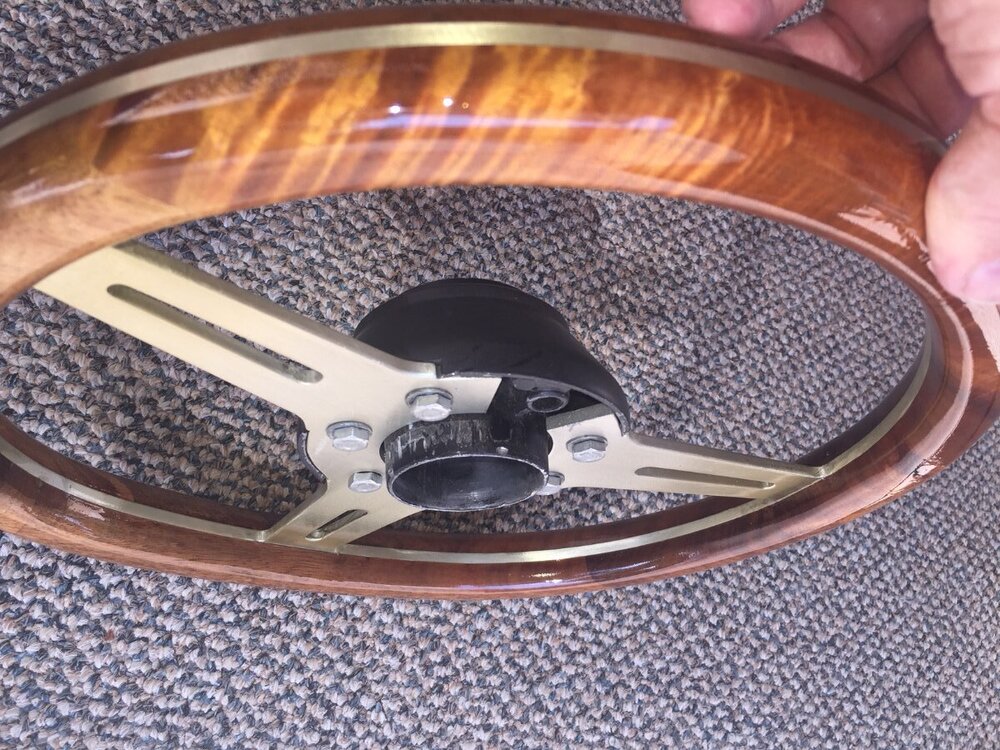
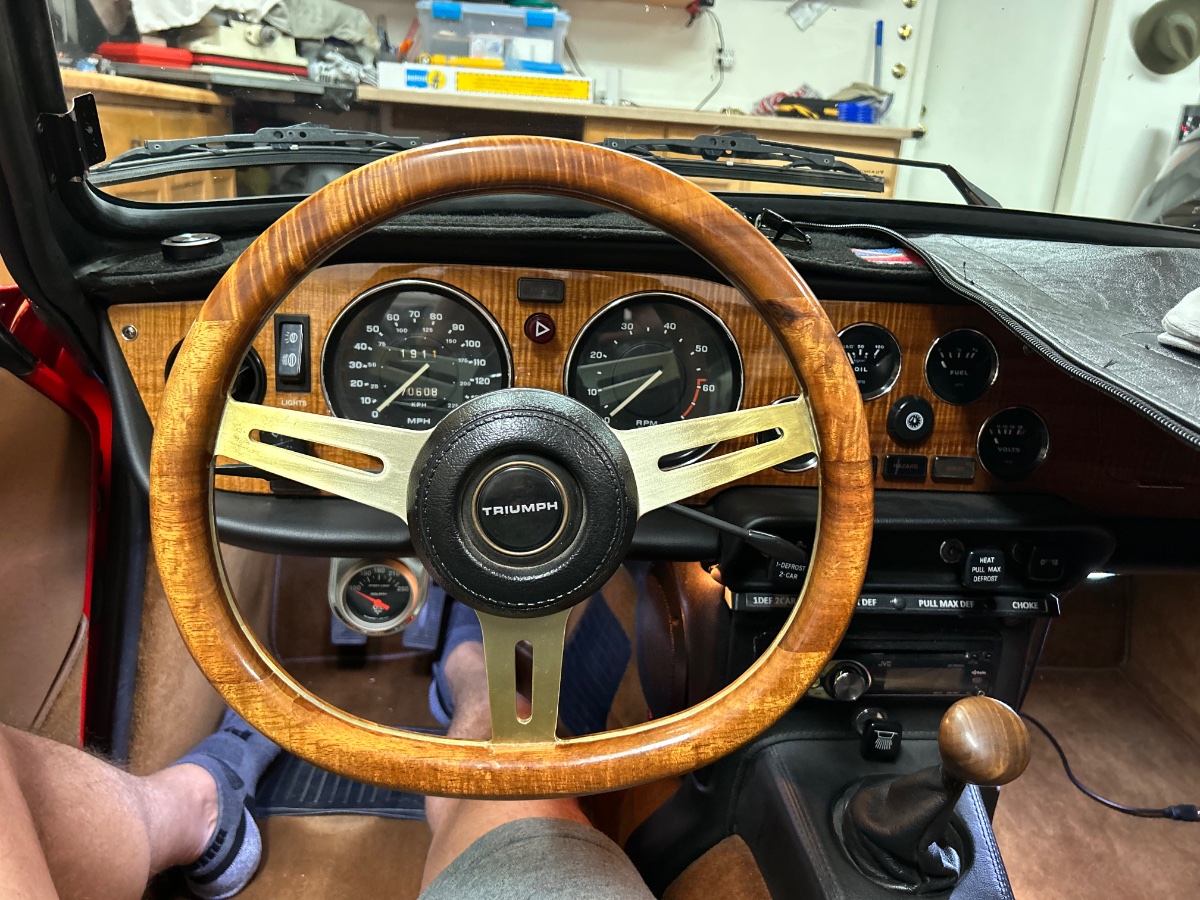
Here is pic of my wheel (koa)mounted on it's hub and another wheel I made in quilted maple in a GT6. Wouldn't trade the extra leg room for anything.
-
I have a 5 circuit box on my car (LHD). It is mounted on a bracket (go binky), that picks up one of the lower bolts for the front wing in front of the wheel arch and the two bolts for the bumper bracket (76). It is a sealed unit. It has the following loads, high beams, low beams, fog lamps, electric fan, and an extra set of horns. It fed directly from the alternator (90 amp) and each relay triggered by the respective circuit. 10 years or more of use. Only issue ever is it popped the fan fuse when the fan motor seized. Not the most convenient location but it is out of the way, and is closely located to the various loads. the fog lamps come on with the running lights, there is a sealed toggle switch to disable this feature. i did have to make a “bullet connector”. I took a six way and cut the center out, then soldered a two way to a four way and then slipped that into the cut six way rubber cover.


Rocker Cover Cap
in TR6 Forum
Posted
Ah, my configuration is alloy cover, fairly large hose to air/oil separator, which has a PCV to an intake common plenum. Separator drains to the sump. Even so, without the plate, I still got oil coming out of the cap. The plate stopped that.
Regardless, assuming the pressure inside the rocker cover is the same as the crankcase, you would need a lower absolute pressure in the intake at sufficient flow to overcome the total blow by such an amount that ambient pressure is higher than the resultant crankcase pressure to insure flow is into the engine from that breather hole. At wide open throttle, I don’t see that occurring unless your intake is throttling the engine some.