


MikeyB1
-
Content Count
117 -
Joined
-
Last visited
Content Type
Profiles
Forums
Calendar
Posts posted by MikeyB1
-
-
-
-
Thanks to everyone who replied.
Charley, thanks a lot for taking the time to take photos and measurements. Unfortunately it appears that the 6 boot is not sufficiently larger than the 4 that it warrants me changing cars.
John, emptied the boot, removed spare wheel and behold, the main body of the scooter fits. Unfortunately, there is absolutely nowhere to stow the motor unit or the seat. Back to square one.
Paul, you're obviously thinking out of the box. I will investigate this further, although I do have reservations about thw weight hanging out the back.
I did have another thought, the main body of the scooter would physically fit on a bootrack. I am concerned though about the weight which is 35lbs. My rack is the type that bolts to brackets, which themselves are captive under the front boot hinges and at the rear it's bolted through the vertical section of the boot lid. Any thoughts chaps?
-
Might I suggest using the Bilt Hamber injection wax. It comes in large aerosol cans with a long thin wand. The can works at all angles and sprays for 360 degrees. I believe their products are far superior to Waxoil (which I have used in the past) and have used them on several cars, including my TR4. No need for a compressor, no need to thin or heat up the fluid. Really excellent stuff.
-
Hello folks, I'm clutching at straws here, need your help please. I have a TR4. My problem is that my wife now needs to use a mobility scooter. The one we have breaks down into several parts, but it's still too big to fit into the boot. Due to the slightly different shape of the TR6 rear end, I'm wondering if the boot is any bigger, I suspect that it will also be too small, but as I said, I'm cluctching at straws, so would some kind owner please run a tape measure over the internals of their "6" boot and let me know. The height is the biggest problem, width I assume will be almost identical, not sure about the front to rear size. Thanks all. Mike.
-
John, for exactly the same reasons as you, I wanted a better solution for working under the TR. I bought from BH Repairs. See my post (MikeyB1) Oct 18th 2020, under Scissor Lift. Cheers, Mike Bambridge.
-
Thanks Conrad, but it's just a hood header rail (or complete hood frame) that I want, and it's got to be a 4a. Cheers, Mike.
-
17 hours ago, stuart said:
It then means you need all the mods to the screen frame as the Spit frame locks in the same way with the handles.
Stuart.
Thought about this again Stuart after I saw a Spit frame for sale. I can't see why I couldn't just remove the handles completely. The header could then be modified as per my suggestion in an earlier post. My real concern is whether the shape and size of the Spitfire header is the same as the TR4. Any ideas? I assume that it must be as some owners have used this set-up.
Cheers, Mike.
-
Good idea Chris, I'll give them a call tomorrow. Mike.
-
Yes I did see it Stuart, thanks, but that and the petrol to collect it puts it to around £300. Does seem a bit steep for my purpose, but they're not exactly plentiful, some I'm not ruling it out completely yet. At the risk of losing it, I'll hold fire for a little while just in case something more suitable ( should read cheaper) turns up. Mike.
-
Right, don't want to do that. I like to work on the KISS principle (Keep It Simple, Stupid). I'll continue to search for a 4a/5 frame/header rail. Thanks again Stuart. Mike.
-
Someone contributing to this topic mentioned that a Spitfire header rail would also fit the TR4. Can anyone confirm this as on that well known auction site Spit bitz have a Mark IV 1500 frame at a reasonable price. Ta very muchly, Mike.
-
Valid point Stuart. Mike.
-
I'm looking for a used TR4a or 5 hood header rail or hood frame with a decent header rail (not bothered what the rest of the frame is like) to convert my Surrey top to a "quick fit" version. Please advise cost plus postage, or happy to collect within a reasonable distance of Frampton Cotterell which is 8 miles north of Bristol. Thanks, Mike.
-
Thanks for the replies chaps. Have looked at your suggested thread Stuart, lots of ideas, thanks. I'm actually now toying with the idea of using an old hood header rail, fixing the front of the existing Surrey top to that (I may have to sew a strip of vinyl on to that to get sufficient material to do that) and then welding on 2 studs to the header which will fit through the hard top fixing holes in the windscreen capping and frame, and then using wing nuts to secure. As long as I can just bung the fabric on quicker than at present, I don't mind spending a few minutes sat inside, out of the rain whilst I tighten down the top. Your comments, gentlemen would be most welcome.
-
Hello folks, much as I love my TR4, the surrey top really annoys me. It's not one that seems prone to flying up, it fits fine, it's just that it's such a faff to put on. The car sits happily under the carport with no top fitted, as that's how I usually drive it. However, I often jump into my wife's car for a quick trip for shopping if rain is imminent, because I can be halfway to the local supermarket before I'd got the surrey erected. It is very expensive, but has anyone got first hand experience of Revington's conversion, which could be the solution. All I can find in the Forum is a comment that it might be a bit baggy! Toodle pip, Mike.
-
Just to make you all jealous......did the shopping at Tesco Click and Collect. Mind you, having the roof down did make it easier to load up.
-
That's great Tony, exactly what I wanted. I'll print it off and go and play in the garage. I'm going to use an old motor first before I take apart the one in the car. Thanks again, Mike.
-
Thanks Roger, gradually getting my head around this. Got to cobble together some temporary circuitry now to check whether or not I've got it right. Mike.
-
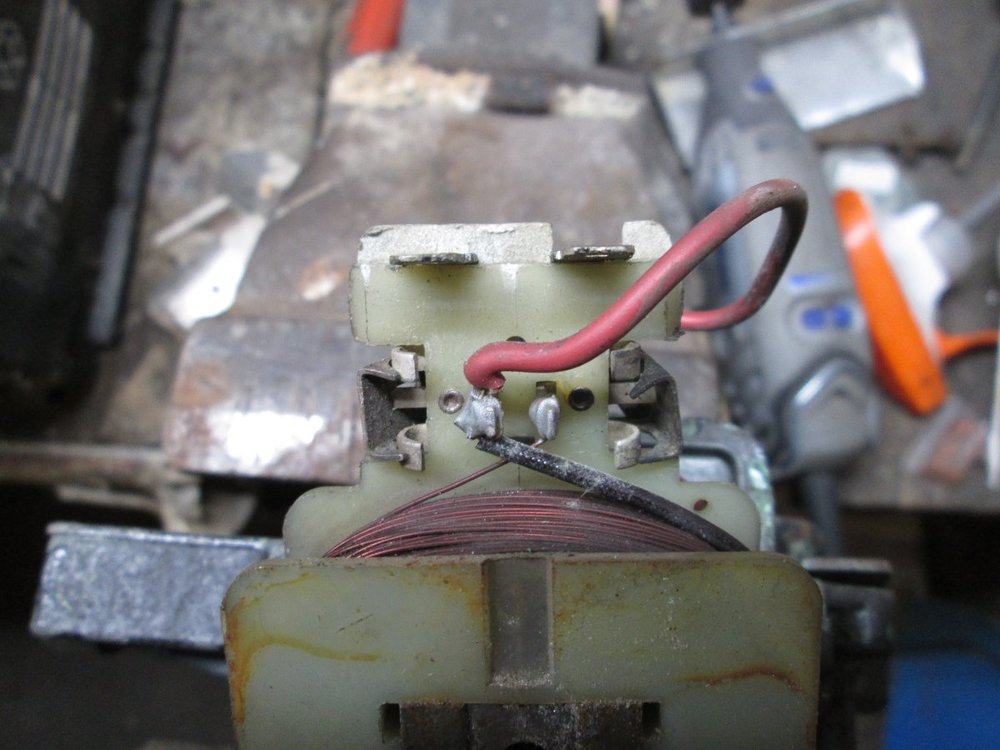
TT, I'm confused now. There is no Green/red wire in or on this motor. The only internal wiring is as you can see in my photo. the connections to the outside of the case are the two tags seen at the top of the picture which protude through the end cap. There are 3 leads going to the motor, 2 for power and a separate one for the earth. The red lead seen soldered to one side of the coil exits the case and is connected to the parking connection. The motor ran before I stripped it down so there cannot be any missing wires, surely. Hopefully you can see my confusion, any comments? Thanks, Mike.
-
2 hours ago, tr graham said:
I use a Henry type hoover on mine .
graham
Same here. Mine's at least 20 yrs old and has a fabric filter which is just shaken to clean it. Simples. Mike.
-
Thanks TT, looks like I'm going to have to do a little more work than I thought. Mike.
-
Sorry to be a pain everyone. I've read all the posts I can find on this topic, including those of the wiper "guru" AlanT. I've stripped down a spare DR3A motor, and identified (I think) the field coil wires. Referring to the photo, are the field coil connections the 2 in the middle? One has the parking(red) wire attached, the other is just to the right. AlanT suggests fitting a resistor into this circuit to enable the second speed. Do I solder the resistor across the ends of these wires, or do I cut just one wire, solder it to a flying lead fom the resistor, and from the other end of the resistor, take another lead to the remaining field coil connection? To prevent me getting confused, could some kind person draw me a simple diagram? Thanks folks, Mike.
-
4 hours ago, RogerH said:
+1
+1 here as well. Mike.

Amco style boot rack
in TR4/4A Forum
Posted
Has anyone any idea what the weight limit of the Amco style boot rack is when attached to the TR4? Would 40 lbs be too much? What do people think? I dont want to distort the boot lid. I've e-mailed suppliers but got no replies yet. Mike