


Trumpy3
-
Content Count
121 -
Joined
-
Last visited
Content Type
Profiles
Forums
Calendar
Posts posted by Trumpy3
-
-
I tend to agree with Stewart but have just replaced mine so achieve the minimum threads required by our local race authorities. The standard long steel wheel studs are not long enough.
Removed the hubs (have a puller), removed the studs and fitted 2" high tensile cap screws with thin washer from the rear and tightened them to prevent them from unscrewing. The washer is used to allow for the thread on the cap screw not running all the way to the hex head.
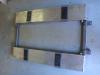
By doing this, no machining is required, preventing any chance of misalignment. To locate the brake drum (disc in my case) I drilled a 7/16" hole in some 1/2" stock and cut off four spacers to act as shoulders on the bolts.
As a matter of interest, I also replaced the front studs with Nice S1060 wheel studs that are a long stud that needed about 1/2" to be cut off. They simply replace the standard TR stud. No machining, drilling etc.
Brian
-
I have found it necessary to remove the hubs to successfully remove the studs. It is relatively easy to remove the hubs if you can get hold of the correct puller. The studs are screwed in and peened over to prevent them unscrewing. I have seen them tack welded in place also. You will need to grind/drill the peened portion out. One of our members removed them by cutting them off flush and screwed them out through the hub with a easy out.
Brian
-
Just a thought. How is thew brake peddle adjustment. The push rod should be loose when at rest but no excess play. Some of the travel could be just the linkage taking up the slack.
-
-
Hi
The starters have a 9 or 10 tooth pinion. Best advise is to count the teeth on your current starter and get that. As you know, the cars age or engine number is not a good indication of the parts currently fitted. I have a 1960 TR3A but it is fitted with a TR2 flywheel (pressed on ring gear) and a TR6 pressure plate
-
Paul,
Not many answers on this. All the water pumps I have striped are the same. The TR pump is not that sophisticated and 2mm sounds about it.
Brian
-
Wheel bearings are not that big a job but getting them can be, the same with inner tubes. I do not run inner now but did need one on an earlier trip and one of our other members carried one in his spare wheel compartment.
We are lucky(?) here in that we do not need to carry triangles, vest, etc by law.
Yes Don, the mobile is the best piece of emergency kit you can carry.
-
If you want a tool for every possible contingency, then you will need a trailer. I carry a fairly basic kit in a tool bag, not a box, as t will blend into a space left after your shoes and that bottle of red.
As for spares, you can carry some small odds and sods in you spare wheel as I am sure most do but there is a good organizer if you can find one. It is an old Tupperware container that fits neatly in the wheel. I carry a spare set of plugs, wheel bearings, bulbs, fuse, nuts bolts washers , wire tape, etc.
-
The clutch slave fork on my 3A is slightly longer than the master cylinder one.
-
Not sure I fully understand where you are up to. As I read it, the box was stuck in gear so you removed it and pulled the selector cover and found you can not remove the selector shaft. Is that correct? If so then the spacer on the shaft in front of the fork should have stopped it. That is what it is there for. Has the box just had work done?
-
I fitted a 2000 box with A type to my car with no real problems. The only mods I done were to change the rear case to get the TR mount and speedo drive. I use the car on track days with no problems.
Since changed to a 2500 box with J type...fewer oil leaks. From memory, they reduced the engagement time to reduce the loads on the IRS and improve its durability (the rear end not the OD).
The 2500 here had a 28% OD which was OK but I was able to get a unit from an outer car(Volvo I think) that is 25% so fitted that gear set.
I run an 2500 sports clutch kit which overcomes the input shaft issue and use the original 2500/2000 thrust bearing set up. With the TR6 I would imagine the TR6 pressure plate could be retained and only the clutch plate need be changed.
An interesting point I found was that with the 2500 box and J type, the original TR3A speedo could still be comfortably used without mods.After fitting I went out with a GPS so I could make up a conversion chart. Over here we have gone metric and use KPH. The chart showed that if you take the reading in MPH from the speedo and double it, it is correct in KPH. Reading 50MPH...actual is 100KPH. Thats just how all the different ratios worked out. Do not know how the TR6 works out.
I would up-rate the lay shaft and gear.That is a real weak point in the all syncro boxes in TRs and saloons.
-
I started with a MS2 V3 build it yourself about 8 years ago. then upgraded to MS2 Extra then to MS3X last year. Went IBT last Sept. I just like fiddling.
This is my msq. I am still tuning but it is going well and my track times are good....for me anyway.
My comp is 10 : 1.
oops it will not let me attach a msq file or the table.
I will try to screen print and send that. Have to work out how first.....never had any success with it before.
-
Same as you, Megasquirt. An MS3X. Fully sequential, wasted spark.
-
 Same problem, different car. I have fitted EFI to my TR3A and the same problem exist, the inner guard. I have a pair of Jenvey 45mm (Weber replacement) duel throttle bodies fitted to a Weber manifold. I fitted a 40mm deep PiperCross filter Which did the job but I wanted a cold air box. After a bit of research on Dr Google I decided to make my own. The easiest way was to make up a extruded polyurethane life size model and cover it with fibre glass. There are any number of u tubes on this process.
 The process is easy, took me about one and a half hours to make the model. The foam cuts and sands easy and you can keep checking for fit and size as you go. Then cover with glass. I picked the foam out of the finished item but you could use thinners, petrol etc to dissolve it.
In my case I used the Piper Cross backing plate to mount the air box as I already had it but it would be a simple task to make one from aluminium sheet. After sanding down and cleaning it up I painted with crackle black (hides all your sins).
Works and looks good, at least I think so. total cost, about $30.00 plus your labor and the backing plate.
-
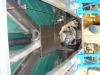
The brake disc is a Nissan Pintara unit(same bolt pattern) and the calipers are from a Nissan 200SX. I chose those calipers because the hand brake cable came off parallel to the axle and the only mod required to the TR hand brake set up was shortening the two cables about 1.5".
If you go to the Australian web site there are some pictures.They are in the Gallery section under Brian Richards. Go to the following and look under Resurrection of TS 80665O
http://www.tr-register.com.au/Files/richardsb.htm
This may raise more questions than answers.
-
happy New Year to all.
Just a thought. Is the small spacer(collar) in place to hold the 'O' ring? Item 56(502567) in the Moss catalog.
-
Disc brakes on the rear....Oh you noticed that. Well there are also a number of other mods, EFI (Megasquirt), front ventilated disc (Skyline GTR 4 pot alloy), Koni on the rear (my mod), panard rod, cruise control, rack & pinion (Ford Escort), camber kit (my own fully adjustable kit), radiator (Volvo 440), electric water pump( Davies Craig).
Went down the originality road with my first TR3A,. Finally won our national concourse. This car was/ is my project when I retired. Came as a 'kit' car, in boxes.
-
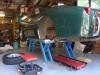
Another way is to use an EZcarlift. I am getting a bit older and was looking for a way of safely lifting the car so I was not down on my knees. I could not fit a hoist in my garage as it is too low and the scissor lifts all have their lift mechanisms in the center. I came across the EZcarlift on the web and it looked the answer. They are built in the USA, not China.
As you can see, you can get at all things under the car except take the sump off. I I want to do that I simply turn the lift around and put it in length wise from the side. It will lift up to 27" and as it works on a screw thread, you can stop it at any height and it is automatically locked in position. It is powered by an electric drill, no air. A good cordless drill will work if there is no power. with the use of 4 small pads it can be used on grass or sand. The center is free and you can use a creeper.
-
I am a bit late on this but only just joined.
All the above sounds OK but it is best to set some form of stop to eliminate any chance of solenoid burn out.
I have experienced an issue with too much clearance. The overdrive was inconsistent in it operation. Some times it would engage immediately, some times up to 30 or 40km later. Rougher the road, the quicker the engagement. It was taking a bump to lift the solenoid plunger just enough to get it into the coils field. Fitted a stop and problem solved. Maybe a new solenoid would have fixed the problem as well.


Lidl Oil Extraction Pump, Sunday 22nd February
in General TR Technical
Posted
A good point for a drain plug, especially for the gear box and diff is that you can see any lumps that may come out. An indication of a pending disaster.