

Keith66
-
Content Count
511 -
Joined
-
Last visited
Content Type
Profiles
Forums
Calendar
Posts posted by Keith66
-
-
Hi Guy's
I'm with Waldi that as the line will be empty i could take ages for the fluid ot come through.
But i would expect to see air bubbles to be being forced out of the line into my container half full of DOT4 when my helper presses the brake pedal but i'm getting next to nothing, the odd tiny air bubble but often nothing and we've done 20 to 30 brake pedal depresses each side, which given other cars i've done is plently.
This seems to indicate the air is not being forced out by fluid, which i cannot understand.
A block is possible but as everything is new and it all worked 3 days ago i'm thinking that is unlikely.
Its as thought the movement in the pedal is not being transferred to movement of the fluid indicating a fault in the master cylinder, but the front bakes bleed and work as expected indicating it ok.
As i said i'm stumped.
Cheers Keith
-
Hi All
This should be a simple thing but it’s gone wrong and I’m puzzled as I do not know what the problem is.
Getting an all new brake system up and running. Everything is new, never been used so I filled it with DOT4 and bled the back and front. All seemed ok’ish with the brakes stopping and wheel spun by hand. Until I discovered the 3way at the rear was leaking where it joins the flexible pipe on the pass side. So I had to remove that and renew the copper seal washer.
As I didn’t have one it did get left overnight unconnected, but put it all back together today but as I disconnected it the fluid in that main front to rear line leaked out. Well to be expected, wasted a bit of fluid but got some spare so no issue.
Just re-bleed the rears then all ok I thought.
But its not, I cannot get the rears to bleed. When depressing the brake pedal, no air bubbling through and no fluid at the bleed nipples, either side, no activation of the wheel cylinders, nothing.
No being sure of the problem re-bled the fronts and no prob, all working as expected and the brakes stop the fronts turning when the pedal is depressed.
I cannot detect any fluid or air coming out of the three way where the original leak was and there were and are not any other visible leaks so I just cannot work out what might be wrong and what to try.
I’ve bled brakes before on other cars and not had a problem and it should be a fairly straightforward process, even for me.
But this has got me stumped.
I’m sure its going to be something simple but I’m at a loss and just can’t figure it out.
Any suggestions?
Cheers Keith
-
Hi All
Reading around on this subject as i've had some starting issues which were helped by using a dedicated 12v Batt in the boot for some initial starts. Seems once started and been running for a few mins it will start ok. But if left for a while, weeks, it struggles. So I’m going to go the dedicated 12v feed to the pump (Lucas on mine).
I absolutely get the theory behind the wiring but not being an auto-electrician I’d rather follow a wiring diag than wing it.
There was a post which referred to one but the link seemed to link back to the same post so I’m a little lost on that and was hoping someone had a diagram.
Q2 is what spec Relay do i need. Again fine with the theory of the Ign wiring telling the relay to connect the direct feed but all relays are not the same and i have no idea what spec I might need.
Cheers Keith
-
Hi All
Been reading this thread with increasing concern.
When i got rebuilt my engine errr cough cough years ago i well just bought a new oil pump from one of the big outfits and just bunged it in.
Didn't think much about the old one, well a new one is it bound to be better right, although it seems maybe not.
Well I'm going to check them both now, not having binned the old one.
So something else to do now, but it also brings to mind a question.
When did Triumph stop using the pump with square type oil pickup with the internal wire gauze filter
As mine is a very early 72 reg date it would have been built late 71 so curious as to what it would have had.
Cheers Keith
-
Hi All
Thought I would update everyone with the latest developments on my dodgy reverse lights.
So I was convinced that either the switch actuator section of the reverse gear selector wasn’t moving far enough out of the way or was just too big. Hence my threat to the gearbox to get my angle grinder out.
But I decided on caution and ordered a new bit as it was surprisingly cheap and better to have a spare if I ruin one with my angle grinder skills or lack of.
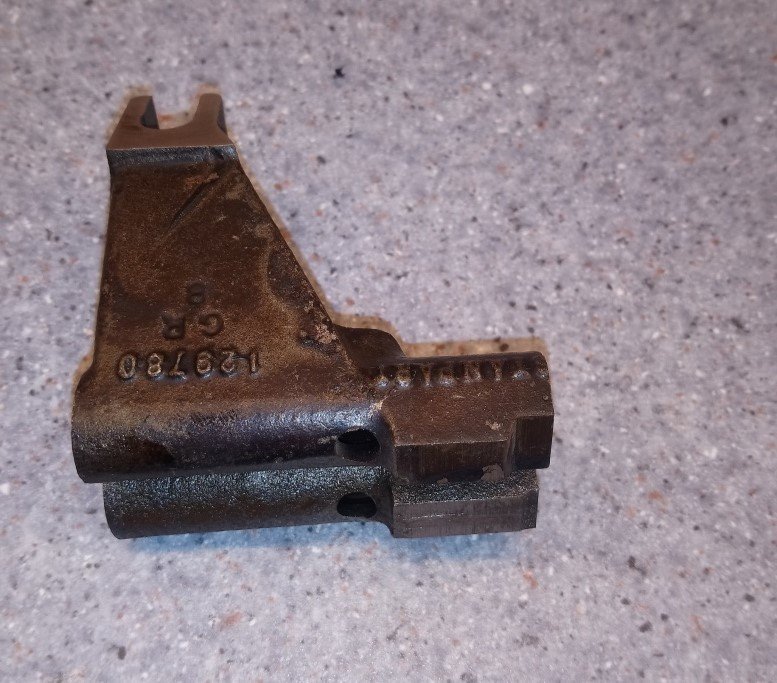
Well my new bit arrived today and sorted all of my problems. As you can see from the pic the high part of the step that actuates the switch is just shorter (top one), so the switch works perfectly. I bench tested it, its fine, I dry fitted and tested it, its fine so now fitted with new gaskets etc and its all fine. Lights on when in rev and off when out. Yeah

And from the pic of the switch hole you can immediately see why. In my original pics the switch actuator part was in the centre of the switch hole, in the new ones it’s there in one but in the other its far enough out of the way.
I also tested the OD switches and can hear the satifying clunk as the solenoid operates so everything in that bit looks like it works as it should.
Just got to get on and finish the rest now, before my possible new charge arrives
Cheers Keith

-
8 hours ago, astontr6 said:
Did CTM know something about the type 2 that others do not and that is why they added the extra mounting point ? I used the Spax gas type they lasted over 20 years now replaced with their last type which I have to say gives a better ride even set on the soft side.
Bruce.
Bruce
To be honest better chance than average that maybe they did, afterall they build new and repair the whole range of TR chassis so i'm sure they've seen pretty much most of the likely problems and would design mods with that in mind.
Alan, now I'm def no chassis or mechanical engineer but my feeling would be that i wouldn't want to put any more forces through the lever arm mounting on the trailing arm. A coilover with that as a bottom mount just seems like it could be too much to me and I'm sure i've read somewhere this is a known failure point. But someone with more knowledge than I maybe able to comment more knowledgably than I can.
Cheers Keith
-
Hi Bruce
And i think the vast majority like you won't have any problems at all, esp if the appropriate shock unit is fitted.
But all our cars are old and they fail for many many reasons. Modifying from std spec is one, not modifying is another.
After all i doubt the expected design life expectancy of a not hugely expensive 1970's car was ever going to be 50 years.
They why we kepp having to mess with them.
And to be honest restoring and keeping them going is half the point.
Cheers Keith
-
Hi Adrian
I considered converting from lever arms and dismissed type ones as a bad idea, as you say due to the stresses they exert on the bodyshell, which was never designed to cope with direct suspension stresses, but I thought type 2’s were a good idea as they bolted directly to the lever arms chassis mount points, I even bought and fitted a set.
But there is a thread on here showing the result of a chassis failure with a type 2.
https://www.tr-register.co.uk/forums/index.php?/topic/66376-rear-shock-conversion-what-not-to-use/
I suppose the failure is down to the chassis not being designed to take the kind of high vertical loads imposed by telescopic shocks rather than lever arms and or an incorrect or incompatible model of telescope being fitted.
But I don’t suppose it’s an exactly common occurrence and will probably have been contributed to by hard shocks and errr, spirited driving over rough surfaces and even chassis weakness due to age and corrosion, although all TR6 chassis are now old, so there is a a risk.
And I’m sure lots have fitted them with no issues and that they offer benefits over lever arms so each to their own.
Cheers Keith
-
Hi Tony
I have two new switchs and one old original that came with the car.
With the known history of my car and its errr, extended time off the road i'm pretty sure that is either original or early 80 replacement not a modern one in todays money.
and all three switch perform the same.
just waiting for my new reverse slector fork so i can try it all agian amd modify if i need to.
Cheers Keith
-
Hi All
Yep looking at the cards themselves 4mm would seem to be absolutely at the top end of the length and they are few and far between, 6mm seems the commonest. Not seen any 3mm but if I can get them does it need a specialist staple gun. Loads of manual ones available for not a lot but as Stuart says will they “fire” 3mm staples?
I’ll have to have a search.
But thinking of tidying up my originals does bring up another question.
There are a couple of minor splits, they are where the pattern has been hot stamped into the panel so are not especially noticeable but I thought about using some sort of “glue” to stick them together.
I’ve seen 3M1099 Scotch-Weld™ Vinyl Adhesive and there are plenty of general purpose flexible glues about. So has anyone tried doing something similar with any decent results and have any recommendation for the product.
Cheers Keith
-
Hi all
Just looking to steal some info.
Not a million miles from refitting the interior and want to get it looking well nicer, but keeping as much of the old stuff a possible,
So the door cards are not bad but the vinyl is coming away and i can see on the back where the staples have rusted and dailed.
So the idea is to staple and glue it back into place. Should be simple right?
Well can anyone recommend a size or type of staple gun and staples?
I've got a normal sized one staple gun but the staples must be 10mm long and would go straight through the door card and cover and probably into my hand. I've tried a normal stapler and they just are not man enough and the staples just bend. I've looked but the smallest staples seem to be 6mm which still seems too long, though I could well be wrong, so thinking there may be a specific type or size of staple or even gun.
Any ideas?
Cheers Keith
-
Hi All
Stuart, fortunate now to have two sets of rods and when the selector for arrives tow of those so i'll try each combo before grinding anything. Also good point that the ball just needs to fall off the ramp a little bit so it'll be tiny bits at a time.
Mark cheers for that, hopefully all will be ok because as it was an OD GBox i wasn't confident in my abilities to do both, i got them checked and rebuilt professionally as needed.
All the GBox bits seem to work ok, its just that part of a GBox rebuild obvs isnt to check if the Rev lights work exactly as they should. And i wouldn't necessarily expect it to be.
I'm sure Stuarts come across similar before as when he installs a GBox he has to make sure it works Rev lights switch on and off and OD switches work as well. The GBox guy just does the GBox and doesn't necessarily check the GBox ancillaries as well.
Esp for something very uncommon (it seems) like mine prob.
Anyway I'll await my Rev selector and see if i can get it working ok.
Cheers Keith
-
Hi All
Stuart my thoughts were kind of on similar lines.
Trouble is re-drilling or slight modificatiom of the rev selector fork is difficult, well for me with a hand drill it is.
So I'll see how the new cast selector fork works, if it does great if its the same it might be something else so then its out with the angle grinder and at least i will have a spare fork if i fork it all up.
Well my motto is find out as much as you can then errrr drive right in, how wrong can it go.
Cheers Keith
-
Hi All
Now all of my comments assume i know what i'm on about, which is debatable at the best of times. So the reason for posting was to find out if anyone had any ideas or could tell me what a plonker i was for getting XXX wrong.
But i'm kind of stumped.
As Stuart says that is a late top cover with the diff rev light switch position. Mine is def right for the age of car, build late 71 reg very early 72, so no worries there.
It def not a switch issue as i've tried 3 diff switches, that have all been bench tested and work as they should. Its not a switch position issue as in in or out of the hole far enough as i tried with no shim and tried with it out over 1/4 of and inch. I can get the lights on all of the time or off all of the time just not on when in rev and off when out of rev.
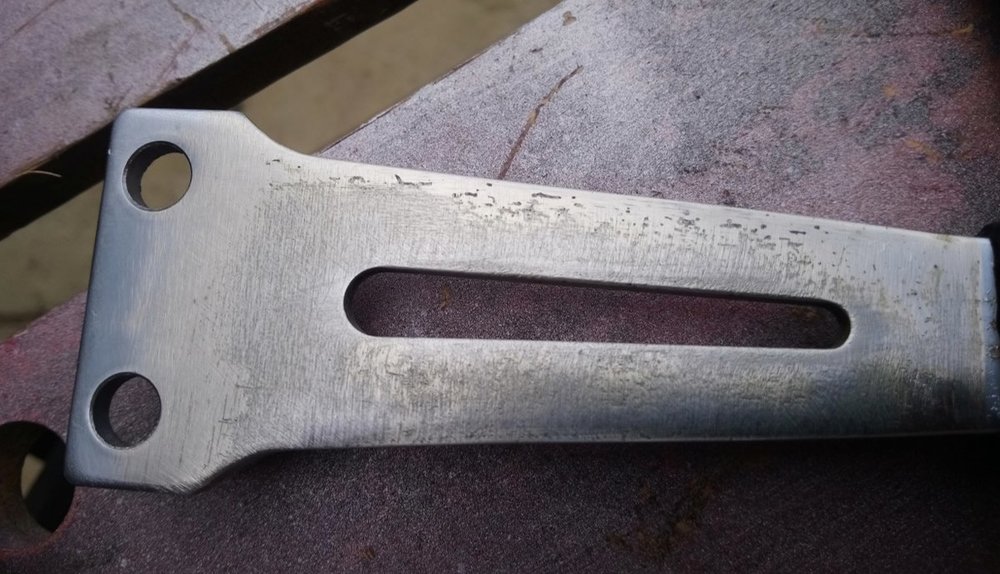
I've got the top off and stripped down and can now see its actually the reverse selector (129780) that operates the switch and its either in the wrong position on the selector rod or its just not quiet the right dimensions.
So i've tried two sets of selector rods and no joy and how can it be incorrect dimensions? I mean 1970's Leyland products were made to the best quality but making internal gearbox bits the wrong size? That would amaze even me.
But surprisingly a new one is cheap at under a tenner so i've ordered one. I can then compare it to my existing one, test if the new one is any better and experiment with my angle grinder if needs be.
Still curious on the cause but in 48years a lot could have happened.
Cheers Keith
-
Hi Guy’s
I really can’t fathom this one out.
And I’ve have had a classic gearbox specialist have a look and no joy.
My reverse lights are on all of the time. So I’ve gone back to basics. Not the switch(es), tried 3. Then bench checked them, they all work, spot on. Then checked the wiring is ok. Rev lights work fine when switch connected up but out of GBox and operated by hand. So thought I would try the switch screwed in varying amounts.
With the GBox in reverse I’ve screwed the switch in until it just turns the lights on then took it out of reverse. Lights stay on. Then started with it in neutral and screwed the switch in until the lights just come on and then back ¼ of a turn so the light go off. Then put it in reverse and …nothing no lights.
So if the switches ae fine and the electrics are fine it must be the GBox not operating the switch correctly.
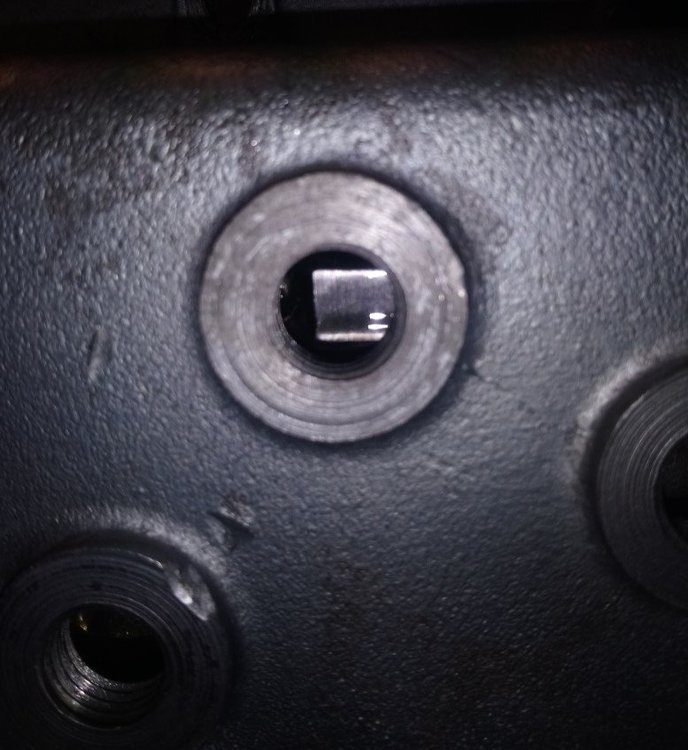
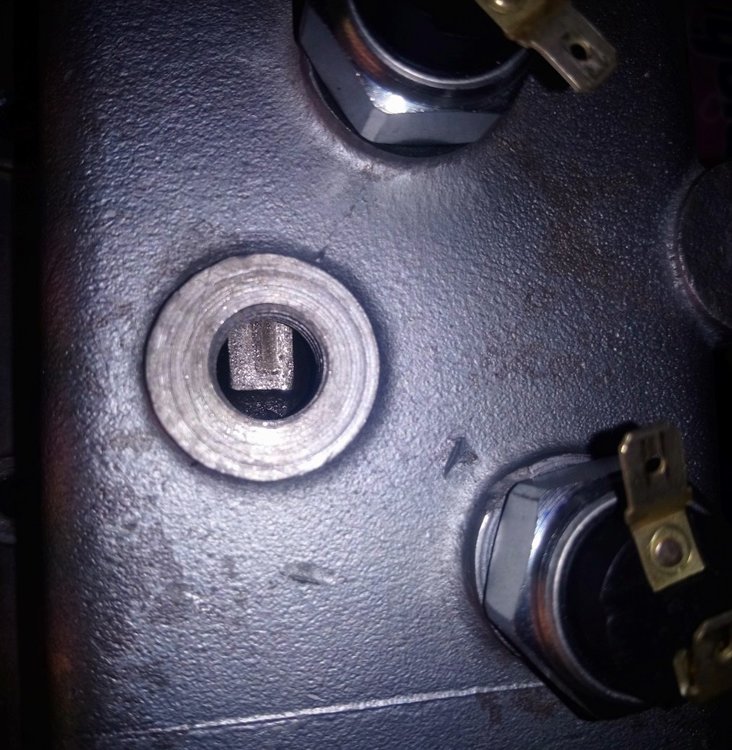
And if I look down the switch hole when in and out of reverse the “high” part which tell the switch to turn on the reverse light is always there.
Now the GBox guys says ther is no adjustment in this. But something must be wrong has anyone got any ideas?
My radical approach is to get the reverse selector fork, make sure I know which bit is in the way of the switch operating correctly when out of reverse and errr attack it with an Angle Grinder. If I take just the right amount away I think (hope) I can get the light working.
But before I take that quite radical action of angle grinding bits inside the gearbox and one got any suggestions what might be wrong cuz it can’t always have been like this surely.
Cheers Keith
-
Hi All
Kind of a really stupid question.
Did all TR6's have Kidney panels?
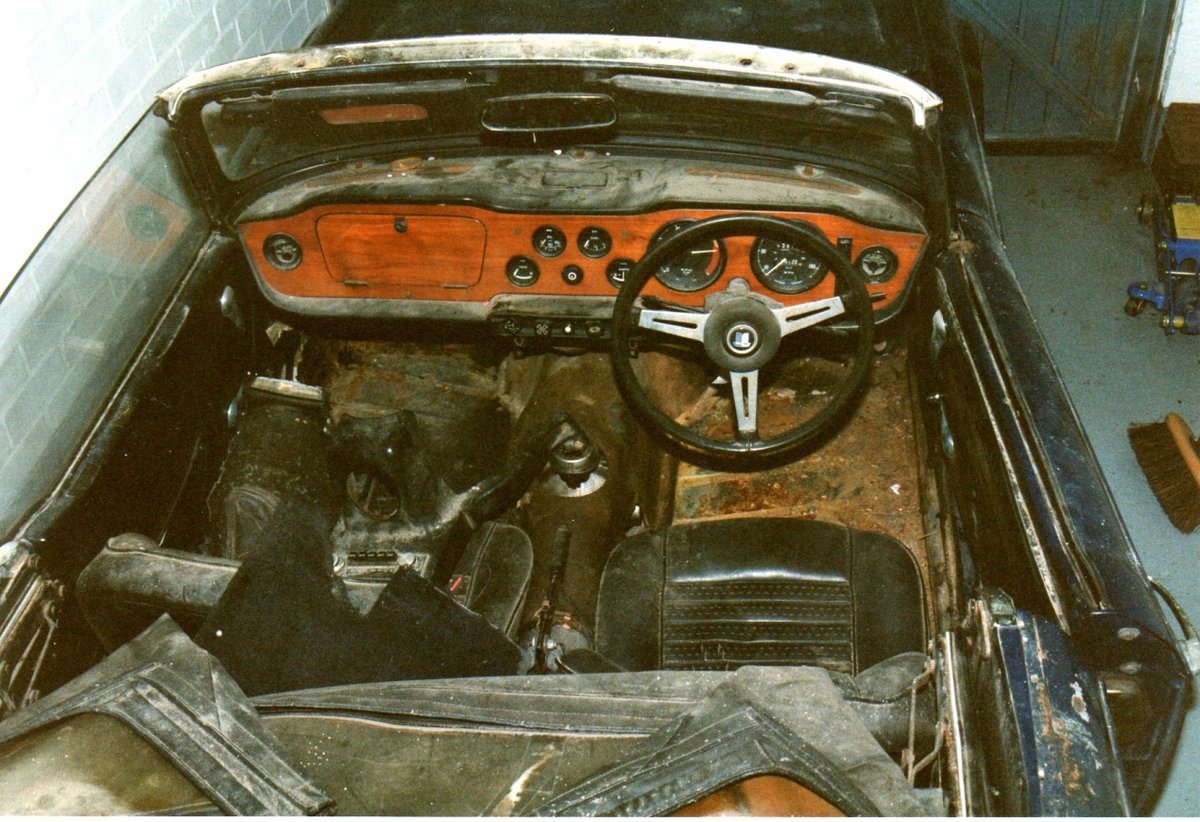
The reason i ask is as you can see from the pic of my interior when i aquired the car it was, well in a bit of a state.
Now i'm putting it all back together i seem to be missing them. So either i've lost them, unlikely. They were a missing item when i bought the car, surprising as pretty much everthing else was there even if it was decrepit. Some cars never thad them, no mention so i doubt it.
My money is on number two but i wanted to check.
Also back when new were the speakers ever fitted in the panels as is an option for new panels now.
Cheers keith

-
Rob
No expert but as far as i'm aware no TR6 had a ligth here at build, so i would say it an addition.
But what i does i've no real idea.
In terms of the wire colours Black should be an earth and Purple White should be Interior light to switch assuming whoever fitted it used BS Colour Codes.
Is it a bright LED as it could be an addition to int lights.
But otherwise can't suggest anything but can't see it be a crucial warning light.
Cheers Keith
-
Hi Guys
Andrew, i won't be much help as I’m midlands but space, what a problem for us car nuts.
Now to be honest i already have too many cars. I’m no money bags with loads of Ferraris or Porsches and my other two in addition to the TR are early 2000 MG-Rovers, so cheap as chips really.
I have one in my garage, one in someone else’s and one just out the front in the rain.
But I’ve got my eye on another late 60’s thing. Again cheap, the best ones might be 4 or 5k but the tatty one I want to restore is going to be mid-teens I hope but where the flip do I put it?
Priced up storage for it until I finish the TR, so that’ll be £100/£120 per month or if its there a year more than the new car will cost me.
Don’t like keeping soft tops out in the rain and snow all winter but what do you do.
Oh well, if I can acquire it I will and I try to sort out homes a bit later.
Cheers Keith
-
Hi Stuart
Well and theres a story.
I didn't test the switch in that hi position because of the problem in my other post entitled Gearbox conumdrum.
But I didn't think that position was normal and 1 or 2 shims at most would make perfect sense to me, so I wanted some feedback to see if anyone had had to unscrew the switch that far, was it a partially working switch that was actually duff or another underlying gearbox fault.
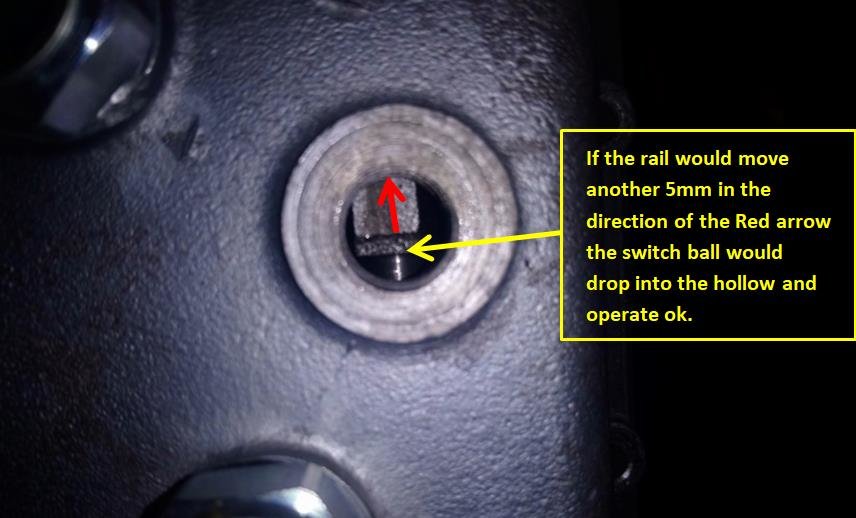
In terms of the selector, i'm assuming that there is a high bit which pushed the ball up to make contact and a low but so the ball falls and cuts the contact when ot of Rev?
Cheers Keith
-
Hi All
Hoped to cure or at sort out what was causing my simple rev light on issue, see my reply to the original post by Garry.
The car is not on the road, 1 as its not ready yet and 2 it has not brake of clutch fluid so those kind of important things do not work, althought it runs ok, so I’m trying to get all the niggy things done (like Rev lights) before fitting the int and driving away.
Anyway in my investiagetion for that and testing the switch in various positions I was putting the car in and out of reverse, (engine not running) not that often but a few times.
But it now appears to be stuck in reverse and try as I might I cannot free it up. Don’t want to force the gear lever to much, I’ve tried rocking and moving it back and forth and no joy. GB is a rebuilt original and was fine as far as I could tell not having run it.
Took a pic of the selectors, just to confirm it is reverse I’ve got it in but any ideas how I can get thing back to normal.
Is a selector stuck and does ther top need coming off or is it a GB out?
Any suggestions welcome
Cheers Keith

-
Hi All
Just wanted to add my thoughts problems to this one.
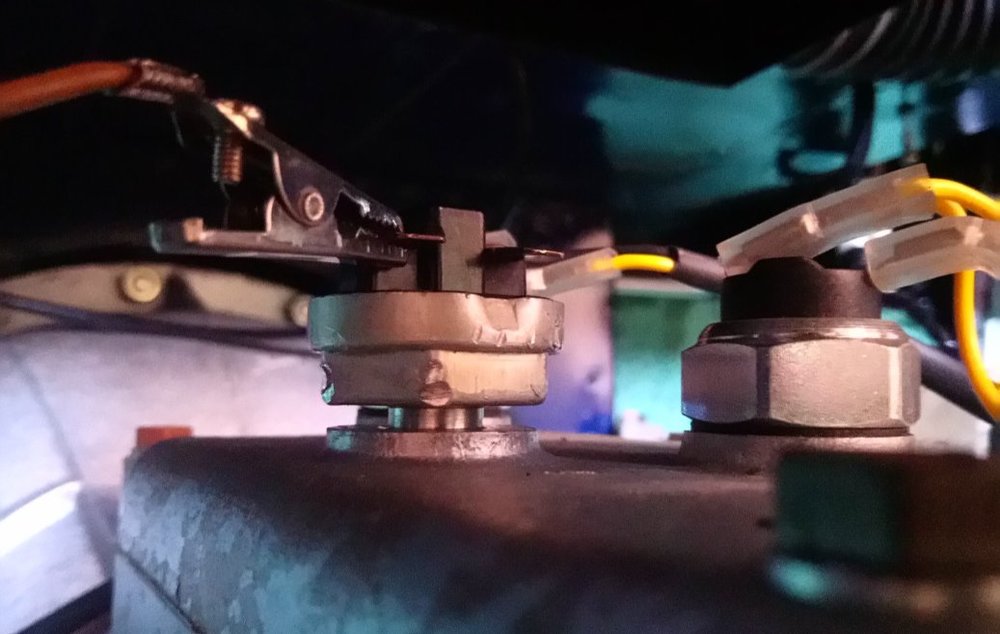
So I’m in a similar position to Gary, my rev lights on constantly. Noteing Stuarts comments decided to check the switch first as the most likely culprit but I was sure I’d checked it on install, but that was ages on non-use ago.
So out with the tranny tunnel again, well at least its not carpeted. And whipped out the switch, an original type and I’ve not replaced it. So I thought I’d do a continuity test and it seems to work ok. Open circuit then closed when pressing the ball in the end, so should be ok.
So pop it back in, screw it in place and oh dear lights on again, doh.
Ah probably need a small shim. So I investigated that route and found that to have the switch in place but not “on” the shim needs to fill a big space as per the picky.
So is this gap (1/4 inch ish) this normal or is the switch kind of working but actually US?
Pointless buying a new one if that will need shimming the same.
Any idea?
But testing this also present me with another problem which is in my other post.
Cheers Keith
-
Mark
Know Aldridge they repaired my seat rip but didn't think about them refinishing the wheel.
Certainly give them a call when things get back to normal.
I asked them for a quote on a problem with my Zt but they are only doing a limited amount at the moment due to a backlog from to being shut.
Cheers KEith
-
Hi Richard
Thought I’d add my bit as I’m doing the same.
As Bruce says original spoke finish is some kind of satin semi-chrome finish, maybe anodised in some way but I would have thought not easy to do unless you are going to remove the rubber grip altogether as Ed did.
I went down the simple route and rubbed down the spokes and sprayed them in silver as Derek did. Now the finish is down to the individual and a satin silver would be more original but I’ve gone high gloss so I lacquered them as well. Which although its not obvious in the after pic looks pretty nice in the flesh.
But I’m going to improve it further by getting the grip professionally wrapped in leather. This will give a nicer finish and thicken the rim slightly.
I've had a quote off Royal steering wheels who mainly do medern prestige stuff (others do it as well) but it’s not cheap but hopefully the finish would be spot on.
Cheers Keith

-
Hi Gareth
Lookin like with just your reply that might be my only option.
Cheers Keith


Parts availability help
in TR6 Forum
Posted
Hi All
This really is a stupid one and largely my own doing.
A while ago (not sure how long but a few years) I bought a new front wing indicator repeater unit to replace my broken rusty one.
Exactly as I wanted, UK spec with the chrome edging, great matched the original I still had.
But recently when fitting my LED’s I noticed a bit of a prob.
I’ve got two LH lenses, so I assume I didn't realise they were different or i just picked the wromg part number, stupid.
Ok they both fit and it not the end of the world but now I know I’m not happy, but there is a simple solution, buy a new RH lens.
Unfortunately things are never that simple because the chrome edged ones are NCA.
So I either have miss-matched lenses or as an alternative I have miss-matched lenses, lol.
So two questions, does anyone know who can supply a chrome edged RH lens? And I’ve e-mailed most of the people I can think of but no joy, they all seem to be plain amber. Or does anyone have one to sell or swap.
Cheers Keith