

mleadbeater
-
Content Count
322 -
Joined
-
Last visited
Content Type
Profiles
Forums
Calendar
Posts posted by mleadbeater
-
-
Gareth,
the original system on PI cars has a cable which splits into two, one to the metering unit, the other to the idle cam, which both enriched the fuel and opens the throttle, so if you have an original system this does as you ask.
My car with modified throttle linkage only had the enrichment cable, which is why I did this mod.
You may need to adjust your throttle cam setting screw to get a faster idle, this should be in your manual.
I still have the original split cable, but the throttle part is defunct, and not a solid wire so it won’t push the valve closed, I would need a return spring, which I didn’t want.
Hope this answers your question.
Mike
-
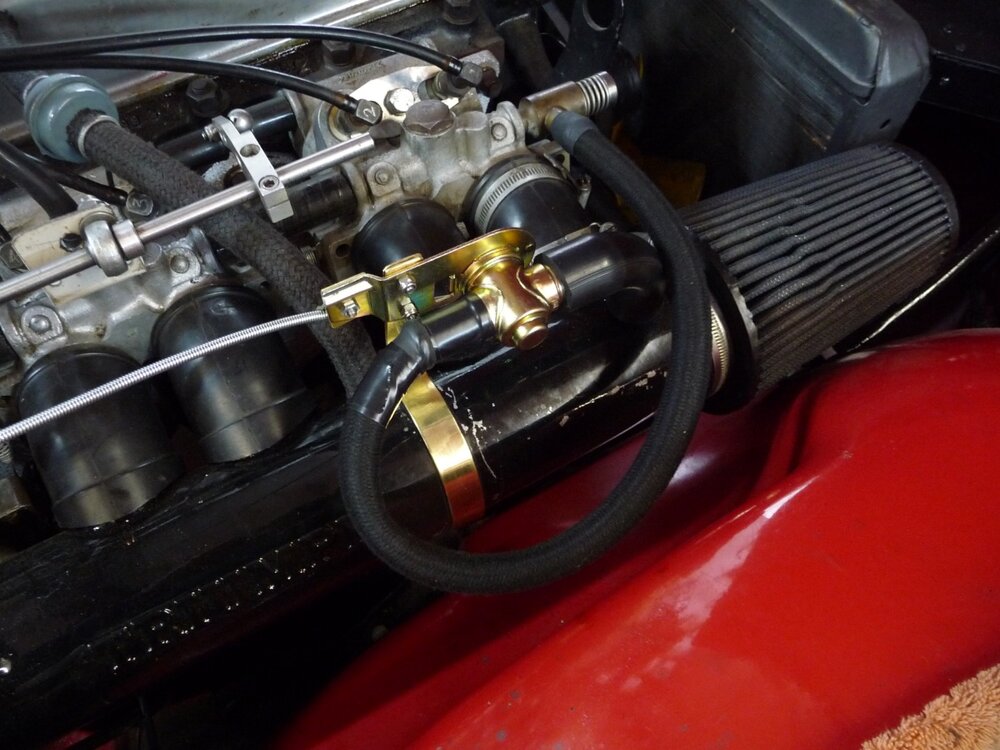
Thanks, I was hoping to make it operate electrically, but couldn’t find a large enough solenoid valve suitable for low vacuum, but the cable operation gives good control and works fine.
The valve is just a standard water heater valve, from ebay, see photo, you also need a solid inner cable for full push/pull control .
heres the ebay link: 19mm (3/4") Heater Control Valve Push to Close Taxi TX1,Kit Car, Classic Car
I've set the existing air valve to well open, having set the butterflies for even airflow using the throttle linkage arms, giving from around 1200 rpm open to 800 fully closed.
Next challenge is to sort a “bog-off” system to improve idle pickup, needs some sort of valve to control the metering unit vacuum supply, tried the idea manually by releasing the vacuum as the throttle is opened which seemed to improve pickup. I may need to master the Arduino , that’s another challenge.
All part of the fun of old “ pre-electronic “ cars, happy days…. yes?
Mike

-
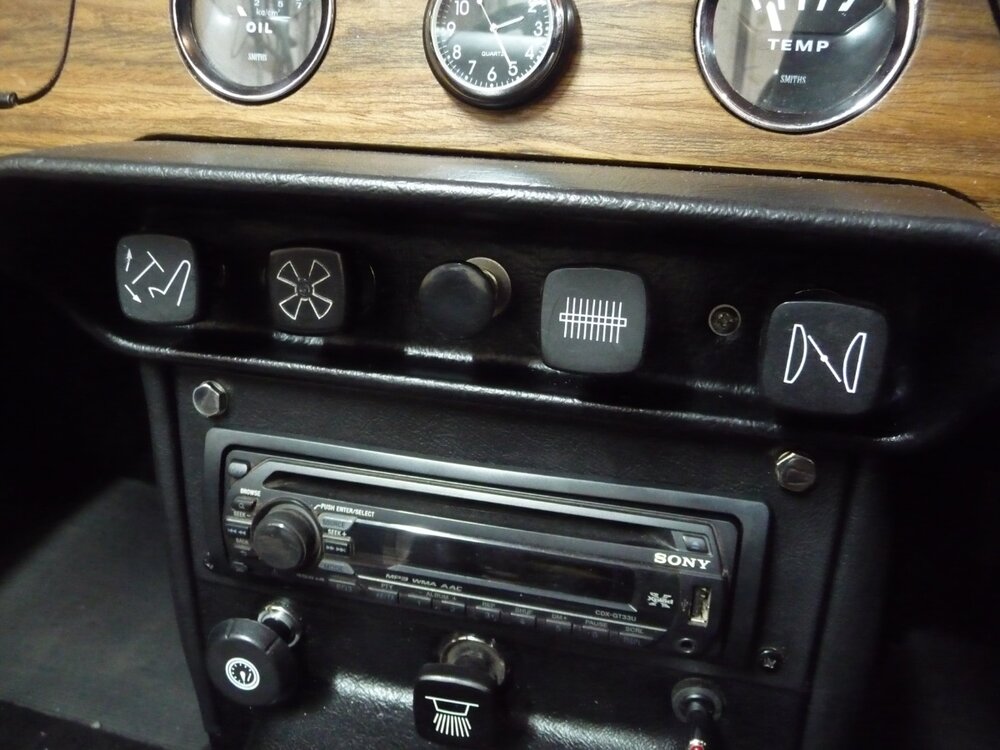
Hi,
as my ‘6 doesn’t have the original throttle linkage, I am unable to set a fast idle during warm up.
To solve this I have fitted a valve connected to the air slow running valve, with a cable on the dash to allow me to set the idle speed from the drivers seat as the engine warms up.
The valve is a heater control valve, which works well to control the air intake.
Maybe of interest,
Mike
-
Interesting video, if a little brief on the actual workings and adjustments to the PI unit.
I am still struggling with why his car revs cleanly, without bogging, when he blipped the throttle, and surprised that weakening the mixture didn’t introduce bogging.
Advice from the forum suggests running rich is the cure for bogging, on my ‘6 the large spring is fully screwed down, yet still it bogs on blipping initial acceleration.
Mike
-
Malbaby
can you give use some more details as to why?
cheers
Mike
-
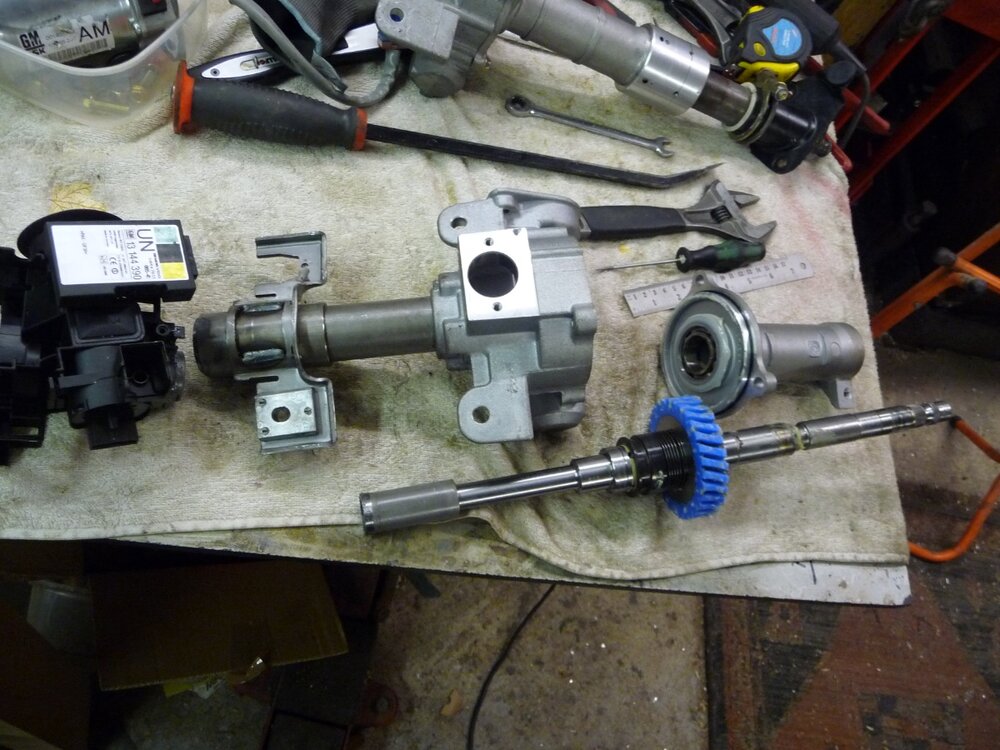
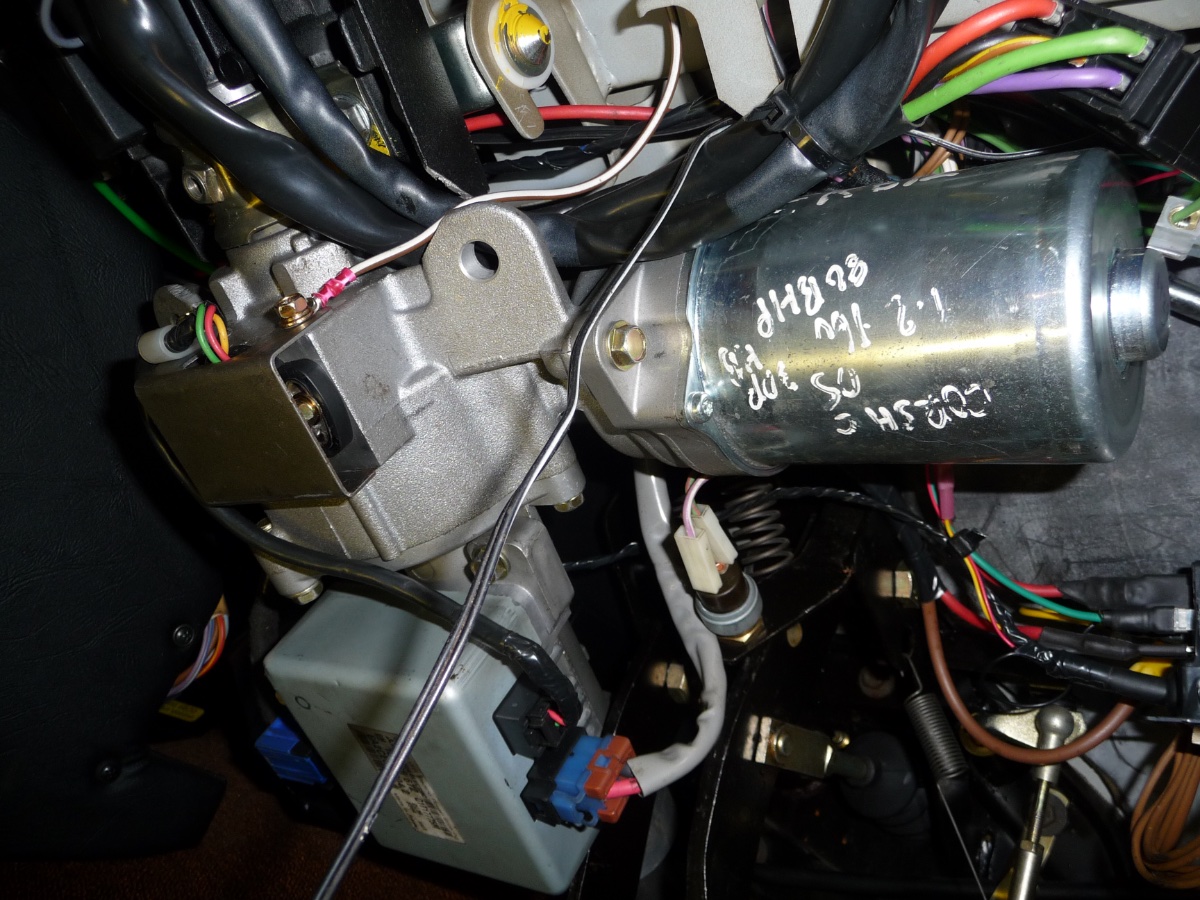
A few years ago I fitted electric power steering to my ‘82 BMW, using a Corsa column and drive , bought on ebay for around £50.
If you have good engineering skills and some machine tools, this can be a challenging and enjoyable project.
I believe there are new options for speed variable sensing, use gps.
The whole job only cost around 80 quid or so, it transformed the car, making it a pleasure to drive.
Photo shows the project in process, more info available if needed.
cheers
Mike
-
As I have already suggested, if you want to seriously learn “how to”, get yourself enrolled on a diy car maintenance course, I’ve just googled this and they are all over the country. Otherwise, continue to shell out.
Mike
ps, a name would be nice.
-
Jonny
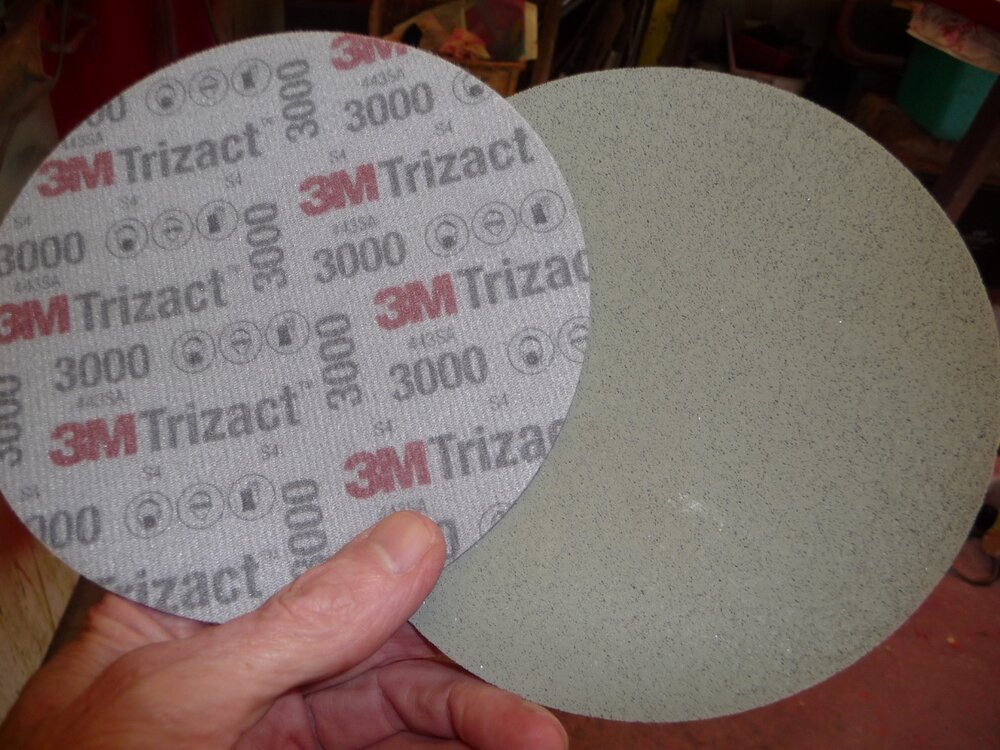
Having been an amateur paint sprayer for around 50 years, I recently discovered a breakthrough in finishing systems whilst painting my TD, namely 3M Trizact finishing pads.
Rather than wet flatting with 1200 grit or whatever, these pads on an orbital sander are the quickest route to a blemish free finish, coming in a full range of grits, including pads fine enough to produce a finished gloss.
They only need a splash of water on a whole panel, one pad can do half a car or so, and you can see the finish being achieved as you go. Then a final buff with say Farecla G3 soon brings a great gloss.
I suggest you check out Youtube,” Trev’s blog “for example, he shows how to use them, highly recommended and very rapid.
Can’t remember which grits I used, but I can look in my store if you’re interested. They aren’t cheap, but you only need 3 to do a whole car.
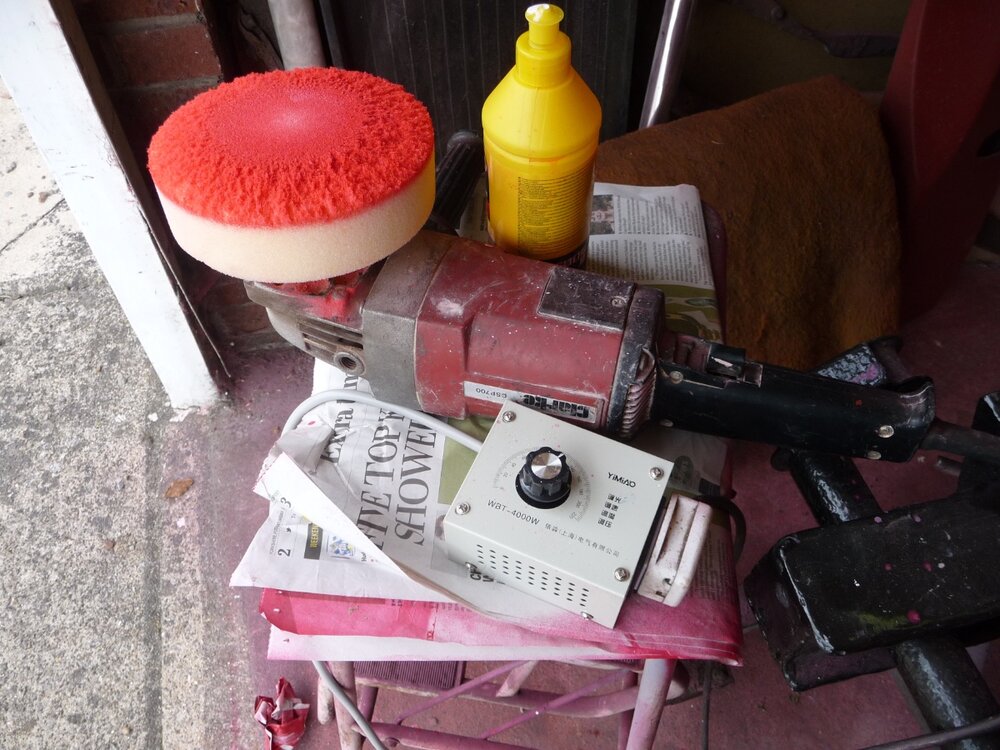
Last pic shows my polishing disc, with cheap speed control to slow it down, as 1200 rpm was a little fast.
Mike

-
As you’ve only driven 1500 miles, the service needs for the spring should only be minimal, you should get at least double this before needing a fuller one.
Main things to check are the brakes: are they working fully , are the discs not corroded apart from a very light bit of rust, which should clear on a drive round the block.
Also, tyre pressures, oil and coolant levels, hose condition and leaks, screen wash level, wiper blades, battery condition ( a battery condition tester is only about a tenner on ebay), brake fluid level and leaks, flexible hoses,
Storage conditions make a difference, ie outside, under cover, or in a dry garage, any damp will cause electrical terminal problems, eg fuse terminals etc, lights all working,
I strongly suggest you buy a Haynes manual, usually plenty for sale, used, on ebay, at least you can use the servicing chapter as a guide.
Have a go!
Mike
-
Belsey,
I would suggest that you go along to some owners club meetings, ask for recommendations for services, and listen to other members experience.
You say you have no idea on DIY, why not get some?
Youtube is a good start, plus adult education courses, and of course manuals, Haynes for example.
If you don’t have tools, buy some,, plus some ramps, and get out and get under as the song goes, what you save on servicing will soon pay for these, next you use them they will be for free.
It can also be very satisfying, and the increase in confidence you gain will help you to enjoy your driving experience and understanding of your car’s many foubles.
You don’t say how many miles the car had done since its last service, this could be helpful if seeking advice from us.
Mike
-
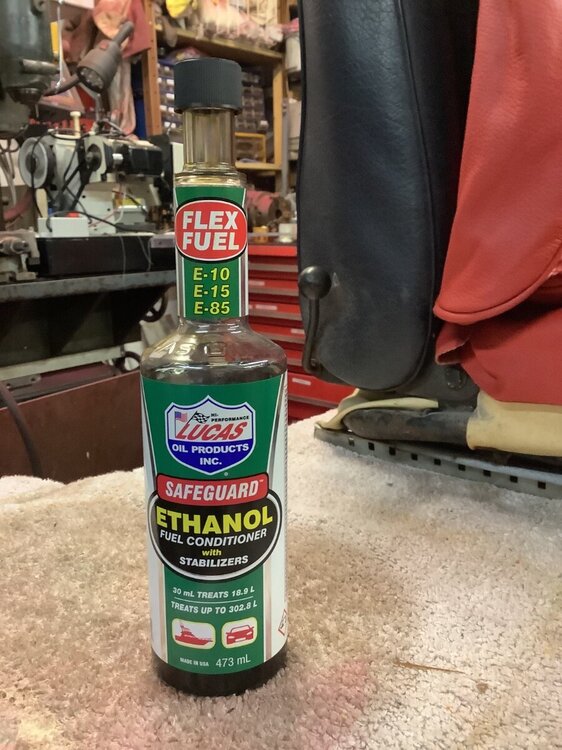 At the recommendation of a friend, I add Lucas fuel treatment to my tank, supposed to stop acids forming as rhe ethanol absorbs water. My friend reports the insides of his motorcycles tanks are corrosion free after several years.
Mike
-
The seller of my car said, when asked if there were a set of door keys, replied why bother locking them? a quick slash of the hood and a thief has access via the inside door handles.
I suppose different thieves have varying motivations, some just opportunists, and others who want to take your car away, I don’t know what the answer is, just have a good agreed valuation insurance.
Anyone any good suggestions for anti theft devices?, any mobile app’s for this?
Sorry to highjack this topic, but it seems to be well covered at this stage.
Mike
-
thanks Andy, you gotta respect a race engine builder.
both my new washer halves are plus 5 each.
Just checked t’net, Stags are also 3 to 11 thou.
Mike
-
yes indeed, M5 nuts went straight in.
Mike
-
Hi,
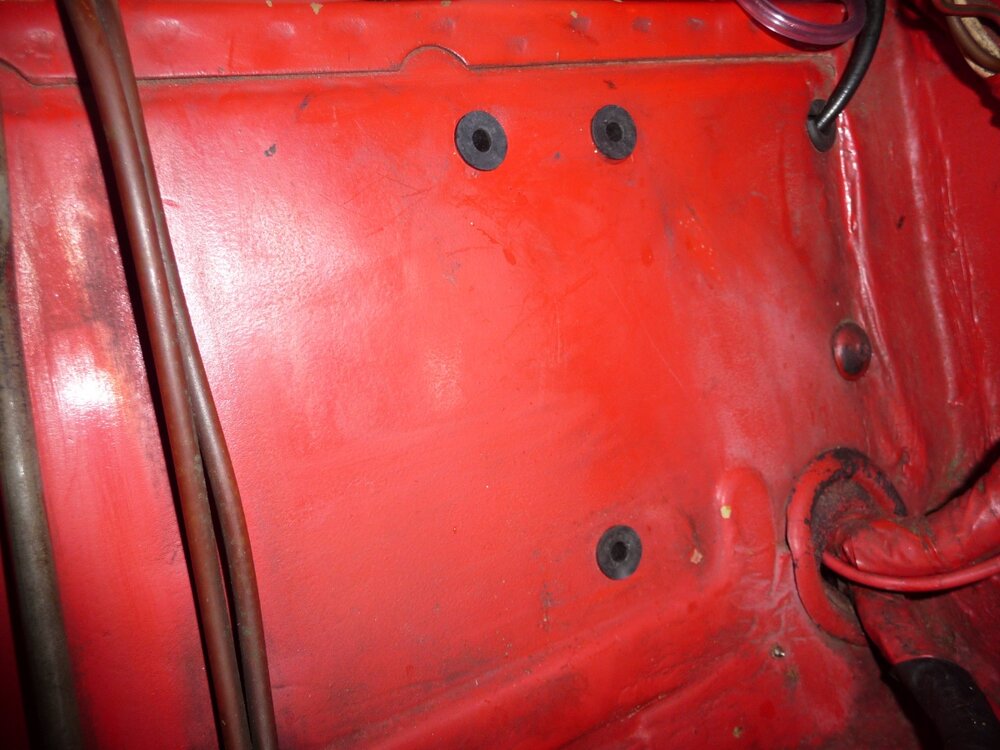
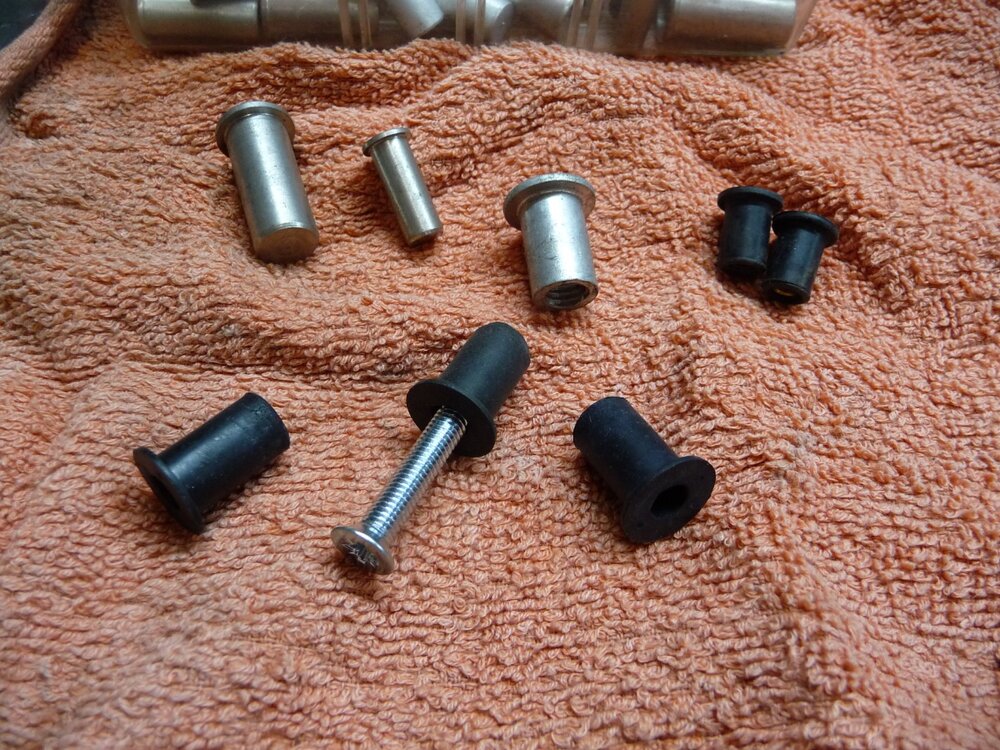
You may be familiar with aluminium Rivnuts, which are a threaded insert attached to a thin panel, bulkhead, or chassis . But did you know they are also available in rubber, with a brass threaded insert.
They are a dead easy way to attach non load bearing items to car structures, needing no crimping tool and just needing a clearance hole.
Great for attaching fuse boxes, screen wash reservoirs, pipe clips, loom clips, etc to any panel, needing no access to the inside.
They simply compress the rubber on tightening, forming a seal as well as fixing securely.
Just used some to re-attach my fusebox and wash reservoir to my ‘6, using M5 / 2ba screws.
Available on ebay in many metric sizes, highly recommended, hope this is of interest.
Mike

-
Andy, the grabbing that you refer to, have you heard of instances of this happening?
If 3 tho is ok for XK and XPAG engines, I think the 5 thou clearance should be fine.
Mike.
-
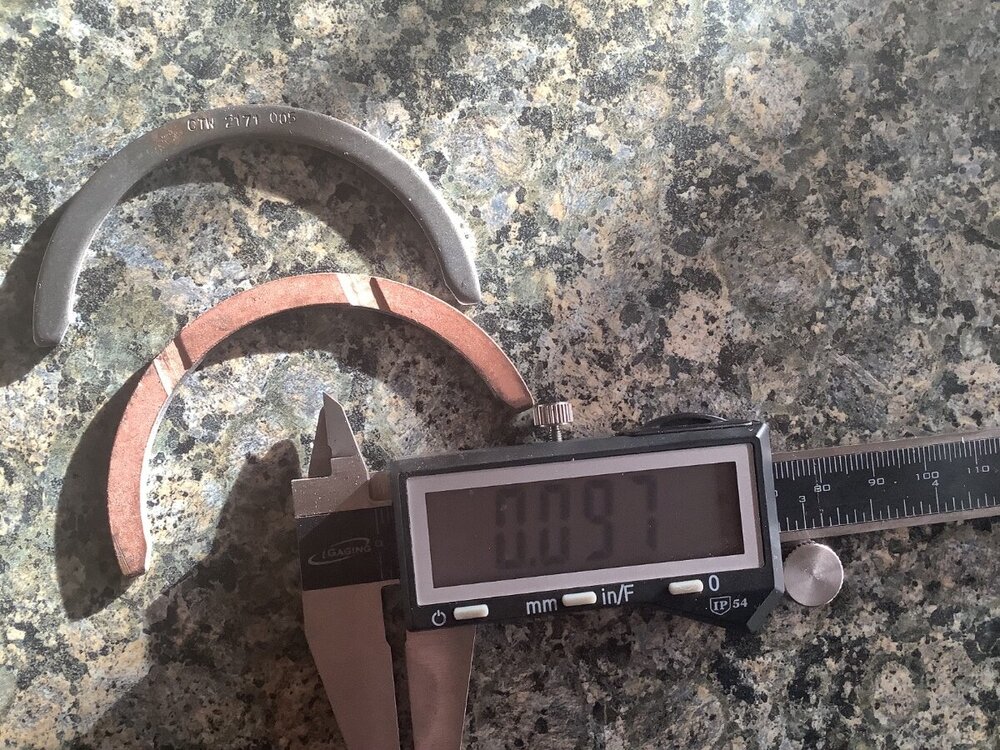
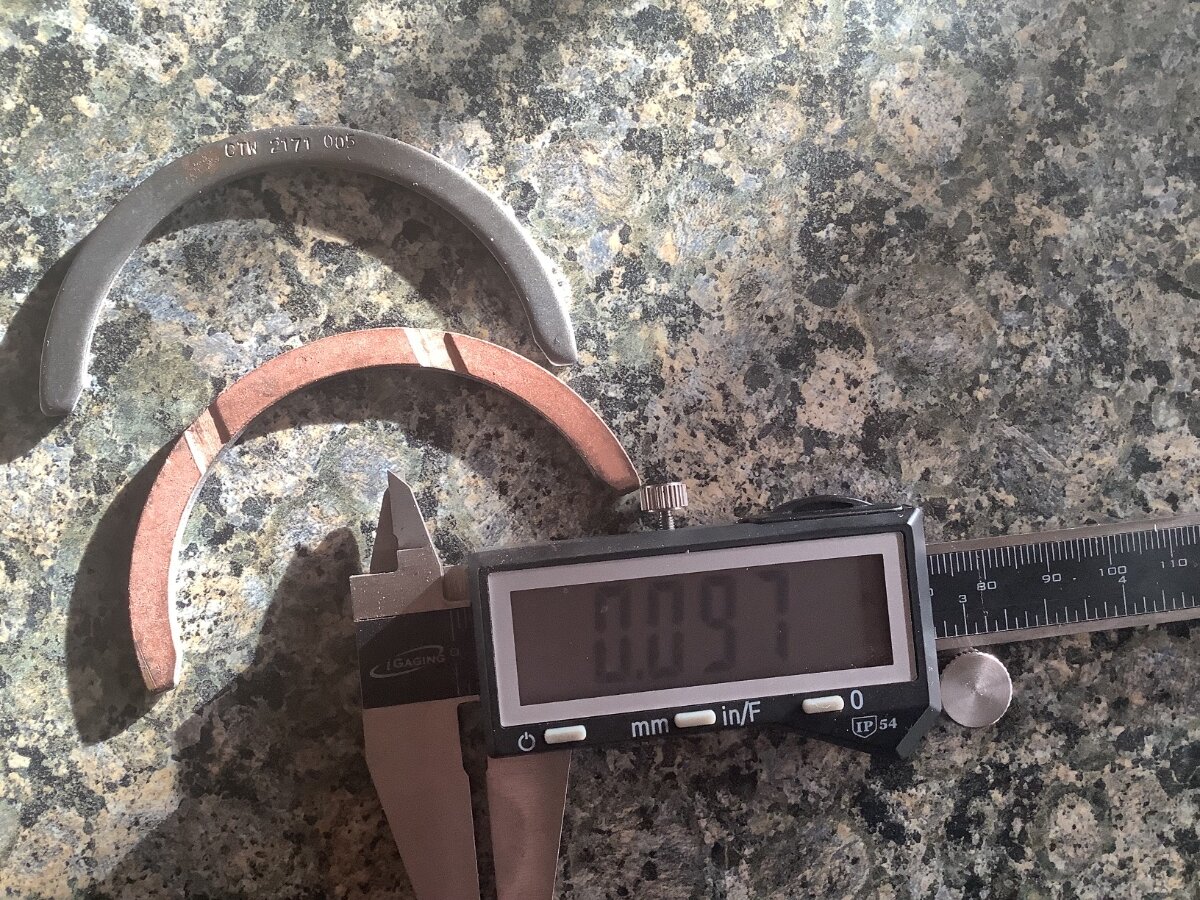
Just received my new thrust washers , from Rimmers, very pleased.
At plus 5 thou, they measure 0.097” which agrees with my “standards “ being 0.093”, so don’t know where the quoted standard of 0.092” comes from?
Anyway , they are copper coated, not white metal, so should last well.
If I fit one to the thrust side of the main, and a std original one to the non thrust side, my 10 thou lash will be reduced to 5 thou.
Comparing the minimum quoted lash of 6 thou for Triumph engines, to , for example the XK engine, or XPAG, which quote a minimum of 3 thou, I reckon this will be OK.
cheers
Mike
-
I’ve recently used Allenchrome, Pocklington, near York, maybe busy but a decent guy to deal with.
Also Quality Chrome, Hull.
Prestige , Mexborough.
All did me a good job.
Be interested to hear what price’s you get.
Mike
-
Thanks for your replies
Have ordered some plus 5’s, from Rimmers, will see what comes.
n.b. whilst waiting, i’ve been looking at making my own. It’s possible to buy a piece of aluminium bronze plate, 3 mm thick by 100 mm sq, so it shouldn’t be a problem to turn up some bearings on my lathe, and mill some oilways.
Mike
-
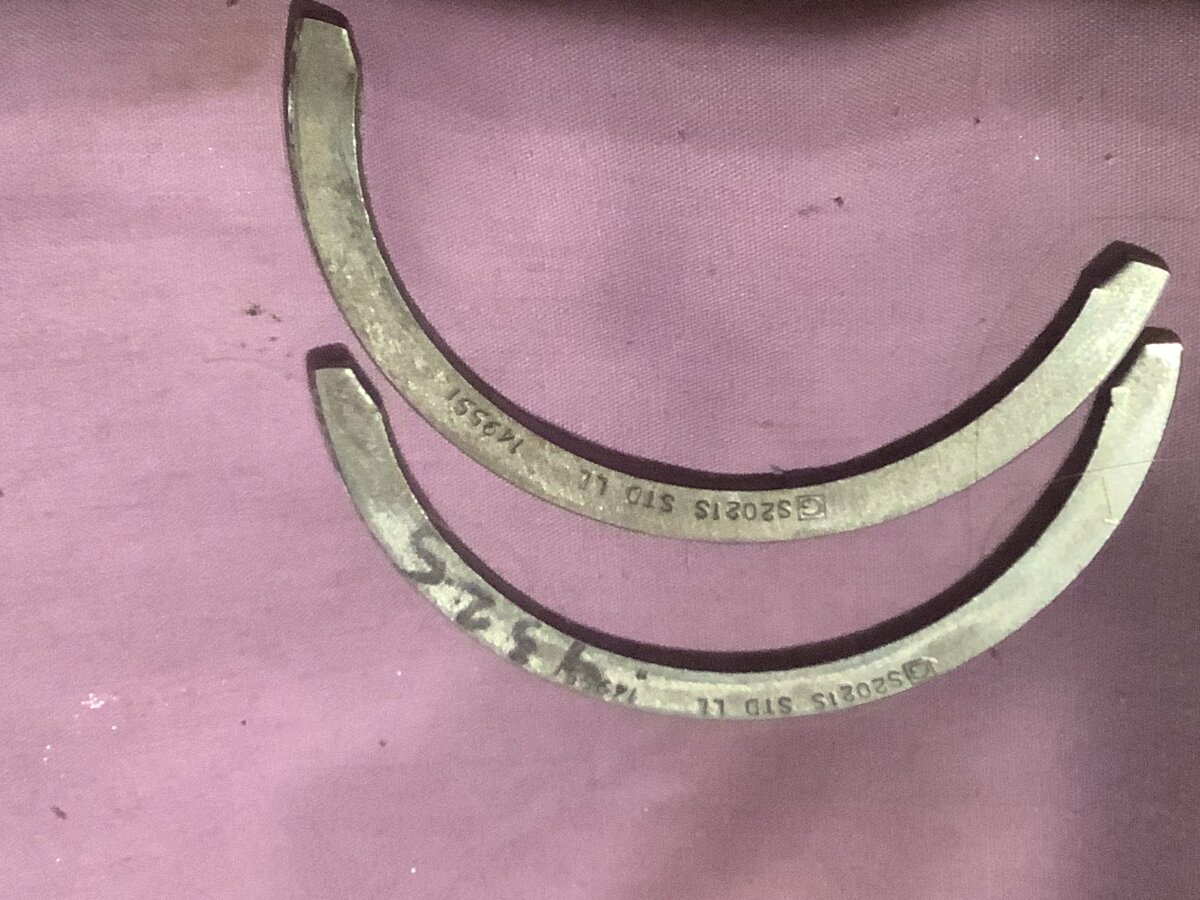
Hi,
Just got the blighters out, and am perplexed. My engine had 10 thou end float, ie 2 thou over the spec, not much, but as it seems an easy and low cost fix, might as well renew them.
Both bearings are marked as standard, which, according to sources are .920” thick.
Mine measure .9325”thick, ie. theoretically +12.5
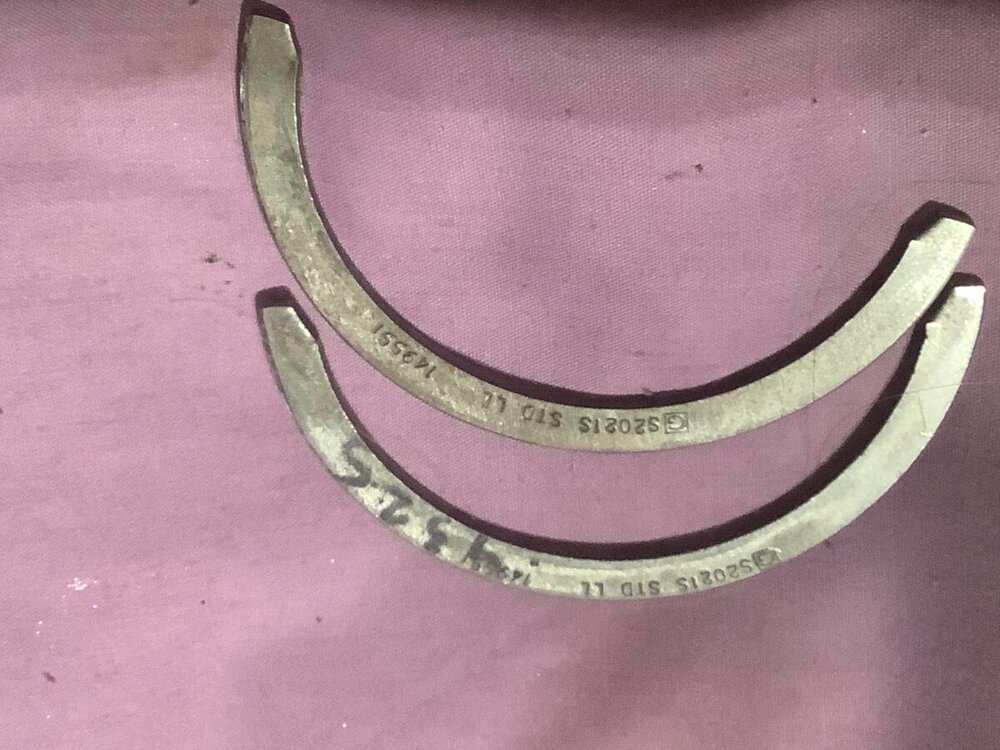
 thou oversize, so whats going on? They also look virtually unworn.
Annoyingly, the parts suppiers, Rimmers, Moss, etc, only quote the oversize plus figure, +5, 10, etc.
So, what oversize do I order, is it plus 5 thou, or plus 15, or what?
Anyone any experience please.
Cheers.
Mike
ps sorry, the inverted photo poltergeist is at it again.
-
Andy, they Should, but isn’t it common knowledge that Triumphs of this era suffer from premature thrust bearing wear?
Thanks Roger, can’t seem to open that link, will keep trying. Ive seen the American guys offerings of wider shims.
Mike
-
Hi Tom
Thanks for your reassurance.
Im more concerned about the poor service life of these half bearings, the engine was rebuilt around 30 k miles ago, and is already 2 thou over tolerance . If a simple mod can improve this, I will make it.
I don’t like poor design, all too common in the UK motor industry in that era. It’s part of the fun of ownership to include upgrades wherever possible.
cheers
Mike
-
Hi
Just about to drop the sump and replace the thrust bearings on my ‘6, as have measured ten thou of endfloat.
It seems crazy to only incorporate half bearing shims for each side of the main, so am wondering what is involved in fitting them to the bearing cap as well.
I notice Racestorations sell complete sets of upper and lower shims, to double the thrust area. This seems a good way to go.
Does the main cap need machining to fit these?
Any experience or suggestions please.
Cheers
Mike
-
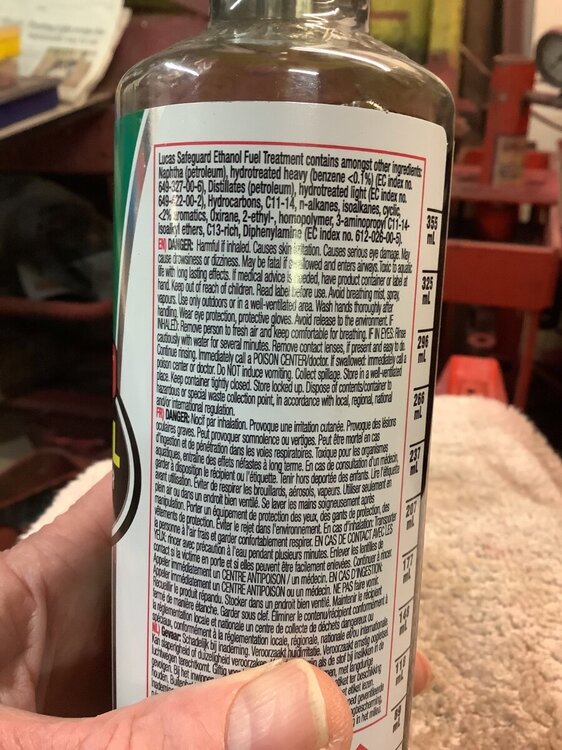
For my winter layup, I add some Lucas fuel stabaliser, supposed to stop gumming and other damage to fuel feeding components.
link to this, any other brands available.
Lucas Safe Guard Ethanol Fuel Treatment Conditioner Stabilizer Additive 473ml
In my modern Honda, I use 5% ethanol petrol, as the 10% **** gives around 10% worse fuel consumption, the former costing only around 5% more .
ie. pay 5% more and use 10% more…… biggest government con I am aware of, not a well thought through scheme.
Mike


Idle adjustment knob
in TR6 Forum
Posted
Sorry Gareth, I still can’t fully understand your question, the original split cable wont push the new valve closed, a spring to do so would be required, but the double cable would work, but with out independent control of either mixture or idle.
Jerry, I bought a water valve for washers etc, its a diaphragm operation so it won’t work under negative pressure, unless I'm missing something?
cheers
Mike