


Penfold
-
Content Count
49 -
Joined
-
Last visited
Content Type
Profiles
Forums
Calendar
Posts posted by Penfold
-
-
Thanks all - some great advice - I'll take another look and see if I can get the contact disc out as suggested by ed_h....I think I missed the fact that it may be held in with a bayonet fix and half a turn with some needle pliers and it'll come out. Thanks again.
-
Hello all,
I have an intermittent problem with the front off-side indicator...the bulb loses connection and I get no flashing. If you move the green cable feeding the bulb housing, connection is restored or if you turn the bulb to release it from the bayonet fix, successful connection is made with the bulb held in place and wiggled a bit. This is not an earth problem (side-light comes on reliably), it's not a bulb or bulb contact problem and it's not a flasher unit problem. The cause appears to be a bad connection in the bulb housing itself. Does anyone know whether the bulb housing can be dismantled to get access to green wire termination and spring-loaded bayonet mechanism - it doesn't appear to be open-up-able. Please see the attached diagram with the bits I'm interested in circled in red. If anyone's opened this part up, please let me know how you did it! Thanks.

-
Thanks all...just to answer some of your questions...The injector leads are not braided - they look like originals....The fuel was quite new - less than a couple of months old...Standard points fitted (not electronic)....Coil seemed good - getting a good spark when turning the engine over. It seemed fuel related - one thing I omitted....the young mechanic (bless him) suggested the plugs looked a little dry when we took a couple out. I didn't have any reference to make any real judgement on it. I wasn't aware PIs run rich at idle - but this seems logical. My theory is - temperature in the garage was warm(ish), idling engine running rich, temp of fuel rising (it had been running for over an hour-and-a-half if you add up the idle time before leaving, run to the garage and idling during MOT), rising fuel temp causes it to vapourize, fuel pressure drops, PI continues to demand rich mixture at idle - and just gets starved. The 10-15 minute refusal to start caused by the time it took for the fuel temp to fall and vapourization to cease so the the pump could do its thing.
It did pass the MOT in the end!
-
Hello all - took my PI in for an MOT yesterday. It hadn't been run for a while so, before leaving, I left it running for 20mins with a bit of choke before driving over the to garage. On arrival, parked up, switched off and about 25 mins later the mechanic started it up, drove it onto the ramp and left the engine idling (800rpm, no choke) for about 45mins (he was on his own and the reception phone was ringing all the time, so it took a bit longer than normal). The engine was idling throughout. Just as he was finishing up (engine still running), it cut out. And could not be restarted. Fuel pump was running ok, gauge temperature normal, about half a tank of fuel, and plenty of spark. After about 10-15mins of farting about and just before I was about to remove one of the injectors, I'd sort of given up and elected to phone recovery (the young lad doing the MOT looked terrified and confessed it was beyond him - where do I plug the laptop in? etc). At this point I wandered out of the back of the garage and decided to call recovery. While on the phone to them, the mechanic had managed to start it and drove it around to me. Left it running, finished all the paperwork and drove 20 or so miles pretty hard before bringing it home. All seems well and I couldn't fault it. It's never done this before - I've had it for 8 years and have had many situations of being stuck in slow moving traffic on a very hot day without any problems at all (the only difference being able to rev the engine from time to time and using the additional manually-switched cooling fan in the engine bay).
Could this be my first experience of fuel cavitation?
(I'm afraid I don't know: how hot the fuel pump was or whether there's any blockage in the tank or return feed). It did pass its MOT which was nice.
-
Doh! Of course...I'll get me coat..thanks guys, I'm being an idiot!
-
Hello all,
Just trying to replace the water pump and can't seem to get it off the housing. It looks as though the studs connecting it to the housing are not in (to the housing) far enough. This means there's not enough room between the housing and pulley for the nut to come off the end of the stud (see attached photo). This is slowly driving me nuts! Does anyone have any ideas how to get the studs further into the housing to give the nuts more room to come off? The pulley wheel doesn't come off (fixed unit). I can only assume the studs must have come out a bit since the pump and housing was put together otherwise I'm not sure how it could have been assembled in the first place. Any clues gratefully received. Thanks all...

-
The same thing happened to me. Consistently showing 1/4 tank less than actual. First thing to do is check the gauge - do this by disconnecting the spade connectors on the tank sender unit and connect them together using a paper clip stuffed into each end of the wire and joining (careful not to touch any other wire/metal). Turn the ignition on - the gauge should go to full. If it doesn't there's either a wiring or gauge fault. Assuming the wiring/gauge are good, it's very likely to be the sender unit itself - it's just a variable resistor which alters the gauge needle position as the float goes up/down. My sender was broken somewhere within the resistor component - I replaced it and all is good. It's possible to get the tank out without disconnecting everything - remove top bolts and the bottom right side bolts, loosen the others and the tank will tip forward enough to get access to the sender. You may also need to disconnect the fuel return pipe towards the top front of the tank (as you're looking at it). I bought replacement from Rimmers which seems to be working ok.
-
Definitely get the wheels re-balanced. You can get some very odd things going on if more than one wheel is out of whack and the effect can vary depending on speed and road conditions depending on how much each wheel is out-of-balance. Also....if you have wire wheels - don't let the muppets at the mainstream tyre fitters do the re-balancing (or tyre fitting for that matter) - the wheels will 'seem' balanced but be far from it...Wire wheel balancing requires specialist gear and know-how.
-
Definitely the pads - less of a click and more of a rattle as the pads move about in the calipers - gentle braking will always stop it immediately. Although it appears to be coming from the right front, it could be coming from both sides (you just hear the side you're nearest to). It drove me mad but an easy fix....
-
Thanks! I'll give it a go. Just need to drive around some more to empty the tank. It's a hard life! Thanks again.
-
Justin - you're a star! Thanks for putting me in the picture. It's always encouraging when you find someone who's already done what you're trying to do....just a couple more questions:
- I'm assuming you can disconnect the return pipe from the boot side of the tank and don't need to go in from the luggage compartment (behind the seats)...?
- Did you get your replacement sender from Rimmers or somewhere else? (Just need to make sure the one I buy isn't worse than the original!)
Thanks again,
David
-
Thanks for your responses. Does anyone have any experience with changing the fuel sender without removing the whole fuel tank - just tipping it forwards a little? Would be very interested in any tips. Thanks all.
David
-
For a while now I've noticed that fuel gauge never quite makes it to the full position even when the tank is filled right up to the neck of the filler tube. I've read various posts and have checked the gauge by earthing the sender feed - which shows all is well as the gauge goes to full. I have a feeling the float on the sender may no longer be watertight which is causing the lower-than-actual reading at the gauge. Before I replace the sender I have a couple of questions:
- I read on one of the many posts that you can release the filler tube and hinge the fuel tank forwards just enough to get the sender out without having to drain and completely remove the tank and pipe fixings. I assume this is simply a case of removing the top bolts on the tank and loosening the bottom ones to allow it to slip forward - am I right? (I really don't want to cause any damage to anything - especially any pipe fixings - so it would be good to know if there are any tricks to this I need to be aware of).
- The previous owner went a bit mad with sealant around the sender gasket - I assume to make damn sure no fuel leaked. Is this really necessary or should the gasket do its job assuming it's screwed nice and tight? Any tips or clues most appreciated.
Thanks all,
David
-
Interesting. The carmine red TR6 at the link below looks to be taken outside John Andon Classic Cars' workshop at EE Holloway in Byfleet, Surrey.
http://www.ebay.co.uk/itm/TRIUMPH-TR6-RED-1970-/281944224130?hash=item41a52f7182:g:SbsAAOSwPc9WzSB6
The workshop closed a few years ago, so the photos must be pretty old too. The original pics can be found at the below link. Incredible what these scammers will try.
-
I had the same problem a while back - oscillating needle and underestimating speed. Changed the cable and drive which actually made the oscillations more wild. In the end, sent the speedo to JDO and now it's rock solid and as accurate as it will ever be. A useful tip - you can check the diff, gearbox, wheels etc all in one go - drive a circuit of 10 miles in a modern car. Drive the same circuit in the TR6 - if it shows 10 miles distance (give or take a couple of tenths), you know the diff etc are all ok. If not, record the modern car and TR6 mileage difference shown (to the nearest tenth) and send the speedo to JDO for speed and odometer calibrating. It'll come back as near to perfect as you'll ever get - www.jdo1.com
-
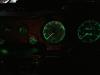
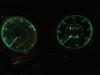
Fixed a hole in the rocker cover with some tin solder which stopped an oil leak I'd be meaning to fix for several years - straightened the cover up a bit, cleaned and touched up plus a new gasket ....And replaced all the loathsome filament bulbs in the dash illumination with some excellent LED alternatives from www.bettercarlighting.co.uk...what a difference - the photos don't really do it justice but definitely worth the sore back, aching muscles and moderate swearing....
-
Valvemaster has 1 to 2.5% ferrocene in it.
Its an antidetonant ( boosts octane).
But ferrocene is not allowed in western pump petrols owing to its wear-promoting properties.
http://www.fuelexpert.co.za/dooctaneboosterswork.php
It turns ro rust !
Peter
Ah! Thanks Peter. This may be why you can't seem to buy Castrol Valvemaster Plus anywhere at all now. They may have withdrawn it completely. There's Millers VSPe but as far as I can tell you need a lot more of it per fill up. I've been buying Wynn's Lead substitute (Halfords) - 250ml bottle treats 250 litres of fuel. Millers appears to be 40 litres fuel per 250ml bottle so I can see why Razza asked his original question.
-
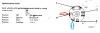
I have just bought the same - just need to work out which wires to connect to, I removed the one the PO fitted when I reversed the earths last year as it stopped working) and used the vacant wires for my radio. Can I hack err I mean splice into the same ?
Yes you can. You may have a spare connector so won't need to 'splice' the radio feed. I have a dash mounted ignition switch which has auxiliary connectors shown at '4' below. Radio connected to red and 12v socket to blue. The auxiliary connector is quite handy - turning the key anti-clockwise to 11 o'clock turns on anything connected to 4 without full ignition.
-
If you can't find a 12v socket to fit the hole, I've just fitted this to the bar under the glove box (TR6) which works a treat. I attached a separate length of wire with fuse (Halfords) and connected straight to the auxiliary connector on the ignition switch. It was the only one I could find with a suitable bracket.
http://www.ebay.co.uk/itm/380503208544?_trksid=p2060353.m1438.l2649&ssPageName=STRK%3AMEBIDX%3AIT
-
Although a bit old (2011), there's quite a nice summary to be found at:
http://www.classiccars4sale.net/classic-car-how-to-guides/restoration/a-guide-to-unleaded-additives
I've heard in the past that the Castrol Valvemaster Plus additive is a good combination of valve seat protection and Octane boost. Not sure if anyone on the forum could vouch for it.
-
Thanks all. I'll take the rocker cover off and see what can be done.
-
Hello all,
Just under the breather tube, I've found a tiny hole in the rocker cover. It's a standard painted, steel cover and I don't believe the hole was caused by rust - it looks more like damage from a tool of some sort possibly years ago. A small amount of oil is leaking and being deposited around the lip of the rocker cover which fills and then spills over the end near the bulkhead. It's probably been doing it for years (before I bought the car). I've searched the forum and found a few comments about repairing it (Araldite & tissue paper). Just wondering whether anyone has successfully repaired a hole like this or whether it's best to take the cover off and weld a small plate covering the hole on the inside. I'd rather not replace the cover if I don't need to.
-
Hi Penfold,
If I fill the overflow bottle to half full and then go for a good run, I will find when it has all cooled down that there is less than an inch of fluid left in the overflow bottle. As Peter suggests, I think the system is pressurising and forcing coolant out the top of the overflow bottle in the few minutes before the thermostat opens. My radiator remains absolutely full to the brim. Like you I have no overheating at all. Again, as Peter suggests, a new thermostat and thorough flushing is my next job.
Does your overflow bottle remain at half full after a good run or are you topping it up regularly?
Regards
Les.
Hi Les,
My overflow bottle level remains at half full - I rarely top it up - although I often top up the rad - Peter's suggestion may be your best bet...Honestly, who'd own an old car?

-
Les - I had a very similar problem last year - water escaping (apparently from the overflow bottle) and lots of hissing only a mile or two from home. I duly topped up the radiator but it continued to do it on subsequent trips. No overheating was ever apparent and the temperature needle never moved outside its normal range even in very slow moving traffic on a hot day. Since then I've noticed I get odd behaviour (water escaping/hissing) if I let the water level in the overflow bottle drop below the end of overflow hose and if the water in the radiator isn't filled right to the very top (right up to the narrow part of the neck). Subsequently I always make sure the bottle is at least half full and the radiator level is topped right up - I haven't had a repeat of water escaping/hissing since.
Denis - best way to get the air out is to run the engine without the rad cap on and make sure the heater is set to hot to ensure air is pushed out of the whole system. Top up the rad as soon as you see the water level drop - keep topping it up until the level is stationary. After a minute or two, all the air should be out.


Front Indicator Assembly
in TR6 Forum
Posted
The only way to do it is to unscrew the whole indicator sidelight housing, remove the rubber cover on the back and then the live feed to the bulb is loose and can just be pushed out. A bit of cutting, cleaning & soldering and it's done. Thanks all.