


TR4A1965
-
Content Count
503 -
Joined
-
Last visited
Content Type
Profiles
Forums
Calendar
Posts posted by TR4A1965
-
-
I found my notes. This is what I worked to.
Best
Paul.
TR4A Ride Height
Exactly 40cm from wheel center to underside of wheel arch. That is 15.75". And....... the most important: car rear should be lower than front by 1.25 +/- 0.25 cm, i.e. 1/2". This relates to the distance from ground to underside of wheel arch.
NOTE: During the rebuild the car looked proud and the ride height all wrong. After a drive and back to the MOT Station (18 miles round trip) it came back perfect. The new poly bushes had settled in - new springs and bushes as well as suspension will sit the car proud and it will need a drive to settle before you start taking it apart again to get the ride height right:-) Have faith!!!!!www.tr4a.weebly.com
-
Hi Graham.
As I remember, the ride height should be around 41ch at the rear and 42cm at the front.
I can't locate my reference material on this so it is from memory.
It is on my website somewhere but I can;t locate it.
Stuart is right. My TR4A looked high. I drove it to the MOT station and when I got back the ride height was perfect.
My new bushes need to settle in.
Have faith and take it for a spin.
Best
Paul.
-
http://www.revingtontr.com/product/rtr3634/name/steering-shaft-tr4-6
I will be giving this ago in December.
Apparently it stops any vague feeling in the steering?
My steering feels OK now but as I have to replace the upper bushes dash side I thought why not?
I'll report back.
Best.
Paul
-
Stef. where were you when we needed you:-)??.
We still joke with my mate Chris who shut the bonnet in the first place - you need someone to blame when it happens:-)
Best
Paul
-
Nige:-)
What a bummer - it happened to me.
You can visit my website here to visually see what we did but it is a long way down the page so be patient as it loads.
The last pictures show us undoing the bonnet hinges.
http://tr4a.weebly.com/body-repair-fit-and-paint.html
Below is the text I wrote at the time.
The short version is:
3 people.
Put the car on a ramp if you can as it will save a lot of agro.
If not no matter.
Undo the hinges from beneath.
2 people lift the bonnet at the front from both sides VERY gently so as not to distort it.
Then, we used a coat hangar that was actually 2 coat hangars as the run from front of bonnet to back is long.
Get the hook of the coat hangar (made to be a 90 degree right angle at the end) to fiddle about and pull the release back.
If you can have another person above the catch pushing down and jigging the panel around over the catch that helps also.
We had the guy at the front holding up the panel and operating the coat hangar:-)
I was jigging and eventually it popped.
IT IS A SOD OF A JOB BUT BETTER THAN CUTTING ANY HOLES INTHE BULK HEAD.
Good luck.
If you are in Kent I have a ramp - and 3 guys experienced in these matters:-)
Triumph TR4A Bonnet / Hood Catch - when they stick!!!Whilst fitting the bonnet / hood it got itself stuck and we could not release it!!!!! It had a good cable on it and an 'Emergency Bonnet Release' should the cable ever brake. This was not our problem. The spring in the release catch was not returning. So, when the catch went in to the latch it sailed passed the catch mechanism and lodged itself under the catch and hole in the latch??? Make sense?? THOUGHT NOT!!! So, if your latch has an old spring throw it away and buy a new one as no amount of cables and emergency release equipment will fix this problem.How to release a stuck TR4A Bonnet / Hood.This will take time and it will need a couple of you and a ramp. Put the TR4A on a ramp and access the bonnet hinges from below and undo all of the bolts that hold the hinges to the body and the bonnet / hood. Once you have done this there will be enough movement in the bonnet to access the side bolts that keep the bonnet in place. Once they have all been removed you can gently jig the bonnet around and it should free up. If it is your catch that has locked then you can make a release out of very stiff coat hangar/metal wire with with a hook on the end and pull the latch. You will need someone to hold the bonnet up for you and you'll also need a torch. It took 3 of us an hour to get the bonnet off. Needless to say we have ordered a new bonnet latch for the bulkhead. This is not a nice job to do and you do need help and a ramp at all possible. -
Andy, great job and I like you choke cable solution.
Never an easy one:-)
Great stuff.
Best
Paul.
-
Ha ha, Stuart is as sharp as anything for a man of his years (How old is he:-)??
Sorry Stuart, missed that one.
Roger you are right. You can't have too much of a good thing.
I was thinking I was at the point if doing my restoration again would I have gone for this at that price???
I paid £800 for mine and it took a bit of work getting back but no welding.
At £4500 it might be worth selling the pet rabbit for at least - I think I would have been very tempted.
Take care Roger
Paul
-
As the listing says - Once in a lifetime opportunity - £4500
It's a thing of beauty!
Best
Paul.
-
I have recently rebuilt my TR4A IRS and used Koni shocks.
They made such a difference as the car used to scuttle around corners.
Whilst it was fun getting to know how far you could push the car in the bend with the armstrong levers the Koni conversion has made all the difference.
You can steam in to a bend with confidence and the car is as solid as a rock. The road holding is amazing and I love it.
I don't think the original lever set up was this good:-)???
I spoke to the original owner who stated that the IRS set up was useless and worse than his previous TR3.
He put this down to the fact that there was no Koni shock absorber conversion available at the time for the TR4A.
There was a conversion available for the TR3 when he had it.
For him, his new TR4A was a bit of a let down by comparison.
Best
Paul.
-
Hi Andy.
There should be no trouble at all.
I did this conversion and I am really happy with it.
Here is a link to loads of pictures of the conversion and linkage plus a video.
http://tr4a.weebly.com/hs6-carburettors-triumph-tr4a.html
Also on that page you will see the super rare S.U. DU-6 carburettors.
That is a conversion I would love to see:-)
Good luck.
Paul.
-
A big thank you to all those who gave me advice and help with the restoration of my TR4A.
It made the cover and the 'Big restoration' section of Practical Classic in the October Edition out now! (Pic attached)
I gave the TR Register a good plug and STUART -YOU GET A MENTION;-)
The restoration is nominated for 'Car Restorer of the Year' so when they voting starts vote for me:-)
Through the TR Register I have made some life-long friends. It has been a blast and I have to say that this is the best forum in the world.
I am still fiddling with bits on the TR (About to rebuild the steering column for the 5th time due to this pesky bushes and a wiper box has failed. Other than that, all is well.
I was lucky enough to meet the original owner of my TR4A that he bought new in 1965. There is a short film on my website at: http://tr4a.weebly.com.
Again, thanks to all and best wishes.
Paul.

-
Hi Dave.
You came to my house in Kent picking up the parts from Stef.
Try Conrad or Walter Petchy.
If you need their details let me know via PM?
Best.
Paul.
-
Hi Michael.
I took detailed pictures of my seats when stripping them down.
You can see the tonneau stud and location clearly.
The pictures are online here: http://tr4a.weebly.com/triumph-tr4a-trim.html
Best
Paul.
-
Hi,
I replaced mine a while .
Details here.
http://tr4a.weebly.com/body-repair-fit-and-paint.html
I needed getting a Stanpart panel from Remington - the last they had at the time.
I did cut the differential bump out of mine as it was in good condition and Conrad bought it as part of a load of my left over parts.
Conrad may still have it and if you are fabricating a panel having the diff cover bump in the seat panel will save hours an hours of work.
Best.
Paul
PM me if you need the contact details for Conrad
-
I remember putting a super tight grip on mine with mole grips after using loads of WD40 too. I hit the mole grips with a hammer and eventually it all started to move and managed to unscrew the stop. I then put a tap through it to clean out the thread. Worked a treat but takes time. Better than saws and drills if you have the time:-)
-
Made me smile. Imagine trying to rotate a handle on a modern car to fit??!?!!
I am so stuck in the 60's;-)
-
Also, note harry's comments on the door handle:-)
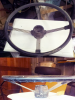
"Yes Paul I think this is probably the original steering wheel, there was certainly one like it in our attic for some years and I know it was passed on to the new owner. As to why I had a wood-rim one put in its place, I think that’s because the replacement was a tad smaller in diameter (though I may be wrong here) and thus made entry & exit easier; I suppose another factor is that, at that period, such wheels were the ‘in’ thing (although I have never been a great follower of fashion!). Another easy mod was to rotate the driver's door handle through 180 degrees, so that my knee did not rest against it uncomfortably while driving – being 6’ 4” high has its drawbacks sometimes!"
Best.
Paul.
-
Stef, interestingly, Harry who bought the car new is 6ft 4". I wonder if it was possible to order a different steering wheel from new if you were on the tall side? Most car dealers will do anything to nail a sale:-)
Best.
Paul.
-
The original owner thinks it came with the car when delivered new???? Can this be??
Best
Paul.
-
Apparently, this was fitted to my TR4A according to the second & third owner. He had it between 1976 and 1990.
I don't recognise it? Spitfire? Vitesse? 2000? Herald?
Best
Paul
-
So, here is the response from the BMIHT on our Heritage certificate - problem solved:-)
Dear Mr Anderson,
I have checked the factory record and an error was made when the research for your certificate was done. The recorded engine number is CT/58175-E. I will correct the certificate and have a new one out to you
RegardsRicharde BacchusCertificate OfficerBritish Motor Industry Heritage Trust -
 So, Harry found another picture today taken one year in to his ownership. 1966
I have to say that I am liking Harry more and more.
He put the kids and his in-laws in the Austin Princess 1100 whilst he and his wife enjoyed the TR4A:-)
-
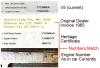 Looking at the sales Invoice I have found an interesting anomaly.
I have attached a picture from the documents associated.
Basically, I always thought that our engine had been replaced as my heritage number was different from my engine number yet the V5 appeared to be out by 2 letters (E-G) from the actual engine number.
Now that I have my hands on the original dealer invoice when the car was supplied the engine number on the invoice matches the engine number in the car.
So I am guessing someone has confused the 'E' for a 'G' on the V5 and that the Heritage Certificate is well out?
V5 = CT 58175 G
Heritage Certificate CT 58827 CT
Dealer Invoice 1965 CT 58175 E
Actual Engine Number CT 58175 E
So it would appear that I have a matching numbers car - would you agree?' and, is it worth me talking to the heritage certificate people to get the records altered or at least a new certificate confirming my data?
What would be worrying is, if all you had was a heritage certificate and it was wrong???!?!?!
In any event, a great find for me now I know the numbers match:-)
Best
Paul
-
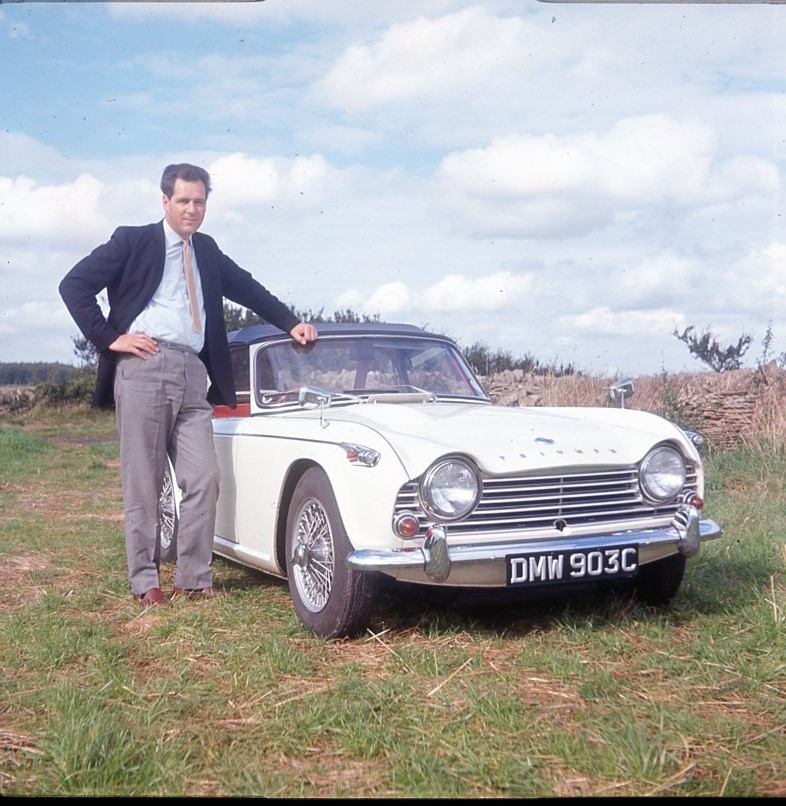
Some of you will be aware of my website www.tr4a.weebly.com but here is possibly the best reason to have a website.
The original owner of my TR4A got in touch via the site after it was brought to his attention.
He provided the picture of himself looking very cool with his brand new Triumph TR4A.
I think he must be about 84 now!
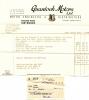
Amazingly, he still had the original sales invoice that he has given to me so it stays with the car.
You can see the picture and bill of sale in this post attached.
When his email arrived I have to say I did not know what to say - :-)
So, we have arranged to meet up so I can let him see his car again and to take him for a drive in it.
Naturally I'll take pictures.

Best.
Paul


IRS Rear spring length and ride height
in TR4/4A Forum
Posted
PM Sent