


TRbeginner
-
Content Count
134 -
Joined
-
Last visited
Content Type
Profiles
Forums
Calendar
Posts posted by TRbeginner
-
-
Thanks Waldi, brass nuts and dry gasket sound effective and straightforward. The mid section of the exhaust is suspended on a fixed mount at the rear of the gearbox, so I was thinking about adding some flexible pipe between the downpipe and this section, to provide some 'give' in the system. The rear section, including silencer is mounted on a rubber hanger. Hopefully these together will overcome any possibility of expansion/vibration stress.
Thanks again and best regards
Dave
-
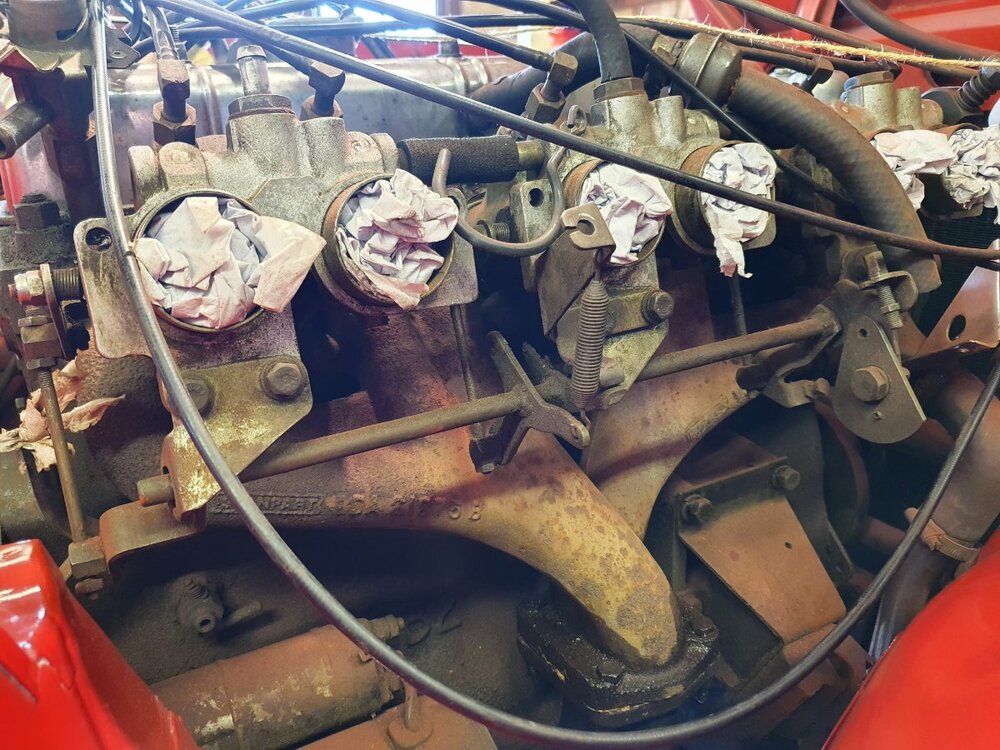
Success!! After liberal quantities of Aerokroil, patience, a little bit of heat and unimaginable torque on a quarter drive extension I have successfully loosened the nuts and separated the downtubes from the manifold. As mentioned previously the original studs had been replaced by bolts. These were 5/16 unf, however the holes in the flanges will take 3/8 unf bolts for the re-assembly.
Interestingly there was no gasket present at the joint, and the exhaust wasnt blowing prior to dismantling!
Accessibility is good at the moment, with various accessories removed, so I need to get the re-assembly right first time (no leakage at the joint etc) with the new stainless downpipes. So a bit of advice would be welcome please. In particular - would brass nuts be recommended over steel ones - research indicates that steel nuts on manifolds are prone to loosening. Also, do I need to use a jointing compound such as Holts Firegum? Any recommendations about re-assembly welcome please.
Many thanks
-
Just now, stuart said:
You would have to strip the throttle bodies out as well Im afraid.
Stuart.
Thanks as ever Stuart, I was afraid this would be the case. The gas torch approach in those confined spaces and upside down scares the wotsit out of me - 40 years ago I probably would have not given the possible consequences a second thought! Self prervation seems to be an age thing!

-
On 11/28/2021 at 11:29 AM, kpgarage said:
Dave, good morning. Let me point out one thing which may be of help. Looking at your exhaust manifold picture, it appears that the factory studs have been removed in favor of four through and through bolts. That may ease the removal of the head pipe in the car. I’d soak those four bolts in PB blaster penetrant and then try to remove. Unless you just want to remove the exhaust manifold for clean up you could leave in place. The Triumph exhaust manifolds are really quite good and I’d be reluctant to change it to header or SS model, whatever it’s called over there.
Apologies KP, I missed this message. Ive been soaking the bolts in Aerokroil lubricant every few days since Xmas (domestic stuff prevented further progress before Xmas), and only one has loosened. And Im not keen on the idea of using a gas torch at various precarious angles. The only other option appears to be to remove the exhaust manifold/downpipe combined and then split on the bench. I intend retaining the cast manifold, but already have a stainless down pipe.
Can the exhaust manifold be removed without removing/upsetting the throttle bodies/manifolds etc? -
On 11/15/2021 at 4:07 PM, stuart said:
Strictly speaking thats the TR6 manual, though it pretty much covers all of the mechanical aspects of the 5, you really need a proper TR5 workshop supplement to the TR4a manual to cover it properly.
Stuart.
Thanks for the clarification Stuart. I'll read up before I proceed.
-
18 hours ago, Waldi said:
Hi Dave,
I’m glad to be of help (like many others).
If you use the “Brown Bible” and follow the steps in there, and off course ask on here if in doubt, the results will come. The Moss catalogue is a valuable source too. You will have to remove the throttle bodies anyway to replace the gasket. Take lots of pictures and make notes during dismantling.
Waldi
Hi Waldi
Thank you. - the people on this forum are indeed amazingly helpful and friendly.
The 'brown bible' being the workshop manual I presume, or am I missing something.....?
Thanks
Dave
-
1 hour ago, Waldi said:
I would remove the 3 throttle bodies, and clean/inspect them.
Check for play in the spindles, and if the gaps on the disks are the same when closed (idle screws removed).
Clean the bores of the idle air.
Also replace the bearings in the linkage system (3 off) by (blue) PU items, you are missing one now.
Use a good gasket, Payen seems to be the best many say on here.
I do not like a SS exhaust manifold for the additional heat it radiates but each to his own.
Work precisely, it will pay out.
Good luck,
Waldi
Waldi, thanks for the tips above. Throttle bodies/gaps/boresetc are new territory to me - on any car! Very wary about stripping down further, but will take a close look - may as well while stuff is accessible. I'm not replacing the manifold, just fitting a stainless downpipe - when I read up on pros/cons of a stainless manifold there was enough concern expressed from folk much more knowledgable than me (heat, routing etc) to put me off!

May get back to you about the detail around your suggestions if thats OK.
Thanks again.
Dave
-
1 hour ago, stuart said:
FWIW It looks as if you have bolts instead of studs in the manifold flange so they should be easier to remove anyway.
Stuart.
1 hour ago, stuart said:FWIW It looks as if you have bolts instead of studs in the manifold flange so they should be easier to remove anyway.
Stuart.
Yes, they are bolts. Every cloud has a silver lining! Thanks Stuart
-
29 minutes ago, stuart said:
The front panel is welded on (Or should be if original) dont try removing it unless you know what your doing to replace it and get everything to fit again, You do need to remove the inlet manifold to remove the exhaust manifold.
Stuart.
Stuart
Thats all I needed to know - thanks for the confirmations. Will leave the front panel well alone, and will give the exhaust manifold some thought - was looking for an easier way to separate the downpipe given the horror stories of freeing the nuts. Have just ordered some Kano Kroil - hope it lives up to reputation!
Earlier this year you put me on to TR Bitz for a screen frame repair. Their body guy Noel did a very good job for a very fair price. Thanks for this too.
All the best
Dave
-
Good afternoon all
I'm part way through what seems to have turned into a rolling restoration/general tidy up. Currently the 'rear half' of the engine bay (ie inner wings to bulkhead is undergoing some restorative treatment with body work, accessories, ancillaries etc being tidied up, parts replaced where appropriate etc. Before I start re-assemnbly, I am thinking about extending the work and advice in a couple of areas would be appreciated please...
1. Access to the front of the engine compartment is very limited, even if the bonnet is removed. Can any one offer advice please, whether it is easy (or even possible) to remove the front panel to provide better access/limt grazed knuckles so that I can continue the engine bay work. I'm assuming the front panel is 'bolt on' without any welds. The engine and ancilliaries at the forward end are all in situ and obviously would be more easily acessed without front panel, which itself is in excellent condition, just covered with almost 40 years of road grime. I feel a better job could be done with the panel removed. Currently panel gaps are good and I dont want to open a proverbial can of worms.
2. I am also fitting a new stainless exhaust/downpipe and am anticipating having problems loosening the nuts securing the existing downpipes to the manifold in situ. It may be easier to separate the two on the bench rather when fitted to the car. The manual says that the inlet manifold must be removed in order to remove the exhaust manifold. Is this the case even when all accessories around the exhaust manifold are already removed - I'd prefer not to mess around wth the inlet side, and it looks like all exhaust manifold nuts (7?) securing it to the head are accessible currently.
Any help on both the above would be great please. I have trawled the forum on both the above topics but cant find any directly relevant guidance.
I'm learning fast and I may no longer be a TR beginner, but every job goes into new territory! Doing my best to understand each piece of work BEFORE diving in! Thanks for any information forthcoming - all very much appreciated.
Regards
Dave
-
Fabulous result Tim, love the colour. Well done! I'm sure you'll enjoy every minute out on the road.
Dave
-
17 hours ago, Tim T said:
I would agree with Graham. I made something very similar for the 3a.
Cheers,
Tim
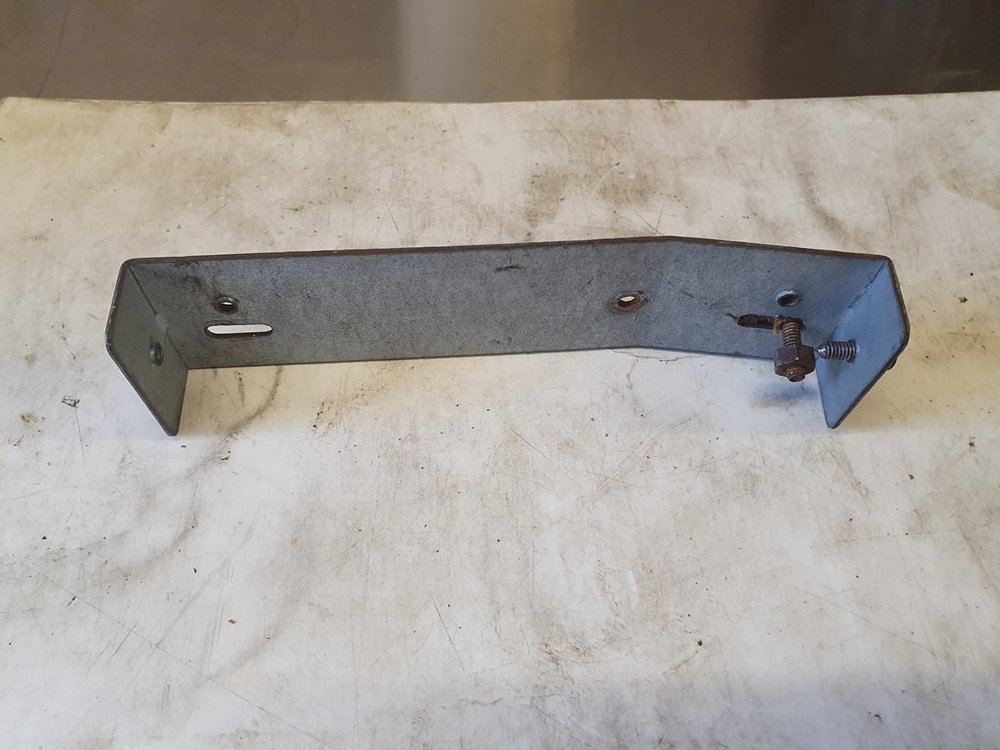
On 10/28/2020 at 5:58 PM, Graham said:Looks like a CB radio bracket to me.
On 10/28/2020 at 4:38 PM, Paul J said:Nothing like that on mine Dave.
Paul
Paul, Graham and Tim,
Thanks all, for your replies. Youre confirming what I thought that it belongs to some extraneous accessory. When I acquired the car it had a graphic equaliser sitting in the glovebox and I'm wondering if it started life mounted under the pedal box frame - what an odd place though. Anyway the offending bracket wont be included in the rebuild, so thanks again all. Independent views help a lot!
Dave
-
17 hours ago, Tim T said:
I would agree with Graham. I made something very similar for the 3a.
Cheers,
Tim
Paul, Graham and Tim,
Thanks all, for your replies. Youre confirming what I thought that it belongs to some extraneous accessory. When I acquired the car it had a graphic equaliser sitting in the glovebox and I'm wondering if it started life mounted under the pedal box frame - what an odd place though. Anyway the offending bracket wont be included in the rebuild, so thanks again all. Independent views help a lot!
Dave
-
Hi All,
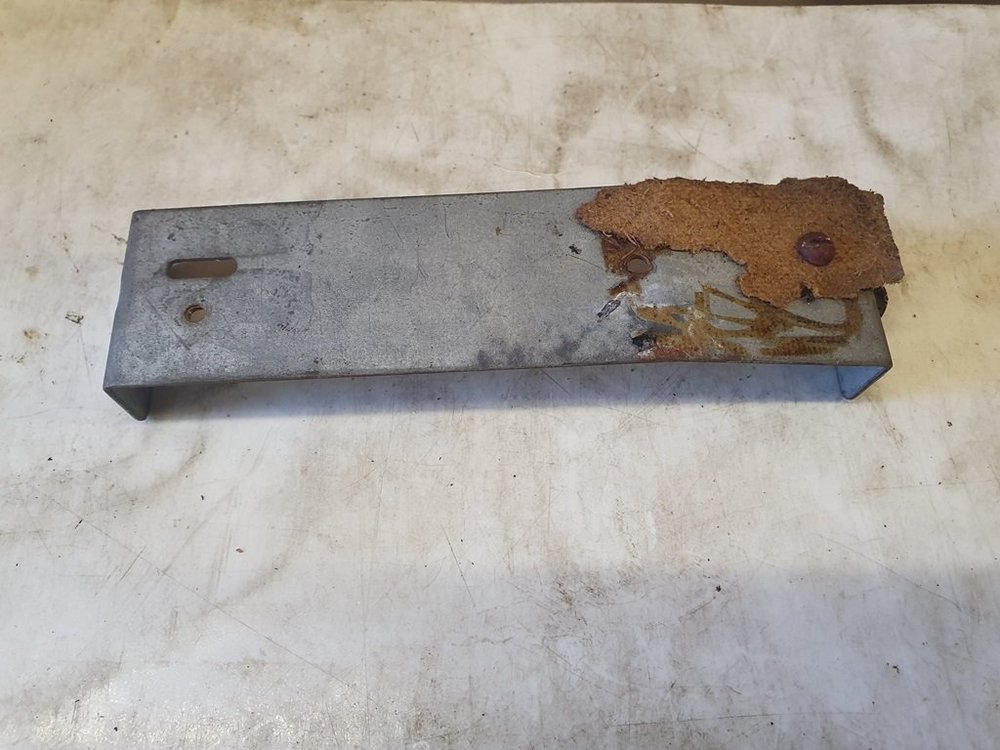
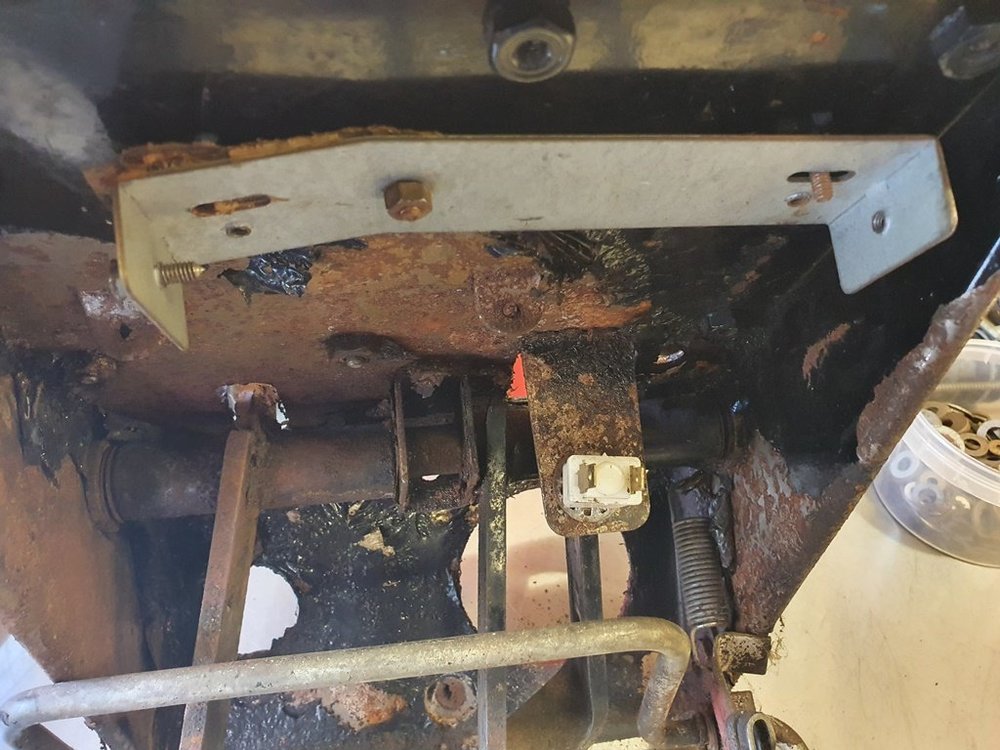
The ongoing work on the TR5 led to the removal of the pedal box today. Thought Id removed all the bolts and wondered why it wouldnt move, until I notice two tiny almost flat bolt heads, (same colour as the paint work) on the upper side of the bulk head which were securing a bracket on the underside of the pedal box. See attached photos - it looks like a mounting bracket for a radio, but is slightly too small and what an awful position..!
I cant find this part in any of the manuals/diagrams so am pretty sure its surplus to requirements but would appreciate confirmation (or otherwise) before I bin it. All opinions welcome. Many thanks, Dave
 ve
ve
-
On 9/20/2020 at 8:37 PM, barkerwilliams said:
As Bob above, then fit a plastic tray.
Alan
Hi Alan, thanks for the reply. As per Bob above, painting is the first priorty, then maybe I will look at a tray.
Regards
Dave
-
On 9/20/2020 at 6:38 PM, Waldi said:
I would use a 1K primer (after a coarse sanding with 220 grid, then sand 220/320/400 and use a 2K aerosol (rattle can). Make sure you degrease the area before painting.
Waldi
On 9/20/2020 at 8:28 PM, PodOne said:As above use 2K spray paint but please use a decent mask like this one from 3M https://www.ebay.co.uk/itm/7-in-1-6200-7502-Paint-Spray-Gas-Shield-Safety-Work-Facepiece-Respirator-Filter/313201560032? as the fumes even out doors aren't pleasant.
Andy
Hi Waldi/Andy thanks for the advice, I'll proceed as you suggest other than the 2k aerosol - I think my preference is cellulose. Not sure a 2k aerosol will be the same but general a 2k finish looks slightly heavier to me - less in keeping with the age and other paintwork maybe?
Cheers
Dave
-
On 9/20/2020 at 6:16 PM, SeanF said:
Bondarust will take cellulose but you might want to use a surface prier that you can sand flat before the top coat. I would suggest aerosol over brush painting. It should be fairly easy to isolate the battery tray with judicious masking.
Hi Sean, thanks for the guidance. Will add the surface primer and then probably use cellulose as you suggest - I think the finish is more in keeping with the age/existing paintwork etc. Having had a closer look at the edges, the masking is ok too.
Cheers Dave
-
On 9/20/2020 at 3:55 PM, Lebro said:
Can't answer the painting question, but consider fitting a plastic insert to protect the battery tray from any acid leakage. They are readily available from the usual suppliers
Bob.
Hi Bob, thanks for the tip. I'll have a look round and cgive it some thought. First priority is to repaint the tray.
All the best
Dave
-
Good afternoon all, Im just about to repaint the battery tray on my signal red TR5 and looking for guidance please.
All surface rust has been removed and treated with jenolite, followed by Bondarust primer. Now I need to follow through with either aerosol or brush applied colour and I have a few questions.
1) The hazards around 2k are putting me off using it in favour of cellulose, which I have previous experience years ago of using via a gun - is this a sensible way to go?
2) Brush or aerosol? The area (engine is in situ) is not conducive to easily using an aerosol but brush painting cellulose is fraught with its own problems, possibly mitigated by using 'brushing thinners' I believe
3) Will Bondarust take the cellulose OK or do I need a primer/sealer (eg Frost Isolator Primer) beforehand?
4) Any recommendations for a lacquer would be helpful please
5) If I go down the aerosol route, are the Moss aerosols recommended?
So many variable here - any guidance would be appreciated to lead to the best finish. Thank you
")
Dave
-
18 minutes ago, stuart said:
Always red prime (Bondarust) first so you get it right into all the seams properly then seam seal before primer/paint. I use a good brushable sealer so you can get it right into the joints and use it everywhere inside and out. Tigerseal is not a proper sealer, you need something like this Seam sealer
or like this More seam sealer
Stuart.
Stuart, thanks, great clear advice. All the best, Dave.
-
Morning all,
I'm just about to apply seam sealer on the front bulkhead seams behind the dash following a complete strip out, heater refurb etc. Would be interested in recommendations for either gun applied sealer (Tigerseal....?) or brush applied, taking note of the pros/cons above.
Also, showing my ignorance here, is the sealer applied on top of primer (Bondarust) or to the bare metal, then primed? Im guessing the former but wanted to check - sorry, probably a naive question.
Thanks
Dave
-
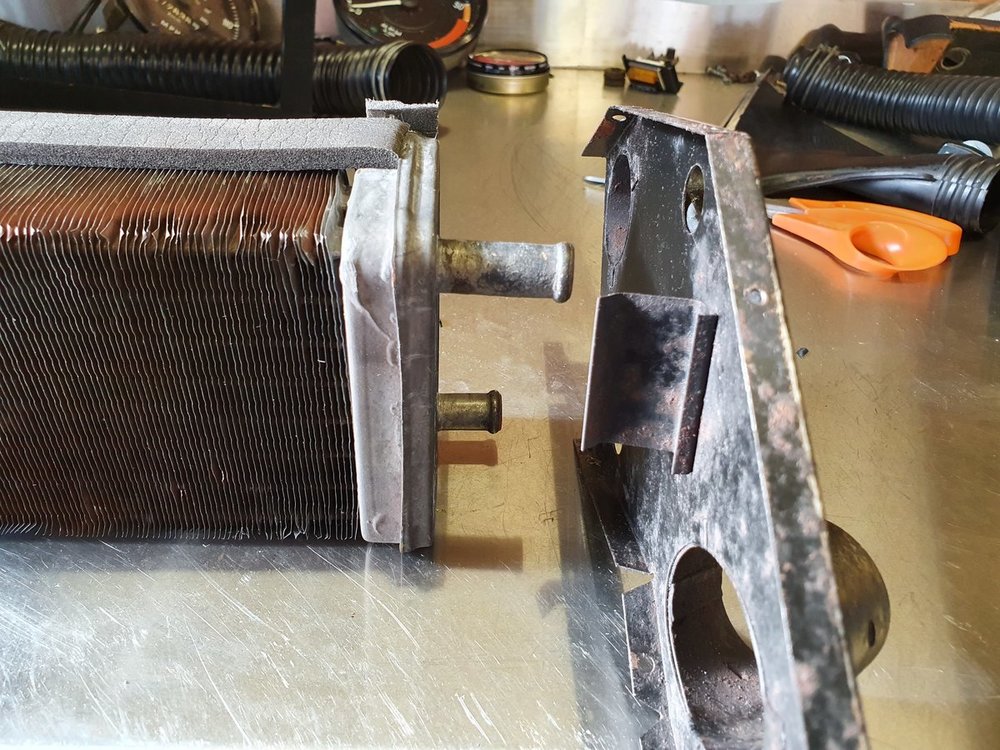
9 hours ago, RogerH said:
Hi Dave,
I've just looked at a video clip of my heater rebuild and the short pipe is the lower one.
Roger
9 hours ago, RogerH said:Hi Dave,
I've just looked at a video clip of my heater rebuild and the short pipe is the lower one.
Roger
Hi Roger
Thanks for your help and confirmation, all back together now. Starting to head in the right direction at last.
Dave
-
Morning all, looking forward to a gorgeous Sunday morning in the garage here!

I little advice need please....just re-assembling the heater I dismantled recently - a good clean, flush and new foam, but I now have a 50/50 chance of locating the heat exchanger the correct way round. Does the long connector mate with the top or bottom hole in the side plate? Omitted to take the photo prior to dismantling Im afraid.
Also, when it was removed from the car, one of the three grommet style rubber mounts was missing. Are these available anywhere? Moss catalogue states not available.
Thanks all, enjoy your day in the sun.
Dave


TR5 engine bay refurb - (front panel removal; exhaust manifold removal) - advice please
in TR5/250 Forum
Posted
Hi Neal....just to clarify....are you talking about the exhaust manifold to cylinder head gasket or the exhaust manifold to downpipe gasket? I havent removed the exhaust manifold from the head. Thanks
Dave