


ekamm
-
Content Count
19 -
Joined
-
Last visited
Content Type
Profiles
Forums
Calendar
Posts posted by ekamm
-
-
Here are the couple that I could find
All of these are original. I couldn't find any after the work was complete.


-
Appears to be the upper part of ashtray.
-
Here is a good picture of it in Menno's post on another subject.
http://www.tr-register.co.uk/forums/index.php?showtopic=33444
-
I just thought if you mean how does the pull fit in the door card I don't have a picture but it fits from the top through a gap in the pocket and rests on a clip on the inside of the card.
-
I am assuming that we are talking about a 3a. It's pretty straight forward here's a pic of the door interior.

-
Again sorry for the order. This shows how the leather was applied. I found it a bit easier to do a little at a time, taping down the leather as I moved a long.

This one after it was all glued taped down to hold till the glue set and applying a little pressure to keep the skin taught untill it dries. After I removed the tape and glud the under side leaving the ends undone until the bottom dried.

After all is dried you can cut the ends to fold under. take care to cut only a little and fold under to see if the fit is correct.. Glue down the ends when you feel that the fit is correct and make a thin incision to allow the buttons to be pressed in. I put a little glue here as well but never was satisfied with the fit of the buttons as the stayed a little loose.

-
Here are a few pics of my capping work if you do a google search for tr3 capping you should see some posts from another site. Sorry these aren't in any particular order. The door cappings that you were referring to are last. I made a sort of jig that only served to hold the metal in place while working on the piece. I put a small amount of adhesive on the metal and then attached the round foam to it. I then attached a thin piece of batting to the foam (suggested to me by some other people). If I had it to do again I would try to find a very thin 1/8" thick sheet of foam to cover it with. This just helps to hide any imperfections that result at the ends where the round piece gets cut and the leather is pulled accross.


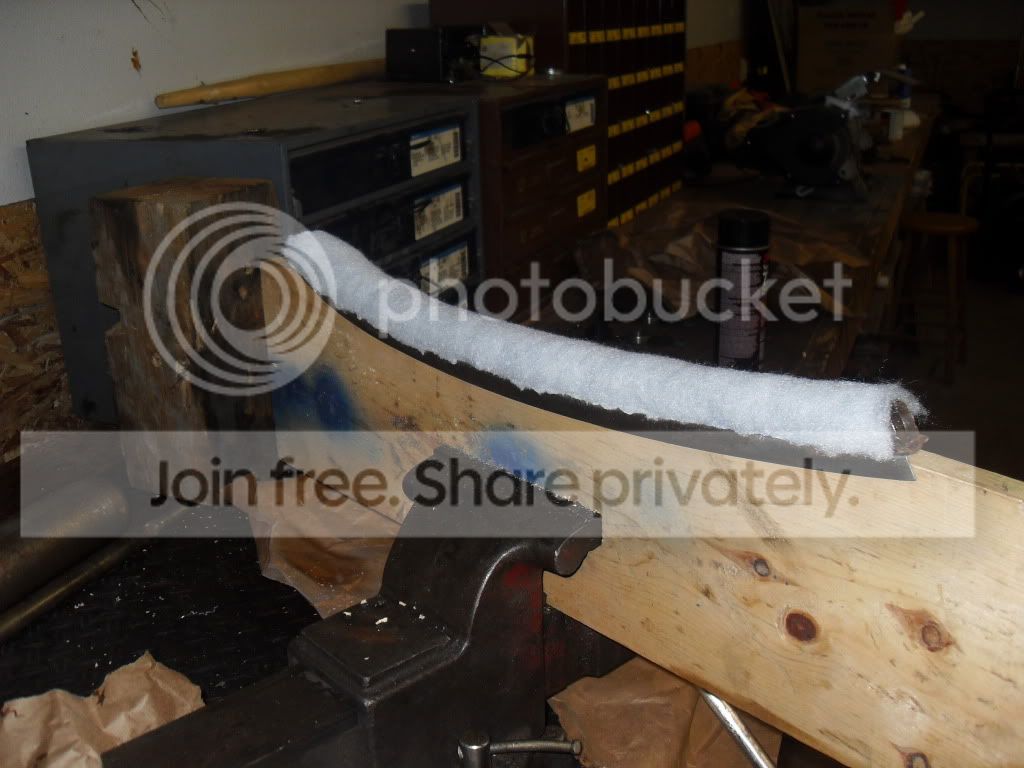
This is the end after finished

-
I'm that chap although never referred to that way.
The idea wasn't mine but another guy on the bcf site. I did wet it by the recommendation of others and used some heat as well. I very had few problems. It was one of those dreaded things that wasn't as bad as it seemed. I have some more pictures of all the cappings if any one is interested I'll post at your request.
-
The clutch is the smaller one in the center.
-
TRF is currently running a sale on the tr2/3 catalog and many of their parts are greatly reduced. I think that it runs through Jan 17 or something near that.
-
Ashley, I was referring to James the guy that started the post.
-
James check your notifications upper right, top of page.
-
Hey Menno this is off the subject but there are no screws at the top or your door panel how did you hold it on?
-
You have to do something to keep the chickens out of the carbs.
-
My Aug '59 TR3A has the same disintegrating leather on the dash 50 years now. I will be removing i the next week or so. Th door and dogleg have been redone so it will be interesting to see what is under that hopefully reusable spongy material. What to replace with if it's unusable?
-
Alec I am on the West side of the pond and have to agree that this concourse **** is unnecessary. I love my TR3A and just want to drive and enjoy it. It is very original, just because I haven't changed anything. I would love to have the weird oops that's not RIGHT part as long as I can continue to drive and enjoy!
-
Pitty that she can't go out on her birthday.
-
I believe that I was available at Amazon or another like purveyor. I assume that you searched it or possibly Ebay.
Sorry - yet another anorak warning
in TR2/3/3A/3B Forum
Posted
I belive that they were cadmium finish but mine are quite worn.