In The Garage - November 2020

Issue 10
November 2020
Welcome to Issue 10 of In The Garage with its new header courtesy of the talented Paul Gibson. We are always looking for content so now that we have plenty of fettling time on our hands due to Lockdown 2 please let us know what is going on in your garage.
In The Garage isn’t published at fixed intervals but rather when we have enough content to make a reasonable read. Contributions don’t need to be a novel about major project; simple hints and tips or a picture and a few words of explanation are welcome.
Andrew Willmott – TR3 and TR4
TR3 Inlet Stub Stacks
Following on from Bob Dove’s article on air intakes and filters in the last issue and finding some time on my hands, I rummaged through my metal store and found a couple of large diameter alloy offcuts ideal for making some new stub stacks with a full elliptical inlet tract.
I drew the elliptical profile on AutoCAD and then made a table of angles and diameters that I could machine on my trusty Myford. A bit of hand fettling with a file and emery cloth blended the machined flats into a smooth profile while still spinning the job in the lathe.
The breather holes and mounting studs were marked out and drilled on the pillar drill prior to final polishing.
The finished units are too big to fit inside my K&N filters so they were fitted without filters to try them out. Road testing revealed that the engine seems to run more smoothly at higher revs and the jets on the HS6 SU carburettors needed dropping a couple of flats to richen the mixture so I’m guessing that if it needed more fuel it must be sucking more air. Running without any filters or stub stacks doesn’t require the extra fuel so I cant put the change down to the lack of filters. I’ll leave them fitted as they are for the time being but a plenum chamber and inlet hose with filter might be a future project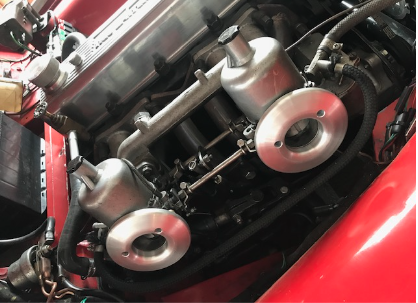
TVR Fin Wheels
A set of TVR Vixen ‘Fin’ wheels appeared for sale on eBay, collection only and located in the depths of Scotland. I knew that the TVR Vixen used TR6 Hubs and a message to my son Chris revealed that he would pass within a couple of miles of the seller on his next drive home after working offshore. A week or so later they arrived back in North Devon and were soon vapour blasted clean and fitted with new steel wheel nut inserts. The 15 x 5 1/2” wheels were made specifically for the Vixen and so are quite rare. The offset sets them out about 10mm more than a standard TR6 wheel so they should fill the arches well without being ‘Carlos Fandango’
The plan is to fit decorative spinners using spigots machined from old wire adaptors. To that end if anyone has any scrap adaptors with worn splines that would normally find their way into the scrap bin please save them for me, as I need another four.

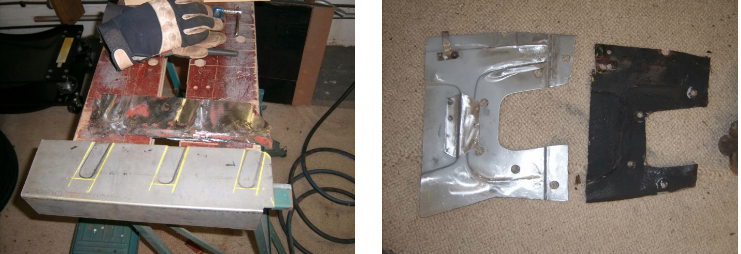
TR4 front Suspension Camber
The standard one-degree positive camber on the TR4 doesn’t suit modern tyres that work much better with a bit of negative camber. My 5 1⁄2” 72 spoke wires are fitted with a 6mm spacer behind the adaptors to retain the standard long wheel studs and the top of the wheels protrude slightly from the arches.
The camber blocks fitted to my TR3 and described in Issue 7 had seen a few miles and proved their worth so a second set was manufactured to fit to the TR4.
With the benefit of experience from the first set manufacture and fitting of the second set went smoothly and the TR4 was soon sat on its modified suspension.
The tracking was reset to suit the revised stance and road testing revealed no vices. The car sits on Revington road/rally springs and under steers when pushed even without a front anti roll bar fitted. With the camber set at 11⁄2 degrees negative the car seems to turn in more readily with less of a tendency to understeer. The steering is a little heavier but remains entirely acceptable.
The modification did show up one shortcoming in that the aftermarket top ball joints proved to be woefully short of articulation and were at full articulation on droop with the standard camber setup. With the negative camber blocks in place the lower bump stop barely reached the abutment. A set of quality OEM spec top ball joints from British manufacturer Amsteer solved the problem. They weren’t cheap at around £50 each but I certainly recommend that anyone buying new ball joints pay the premium rather than rely on components made on the other side of the world and costing £20 a pair.
Before modification After Modification

Martin Lovell – TR6
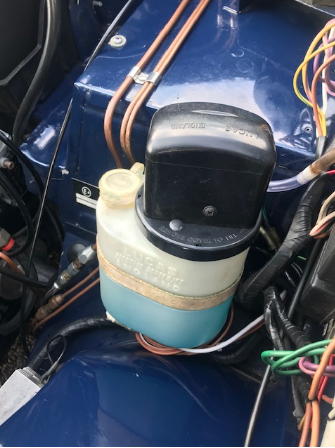
Windscreen Washer Pump Cover
Those who are familiar with Martin will know that he like things neat and tidy and the standard TR6 windscreen washer pump always looks like it may be missing its cover.
Martin recognised that a Lucas control box cover from the earlier dynamo equipped models was just the right size and its material matched the washer bottle lid. An hour of fettling saw the control box connection details buffed off the lid leaving a plain polished surface with just the Lucas England script remaining. A bit more ingenuity saw the cover fitted to the washer bottle lid and looking like it should have been there all along.
John Davey – TR6
Rebuild
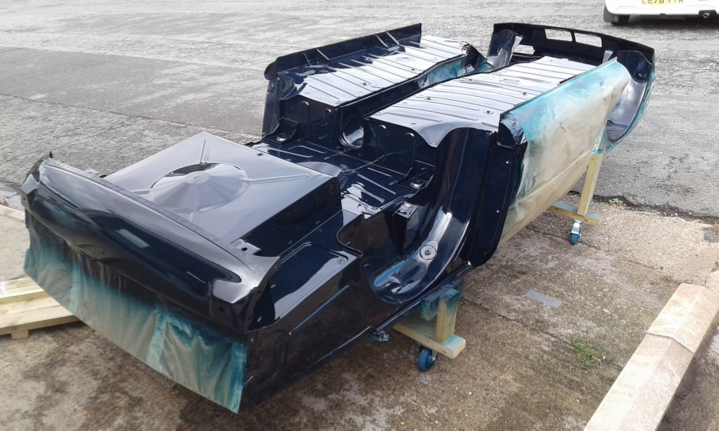
John has been beavering away in Teignmouth for some years on his not so recently acquired TR6 and has contributed a few pictures of his progress. The results so far look pretty impressive. It is John’s intention to restore the car to the original factory specification finished in royal blue with shadow blue interior.
John writes
“I bought the car about 11years ago. I had been trying to complete the sale of a Series 2 4.2 XJ6 which l had recently restored. The "buyer" had seen the XJ6 at a show and offered me a Series 2 4.2 2+2 import
as a straight swap. He led me up the garden path for 6 months and l finally gave up!
In my frustration l was window-shopping on line when I spotted the TR6 for sale in London. It needed rust repairs but had an "excellent chassis" (It was badly damaged and very corroded but that's another story!) The car was a very early example being the 108th built and at that time and the 11th earliest in existence. I asked the seller if it would drive me back to my home in Teignmouth and he confidently said it would; and it did! I paid £4250 for it, which in hindsight was too much. I took the train to London and drove back
to Devon, another story in itself.
During this protracted restoration I’ve overcome many hurdles and have now been restoring this ungrateful Triumph for over 10years! This TR6 has taken me to the edge of insanity many times over and l have been very, very close to giving up altogether and scrapping it, and believe me l don't give up easily.
I have probably spent in excess of 2000 hours so far and have at least another 500 to go! Aaarrrgh!”
John
(500 hours sounds like about 10 weeks to meJ- Andrew)
All the old paint and rust was removed by hand

John has made repair panels rather than replace with reproduction parts in order to preserve as much of the original steel as possible.
Drivers door with the usual TR rust along the bottom removed and repaired
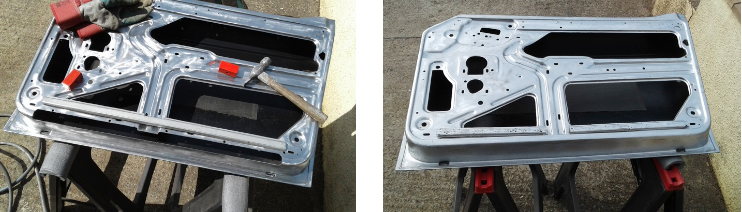
The paint on the underside looking better than when it left the factory.
Now that I’m aware of this project ill be keeping a keen eye on progress and foresee a little trip to Teignmouth in the offing once the current restrictions are lifted - Andrew
Iain Paul – Works TR3a
The oil Leak That turned into a Chassis Rebuild
It all started when I resolved to cure a long standing oil leak emanating from the oil seal at the rear of the crankshaft which lost lots of oil at high revs, annoying especially when you have a 4.1:1 axle and elevated revs are pretty normal.
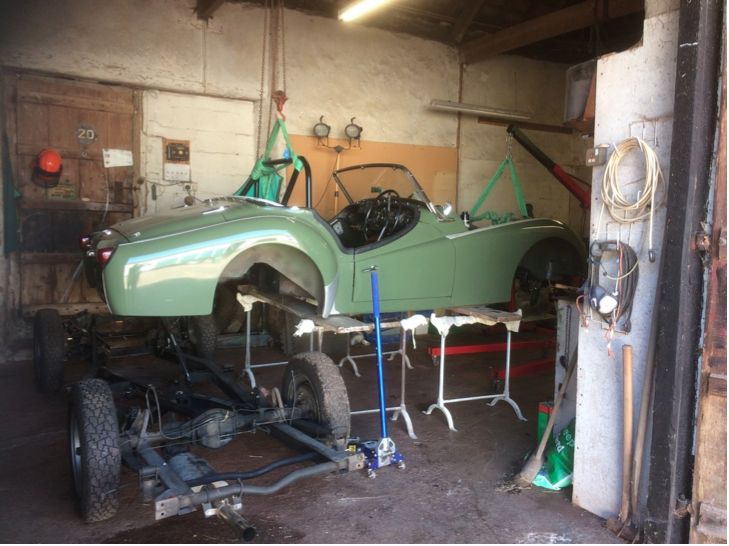
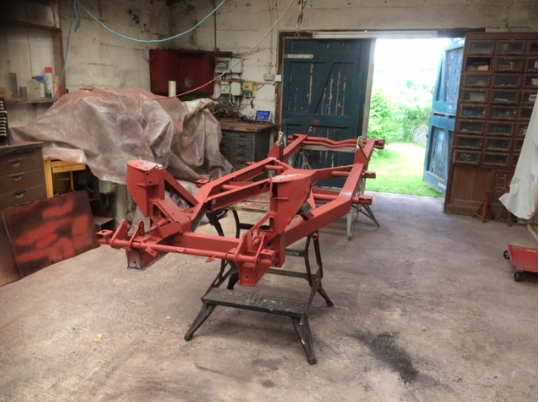
So the engine and gearbox came out in January to resolve the problem. TR projects always seem to “grow legs” and this led to a complete engine strip revealing that during a previous modification to fit a lip seal the crank had been ground to 65mm rather than the correct 63.5mm. This is apparently a commonly known failing from over 40 years ago. As it happens time would be on my side: while the engine and box were out Lockdown V1.0 was imposed. I fell ill just before the lockdown with Covid, and while in splendid isolation, (thanks to my Dr son) the brain became bored and wandered. One night I realised that there were only 20 bolts securing the body and with it removed the chassis could be blasted and repainted. It had become a bit tatty, it being 40 years since I last had it all apart. On a Sunday morning some weeks later I set about it with a block and tackle plus an engine hoist and 4 1/2 hours later I had a kit car!
The chassis was sand blasted by ICS in Cullompton for an extremely reasonable £70. I had used them previously when they had sand blasted a TR4a chassis and charged an equally reasonable £90. Once blasted and with a new outrigger fitted together with some other minor repairs, I repainted the chassis and similarly treated all the suspension components prior to re-assembly.
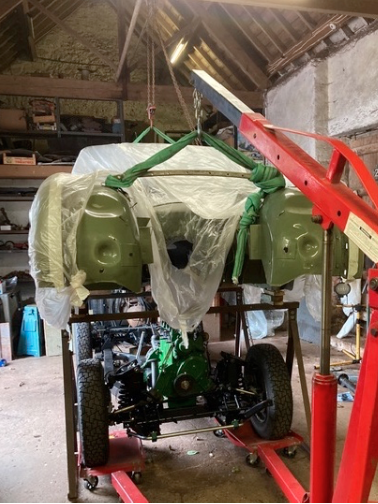
The repaired engine and gearbox were then refitted to the gleaming rolling chassis. While the chassis work progressed the surviving original floor pans had been stripped, primed and repainted ready to refit the body. I rolled the complete chassis back under the body and lowered then it back into position. A length of studding 150mm long had been screwed into each of the four chassis outriggers to ensure relatively easy alignment.
The engine has now been run and has revealed another minor hiccup. The cam followers were sticking after about 15 minutes of running..........off came the head out came the followers and I engaged in some serious discussion with the supplier, the manufacturer and the machine shop! The new “improved” Tuftrided followers were almost exactly the same size as the cam follower bores at 0.9375”. The followers need a minimum of 0.001” clearance in the block according to my engineer son’s calculations, (something about achieving an H/h fit). They are somewhat tighter as supplied. It took me a day on the lathe to polish them all to achieve sufficient clearance. Being Tuftrided, they are b*** hard! So all four-pot TR owners beware: choose your cam followers with care and measure everything. This is set number 3 for me and the two previous sets were fine when cold, but if allowed to run at 3/4 hot on the gauge they would start to stick. Once they stick the situation rapidly worsens due to the lack of rotation, they gall, stick more, rotate less and then its all downhill. At the supplied diameter a mere 20micron expansion would result in them being an interference fit and seizing. I consider that the side drilled oil hole is actually counter productive in that it allows all the oil to drain out rather than keeping the follower full of oil which overflows to provide an excess of lubrication. Possibly wrong but a well-known engine company that has worked on TRs for years think it’s highly plausible.
Here’s to 2021 and putting some miles on our cars!
Iain
“Petrol” Ignition and Detonation. – Contributed By Bob Dove
What is detonation?
Well it’s pinking isn’t it?
Not actually.
Pinking is pre-ignition when the spark happens too early and causes the piston to rattle in the bore making that noise. Detonation is much more destructive. It is defined as the spontaneous explosion of the end gasses of combustion and can burn through metal like a knife through butter.
So what normally happens when the spark plug lights the fuel air mixture in our engine? The spark ignites a mixture of air and fuel at the point of the spark plug and over the next few milliseconds a flame front propagates outwards from that point until it fills the combustion chamber expanding as it does so. Seeking a way out the resulting mass of gas exerts pressure on the only things that can move which is the piston, forcing it downwards and imparting movement to the connecting rod and thus rotating the crankshaft. If that occurs before the piston has passed the top of its stroke a fight will ensue resulting in that rattling noise known as pinking. Now note I said that the flame front propagates over several milliseconds and for the most part that time is constant for a given volume of gas. This means that in order for the combustion to have maximum effect the spark needs to happen at a time to allow that maximum pressure to develop so that the piston is just ready to descend. In other words before the piston actually arrives at the top of the stroke (TDC or top dead centre). In order to arrange this we set our ignition timing so that this state occurs but since the time changes according to engine revolutions we need to arrange for the timing of the spark to alter according to engine speed. We therefor need to advance the spark as engine speed rises up to a point where maximum power is produced (usually corresponding to maximum engine torque) without introducing pinking or detonation. This is usually done in a distributor with a system of centrifugal weights acting to rotate the cam of the distributor in relation to the electrical points that cause the spark to occur. In modern engines of course this process is done by the electronic engine control unit, more of which later.
Ok so far? But let’s go back to detonation for a moment and discuss petrol while we are at it. Many years ago when the world was young petrol was found to be a useful fuel for powering the new fangled internal combustion engine. “Internal combustion” as the burning took place inside the engine as opposed to the then familiar steam engine with its external firebox. Soon afterwards detonation was discovered! Once that happened testing started to find ways to limit detonation and measure the resistance of petrol to detonation. This resistance was tested in a laboratory in a specified single cylinder engine and given a RON number (Research Octane Number) according to how successful it was, the higher the number the better and more resistance to detonation was the fuel. Of course detonation is also the result of compression ratio and air/fuel mix. If we ignore the theoretically correct “lambda” number of 1 the best power is normally found with a slightly richer mixture than this. Weaker mixtures can induce detonation quite quickly. Intake temperature can also play a part but here we are dealing with normally aspirated old engines so it seldom comes into effect. With turbocharged engines things are quite different and an intercooler is needed to keep intake air temperature down. Anything much above 60 centigrade is an open invitation to detonation.
So to recap, detonation is a result of high compression ratios, overly advance ignition timing, excessive mixture temperature, or poor quality fuel. People soon learned that the quality of petrol available in early days would not support compression ratios of much more than 7:1 and once they started using charge compressors or superchargers, methanol, an alcohol mix was added along with some other nasty compounds like toluene and acetone to raise RON number to a point where the engine could survive whilst producing much increased power. The addition of lead compounds was also found to be beneficial not just in increasing detonation resistance but also in lubricating the surface of exhaust valve seats preventing premature burning and failure. No longer did mechanics have to remove the cylinder head every thousand miles and lap in the valves.
Now turn for a moment to the type of car most readers are interested in. The engines were designed at a time when high quality petrol was available in a range of octane ratings from lowly regular via premium up to 101 octane Super plus. Using such fuels, ignition timing could be run quite high and typically sports cars of the period often ran as much as 40 -42 degrees of maximum advance. The 1960 and 70s Alfa Romeo cars I spent so many years looking after even ran as high as 44 degrees according to the handbook. Admitted power outputs were low compared to modern multi valve turbo charged engines but not compared to their contemporaries.
Then came science and the realisation that some of the compounds used in petrol were not very good for either people or the environment. Lead in particular was found to be particularly poisonous and as the 1970s turned to the 80s lead content began to be reduced. This was also found to be necessary in order to protect the new catalytic converters that were being installed in new cars to reduce other poisonous products of combustion as lead contaminates the catalyst. The immediate result of this reduction in lead content was that older engines especially those with cast iron cylinder heads started to suffer exhaust valve seat erosion. Aluminium heads with steel valve seat inserts fared better although around that time came a fad for using liquid gas systems where the fuel was cheaper than petrol. This gas being a very dry fuel re-introduced valve seat erosion and required even harder materials. So eventually stasis returned and people happily ran their classic cars sometimes using lead replacement additives such as Millers CVL or Tetraboost and sometimes using in line fuel canisters. These were developed during World War II and fitted to Roll Royce Merlin engines in Hurricane fighters sent to Russia I am told.
Then again we motorists were the focus of pressure when it was realised that petrol produced green house gasses said to cause climate change and it was mandated that plant based ethanol be added to all petrol initially at 5% by volume. My own observation is that this addition actually caused the miles per gallon of my then Alf Romeo 166 to drop by nearly 5% so I do wonder just what the ethanol is supposed to do. A change to the premium grade fuel (97+ octane - which at that time did not contain ethanol) did appear to restore the MPG. Remember that these new fuels were formulated for squirting through injectors at high pressure rather than being sucked through a carburettor so more problems occurred. With the removal of lead and addition of many other high aromatic compounds we discovered the first of many problems for old cars using this new fuel, an Ultra-short storage life. It also ate its way through old rubber hoses and even carburettor floats causing all sorts of problems but still we plugged on finding solutions. It began to dissolve the zinc-based alloys of our carburettors themselves until additives were made available to combat this and the hydroscopic effect introduced condensation and water to our tanks causing yet more problems.
What has not been mentioned so far was the detrimental effect this new fuel had on the performance of our cars. Regardless or the octane rating it was found that detonation began to return and many engines were damaged as a result. Part of this is due to the faster burn rate of this new petrol which demands much less spark advance. Some owners who thought it smart to keep full tanks took their cars out in spring after several months storage not realising that the petrol had lost much of its knock resistance and burned holes in the tops of pistons. Storage is not a problem with new cars where the engines are controlled electronically. Knock sensors can note detonation in less than one engine revolution and reduce ignition timing before the next power stroke protecting the engine at the expense of reduced performance.
With older cars it became necessary to reduce ignition timing from the original book settings to one that did not cause detonation, typically from low 40s down to mid thirty degrees before TDC. Unfortunately this introduced another problem. The distributor already had probably 35 degrees of engine advance built into
it since static timing was set to around 5 to 8 degrees giving total of 40 -43 total. Reduce the max to 35 degrees and you have no static advance. The result is that tick-over and start up are compromised greatly. A very good friend and I discovered this problem about 23 years ago and worked to a solution helped when he managed to find an old distributor-testing machine. We found that it was possible to alter the maximum built in advance by welding up the stops for the centrifugal weights and adjusting the tension in the springs to completely change the advance curve.
By reducing total engine advance to around 22 degrees we were able to run static advance of 12 degrees (which helped starting and idle) whilst keeping maximum advance down to 34 degrees that we found to be ideal for the Alfa engines at the time. When later I started building lots of Coventry Climax engines I transferred this knowledge to them and again found that maximum advance needed to be around 34-35 degrees. I can’t say with any certainty that this would be right for Triumph engines but think it would not be far from optimum. Of course people do fit so called map-able electronic distributors to some cars at great expense but they are precluded by the regulations for the racing engines I build, only points being mandated. We have experimented on the dyno and the ability to increase the advance in the mid-range whilst slightly reducing the total at max power with these map-able units does sometimes improve driveability. With a non-reversible linear mechanical device this is not possible,
Conclusions
Firstly only use fresh fuel from a high footfall petrol station. Ignoring the specialist racing or classic car fuels on the market, Shell Optimax is the very best available closely followed by Tesco Momentum 99 (yes honestly) with a lowly third going to BP premium which is only 97 octane. Several other people including Tetraboost themselves have verified these results. If you leave your car for any length of time (greater than one month) try not to leave the tank full and if you did please put a can of octane boosting additive in before you take it out again. Only use premium fuel.
Make sure that all rubber fuel hoses have been changed recently and when storing the car over winter add some protection for your tanks and carburettors. The fuel evaporates so much faster than old petrol and gum forms very quickly causing problems especially with Weber carbs.
Always make sure that the ignition timing has been set using a rolling road to ascertain the best setting for power and knock prevention. If this means modifying the distributor so be it. I can tell you how or you can consult one of the specialists.
Finally when this lock down ends GO AND MAKE SOME NOISE! Bob
You – Your Car
Thanks to all our contributors to this issue.
Contributions and feedback (positive or negative) are always welcome.
What’s happening in your garage?
Please make a few notes about your garage exploits and email them to me for the next issue. Contributions are best managed by sending in plain text with attached photos or in Word format.
Mail your notes and pictures to: andrewawillmott@gmail.com
Andrew W