In The Garage June 2020
June 2020 Issue 9
Welcome to Issue 9 of In The Garage. We are always looking for content so please let us know what is going on in your garage now that we all have plenty of fettling time on our hands. Contributions don’t need to be a novel about major project; simple hints and tips or a picture and a few words of explanation are welcome.
Your feedback on format and content will also be welcome.
Andrew Willmott – TR3
Glove Box Key
As owners will know access to the glove box on side screen cars is by key only: if the lid is unlocked it is open. Consequently access on the move can be problematic unless a key is left in the lock. If the key is then forgotten about and left in the lock it serves as an indication to passers by that the glove box is effectively open. Half an hour spent with a spare key and heater rheostat knob provided a neat knob that doesn’t attract attention if inadvertently left in the lock while parked.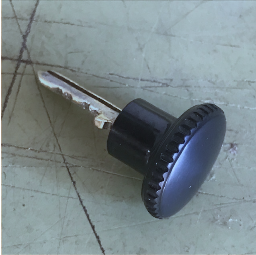
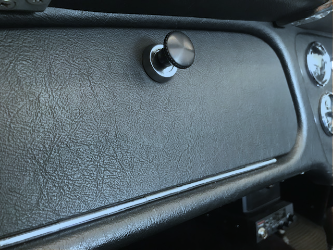
Boot Liner
Since 1986 the TR3 boot liner has been an offcut of brown carpet from our first house so it was about time that I sorted out something more in keeping. An online search turned up a product called Hardura comprising a sound deadening felt backer with textured PVC facing which looked ideal. I ordered a 1m length online and having made a cardboard template cut the Hardura to fit. I took the opportunity to re- locate the vulnerable wiring looms from the standard position on the boot floor to a new location secured along the top corners of the inner wing and rear valance; now it shouldn’t get tangled up with camping gear when fully loaded. The fire extinguisher that previously resided in the glove box was secured to the rear inner wing ready for easy access.
Fuses and Relays
The standard TR3 uses only two fuses; one fed direct from the battery for the horns and lights and a second fed from the ignition switch. As a number of additions and modifications have been made to the car over the years an update was in order.
A row of relays were fitted to power headlight main beam, headlight dip beam, engine cooling fan, auxiliary power output and a new 10 way fuse box.
The fuse box relay is actuated from the ignition switch and all the auxiliary circuits are now fed from individual fuses in the box sparing the ignition switch from the high loads and avoiding the loss of multiple functions if a fuse should blow.

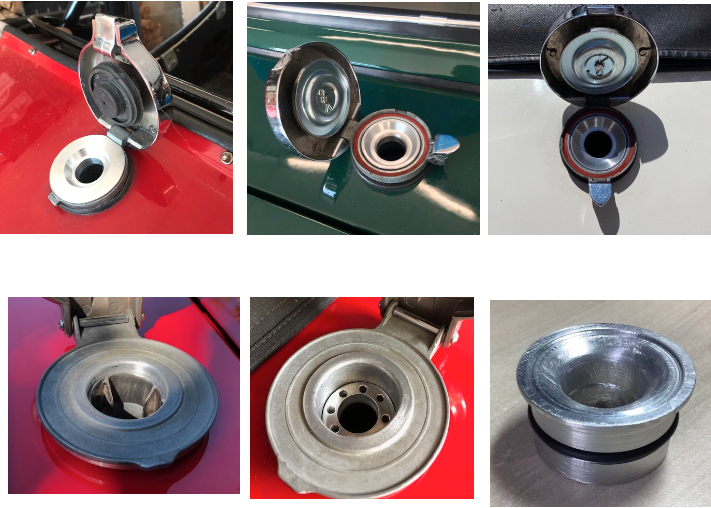
Fuel Restrictors
Subsequent to a few miss-fuelling incidents over the past year or so and Dennis’s tale of woe featured in the previous issue, group members have been busy ensuring that future incidents are minimised. Confusing the premium petrol pumps with the premium diesel pumps that feature the same logos (combined with a momentary lack of attention) caused all the reported incidents.
Various designs of restrictor to suit the the smaller 22mm petrol nozzle but exclude the larger 25mm diesel nozzle have been made to suit different filler caps found on our TRs and prevent future incidents.
The three shown on the bottom row are all of particular note having made with a good deal of ingenuity but without the benefit of a lathe. The stainless steel fabricated restrictor and an aluminium unit featuring “drillium” detailing were made by Paul Gibson to fit his Monza TR6 cap. Dennis Hobbs made the third unit for his TR5.
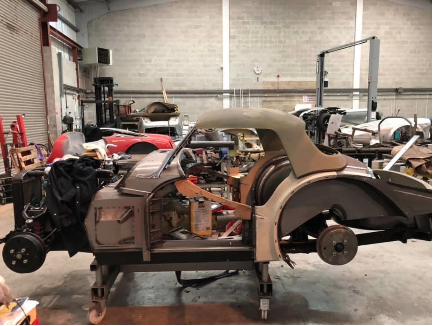
Paul Evans – TR2
Paul’s long term TR2 restoration is still making progress although day to day activity at North Devon Metalcraft building and repairing Shelby Cobras tends to slow things down.
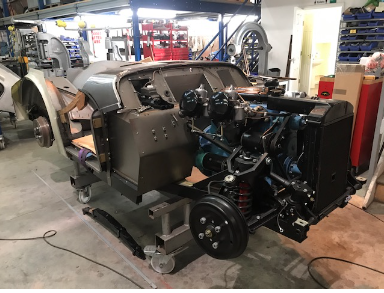
All the running gear has been completed with standard specification engine and gearbox so he is now concentrating on what he considers the easy bit. I’m sure that most of us don’t consider the panel work quite so simple
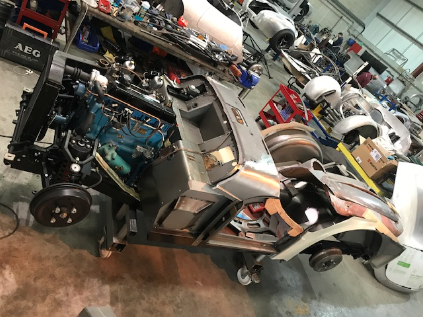
Jason Simmonds - TR3
Jason has recently purchased a TR3 for rolling restoration and has been beavering away in Croyde during lockdown.
His car may not polish up too well but it is very solid and lots of new parts live under the heavily patinated body shell. Recent work has included replacing the short wheel studs used with wire wheels for the longer version more suited to the steel wheels currently fitted, replacing the speedometer, replacing a broken exhaust manifold stud, tidying the electrical system and fitting the missing weather equipment as a roof was deemed a handy accessory for UK driving.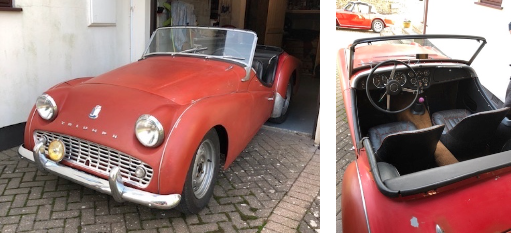
John Blake – TR4
John’s quick bodywork refresh/nut and bolt rebuild is now nearing completion and the smaller components are being fitted. When preparing the aftermarket fuel filter for refitting it was apparent that the plastic bowl had been adversely affected by the modern petrol formulation and showed micro cracking and embrittlement of the plastic. The trusty Myford was pressed into action and the filter now sports a shiny aluminium bowl.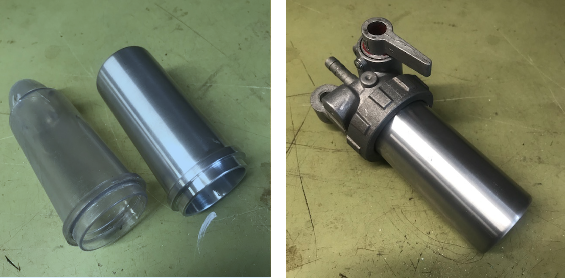
We have had a few instances of previously reliable components being adversely affected by the ethanol in the current E5 fuel so close examination of rubber and plastic components in the fuel system should now be on everyone’s to do list in order avoid unscheduled roadside repairs or worse.
Martin Lovell – TR6
Martin has been busy during lockdown making a few improvements to his TR6.
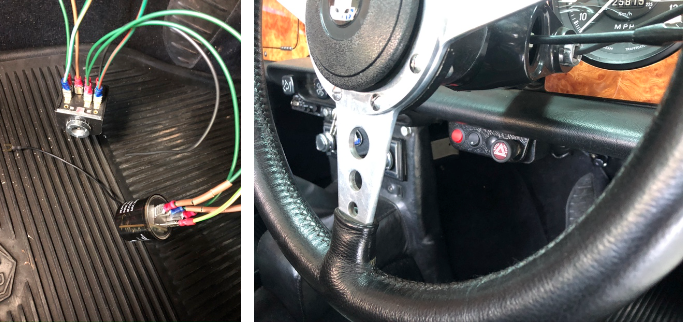
Hazard Warning Lights
When “on tour” we often find ourselves pulled to the side of the road waiting for stragglers, U turning or less often sorting out a breakdown. Hazard warning lights are especially useful on a dark blue car so with a switch and period correct switch panel sourced on eBay and electronic flasher unit from Classic Car LEDs Martin spent the day lying in the foot wells wiring them in. When working under the dash it’s always worth the 5 minutes it takes to pop the seat out to improve access and avoid aches and pains the next day.
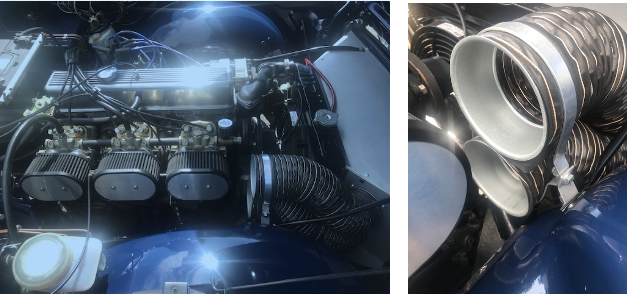
Engine Bay Cool Air Ducting
TRs tend to get a bit warm under the bonnet at the best of times and some recent spells of hot weather don’t help the situation so Martin made a plan to improve the cool air feed to his injector body inlets.The pictures are pretty self-explanatory and needless to say Martin has made a neat job using steel inserts to support the large diameter ducting at the clamp positions.
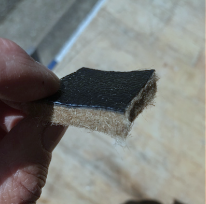
Checking Tyres
After the recent period of inactivity that most of our cars will have endured I’m sure that we will all check the tyre pressures along with other routine checks carried out prior to hitting the road, fewer drivers check the full condition and age of the tyres.
The experience of at least one TR owner has shown that it is worth spending an hour in the garage checking over the rubber.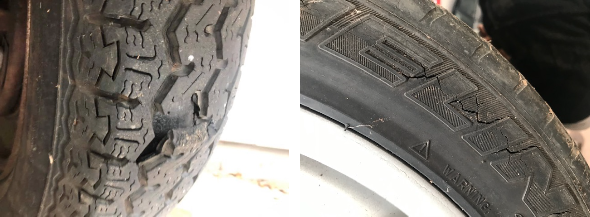
The tyre on the left was in use on a TR and the one on the right on a Porsche
With the tyre clear of the ground and the car properly supported examine the tread for depth and damage. Using a good light source to illuminate the area examine the carcase paying particular attention to the area at the bottom of the grooves in the tread as this area is often the starting point for cracking of the rubber and delamination from the carcase. The sidewalls should be examined carefully for cuts, bulges and damage caused by curbing. I’ve seen tyre in use on a TR with no evidence of the script remaining on the sidewall due to persistent kerbing!
Drivers often neglect to check the age of the tyres fitted to their cars especially on classics that rarely cover enough mileage to ever wear them out. I removed the 20-year-old tyres from a set of TR wheels last year and they all split along the base of the tread and exposed the carcase when the bead breaker pushed the sidewalls together.
Tyres more than ten years old will be well passed their best, the rubber having hardened with age, use and exposure to UV light. Grip is considerably reduced compromising road holding and particularly braking distances. Porsche currently recommend that tyres should be discarded after 6 years.
Look for the four number date code moulded into the sidewall showing the week number and year of manufacture and be aware that the number usually appears on only one of the sidewalls so you may have to crawl under the car to check it. I fit tyres with the date side outermost for easy checking and check the age of ‘new’ tyres before fitting. A set fitted by a ‘supercar’ main dealer last year proved on examination to be two years old when supplied and so already 1/3rd of the way through the useful life!
Tyre date codes showing week 9/2017 and week 33/2015
Air Intakes and Filters contributed by Bob Dove
This short article comes about following a conversation across the lane with Andrew Willmott during our Thursday evening clap for the NHS. We love Andrew in our house since despite a Nissan Skyline drift car and Fiesta rally car in our collection his TR3 is still the loudest car in our lane.
First a short introduction:
I have been involved with motor sport for over 60 years having watched Stirling Moss win The Easter Trophy race at Boreham Airfield in Essex in 1952 and attended my first race as a new driver and member of VSCC in 1962 two weeks after my 17th birthday with my neighbour (a Connaught owner) as my supervising driver in my 1934 Triumph Gloria Monte Carlo, one of the original six team cars. Later I had a series of 2000 and 2.5 estates as tow cars and even rallied one until I almost destroyed it one night. Chasing time due to a navigator error I saw tail lights far up ahead so was flat in overdrive third cresting a brow to find that the road went 90 right 90 left twice and another 90 right around a small field. I didn’t! The resulting flight across a low roadside bank and subsequent landing on top of a steel farm gate did nothing for the front suspension geometry of the Triumph!
On to the matter in hand:
Ram pipes or air filters?
The question is far from easy to answer as it depends on what one wants from one’s engine and what use it is put to. Back in the days of Formula One’s tall air-boxes filters were never used. Instead the inside of the air-box was coated in thick grease to try and catch any small stones thrown in. I used a similar idea when running an Alfa Sud in the British Touring Car Championship when open stacks under the bonnet were caged in a simple alloy box below and the inside of the bonnet above and yes, to an extent it worked. For us at that time our 1300 class was ultra competitive with 1/2 second often covering five or six cars so any power loss was punishing. We found by constant use of a rolling road that over the three hours use on an average race weekend we could see a drop in power on around 7 BHP at the wheels. Subsequently after every race I removed the heads from the flat four engine and re-lapped the valves restoring the missing 7 bhp and won our class at the end of the year. (Our 1300 engine made 145 bhp at 8450 rpm when on song)
So now we know that un-filtered intakes are not a good idea but what shape intake should we have before we stick some kind of filter in front of it.
We see lots of Webers used with the standard parabolic trumpets fitted and whilst these work reasonably well they are not the best solution. I was lucky in the late sixties to spend a day or two at Tecalamit in Plympton where they were developing the Tecalamit Jackson mechanical fuel injection system. It was there that senior development engineer Dick Atkins showed me that one third of the air that an engine uses could come from behind the ends of any trumpets. They had a 1000cc Ford engine on the dynamometer running parabolic trumpets on TJ injection and at critical revs (I can’t recall what that was) a dense cloud of petrol droplets were clearly visible about three inches from the mouths of the four trumpets. This is known as stand off. Dick had the idea to capture this stand off by increasing the length and diameter of the trumpets. He took four Tecalamit oil filter bowls, cut off the rounded ends and formed a round outward ridge at the open end. These were then brazed to the original parabolic trumpets and the testing repeated. I can’t remember what the power increase was but I do remember it was worth the effort. These were the first full radius air intake pipes in effect and now many companies sell alloy versions to fit many different carburettors.
So to sum up on ram pipes: anything is better than nothing but for the very best airflow into your engine you need a large diameter full radius trumpet. As far as length is concerned to a great extent that is dependent on space but as a guide, the shorter the stack the better power at high revs but the longer it is, the more torque you will have at lower revs. There was a computer program a few years ago in Canada of which I saw examples that could define the very best length for any given engine configuration. This took into consideration cam design, lift and timing as well as port sizes etc. and came up with a total length from back of inlet valve to end of trumpet for optimum power. On the 2 litre Alfa engine I was interested in at the time, that length was approx. 21 inches which for most installation would be impractical but did remind me of those ultra-long intake trumpets used on single SU Mini racers years ago.
Now to filters and similar ways to reduce premature wear on your engine. Although one could say that for the average classic car owner, the 2000 or so miles a year does not merit too much worry here.
The very worst kind of air filter is in my view the old oil bath system loved of MG et al in the fifties. Next on the list are those narrow pancake filters often seen on SU carburettors. They have insufficient area to adequately supply air and without air your engine can not breath and achieve its potential. There is a slightly different type (no names for fear of legal action) that is square and has a filter matrix that needs to be oiled. I used these on an engine once and so long as you did not put oil in them it
was fine but I once tried the recommended service and re-oil and took 500 rpm off the top of my power range.
From experience the best after-market air filters are from either ITG or Pipercross and consist of a foam mesh encased in a housing that attaches to a back plate on the front of your carbs behind the trumpets. This type appears to have minimal effect on airflow with a useful amount of engine protection. (We used this type on the Group C Tiga I helped run a while back.) For those people who may do the occasional sprint or hill climb and want max power on occasions there are “socks” which slip over the trumpets for use when driving on the road. We have run these socks on engines on the dyno and they do not appear to have any effect on power produced. Not so with the clip on filter gauzes available from a well know Italian company that we found to be surprisingly restrictive.
In conclusion I offer my version of the very best solution to engine life and performance. Intake air temperature has a remarkable effect on engine performance so keeping the air cool is important. Alfas of the seventies had a two-position air intake on their filters for either winter or summer, drawing air either from the side of the block in winter or in front of the radiator in summer. Since most classic cars are little used in winter we should concentrate on getting cool air in for summer use. So firstly find a suitable area from which to draw air. Next fit a set of full radius intake stacks or ram pipes, and encase them in the largest box that can be fitted into the engine bay. Make the box with a round ferrule at the front onto which the largest flexible hose that can be accommodated should be fixed. Take the hose as far forward as space will allow. Lastly find an aftermarket conical foam filter such as used on boy racer Subarus and install this to the tube at the front of your car.
Purists not concerned with maximum performance may be happy to accept the manufacturer’s offerings but must also accept the limitations.
Ed: “Standard is just another word for sub-standard” - Gordon Murray.
Subsequent to chatting with Bob my research turned up this interesting chart:
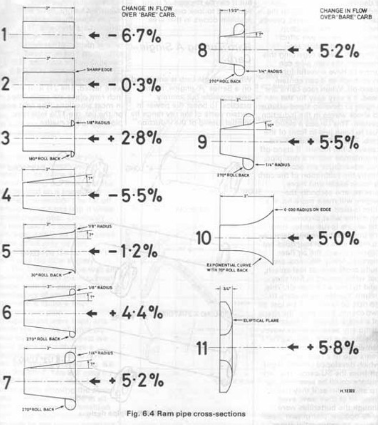
Next time: detonation, ignition timing and fuel.
You – Your Car
Thanks to all our contributors to this issue.
Contributions and feedback (positive or negative) are always welcome.
What’s happening in your garage?
Please make a few notes about your garage exploits and email them to me for the next issue. Contributions are best managed by sending in plain text with attached photos or in Word format.
Mail your notes and pictures to: andrewawillmott@gmail.com Andrew W