Motorsport Mickey Posted October 22, 2021 Report Share Posted October 22, 2021 (edited) No… use the engine stand. Easier to rotate and a better height for working on. The rear cap can be loosened by undoing the bolts and then tapping the bolts as they protrude from the rear cap….gently… in the direction up and down the length of the block. When it starts moving wearing gloves grab both the rear cap protruding bolts and wiggle and pull the cap upwards at the same time by pushing the bolts out sideways to get a pull on the cap. If you have an overhead winch you could screw bolts into the sump bolt holes and use that for a vertical pull. The Wellseal is fresh so it will shear easier than when it’s been done 15 years ! Try and keep the cap movements very small for the first 1/4 inch upwards, trying not to nip or bruise the rear bearing shell. Write down any new swear words you come across, they can be useful later ! Oh I take it you don’t have the camshaft with followers fitted yet ? If so you’ll need to restrain the followers when engines upside down. PS: Don’t forget to measure the turning torque on the crank before you start stripping the cap out. Compare it against the torque achieved when you’ve redone the work. No…. I don’t know what they are going to be. Especially with the additional Marx seal fitted. Hopefully they will be about the same, post to pre torque figures, suspect any marked difference, do this before refitting rear cap felts and Wellseal. Mick Richards Edited October 22, 2021 by Motorsport Mickey Quote Link to post Share on other sites
Ian Vincent Posted October 22, 2021 Report Share Posted October 22, 2021 I had to remove the rear bearing cap on my engine as a result of the seal not seating properly. I used a piece of 3mm flat with four holes in it, two at each end. Then I bolted the two inner holes down to the bearing cap and put upside down nuts and bolts in the outer holes so that heads were sitting on the block and the nuts pressing against the underside of the flat with the thread protruding through the outer holes. Then by unscrewing the nuts on the outer bolts the piece of flat was lifted and with it came the bearing cap. Rgds Ian Quote Link to post Share on other sites
Motorsport Mickey Posted October 22, 2021 Report Share Posted October 22, 2021 Good one Ian, I'd forgotten that, I think it's even in the workshop manual. Mick Richards Quote Link to post Share on other sites
Adrian Fuller Posted October 22, 2021 Author Report Share Posted October 22, 2021 OK so rear end bearing caps are now slackened off and about 1 turn out. Just do not see how tapping these will cause the cap to move as the bolts are into the block so nothing would move.... Would it? How does this work? Thanks again in advance Quote Link to post Share on other sites
Motorsport Mickey Posted October 22, 2021 Report Share Posted October 22, 2021 You can even remove the bolts completely, then apply a rear mains remover as Ian says. I’d completely forgotten I made a small remover, ( back in 1987 I think) a piece of angle steel long enough to span the block gap by a couple of inches overall with a couple of holes drilled through the flat surface and nuts welded on top of the holes. Then 2 other holes drilled in the flat horizontal surface at the hole centres in the bearing cap and secured by bolts to it. Fit 2 bolts 1 in each nut of the overhanging angle and wind the bolts through the nuts onto the sump block surface and pull the cap up vertically in control of it. I’ll see if a photo can’t be found of it. Mick Richards Quote Link to post Share on other sites
Adrian Fuller Posted October 22, 2021 Author Report Share Posted October 22, 2021 Works a treat Quote Link to post Share on other sites
Lebro Posted October 22, 2021 Report Share Posted October 22, 2021 Yep, I made something similar to remove mine. BOb. Quote Link to post Share on other sites
Adrian Fuller Posted October 23, 2021 Author Report Share Posted October 23, 2021 All now assembled with good or no high spots.. Secret was 2 man job and lots of fettling as tightening up. Time for a pint. Quote Link to post Share on other sites
Lebro Posted October 23, 2021 Report Share Posted October 23, 2021 Well done ! Bob Quote Link to post Share on other sites
Adrian Fuller Posted October 25, 2021 Author Report Share Posted October 25, 2021 All pistons now in and back to where I was 2 weeks ago. One more question.. Before I had to re._gap rings etc I noticed on the no1 bore an oil mark where piston moved up and down, I have now gapped rings etc and the oil mark or trail is still visible (see photo), although in a different location that appears to be in line with where the ring is gapped. The oil wiper ring on no1 piston was very marginally not as free as the others but I removed it and re_fitted it (hate that job) but did not make any difference and as it is only marginal I have gone with it. Any thought on this or am I just being paranoid? Thanks in advance for your thoughts. Quote Link to post Share on other sites
Motorsport Mickey Posted October 25, 2021 Report Share Posted October 25, 2021 Hi Adrian, No you're not paranoid...but the man following you is ! As explained in many journals piston rings depend upon combustion pressure to expand their diameters and complete their sealing process hence BMEP etc, so any oil wiping or not of various rings can't be judged until after the engine is run and then subsequently stripped down. You're doing good, Mick Richards Quote Link to post Share on other sites
Nobbysr Posted October 26, 2021 Report Share Posted October 26, 2021 On 10/20/2021 at 2:09 PM, RogerH said: Hi Steve, to be fair to Moss they sell both cheap and expensive (quality) both timing chains I once had a meeting with the top men ad suggested they throw the cheap stuff away and ONLY sell quality. They said they would go out of business pretty damn quick. Contrary to what people say on here cheap is the order of the day. If there is no Moss then folk will turn to Ebay. The new 4 pot cranks are a work of art and cast & rough machined in India - top quality.. You are of course correct, but unfortunately people often want a Rolls for the price of a Mini. in this instance the chain was beyond poor. i often see issues where people replace the chains but not the gears and then have noise issues, the gears should alway be replaced when the chain is .But when you have spent nearly £1000 parts and regrind a £30 chain is cheap. As i mentioned the are good and bad engineering companies in India and i spoke a colleague in India and he spoke to the company and rates the company quite highly Roger Quote Link to post Share on other sites
Nobbysr Posted November 2, 2021 Report Share Posted November 2, 2021 On 10/20/2021 at 4:53 PM, RogerH said: Hi Adrian, did you mean 0.0012" ( one thou and a tiddly bit) or 0.012" Twelve thou. If the first one - that is very small. Roger On 10/26/2021 at 9:30 AM, Nobbysr said: it is interesting though Roger how price v quality does impact on every aspect of maintaining our cars .. I spent £12 on a ring compressor and the ratchet striped after fitting two pistons . Every time I tapped the piston down it would unwind... another weekend gone !. I purchased a Draper unit and it was perfect, £20 more but did the job and good for many more . For me its the amount of time as well as money wasted, all the weekends where i've had to down tools and wait for replacement items . Most of the time i have had my money back but lost loads of weekends. thanks to every one who has spared the time to reply Quote Link to post Share on other sites
Adrian Fuller Posted November 19, 2021 Author Report Share Posted November 19, 2021 Engine hopefully now sorted and ready to go into chassis over the weekend Quote Link to post Share on other sites
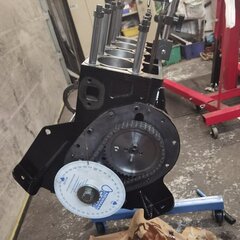
Nobbysr Posted December 2, 2021 Report Share Posted December 2, 2021 Looking good Adrian have just finished mine will try and run it before it goes in the engine . I has a few alloy components, the front engine plate has a hard plate inserted where the Chain Tensioner sits. I had everything balanced, including the fan and fan extension which should make a difference Quote Link to post Share on other sites
Nigel C Posted December 2, 2021 Report Share Posted December 2, 2021 nice bit of polishing going on there too! very smart.... Quote Link to post Share on other sites
BlueTR3A-5EKT Posted December 3, 2021 Report Share Posted December 3, 2021 (edited) Reading 11 on the ‘smart-o-meter’ If the engine has correctly timed ignition I’d say the distributor drive gear was one tooth too far anti clockwise. …..just how my car is at present. It does not cause problems, other than the vacuum advance tube points the wrong way. Edited December 3, 2021 by BlueTR3A-5EKT Quote Link to post Share on other sites
Ian Vincent Posted December 3, 2021 Report Share Posted December 3, 2021 36 minutes ago, BlueTR3A-5EKT said: Reading 11 on the ‘smart-o-meter’ If the engine has correctly timed ignition I’d say the distributor drive gear was one tooth too far anti clockwise. …..just how my car is at present. It does not cause problems, other than the vacuum advance tube points the wrong way. +1 Quote Link to post Share on other sites
Lebro Posted December 3, 2021 Report Share Posted December 3, 2021 +2 Bob Quote Link to post Share on other sites
stuart Posted December 3, 2021 Report Share Posted December 3, 2021 52 minutes ago, BlueTR3A-5EKT said: Reading 11 on the ‘smart-o-meter’ If the engine has correctly timed ignition I’d say the distributor drive gear was one tooth too far anti clockwise. …..just how my car is at present. It does not cause problems, other than the vacuum advance tube points the wrong way. Yep which if youve not got enough tube can be a pain especially as that A/R unit has the screw on end. Stuart. Quote Link to post Share on other sites
Nobbysr Posted December 3, 2021 Report Share Posted December 3, 2021 14 hours ago, Nigel C said: nice bit of polishing going on there too! very smart.... I doubt I would have gone the polishing route if lockdown hadn't happened but i do have a pedestal grinder and big polisher i use for Knife making. which makes it a significantly easier job cheers Steve Quote Link to post Share on other sites
BlueTR3A-5EKT Posted December 3, 2021 Report Share Posted December 3, 2021 2 hours ago, Nobbysr said: I doubt I would have gone the polishing route if lockdown hadn't happened but i do have a pedestal grinder and big polisher i use for Knife making. which makes it a significantly easier job cheers Steve How dirty did you get when polishing the aluminium and what mop and compounds did you use? Quote Link to post Share on other sites
Nobbysr Posted December 18, 2021 Report Share Posted December 18, 2021 On 12/3/2021 at 4:21 PM, BlueTR3A-5EKT said: How dirty did you get when polishing the aluminium and what mop and compounds did you use? Hi Peter, i don't get extremely messy . The biggest pain is removing the casting finish, i use a combination of abrasive bands and p60 grit ant them work down the grits. I use wet & dry as it keeps the dust down . i have a bench polisher and a pendant flexible drive grinder/drill polisher and i use avive rubber points for radiuses and then work though the compounds . The more work you do moving through the paper grade the better and easier the polish i work to about 800g for aluminium and 1000 for ferrous materials Attached is a diff cover I'm working on and now needs the final polish plus Polishing & Compounds.xlsxinformation on polishing compounds and the types of wheels hopefully the excel file will open as I have detailed the compounds and wheels i use let me know if you have anymore questions Quote Link to post Share on other sites
BlueTR3A-5EKT Posted December 18, 2021 Report Share Posted December 18, 2021 1 hour ago, Nobbysr said: Hi Peter, i don't get extremely messy . The biggest pain is removing the casting finish, i use a combination of abrasive bands and p60 grit ant them work down the grits. I use wet & dry as it keeps the dust down . i have a bench polisher and a pendant flexible drive grinder/drill polisher and i use avive rubber points for radiuses and then work though the compounds . The more work you do moving through the paper grade the better and easier the polish i work to about 800g for aluminium and 1000 for ferrous materials Attached is a diff cover I'm working on and now needs the final polish plus Polishing & Compounds.xlsxinformation on polishing compounds and the types of wheels hopefully the excel file will open as I have detailed the compounds and wheels i use let me know if you have anymore questions Thank you I shall take a long look at your info and compare it to the compounds I have historically used. Quote Link to post Share on other sites

Recommended Posts
Join the conversation
You can post now and register later. If you have an account, sign in now to post with your account.