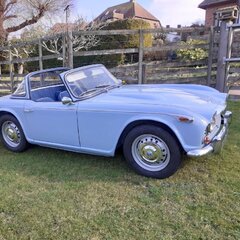
rvwp Posted March 12, 2021 Report Share Posted March 12, 2021 Hi Guys, Thought you might like to see my now completes 4A restoration. Bought the car 'unseen' in July 19. Although having been off the road since 1984 as indicated by the last MOT and tax disc, it had clearly had some abandoned restoration work done on it which did not look too bad. Picture below. Most of the work however was probably undertaken in the 80's when the car had little value and included many patched and fibreglass!!. The engine and gearbox were out of the car. The gearbox was probably being the reason why the car was taken off the road back in 1984 whilst still MOT'd, as the 3rd gear had several teeth missing, the layshft was bent and the needle bearings destroyed. Quite common! Anyway the car has undertaken a complete restoration requiring all the usual panel replacement, and all engine and running gear rebuilt. The car is now back to it's original factory colour Wedgewood blue. I have many pictures of the horrors uncovered but can't seem to upload to this post as too large? Rich Quote Link to post Share on other sites
Tim T Posted March 12, 2021 Report Share Posted March 12, 2021 Well! What are you going to do now? Atb, Tim Quote Link to post Share on other sites
rvwp Posted March 12, 2021 Author Report Share Posted March 12, 2021 Hi Tim, Keep fiddling, it's a classic car! Quote Link to post Share on other sites
BRENDA1 Posted March 12, 2021 Report Share Posted March 12, 2021 Tim he’s going to get out and enjoy himself. Rich that looks fantastic well done another TR saved time to put you feet up for a week or two. Mike Redrose Group Quote Link to post Share on other sites
Jase Posted March 12, 2021 Report Share Posted March 12, 2021 That looks fantastic and only two years to get to this standard. Amazing - Enjoy! Quote Link to post Share on other sites
MichaelH Posted March 12, 2021 Report Share Posted March 12, 2021 What a beautiful car! Congratulations: enjoy driving it so everybody can appreciate your work and the car! Michael (got a blue four myself) Quote Link to post Share on other sites
stuart Posted March 12, 2021 Report Share Posted March 12, 2021 Looking very nice now, you might want to swap your wiper arms over to save them hitting the vent flap when opened. Stuart. Quote Link to post Share on other sites
openroad Posted March 12, 2021 Report Share Posted March 12, 2021 Excellent Richard, never doubted your talent ! Soon be some great weather, and restrictions lifted . Cheers Conrad. Quote Link to post Share on other sites
Tr4aJim Posted March 12, 2021 Report Share Posted March 12, 2021 Richard, beautiful car! What sun visors did you use? Jim Quote Link to post Share on other sites
rvwp Posted March 12, 2021 Author Report Share Posted March 12, 2021 Hi Jim, Sun visors came from John Skinner, although I have to say that compared with the ones on my TR6 are not as thick and are a bit bendy. In fact the driver side one seems to a break in the presumably card material inside so that its a bit wobly? Disappointing . Rich Quote Link to post Share on other sites
rvwp Posted March 12, 2021 Author Report Share Posted March 12, 2021 Thanks Stuart, straight arm should be on the RH side, stupid mistake, will correct, thanks Rich Quote Link to post Share on other sites
tim hunt Posted March 14, 2021 Report Share Posted March 14, 2021 Lovely looking job Rich. I see that you have a socket on the windscreen frame for a hood latch. Have you converted the Surrey fixing in some way or are these sockets now redundant? Tim Quote Link to post Share on other sites
Jase Posted March 14, 2021 Report Share Posted March 14, 2021 Any more pics Rich? Quote Link to post Share on other sites
rvwp Posted March 15, 2021 Author Report Share Posted March 15, 2021 Hi Tim, yes I have used a 4A front hood rail and catches at the front of the Surry to secure to the frame. If you search Surry top on the Forum you should find a fairly long discussion on my route to get to this. Regards Rich Quote Link to post Share on other sites
rvwp Posted March 15, 2021 Author Report Share Posted March 15, 2021 Hi Jase, Loads of pictures taken all through the restoration process, but most of them get rejected as to large a file to add to a post. It seem beyond me how to reduce the size? I thought that this is possible via photos on one-drive (?) but not sure how. Will post if I can get help with how. Regards Rich Quote Link to post Share on other sites
Jase Posted March 15, 2021 Report Share Posted March 15, 2021 44 minutes ago, rvwp said: Hi Jase, Loads of pictures taken all through the restoration process, but most of them get rejected as to large a file to add to a post. It seem beyond me how to reduce the size? I thought that this is possible via photos on one-drive (?) but not sure how. Will post if I can get help with how. Regards Rich To be honest the best way I have found is to upload via my iphone. When you add the pic and select it you can click on 'Actual Size' at the bottom and it will give you the option of small, med, large or actual thus reducing the size. If you aren't sure I can do some screen grabs. Much quicker than reducing the size or hosting elsewhere. Quote Link to post Share on other sites
boxofbits Posted March 15, 2021 Report Share Posted March 15, 2021 52 minutes ago, Jase said: To be honest the best way I have found is to upload via my iphone. When you add the pic and select it you can click on 'Actual Size' at the bottom and it will give you the option of small, med, large or actual thus reducing the size. If you aren't sure I can do some screen grabs. Much quicker than reducing the size or hosting elsewhere. The best way is to take pictures, then email them to yourself which reduces the file size dramatically . Then save and use those to upload. Kevin Quote Link to post Share on other sites
rvwp Posted March 15, 2021 Author Report Share Posted March 15, 2021 Cracked it! so here is a few of the pictures taken throughout the restoration. Slightly out of sequence but gives an idea of work undertaken. Rich Quote Link to post Share on other sites
rvwp Posted March 15, 2021 Author Report Share Posted March 15, 2021 By the way, both the chassis and the body, less wings etc were taken to a grit blaster and blasted whilst on its turn over rig once all repairs were done and immediately primed. The only way! Rich Quote Link to post Share on other sites
tim hunt Posted March 15, 2021 Report Share Posted March 15, 2021 9 hours ago, rvwp said: Hi Tim, yes I have used a 4A front hood rail and catches at the front of the Surry to secure to the frame. If you search Surry top on the Forum you should find a fairly long discussion on my route to get to this. Regards Rich Ah all now clear Rich, I missed the earlier thread. I can see there is no way your Surrey is ever coming adrift!! I still have the original Surrey for my car (with it when acquired in 1970) and have never had an issue, I think the key is having the frame correctly adjusted for the right tension and to have the reinforcing strips on the leading edge well tucked under the retaining recess on the header rail. I find that the Surrey is completely watertight in the heaviest rain. Tim Quote Link to post Share on other sites
Jase Posted March 15, 2021 Report Share Posted March 15, 2021 Looks amazing Rich, did you paint the inside frame of the car yourself (behind the wings etc)? Quote Link to post Share on other sites
pfenlon Posted March 15, 2021 Report Share Posted March 15, 2021 Terrific well done too. Quote Link to post Share on other sites
Richardtr3a Posted March 15, 2021 Report Share Posted March 15, 2021 Was your grit blaster able to remove all paint without over heating the panels and causing deformation. ? My local workshop will not strip the 3A front panel for fear of damage. ? How did you do it in only two years ? Did you do the paintwork at home ? Well done Richard & B Quote Link to post Share on other sites
rvwp Posted March 16, 2021 Author Report Share Posted March 16, 2021 Hi Richard, The grit blaster was experienced with blasting cars. However, I made sure he did not do the rear deck and front scuttle tops which are easily cleaned up back to bare metal by using rotary tools. Everything else was done, as I say on the turn over jig so nothing was missed. Jase,- all the surfaces, ie the underside, inside the cab, inside the boot etc, and under the wings were primed, stone chipped and spray painted at home. The car was then reunited with the unrestored chassis and taken to a professional paint shop and the body with wings loosely attached was then rubbed down, re primed and painted in 2 pack. The bonnet, doors and boot lid were all professionally painted separately. The car was then returned home and the body was removed from the chassis, and then the chassis strip/repair/ rebuild was undertaken. Rich Quote Link to post Share on other sites
Malbaby Posted March 16, 2021 Report Share Posted March 16, 2021 (edited) As a matter of interest did you paint the underside of the floors etc body colour. Edited March 16, 2021 by Malbaby Quote Link to post Share on other sites

Recommended Posts
Join the conversation
You can post now and register later. If you have an account, sign in now to post with your account.