foster461 Posted August 14, 2020 Report Share Posted August 14, 2020 I think these old gearboxes just get worn and what might have been a step 60 years ago is now a smoother transition. My TR6 and TR3a are both LHD which requires a different push motion rather than a pull but on both cars I just give the gearstick a backhand thump and they go into reverse with no drama. Stan Quote Link to post Share on other sites
EliTR6 Posted August 15, 2020 Author Report Share Posted August 15, 2020 (edited) 14 hours ago, BlueTR3A-5EKT said: No that stick will not work without shortening, a different spring and a method of locating it in place as the long bolt you have will not go through it. where the long bolt goes through are there threads in the aluminium ? If so you will need to use that later stick with spigotted 5/16” unf studs. You will also need to drill out the holes in the cap to accept the bigger bolts. pm me for more info before you attack anything. The spring marked with a Red Cross is the one to be used with that later gear stick. Cheers Peter W PS other pictures. Looking into the hiole the gearstick came out of. The reverse 'detent' or ramp is the LH selector in the hole. The thing should be taller than the other two. The 1/4" diameter long bolt should be a good fit in the aluminium housing. Not sloppy. Thanks Peter. The photos are a huge help So my gear lever should be fine but maybe the ramp is worn down. The new box is an ex stag box with tr internals apparently. I'll have a look at the ramp after work. It really slides into reverse with no effort at all. It could do with a lift up flap / gate for reverse like series land rovers The idea of selecting reverse while driving fills me with dread! Edited August 15, 2020 by EliTR6 Quote Link to post Share on other sites
Lebro Posted August 15, 2020 Report Share Posted August 15, 2020 9 hours ago, Ralph Whitaker said: Mine is an ex saloon 4 synchro box and it appears they use more of a ramp, where the 3 synchro boxes had a step that had to be lifted over. Mine too is too easy to pass 3rd and get reverse, but I am using the saloon gearbox top and was wondering whether it would be better with the top off my spare 3 synchro box and if it would fit. Otherwise a stronger spring under the metal cap might make it less inclined to mount the ramp into reverse. Ralph Mine is also a 1972 saloon box (including remote extension) I am using a TR3 gearlever, and had to drill through the threaded holes in order to fit the long horizontal bolt through the ball. to get reverse I have to lift the gear lever, or give it a heafty thump to the right before it will pass over. Bob. Quote Link to post Share on other sites
Ralph Whitaker Posted August 15, 2020 Report Share Posted August 15, 2020 45 minutes ago, Lebro said: Mine is also a 1972 saloon box (including remote extension) I am using a TR3 gearlever, and had to drill through the threaded holes in order to fit the long horizontal bolt through the ball. to get reverse I have to lift the gear lever, or give it a heafty thump to the right before it will pass over. Bob. I will have to have another close look at mine. I was told it was an early 2000 saloon gearbox, and I am using a TR lever with the hollow centre. The long bolt went straight in, I didn`t have to drill out the holes, so maybe the early boxes had the older type lever anyway?. It all seems pretty positive with no excess play. Incidentally, the "gate" for the overdrive cut out switch on mine is right at the back on the end of the 3/4th selector shaft and the switch is mounted on a bracket attached to the same bolts that hold the stick in place, so I can`t get overdrive on 2nd. On the plus side I do have a hole for a reverse light switch. If I was to swap the top for one of my spare non overdrive 3 synchro gearbox items, I would have to drill out and tap the bosses cast into the top for the switches, but are the neccessary detent grooves already there on the selector rods? Cheers, Ralph. Quote Link to post Share on other sites
harlequin Posted August 15, 2020 Report Share Posted August 15, 2020 It's a fairly simple job to strip the gearbox top / selector mechanism infact the whole thing does not need to be stripped as I seem to remember that reverse is the 1st rod to be removed. Once out it may be able to build up the ramp with weld and file down to suit. I have an idea that the rod from your old box will not fit but it is worth checking George Quote Link to post Share on other sites
EliTR6 Posted August 15, 2020 Author Report Share Posted August 15, 2020 44 minutes ago, harlequin said: It's a fairly simple job to strip the gearbox top / selector mechanism infact the whole thing does not need to be stripped as I seem to remember that reverse is the 1st rod to be removed. Once out it may be able to build up the ramp with weld and file down to suit. I have an idea that the rod from your old box will not fit but it is worth checking George Thanks George. I take it the cover from the 3 synchro box wouldn't be a straight fit? Quote Link to post Share on other sites
harlequin Posted August 15, 2020 Report Share Posted August 15, 2020 (edited) I don't think the reverse selectors are the same and you will need the drilling for the isolator switches. There are about a dozen variations of the top cover and not all are interchangeable. But then if you have the cover it's worth trying to see if it will fit George Edited August 15, 2020 by harlequin Quote Link to post Share on other sites
Ian Vincent Posted August 15, 2020 Report Share Posted August 15, 2020 I have a 2000 saloon box with a 22% overdrive in my TR3a. I acquired a spare cover (complete with selectors) from a TR2/3 box which came with a dipstick. I stripped and refurbished this lid and drilled and tapped it for the overdrive switches. It has been on the car ever since. Rgds Ian Quote Link to post Share on other sites
harlequin Posted August 15, 2020 Report Share Posted August 15, 2020 Eli These are a selection of top covers for just the TR6, I have a 76 saloon box in my TR6 which is different again, I did try to fit a top cover from a TR2 to the saloon box and seem to remember that the selector forks fell in the wrong place but that was one of the very early covers and one of the very last gearboxes. George Quote Link to post Share on other sites
EliTR6 Posted August 15, 2020 Author Report Share Posted August 15, 2020 Thanks everyone. I had a small window of free time this evening and I've compared the 2 gearboxes. To help any future brainiacs who are wondering what we're talking about, thanks to everyone's help I've realised that it's nothing to do with the cover but the step is on the end of the reverse selector rod inside the top cover. This is the old box, it's a sharp step that the lever has to be helped over to select reverse. The new one is hard to make out in the photos but it's more of a ramp. The resistance is there but is easily overcome. A new spring has been suggested. I've just taken the car for a test drive, everything works and the gears feel (too?) tight. 3rd and 4th need a bit of a push to slot in. Might the clutch need adjusting? The car is looking more and more like a racecar with its missing passenger seat! Quote Link to post Share on other sites
BlueTR3A-5EKT Posted August 15, 2020 Report Share Posted August 15, 2020 (edited) As mentioned by Bob. Ramp to reverse in the selector of later 4 synchro gearbox and a squared shoulder for 3 synchro and earlier 4 synchro I think you will find the reverse selector with the squared off shoulder can be fitted in place of the one with the ramp - just undo the taper-lok screw that retains it. (have fun with that one - it can be a horror to remove the locating screw) Try a shim under the existing or a stronger spring. Cheers Peter W Edited August 15, 2020 by BlueTR3A-5EKT Quote Link to post Share on other sites
EliTR6 Posted August 15, 2020 Author Report Share Posted August 15, 2020 (edited) 18 minutes ago, BlueTR3A-5EKT said: As mentioned by Bob. Ramp to reverse in the selector of later 4 synchro gearbox and a squared shoulder for 3 synchro and earlier 4 synchro I think you will find the reverse selector with the squared off shoulder can be fitted in place of the one with the ramp - just undo the taper-lok screw that retains it. (have fun with that one - it can be a horror to remove the locating screw) Try a shim under the existing or a stronger spring. Cheers Peter W It took me a few days to wrap my thick head around it. Once you know, you know! I've learnt a shed load thanks to the forum. Every night I go to bed a little wiser! I think I've found my oil leak : the steering box Edited August 15, 2020 by EliTR6 Quote Link to post Share on other sites
Tim D. Posted August 15, 2020 Report Share Posted August 15, 2020 I've got a 2500 saloon and the ramp is much more extreme than on my TR6. Quote Link to post Share on other sites
harlequin Posted August 15, 2020 Report Share Posted August 15, 2020 I think I've found my oil leak : the steering box Are you using steering box lubricant or oil? If its oil I would suggest draining it and filling with steering box lubricant which is so thick its unlikely to leak out and you may find the steering will feel tighter. George Quote Link to post Share on other sites
EliTR6 Posted August 15, 2020 Author Report Share Posted August 15, 2020 8 minutes ago, harlequin said: I think I've found my oil leak : the steering box Are you using steering box lubricant or oil? If its oil I would suggest draining it and filling with steering box lubricant which is so thick its unlikely to leak out and you may find the steering will feel tighter. George I'm assuming it's oil (only had the car a few months and haven't looked at the steering box yet) There was a spare hole in the dash so I used it to fit a warning lamp for the od. Think it might be a bit distracting at night! Quote Link to post Share on other sites
harlequin Posted August 15, 2020 Report Share Posted August 15, 2020 A rubber plug may be a better choice especially at night G Quote Link to post Share on other sites
EliTR6 Posted August 15, 2020 Author Report Share Posted August 15, 2020 19 minutes ago, harlequin said: A rubber plug may be a better choice especially at night G Or a lower wattage bulb? Current one is 2w. BA9S base I've got options Quote Link to post Share on other sites
foster461 Posted August 15, 2020 Report Share Posted August 15, 2020 2 hours ago, EliTR6 said: It took me a few days to wrap my thick head around it. Once you know, you know! I've learnt a shed load thanks to the forum. Every night I go to bed a little wiser! I think I've found my oil leak : the steering box Check how tight that nut is. The only thing keeping the oil in the steering box is a brass compression sleeve held in place by that nut thing. If the nut is snugged up the compression sleeve may need replacing. Stan Quote Link to post Share on other sites
RobH Posted August 15, 2020 Report Share Posted August 15, 2020 2 hours ago, foster461 said: Check how tight that nut is. The only thing keeping the oil in the steering box is a brass compression sleeve held in place by that nut thing. A word of warning though - don't overtighten that gland nut - it's only brass and splits quite easily if you use too much force. (guess how I know....) Quote Link to post Share on other sites
foster461 Posted August 15, 2020 Report Share Posted August 15, 2020 29 minutes ago, RobH said: A word of warning though - don't overtighten that gland nut - it's only brass and splits quite easily if you use too much force. (guess how I know....) Very true Rob and I wonder if over tightening will cause leaks if that compression sleeve gets distorted. Quote Link to post Share on other sites
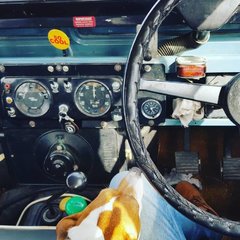
EliTR6 Posted August 16, 2020 Author Report Share Posted August 16, 2020 (edited) 7 hours ago, foster461 said: Very true Rob and I wonder if over tightening will cause leaks if that compression sleeve gets distorted. Thanks, so tight but not too tight Here's my little relay setup. Easy to swap in a new one if it fails and I always carry a spare. It wasn't easy tracking down less bright bulbs for the warning lamp but I've found 1.2w and 0.6w versions (current one is 2w), both filament type not LED Does anyone have experience with liveable dash bulbs? Cheers Of course the gearbox tunnel doesn't fit over the starter motor bulge now. I'm considering springing for a split tunnel from racetorations. I'll try to massage the old one with a hammer in the meantime Edited August 16, 2020 by EliTR6 Quote Link to post Share on other sites
BlueTR3A-5EKT Posted August 16, 2020 Report Share Posted August 16, 2020 Body file on the lump of gearbox bell housing that hits the tunnel. Hammer with Ball pein on the tunnel to create a bulge. Slacken gearbox and the front engine mounts and lever the power unit forward as far as possible will gain a bit of space too. Check nothing gets snagged or trapped. Re tighten mounts after. Cheers Peter W Quote Link to post Share on other sites
MilesA Posted August 16, 2020 Report Share Posted August 16, 2020 8 hours ago, EliTR6 said: It wasn't easy tracking down less bright bulbs for the warning lamp but I've found 1.2w and 0.6w versions (current one is 2w), both filament type not LED Does anyone have experience with liveable dash bulbs? Cheers Why the aversion the LEDs? Less power draw and probably less fragile than filament. I installed an 'o/d on' light between the speedo and rev counter using a new green lamp holder used in the centre panel of later 3As with a green LED - a white LED showed white even through the green plastic holder. Bright enough to notice without dazzling. Sorry haven't got a photo of it illuminated - driving and photographing with an iPhone can be 'challenging''! Miles Quote Link to post Share on other sites
EliTR6 Posted August 16, 2020 Author Report Share Posted August 16, 2020 46 minutes ago, MilesA said: Why the aversion the LEDs? Less power draw and probably less fragile than filament. I installed an 'o/d on' light between the speedo and rev counter using a new green lamp holder used in the centre panel of later 3As with a green LED - a white LED showed white even through the green plastic holder. Bright enough to notice without dazzling. Sorry haven't got a photo of it illuminated - driving and photographing with an iPhone can be 'challenging''! Miles I thought an LED bulb might be a bit too piercing. Happy to be proven wrong! Drove the TR to a local classic car meet this morning. The warning lamp is fine during the day as well as being partially hidden by the steering wheel. I could always put a piece of tape on it a night for a cheap fix! Petrol hose into the front carb jumped off during the 3mi drive home. Not fun, especially as I didn't have any tools with me. Managed to tighten the collar using the ignition key! Quote Link to post Share on other sites
TwinCamJohn Posted August 16, 2020 Report Share Posted August 16, 2020 Some nice pics. Thanks. Good to see the masques ,but still a few noses poking out ! Loved the Alfa saloon. Where was the meeting ? Quote Link to post Share on other sites

Recommended Posts
Join the conversation
You can post now and register later. If you have an account, sign in now to post with your account.